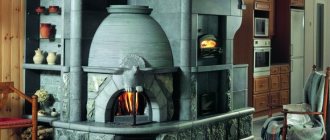
What is a Swedish stove and where is it used
The design has many advantages. The principle of operation allows you to install such a furnace in any room, especially a small one. It gradually warms up the house and keeps it warm for a long time. But this is only possible with proper laying and operation. Anyone can do it. Without some knowledge, the process will be difficult, but following the order and instructions, it can be done really.

The principle of operation and design of the Swedish oven
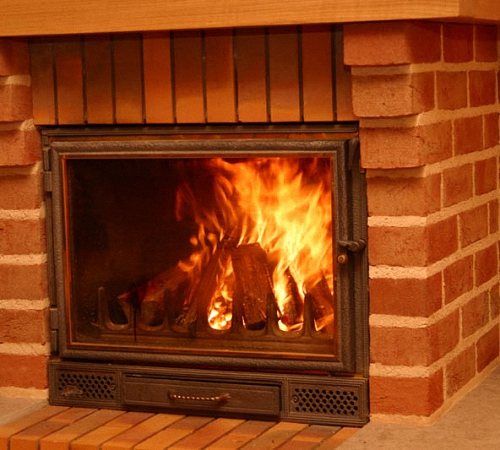
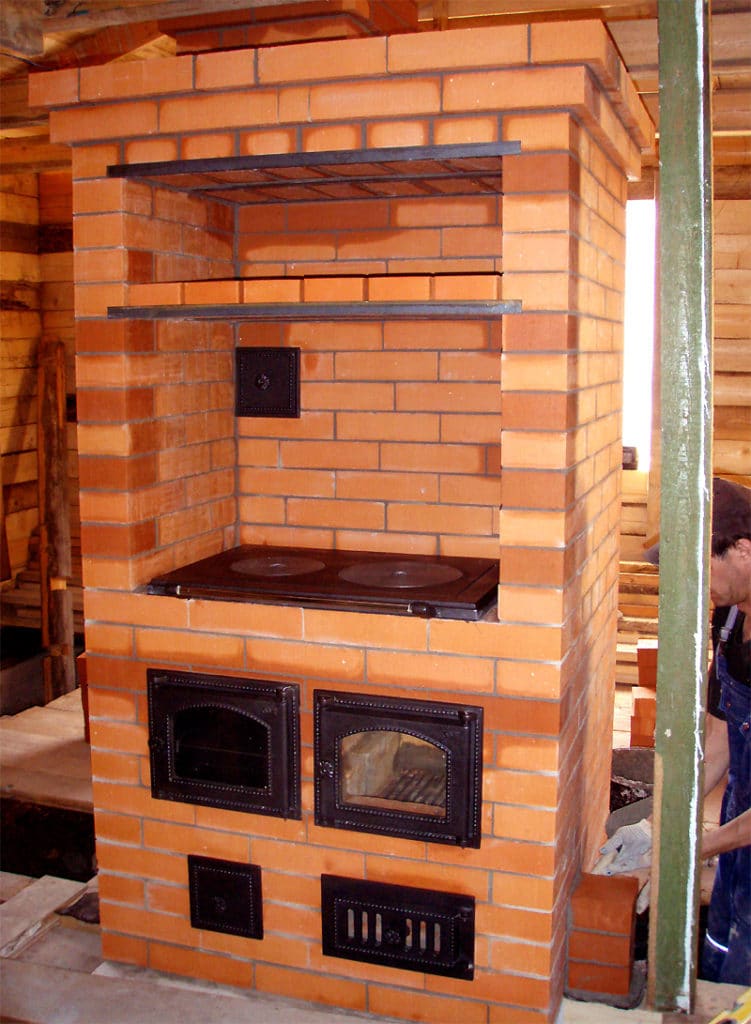
A Swedish stove with a built-in oven and a hob is an economical option to heat a private house. The design has many advantages. The oven is located on the side. The principle of its operation is that the first heat heats up the massive brick well. This part does not conduct heat well.

The furnace part in the form of a cap performs one of the main functions - it burns fuel. The fire does not apply to the metal part of the oven. This is not necessary, because it heats up due to the extreme heat. If you open the doors, the room will quickly feel warming. While preparing breakfast, you can warm up the house well.

This stove is suitable for private and country houses. If the structure is supplemented with a sunbed, it is possible to ensure a healthy and full sleep in the winter.

Upper niche
Compact and spacious part of the oven at the same time. Heats up at the first and second heat. Wet clothes can be dried safely. This is how the heat supply technology is thought out. Convenient to dry laundry. In winter and autumn, she gets wet from rain and snow. The function is safe if the fire safety regulations are taken into account.

Niche above the stove
Old stove samples had a wooden lid, which was used to cover a niche for long-term heat preservation. It was convenient, because in the morning it was warm in the room, even from the evening kindling. This advantage saves time in the morning. Especially if there is not enough time for the firebox.

Chimney
During the development process, the masters decided to abandon the hail. It was located between the chimney and the firebox. This construction method has proven to be complex and costly. Therefore, a do-it-yourself oven is built without a highlighter. Instead, they make a crossflow under the oven. When the house is heated, it is necessary to close the view. Otherwise, the stove will cool down very quickly.

The construction is heated by the second heat, when massive parts of the fuel begin to burn out. In the standard scheme, vertical channels are installed. In this case, the device heats the room poorly. But there is no accumulation of soot, which makes it possible to use any type of firebox.

Initially, horizontal channels were installed. Made in the homes of rich people. This saves time. The kindling did not require much effort. The lower part heated up well and quickly. But cleaning from soot was carried out often. Now this process complicates the operation. It is inconvenient to use, given the hustle and bustle of everyday life.

Much also depends on the type of wood used for heating. It is recommended to choose firewood with a low resin content. For example, aspen or acacia. Pine trees and birch are not suitable. It is these substances in the combustion process that contribute to the accumulation of soot and pollution of the chimney.

Additional elements
The back of such a stove is an ideal place to create a stove bench, fireplace. In place of the lounger, you can create a Swedish bed.Long-term heating will allow you to sleep well in winter. They also additionally create boxes for linen, which is always dry and warm.


Climate
50 votes
+
Voice for!
—
Against!
If it is necessary to build a cooking and heating device at home, we recommend that you pay attention to the stove called "Shvedka". This version of the stove is distinguished by its compact size, ease of construction, and rapid heating to the desired temperature. We will learn more about how to make a stove with your own hands.
Table of contents:
- Photos of stoves by hand - the history of the creation of the Shvedka stove
- Furnace drawings by hand: building a Swedish stove
Photos of stoves by hand - the history of the creation of the Shvedka stove
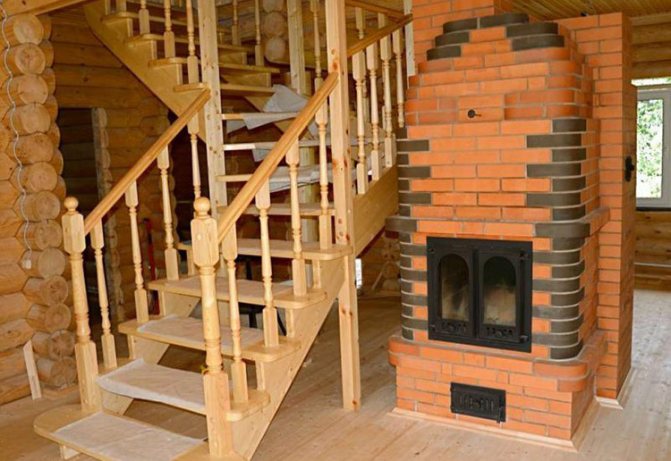
The design features of the Shvedka stove allow it to be placed in a wall between the kitchen and any other room. Thus, it is possible to quickly warm up the kitchen, while completing the cooking. Additional heat is directed to heating the adjacent room. Additionally, the stove can be equipped with a stove bench or fireplace.
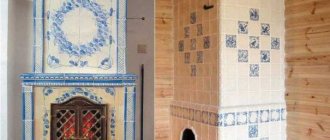
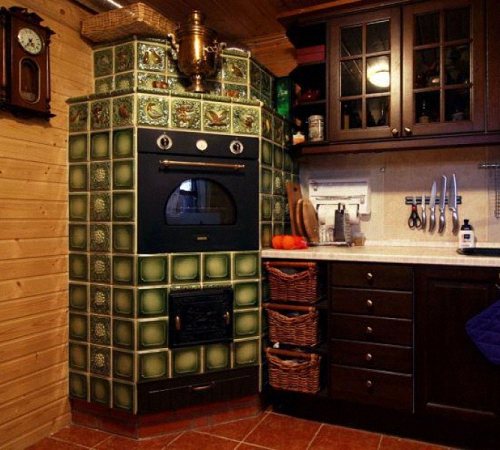
The appearance of modern Swedish stoves can be distinguished by both roughness and decorative delicate patterns. Some purchased models are in the shape of a cabinet and are installed in the room ready-made.

According to legend, the Shvedka oven originated in Russia during the reign of Peter the Great. Thus, the Swedes brought this version of the stove. According to other sources, the stove was developed by the Swedes and was built much later. This version of the stove is very similar to the Dutch stove, however, the hob is wider here, and there is a wall on the stove, thanks to which it is able to heat two rooms at once.
The original Swedish stove is a stove made of brick or a combination of this material with metal, stone, etc. Most often, in Sweden, fireclay bricks were used for the manufacture of furnaces, which have high heat resistance properties.
The principle of operation of the Swedish oven is based on a combination of several devices. First of all, the oven functions as an oven; all kinds of dishes and pastries are perfectly baked in it. For this, the initial heat is used, which is released during the combustion of fuel.
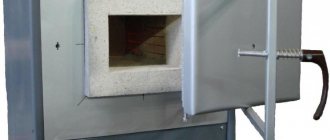
The firebox in the Swedish stove has the shape of a bell, thanks to this, it is possible to chemically burn the fuel. A steel oven does not lend itself to direct exposure to a flame. It heats up when the first fuel is burned. When you open the oven door, after a few minutes from the moment the oven is fired, the oven heats up. At the same time, the smoke is at the bottom, and the oven is heated using gases.
The upper part of the stove has the shape of a niche, it is spacious, and is heated using the first and second heat, as well as burnt coals. It contains a rope for drying linen or clothes. Overnight, the clothes are completely dry.

The niche located on top of the slab is closed with a special lid. It is used to warm up yesterday's food. Arrangement of the highlighter in the space between the firebox and the smoke exhaust element is a rather expensive process. Therefore, the Swedish oven is equipped with only a transfer-type window, which is located under the bottom of the oven.
Heat accumulation in the stove is carried out in relation to duct technology. To warm up the device, the second heat and the residual heat from the coal smoldering are used. The channels in the stove are arranged vertically. The bottom of the oven warms up worse than the top. This factor should be taken into account when using different types of fuel. A variant of arranging a horizontal smoke circulation is possible. In this case, the stove generates more heat, but you need to work hard to clean it. In relation to the individual preferences of the owners, the duration and design features of the duct chimney change.
Another element of the Swedish oven is the second oven. This part of the oven is located in an adjoining room. It may also contain a fireplace or a furnished bed. Please note that a Swedish lounger or lounger is distinguished by certain features of their arrangement. The length of the berth is no more than six feet, and the width is no more than 2.5. A bed is arranged above the sunbed, while the lower part is equipped with heating. Boxes were also kept under the bed, in which the linen was located.
The Swedish stove is distinguished by a simple design, high efficiency, and affordable cost. The heat transfer of such a furnace is much higher than that of the Dutch one, while the amount of materials for its construction is much less. In addition, this version of the oven allows you to cook food in it and dry things. With the right approach, it is possible to obtain a high-quality device for heating two rooms at once.

Furnace drawings by hand: building a Swedish stove
In order to properly build a Swedish stove, it is necessary to adhere to previously developed drawings and dimensions of this structure. The quality of the item obtained for heating is determined primarily by the size of this structure:
We suggest that you familiarize yourself with the optimal dimensions of each stove part:
- the size of the slab is 71x41 cm;
- the firebox is from 28 to 33 cm in height, 32-38 cm in width, 45-50 cm in depth;
- the height, width and depth of the oven are 30x33x50;
- the thickness of the steel from which the door is built in the oven is 0.5 cm;
- the interval between the grate and the nearest wall is about a third of a brick or a whole brick.
These values are approximate and range from 5-10 cm. One of the most important factors is the thickness of the oven walls. If you use thin roofing iron for the manufacture of the oven, then it will quickly heat up and cool down quickly. In this case, it will be impossible to get quality food prepared. For the manufacture of the oven and stove, steel or a material that does not conduct heat well is used. The dishes are heated through the hotplates.
Strictly adhere not only to the specified dimensions of the furnace, but also to the proportional relationship between all elements. For example, when constructing a furnace with a minimum size, the depth of the furnace will also be minimal. Otherwise, the level of efficiency will significantly decrease.
Washing the oven with gases is carried out in all directions. Therefore, between the rear wall and the wall of the firebox, a gap must be arranged, the minimum value of which is one fourth of the brick. The depth of the oven is also adjusted according to the previously described parameters. The oven can be located near the firebox if there is an insulating material in the form of asbestos or vermiculite between them.
Particular attention should be paid to the combustion door. Since the furnace is exposed to constant thermal stress, this part quickly fails. Therefore, it is recommended to make a cast version of the door, which is walled up in brickwork. To make a mustache, it is enough to attach a wire to the door, about 5 cm long and up to 5 mm in diameter. The wire whiskers are also bricked up to better hold the door. An additional steel strip provides a better fixation of the material.
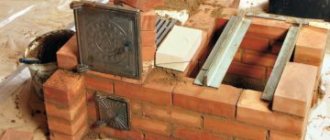
Do-it-yourself oven photo:

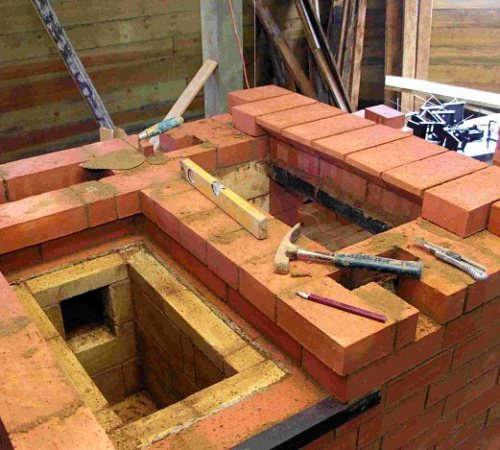
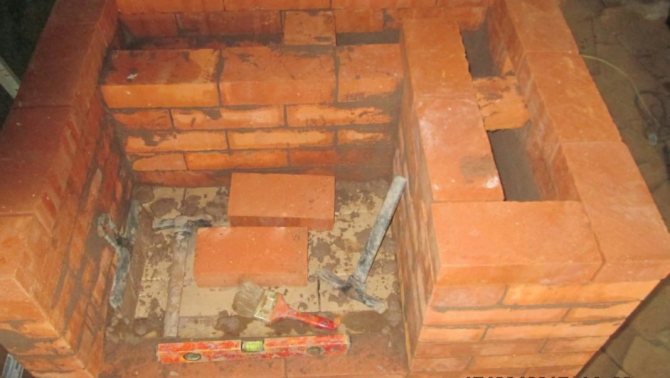
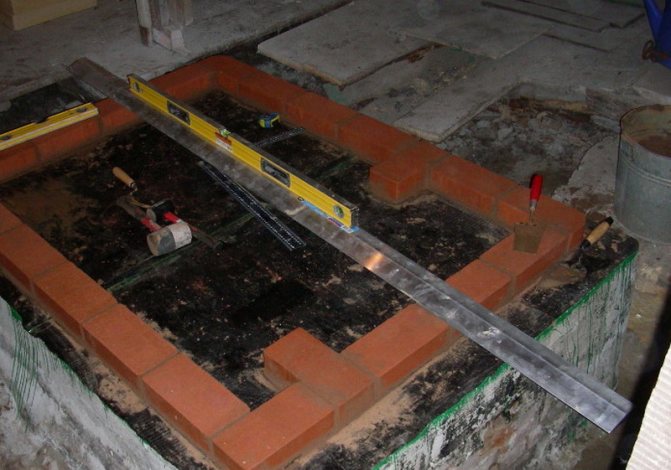
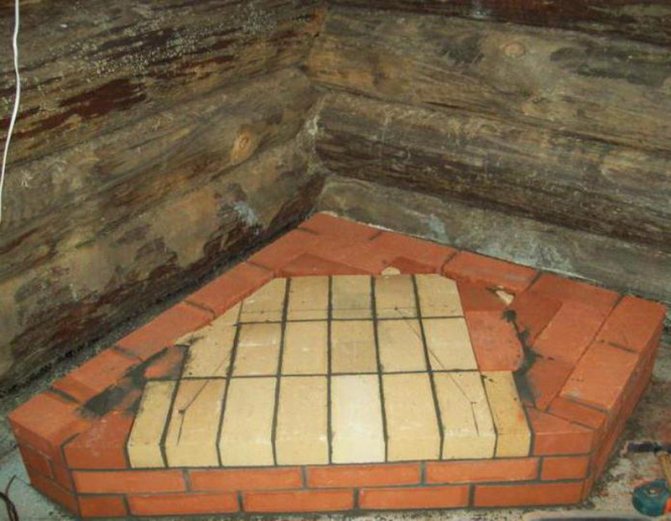
Quite big difficulties arise in the process of laying a Swedish stove. First of all, before starting work, you need to study the drawings for the stove with your own hands, according to which the masonry is schematically performed. The Swedish stove emits a large amount of heat, so the floor on which it will be equipped must be properly insulated. The best option for thermal insulation is the use of basalt cardboard, which is laid in several layers. For work, use sheets with a thickness of 0.5 cm.The middle sheet should be foil coated with basalt microfiber. Thus, the heat will be reflected into the room.
Next, the foot is made. For laying the first two rows of the oven, an interval with additional expansion of the joints is observed. Thus, a part is obtained in the form of a pedestal protrusion. Please note that the maximum seam width is 1.3 cm.

Before starting to lay a brick, it is immersed in water for a few minutes. Thus, the quality of the masonry is improved. Otherwise, dry brick begins to quickly absorb moisture from the solution, reducing its strength. Excessive exposure of the brick to water also negatively affects its quality. Therefore, the brick should be moderately damp. Marl is used for the manufacture of masonry mortar. Some stove options are equipped with ordinary clay. The bricks of the stoves are placed by hand on a solution previously prepared in small portions.
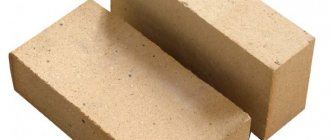
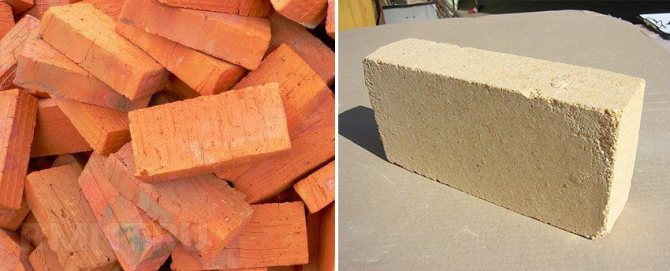
In order to obtain a high level of efficiency and to burn fuel efficiently with maximum heat release, it is necessary to properly equip the combustion section. The temperature inside the firebox must be high, due to this heat is generated and the oven heats up. This element of the furnace is made of light yellow fireclay bricks. For the manufacture of mortar for masonry, fireclay clay is used. Please note that ordinary red brick and its fireclay version differ in the coefficient of thermal expansion, therefore, stacking them close to each other is unacceptable. The interval between these types of bricks should be 0.6 cm.

It is recommended to equip the firebox and the rest of the stove, with the exception of the first three rows, of fireclay bricks. However, this material has a high cost, so you need to make at least the inner part of the firebox from it.
In the process of making a do-it-yourself sauna stove, pay special attention to the evenness of all surfaces. For cutting and joining bricks with each other, it is best to use a grinder. In relation to the order and drawings, the workpieces are made in advance in the open air, since cutting bricks with a grinder is a rather complex process, during which dust is released.
In relation to the drawings, it is mandatory to round the corners. This is to improve traction inside the stove. At the mouth of the chimney, a fluff is settled, cutting through the wind, it increases traction.
Baths, stoves, baths with hands need metal elements. The reliability of the furnace is determined by the presence of a minimum number of steel elements in it. However, in order to reinforce the hanging masonry in the oven, steel strips and corners are installed in it. Thus, it is possible to reduce the cost of the finished device.
After making a do-it-yourself bath oven, the process of putting it into operation follows. Initially, in no case should it be possible to heat a stove that has not yet dried out. Thus, its strength is reduced. The oven should be made during warm weather. For some time, it should dry out, and only after that it begins to be put into use. The minimum amount of time for the oven to dry is 15 days.
Next, warm drying is performed for two weeks. A minimum amount of coal and wood is used to heat the stove, it is best if they are made of aspen. Pine or birch firewood is not suitable as it releases a lot of heat and soot when burned. There is paper in the cleaning door during drying, after it becomes dry, this process ends.
This is followed by the process of performing hot drying, while the stove is heated several times a day, in the morning and in the evening. The load on it gradually increases. In the presence of a multi-pass oven, drying is carried out in winter.
Additionally, you can equip the stove with a stove bench. For the manufacture of such a furnace, significantly more bricks are required. However, the bed can be used as a sleeping place or for drying a lot of damp items.
Such a stove is not equipped with an oven, since the heat from it immediately passes to the stove bench.

The second option is an addition to the fireplace stove. There are two ways to organize such a stove. According to the first method, the fireplace is an addition to the rear side of the stove and has a chimney separate from it. The second method of installing a fireplace involves heating it from the stove, thus, it is possible not only to save materials on the construction of the stove, but also to heat two rooms at once.
Another option for a Swedish stove is a small stove installed in summer cottages. It is used seasonally, periodically. Particularly relevant is the presence of a niche inside which clothes and shoes are dried. The amount of materials for the construction of such a stove is less, but the amount of heat generated as a result also decreases.
DIY Swedish oven video:
Classification
Types of furnace devices, depending on the purpose:
- an oven with a fireplace, a stove is in the cooking room, and a fireplace is in the hall;
- a device with an oven and a dryer - it can easily heat the entire home
- device with a couch
Ancient style and modern, modified technologies are used to differentiate in design. Basically, the finishing is carried out with titanium moldings.
Heating cooking stove Swedish: features, advantages
The Swede is often compared to a Russian stove, but the two devices differ in size and fuel consumption. It is compact, which cannot be said about the Russian stove, which is why many residents of private houses make a choice in its favor. The model was developed in Sweden according to the subtleties of the local climate. The functions include:
- heating the room;
- cooking food.
Depending on the model, it can be equipped with a fireplace, baking compartment. The main advantage is the ability to independently equip such a product in your home. Having chosen the desired option, you can lay out a brick stove with your own hands. To do this, you need to draw a detailed ordering diagram and select all the necessary materials.
How does the Swedish stove differ from the Dutch and the Finns
At the moment, there are many types of brick ovens, but three similar designs are especially distinguished: Swedish, Dutch and Finnish. An inexperienced user should find out which is better of these three options and what are the differences between them:
- Dutch woman. It has a rectangular shape and vertical smoke flows. Used for heating and cooking. The peculiarity lies in the simplicity of the calculation and unpretentiousness. If you overheat the model, then there is a danger of carbon monoxide. Due to the design: the stove can be installed on 2 floors.
- Finca. It has one difference from the Swedish one - it is made with a bread chamber. The designs may vary, but the distinctive feature remains the same.
- Swede. For the arrangement, certain skills and abilities will be required. If the work is done by a beginner, it is important to take into account all the nuances. Arrangement of the unit for a summer residence requires compliance with the order of the scheme and all norms.
Important! The Swede differs from other heating and cooking structures in that it is placed with a shield in the back.
The Swedish stove is a compact and convenient option for building heating and cooking. Choosing between the three options presented, you should pay attention to the dimensions and purpose.
Don't Miss: How to Choose an Electric Baking Oven at Home
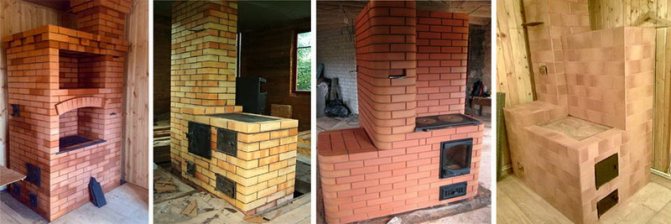
Types of Swedish ovens
Depending on the structure, there are several types of Swedes:
- Without hob oven.The most common design, masonry is often carried out with three firebox modes: the order is designed for masonry for three seasons. Depending on the desired temperature, it will heat up more or less. If you wish, you can make a mini oven with one burner for small spaces.
- With a water circuit. A heat exchanger is built into the firebox or chimney, which heats the water passing through the register and lets it through pipes to the radiators.
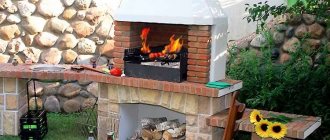
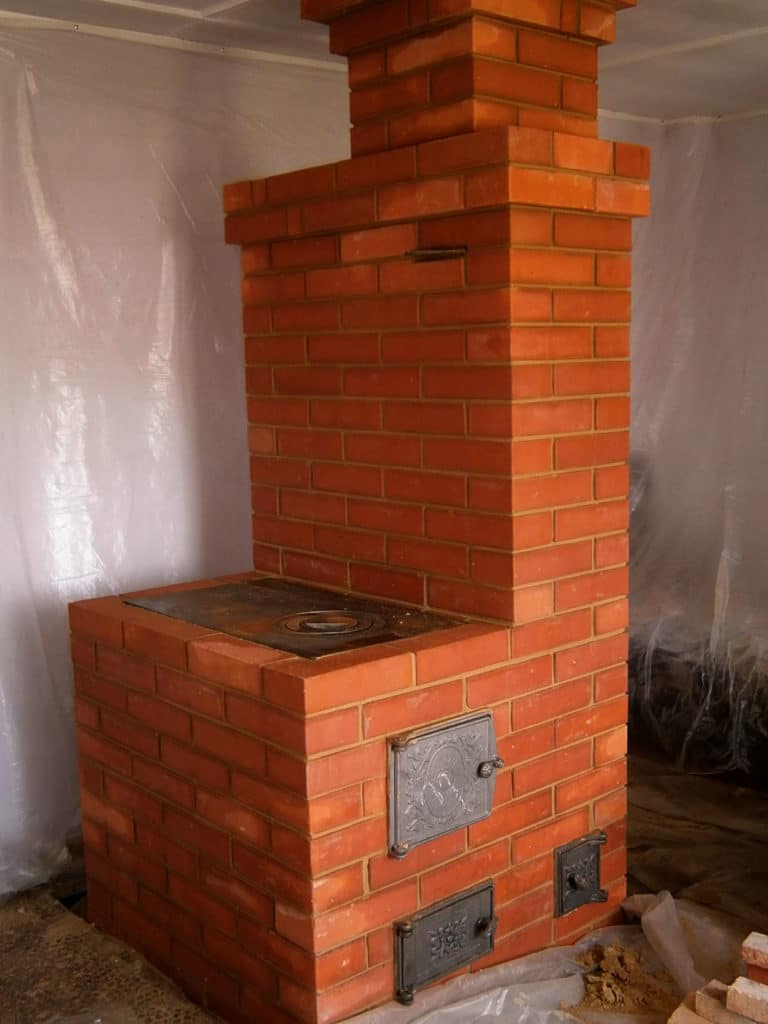
- With fireplace and hob. Such a device is called the Ryazankin oven. The Swedish fireplace stove looks beautiful, it is installed on the foundation. Dimensions - 102x102x217 cm, which indicates the possibility of using in a private building. You can build a stove on one side with a fireplace on the other, then the user can simultaneously admire the fireplace flame and use the firebox for its intended purpose.
- No stove. A special type of construction, when the Swede plays the role of a heating device without the possibility of cooking.
Important! Those who want to independently build a structure are interested in the question of what products are in shape. They can be made round, rectangular, or angular. The type is selected according to the location.
Also, craftsmen can build a version with a drying chamber, where it will be possible to pre-dry the wood for kindling. A separate place is occupied by a Swede with a couch - such a simple design implies additional space for rest.
Depending on the structural features of the device, it can have several caps. For example, the Batsulin two-bell oven has an oven and a stove, an option with five wells, the size and layout of which will help to lay out the material correctly, is equipped with 5 sectors for the movement of smoke. The 2-bell version of brick is considered universal.
Calculation of the features of the Swedish oven
To make a Swedish stove with your own hands, you need to carefully think over the project and select the appropriate size for each element.

Use only reliable orders of the Swedish oven with a hob and oven. This will be a guarantee of a reliable structure. A separate calculation may be needed to determine the size of the chimney. They are calculated from heat transfer.

You can autonomously determine the cross-sectional area of the tube. It is necessary to take into account the amount of marshness and what kind of fuel will be used to heat it. The first indicator is calculated taking into account the following pipe parameters: length, width, height.

Table: Specific calorific value of firewood (kW / m3)
The table takes into account the details that will allow you to determine the correct calculation for maximum performance.

To create brick ovens for your home, you need to draw up drawings with orders. In this table, we will consider the detailed data for the calculation, which we cannot do without when building such a furnace.

This takes into account the power and dimensions of the pipe.


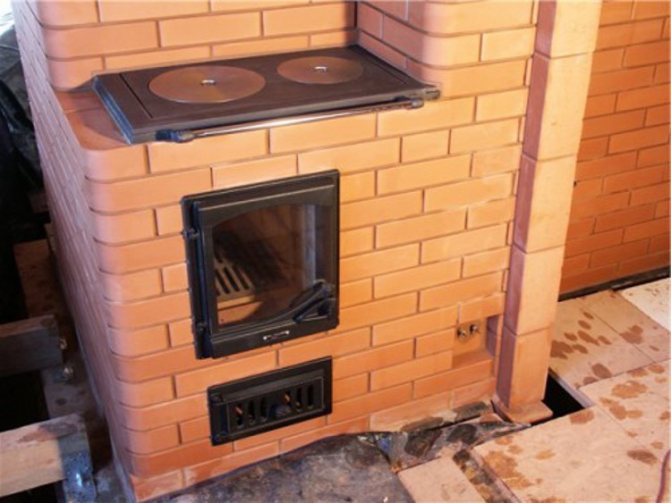
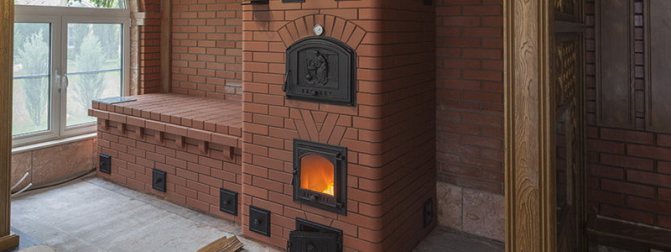
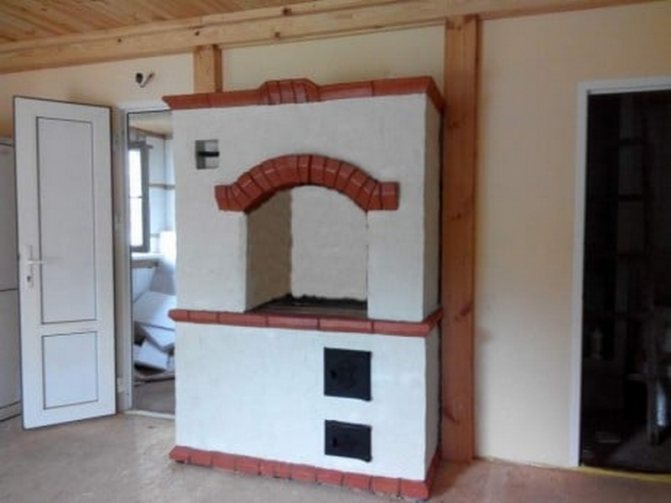
Swedish stove with oven and hob: preparation of tools and materials
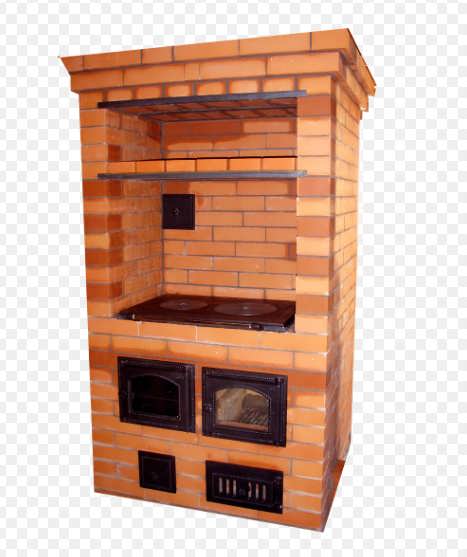
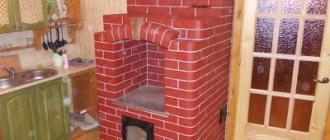
Photo: Swedish stove with oven and stove
Before folding the Swede, you need to choose the right materials and tools. Often newbies are interested in how many bricks are needed for a standard device. For example, for a base of 850 by 616 mm, you will need to calculate the number of bricks: one fireclay brick has dimensions of 230x110x65 mm. From this, you can make calculations for the consumable.
Don't miss: How to properly heat a stove with coal in a house - basic rules and features of a firebox
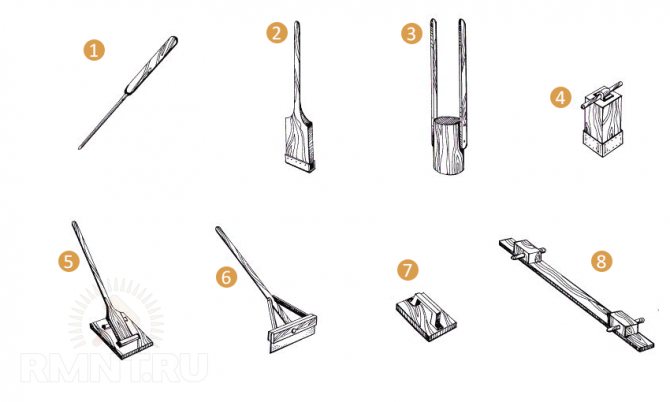
You will need the following tools to work:
- pin and shovel;
- plastic bucket;
- drill and mixer;
- a hammer;
- Master OK;
- jointing;
- level;
- rule;
- plumb line;
- Bulgarian;
- roulette;
- construction stapler;
- tile cutter.
From the material you need to prepare 33 fireclay bricks, 552 solid ceramic bricks, an oven, a cast-iron hob, fuel and rubber doors, a damper, a chimney damper and an exhaust damper.
Tips for choosing building materials
The construction process is not complicated. The Swedish stove is a simple design that requires strict adherence to drawings and order. You need to mix the solution correctly and have minimal knowledge of how to do it.

Required tools:
- Master OK;
- rubber mallet;
- level;
- rail;
- roulette;
- hydraulics;
- pencil;
- scapula;
- bucket.

When making the solution, take a small metal strainer. It must have a cell for sifting sand and clay. Ordinary clay is not suitable as it is not heat resistant. For the construction of such a heating device, only fireclay clay is chosen.

The solution must be soaked for several nights in the trough. This process lasts until the lumps disappear and excess water does not appear on the surface. After draining it, the remaining mixture should have a thick texture. This can be checked with a trowel. A small amount of the solution is applied to a dry vertical surface. If it does not drain, but solidifies, then it can be used.

Advice from the masters in choosing clay: the mixture should not have a third-party odor. Any aroma is a sign of organic impurities that will evaporate during the fire. This will lead to a decrease in the strength of the masonry. Choose your clay carefully.

List of materials that will be needed in the construction site:
- solid red brick;
- fireclay brick;
- fireclay clay;
- door for the combustion and ash chamber;
- grate grate (ideally cast iron);
- iron corners and sheets;
- asbestos gasket in the form of a cord;
- asbestos sheet.

Must be of high quality, no manufacturing defects. You can weld the doors yourself.

Preliminary steps before assembling the furnace
One of the main points in preparation is determining where the oven will be installed. After all, it must evenly heat the entire room. If the device is being built in an already finished house, the chimney outlet must be taken into account. In the process of installing the pipe, it is important not to damage the rigidity of the frame.

Preparatory work is best done in summer or autumn. It will take at least 30 days to dry the foundation. But the masters recommend keeping it up to six months. Holes in the ceilings are made before laying. The roof is collected last.

Determining the place where the Swede will be located.

The main function of the device is heating. Therefore, it is optimal to build the stove in the center of the room. The house must have a very good and strong foundation, which is firmly established. The structure weighs approximately 3 tons. It is important that the base of the house can withstand its weight. In a residential building, it is usually installed near the interior partitions near the exit door.
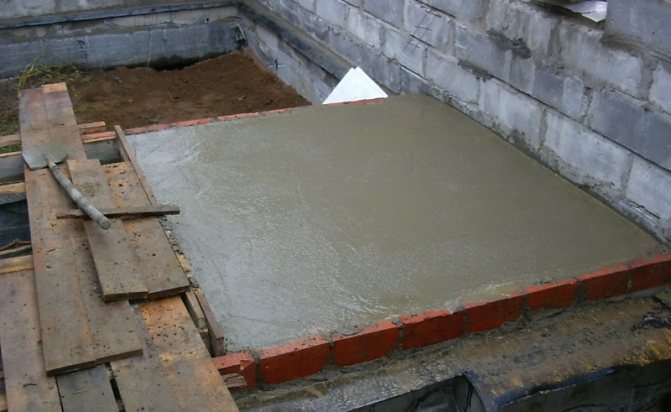
Pouring the foundation: recommendations + video
The period of use of this device, its performance and heat transfer depend on the foundation.
The depth is determined taking into account the region and groundwater. It is important to calculate the depth of frost resistance in winter. If the top is installed above this level, then horizontal extensions will appear. It is recommended to choose such a depth - 0.8-1 m.

Linear values are determined by the size of the furnace. The foundation is poured wider from these indicators by about 15 cm. These are the basic standards in the structure.

A sand gap must be created in the space between the ground and the concrete. Height - 20 cm. In the future, it performs the function of separating water that comes from the ground.
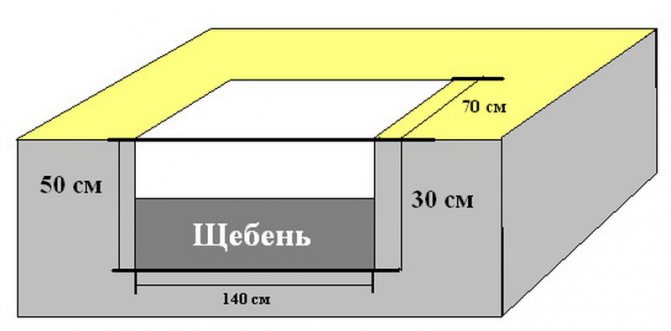
After the sand cushion, you can use crushed stone, brick chips or other materials. Craftsmen give preference to natural stone because it is highly durable.

The reinforcement is installed closer to the bottom layer. It is needed to strengthen and even distribution of temperature exposure. The metal mesh is laid horizontally.
The top surface should be flat. A wide-sized spatula is taken to help. After drying, roofing material is installed in several layers. It is used for waterproofing.
A hole is made in the floor, which must have the correct calculation. This is necessary for comfortable masonry. Then they set up the floor application under the structure body and make the baseboards.

The advantages of a Swedish stove with a hob and an oven are the strong flow of heat. Before laying the masonry, the heat-insulating material is settled. It should have several layers. A good material is basalt cardboard. It is inexpensive and has sufficient thickness - 5mm. Option - fireclay brick, used for the construction of the furnace. The material is more expensive and has low heat conductivity. This does not heat up the foundation.

Video that will be useful:
Creating a waterproofing layer
The picture below shows how to apply the roofing felt layers. Craftsmen also select materials for the cladding, for example, cladding with foil on all sides. Waterproofing is a specific part of the stove's design. For waterproofing, take a dense, stable material. An economical option is a substrate. It comes in different thicknesses.

Do-it-yourself Swedish oven: order and technology
An inexperienced person must follow the step-by-step instructions in the construction of a structure. This type of oven stands out for its small dimensions. Can be installed in a small room up to 40 m2.

Furnace layout
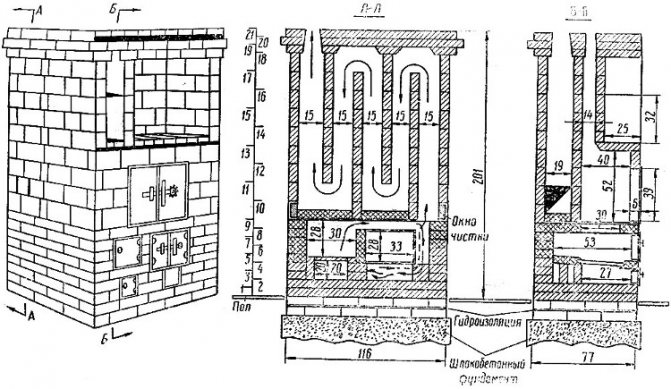
The instruction corresponds to each row of the heating device:
- The first two rows are solid. In the process of laying, you need to adhere to the offset of the bricks. Also, make sure that the corners and the horizontal surface are created correctly or not. The first two ranks are the basis of the whole structure, so mistakes cannot be made.
- Further, in two rows, an ash pan is harnessed - a space for cleansing soot. It is necessary to install special doors for the blower, 3 bolts for cleaning.
- For this, fixing legs are used. After leaving a gap of four to five millimeters. It serves to prevent the expansion of the iron due to thermal effects.

- Rad 5 is needed for the combustion chamber. The masonry is carried out with fireclay bricks. A grate is mounted at the bottom and a gap of five millimeters is left. For stability, they are covered with sand. Then the oven is installed, and the fastening is done in a similar way.
- In the sixth row, chimney and chambers are being built.
- Rows from the seventh to the ninth - this will be the masonry of the furnace compartment - fireclay bricks are used here. A gap must be left between it and the red brick to prevent thermal expansion. The space is not filled with solution. This step is also used to mount the firebox door.
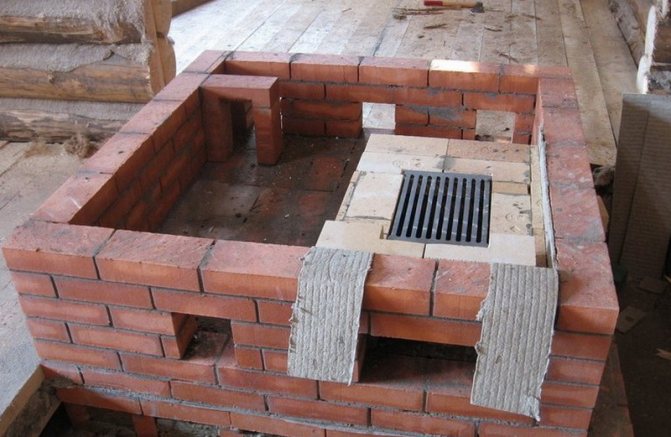
- The eighth row is covered with a sheer channel. To allow the processed gases to pass through the chimney ducts. Therefore, the 9th row should consist of bricks that are grinded at an angle. You will need a grinder with discs for working on concrete.
- The tenth row provides for covering with a horizontal partition.
- Row 11 consists of a metal welding plate. It also lays the foundation for the continuation of the masonry.

- From the twelfth to the sixteenth - create smoke ducts. Make a mop inside. Rows 17 and 18 should rest on iron stops to ensure rigidity and reliability. They are installed from strips and corners. The welding department is closed. To strengthen the bricks, they are fastened with wire at the corners. At this stage, the cooking chamber must be closed.
- At 19 and 20 - they lay a drying chamber, make special holes for cleaning

- 21 to 28 are completely composed of a drying chamber.
- In the twenty-seventh, a gate valve is made, the gap passage is maintained five millimeters. An asbestos cord is wound around the frame.
- Twenty-ninth - closes the channels and tube inlet. The masonry is distributed to create a cornice. 30 in a row, the masonry expands by five centimeters.
- In thirty-one, the initial values are returned.
Do-it-yourself order in the structure of a Swedish stove is the key to creating a properly functioning heating device.
Make a mixture of clay and sand for masonry
Here's a link to a helpful video:
Pipe laying
After laying out all the rows, the pipe is built up. Mainly straight, which does not change in the dimensions of the cross-sectional area. On the technical floor or attic, the brick pipe will turn into a metal one. The size of the inner section should not be subject to change due to this. Taking into account the fire safety rules, where the chimney and the ceiling intersect, a fluff is installed.

Given the operating conditions, the pipe is made at a certain height:
- the chimney is at a distance of 1.5 from the lid, then the head is installed 0.5 m higher;
- the distance of the chimney from the ridge is within 1.5-3 m, then the chimney is raised to the most elevated place of the roof;
- the distance of the chimney is more than 3 m, its upper part should be under a conditional line that goes from the ridge at a ten-degree angle;
- in the presence of a steep roof, the head should be at least 0.5 m higher above it;
- in general terms, the span of the chimney channel from the grate to the head cannot be less than 5 m.

Each period in the structure is shown to be important. Errors should not be allowed, since this completely affects the operation.

Drying the oven
When the construction is completed, the furnace cannot be operated. The optimum drying time is 10-14 days. In the first 2 weeks, drying must be natural. If the weather prevents the solution from drying on its own, then a fan can help in this case.

During the drying process, the cleaning doors must be covered with paper. This material will serve as an indicator. When the paper is no longer wet, the drying process is complete. When finished, you can slowly start using this heating device.

It is necessary to fill in the fuel in small portions, about several kg each. When the first portion burns out, you can start laying a new batch or gradually tweak a few firewoods. In this way, the stove will warm up continuously, gradually. Therefore, a certain air temperature is maintained in housing for a long time.
An excellent option would be aspen firewood. They dry out the structure well from the inside. Recommended for use before further commissioning. Do not use birch or any kind of pine wood. They are not intended for this purpose. Such firewood gives off a lot of heat energy and becomes the cause of the accumulation of a large amount of soot. This is due to the resin content. A blocked chimney builds up carbon monoxide. Vapors are harmful to health. Timely cleaning is the key to long-term use.
Video: small Swedish woman for suburban housing
A detailed memo is described in the video and photo. A detailed story is a way to build a reliable structure.
Useful tips for laying a Swede
The process of laying out requires special attention. A person without experience can face various difficulties. Useful tips at this difficult stage:
- When laying bricks, it is important to observe the thickness of the joint. The recommended rate is 4-6 mm.
- The brick should not be saturated with moisture from the solution, therefore it is moistened with water before construction.
- The uniformity of the masonry is examined along and across. The level will help with this, and the corners will determine the steppedness of the corners of the furnace.

- After finishing laying, it is important to wait at least 2 weeks. During warmer months, the oven will naturally dry out faster.
- Professionals advise using as little metal as possible in the structure of the furnace. But the structure must have metal corners.
- In the process of construction, nothing can be done back to back. It is forbidden to lay iron on an exposed brick. Between them there must be a layer of 6 mm from the solution.

- When installing the hob on a brick, a clay mortar is placed under it. This will prevent the brick from heating up.
- Subject to the order in the structure of the Swedish oven with their own hands, it will come out to make a strong and durable device. The initial stage is preparation. Theoretical knowledge facilitates quick problem solving.

Drawings will help you correctly arrange the rows and make the right Swedish oven. It is strictly forbidden to heat only the made device. This type of oven does not tolerate wet bricks and requires complete drying. The basic principle of the firebox is to lay small batches of firewood. This helps the device warm up quickly.

The addition of new batches prolongs the heat retention in the room. The structure, if used correctly, can store heat from the evening firebox until the morning.
Do not use firewood that contains a lot of resin. They burn quickly, forget the chimneys with soot. Hot drying can be used on cold construction sites. The process involves several fireboxes in the morning and in the evening, in an increasing mode. If the type of oven is multi-pass, then hot drying is carried out on a winter run.

Often, such structures are installed in country houses in summer cottages. This is due to the advantages of the heating device. If you build a medium-sized oven, then it only takes one square meter. Rapidly and well warms up two rooms. The firebox is equipped from the side of the kitchen, and the back is in the room (hall or bedroom).

The functionality is related to the correct location of the chimney. This allows you to efficiently distribute heat. It can be operated at any time of the year. The functionality is not affected. The device can always be in working order.