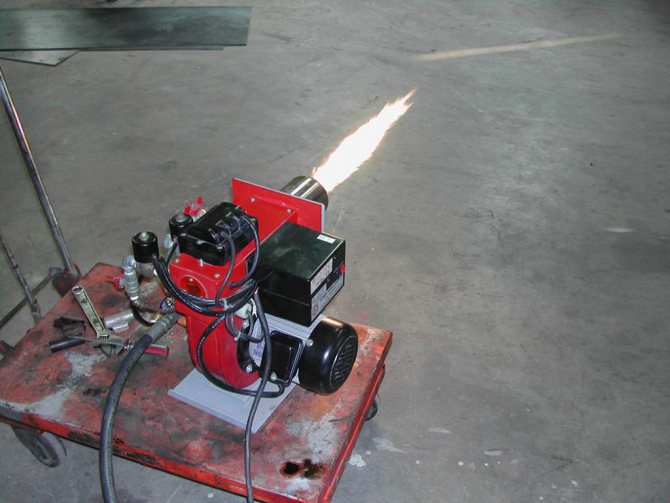
DIY hydrogen burner
A hydrogen burner, as the name suggests, is powered by the heat generated by the combustion of hydrogen. The gas mixture of hydrogen and oxygen (HHO - two hydrogen molecules and one oxygen) is called in our country an explosive gas, and in "them" it is called Brown's gas. Hydrogen combined with oxygen has the highest combustion temperature among gases - up to 2800 ° C. However, hydrogen is extremely explosive. As, in general, any gas supplied in large cylinders under high pressure.
The advantage of hydrogen (or HHO gas) over other types is the possibility of obtaining it by electrolysis from ordinary water! Moreover, to create a hydrogen burner with our own hands, we absolutely do not need to accumulate hydrogen in any cylinders. A hydrogen electrolysis burner produces gas in the quantities required for instant combustion. This greatly improves the safety of gas welding or cutting with a hydrogen torch based on an electrolysis HHO generator. Using such a hydrogen burner, we completely exclude the possibility of a gas explosion, because all the gas produced immediately burns out and does not have time to accumulate in the volumes required for an explosion. Thanks to this, a hydrogen burner is often used for jewelry work, because master jewelers who create their own home production are unlikely to use gas cylinders at home, which is probably not even legal!
I also decided to build a hydrogen burner with my own hands on the basis of an HHO generator, which is a conventional electrolyzer. And after all, even at school, I experimented with electrolysis, thrusting bare wires from an outlet into a jar of water through a rectifier diode. Now I want to repeat my school experiences, only now on a larger scale and more consciously.
What do you need to build a hydrogen burner with your own hands?
- Stainless steel sheet
- Pair of bolts M6 x 150. Washers and nuts to taste.
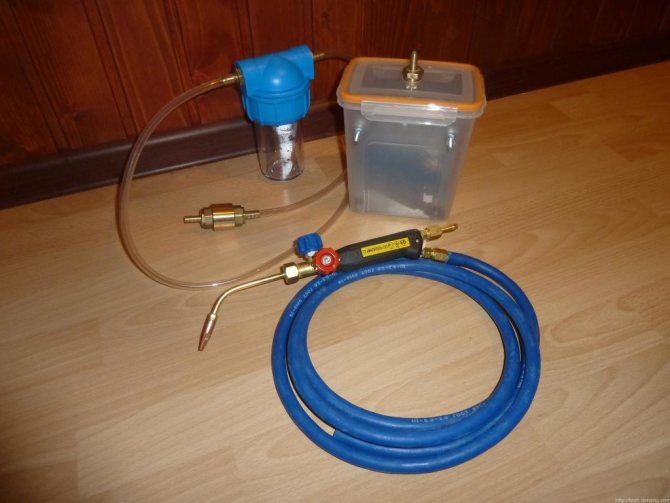
- A piece of a transparent tube. For example, a water level from a hardware store will do. There, a 10 meter hose costs only about 300 rubles.
- Several fittings with a "herringbone" outer diameter 8mm (just under the hose from the water level).
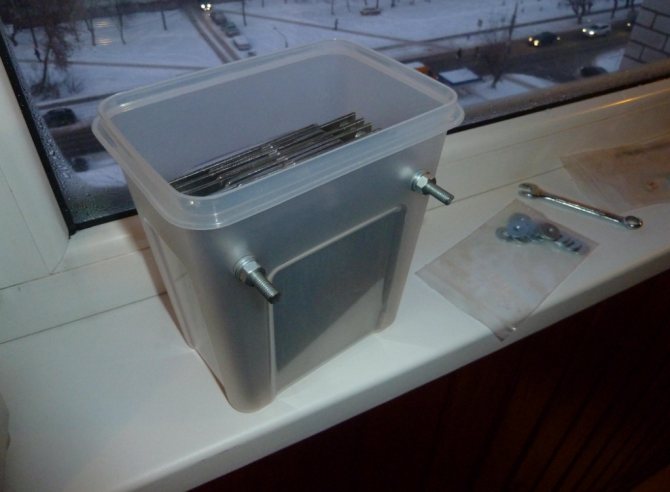
- Plastic container 1.5 liters for 110 rubles from a hardware store (for sealed food packaging).
- The filter for running water purification is small (for a washing machine).
- Check valve for water.
What kind of stainless steel is needed? Ideally, the mark in the bourgeois manner should be AISI 316L, which corresponds to our 03X16H15M3 stainless steel. But I did not specifically order a stainless steel, but took a piece that I managed to find in the barn. It is quite expensive to buy a whole sheet: with a thickness of 2 mm, it will take about 5000 rubles, and you also need to somehow deliver it, and its dimensions are two meters! I found a piece about 50 x 50 cm.
Why, in fact, stainless steel? The fact is that ordinary steel corrodes in water. In addition, to achieve the maximum effect, we will not use water, but alkali, and this is already an aggressive environment. In addition, we will pass an electric current through our electrolyte. Therefore, ordinary metal plates will not survive for a long time in such conditions.
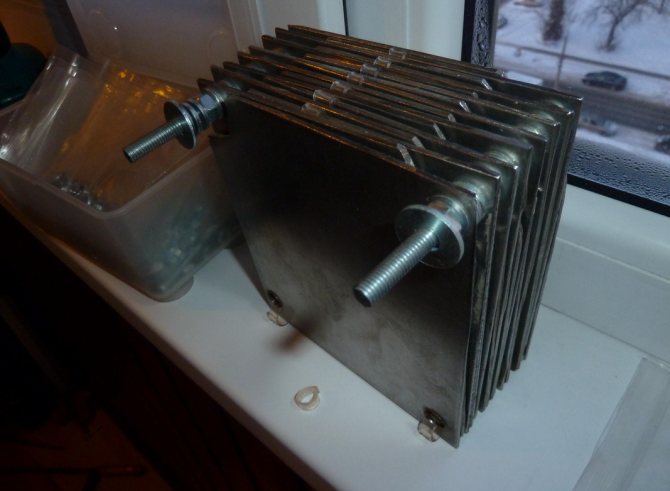
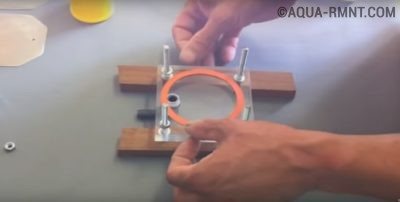
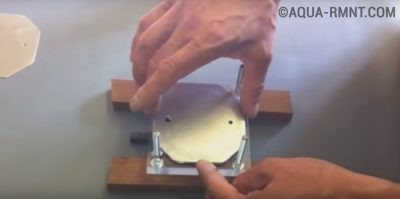
I marked out my leaf and got 16 roughly square stainless steel plates to build my hydrogen burner with my own hands. Sawed as usual - with a grinder. Pay attention to the shape of the plate - a corner is cut on one side. This is necessary in order to further fasten the plates together in a special way.
On the opposite side of the cut, we drill a hole for the M6 bolt, with which we will fasten the plates together. I didn't need the holes in the bottom of the plate. The fact is that I drilled them just in case I suddenly think about making a dry electrolyzer. But its design is somewhat more complicated, and the area of the plates is used extremely ineffectively in it. In general, I already have few plates, so I want to use them to the maximum, so I chose the "wet" electrolyser option for the HHO generator. In this case, the plates are completely immersed in the electrolyte, and the entire area of the stainless steel plate is involved in the generation of Brown's gas (HHO or oxyhydrogen gas).

The essence of the hydrogen generator, which lies at the heart of the burner, is that when a direct electric current passes through the electrolyte from one plate to another, the water (which is contained in the electrolyte) decomposes into its constituent components: hydrogen and oxygen. So we need to have two plates: positive and negative (anode and cathode).
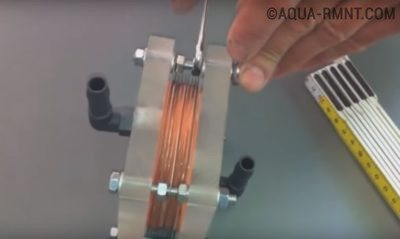
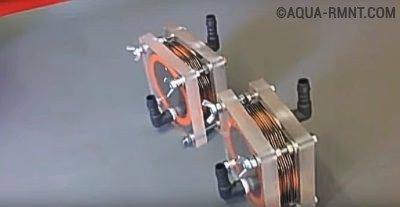
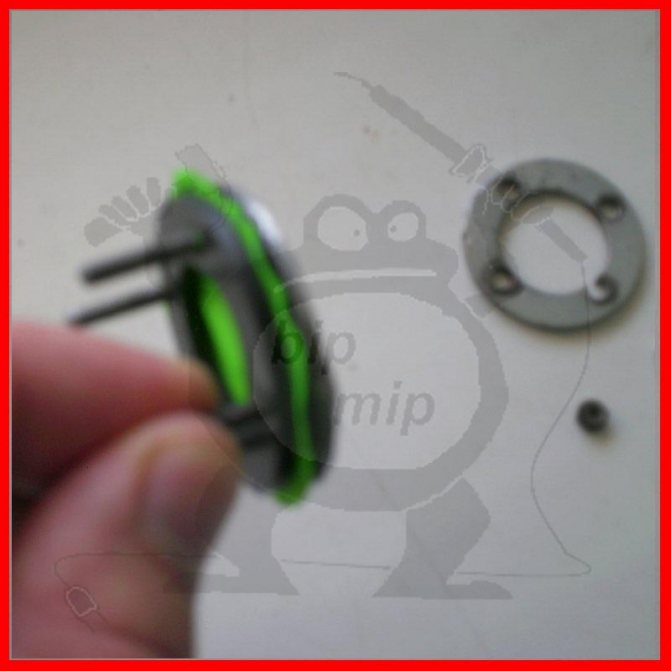
The larger the area of the plates, the larger the area of action on the electrolyte, the greater the current will pass through the water and the more HHO gas we form. Therefore, we will hang several plates at the same time on the anode and cathode. In my case, I got 8 plates per anode and cathode.
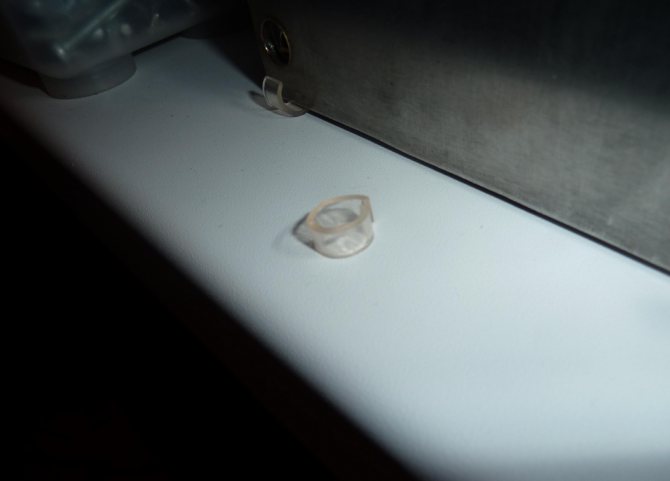
To insulate the plates of different polarity among themselves, I used pieces of the same tube from the water level.
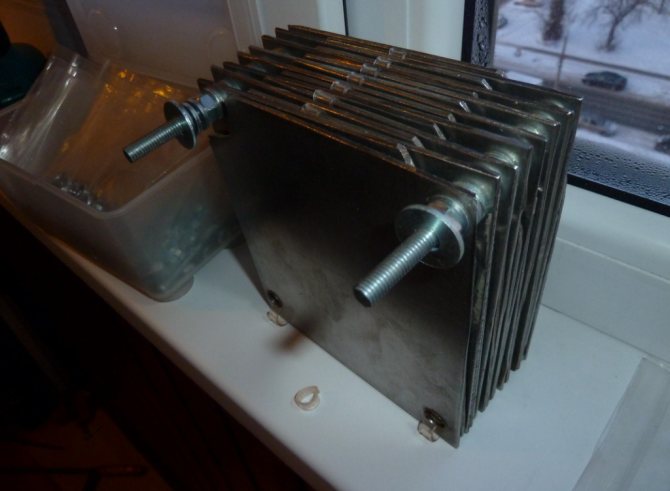
In fact, there are many options for inclusion, and this one is not the most optimal. It is simply simpler in terms of making and fixing the plates on the electrodes. As you can see from the photo, my plates simply alternate + - + - + - + -, etc. Such a switching circuit is designed for a low supply voltage and a very high current to obtain a sufficient amount of gas to create a hydrogen burner with your own hands.
Or we make such an Electrolyzer prince the same on it, it can even drive a car, but more on that later
We add the site to bookmarks or like on the social network so as not to miss something new.


What is needed to make a fuel cell at home
When starting to manufacture a hydrogen fuel cell, it is imperative to study the theory of the process of oxyhydrogen gas formation. This will give an understanding of what is happening in the generator, help in setting up and operating the equipment. In addition, you will have to stock up on the necessary materials, most of which will be easy to find in the retail network. As for the drawings and instructions, we will try to disclose these issues in full.
Hydrogen generator design: diagrams and drawings
A home-made installation for producing Brown's gas consists of a reactor with installed electrodes, a PWM generator for their power supply, a water seal and connecting wires and hoses. Currently, there are several schemes of electrolysers using plates or tubes as electrodes. In addition, a so-called dry electrolysis plant can be found on the Internet. Unlike the traditional design, in such a device, not the plates are installed in a container with water, but the liquid is fed into the gap between the flat electrodes. The rejection of the traditional scheme allows one to significantly reduce the dimensions of the fuel cell.
In the work, you can use the drawings and diagrams of working electrolysers, which can be adapted to your own conditions.
Selection of materials for the construction of a hydrogen generator
Almost no specific materials are required to make a fuel cell. The only thing that can be difficult is the electrodes. So, what needs to be prepared before starting work.
- If the design you have chosen is a "wet" type generator, then you will need a sealed container for water, which will simultaneously serve as the reactor vessel.You can take any suitable container, the main requirement is sufficient strength and gas tightness. Of course, when using metal plates as electrodes, it is better to use a rectangular structure, for example, a carefully sealed case from an old-style car battery (black). If tubes are used to obtain HHO, then a capacious container from a household filter for water purification is also suitable. The best option would be to make a stainless steel generator housing, such as 304 SSL.
Homemade hydrogen generator:
The hydrogen burner is based on a hydrogen generator, which is a kind of container with water and stainless steel plates. The design and detailed description of the hydrogen generator can be easily found on other sites, so I will not waste the printed characters on this. I want to convey very important subtleties that will be very useful to you if you are going to make a hydrogen burner with your own hands.

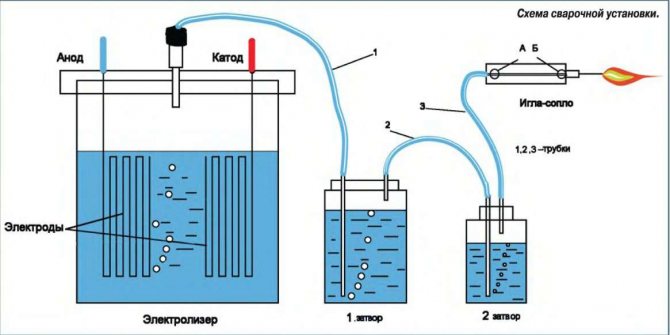
Figure №1 - Structural diagram of a hydrogen burner
The essence of a hydrogen burner is to produce hydrogen by electrolysis of water. You must understand that you cannot pour anything into the electrolyzer (a container with water and electrodes), and therefore, I recommend using distilled water, but I read that caustic soda is added for more efficient electrolysis (I don’t know the proportions).
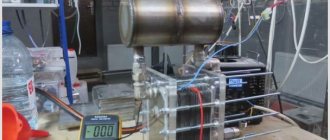
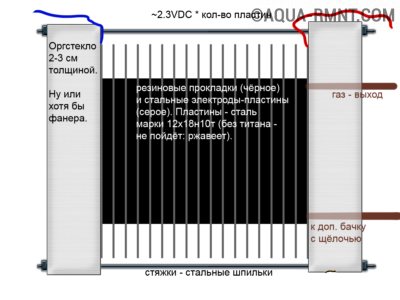
My electrolyzer is assembled from stainless plates, rubber gaskets, and two thick plexiglass plates, and outwardly it all looks like this:
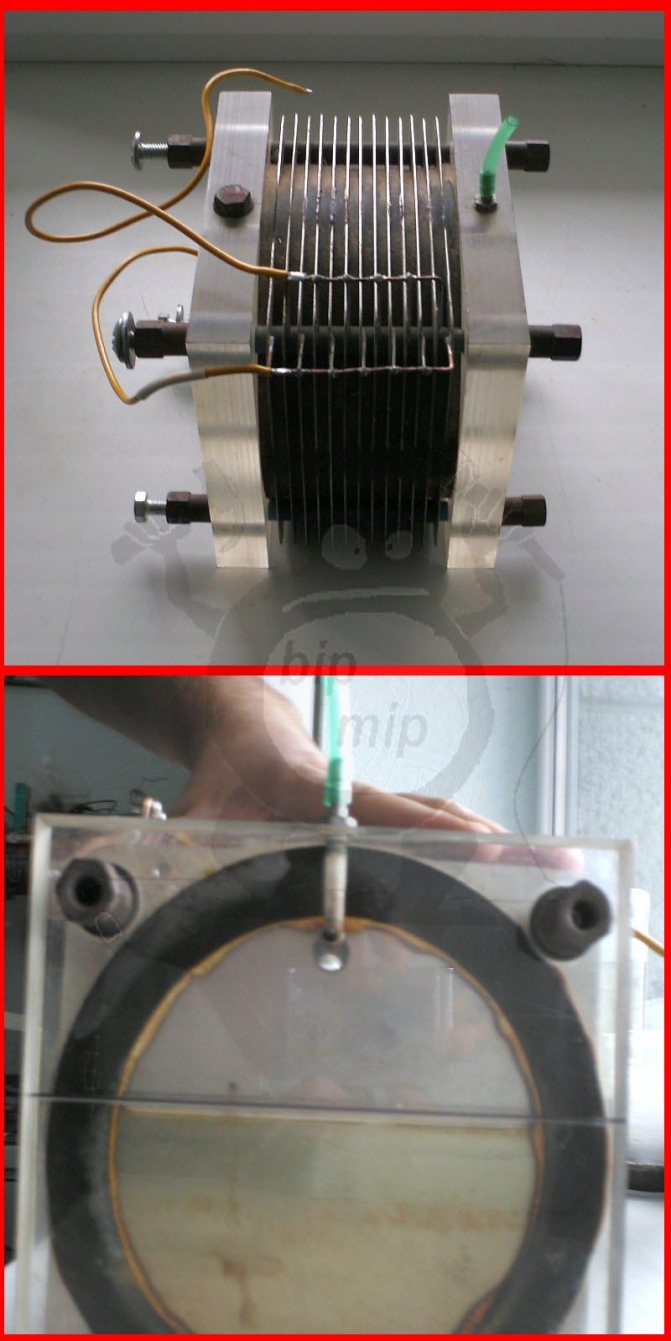
Figure №2 - Electrolyzer
The electrolyzer must be filled exactly half with water in order to comply with safety precautions, keep an eye on the liquid level, as with a decrease in it, the electrical parameters and the intensity of hydrogen evolution change!
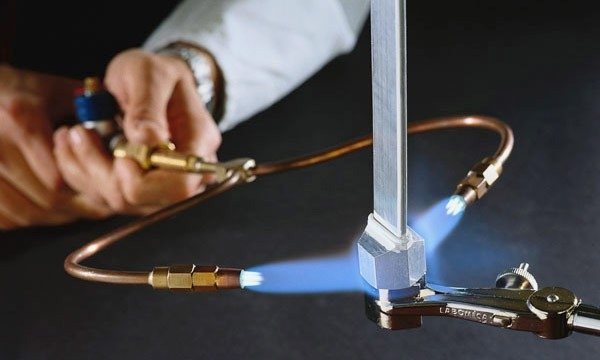
But before you spend a lot of time and materials on assembling the electrolyzer, take care of the power supply to it. My cell, for example, draws a current of about 6A, at a voltage of 8V.
Metal plates (electrodes) are connected with thick copper wire soldered to them, and thick copper wires (about 4mm cross-section).
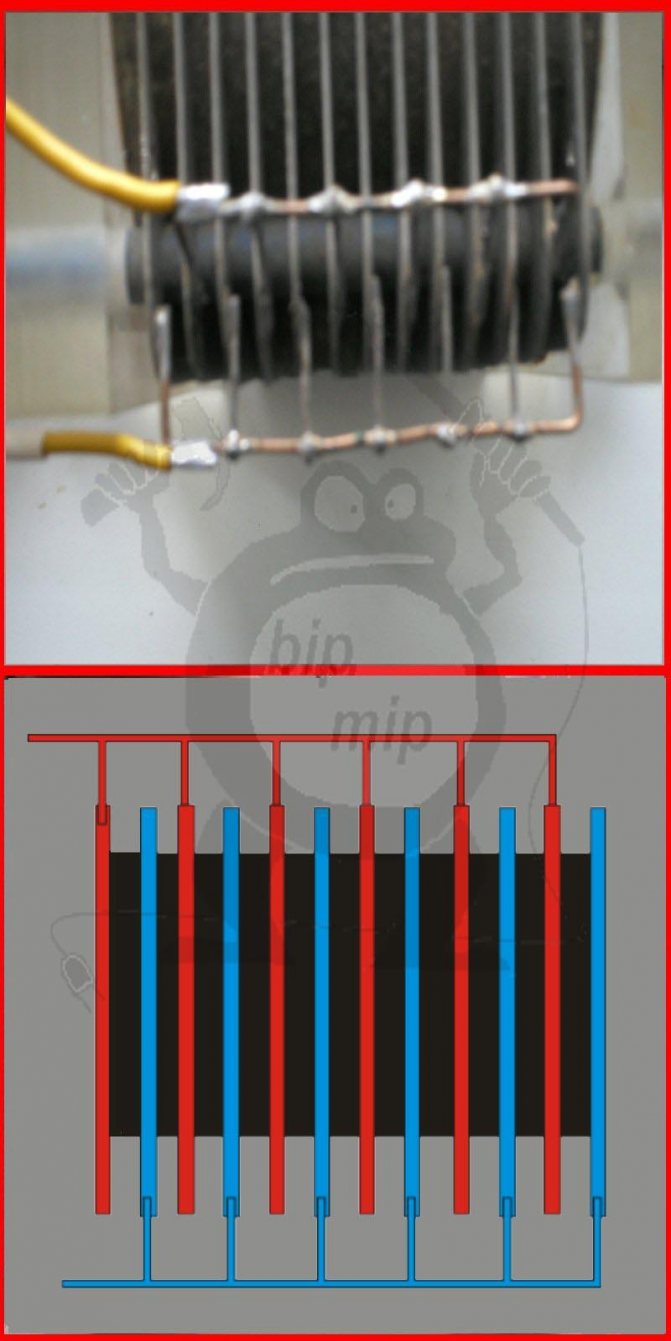
Figure №3 - How to connect the wires
You must also understand that everything must be tightly connected and well insulated, a short circuit of the plates and a spark is unacceptable.
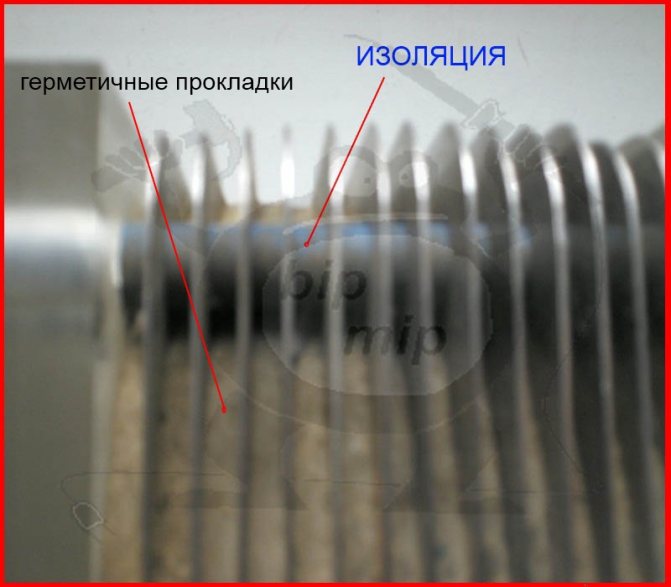
Figure №4 - Insulation of plates
In fact, there are a lot of different types of electrolyzer designs, so I do not want to focus your attention on it, although it is the most basic and time-consuming part for a hydrogen burner, in itself it is not very important (any design of it will suit you).
Instructions: how to make a hydrogen generator with your own hands
For the manufacture of a fuel cell, we will take the most perfect "dry" electrolyser circuit using electrodes in the form of stainless steel plates. The instructions below demonstrate the process of creating a hydrogen generator from "A" to "Z", so it is better to follow the sequence of actions.
Dry fuel cell layout
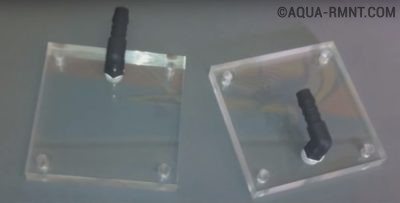
- Manufacturing of the fuel cell housing. The side walls of the frame are plates of hardboard or plexiglass, cut to the size of the future generator. It should be understood that the size of the apparatus directly affects its performance, however, and the cost of obtaining HHO will be higher. For the manufacture of a fuel cell, the dimensions of the device will be optimal from 150x150 mm to 250x250 mm.
- A hole is drilled in each of the plates for the inlet (outlet) connection for water. In addition, drilling will be required in the side wall for the gas outlet and four holes in the corners to connect the reactor elements to each other.
Manufacturing of side walls
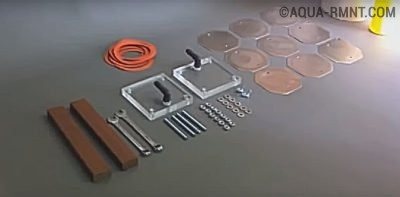
Such a set of parts must be prepared before assembling the fuel cell.
Laying the electrodes begins with a sealing ring.
Please note: the plane of the plate electrodes must be flat, otherwise the elements with opposite charges will touch, causing a short circuit!
When assembling the plates, it is important to correctly orient the outlet holes.
During the final tightening, be sure to check the parallelism of the side walls. This will avoid distortions.
By collecting several fuel cells and turning them on in parallel, you can get a sufficient amount of Brown's gas.
To obtain Brown's gas in an amount sufficient for heating or cooking, several hydrogen generators are installed, operating in parallel.
Video: Assembling the device
Video: Work of the "dry" type structure
How to use a hydrogen burner correctly:
First of all, first of all, always work in personal protective equipment (be sure to put on a face shield or goggles), and secondly, follow the fire safety rules. Third, watch the water level in the electrolyzer and the intensity of the flame burning.
It is not necessary to ignite the flame immediately, let the hydrogen displace the remaining oxygen (it takes me about ten minutes, depending on the intensity of the release and the volume of the vessels with a water seal and a fuse A, B Fig. 1)
Be sure to keep a container of water near you - you will need it to extinguish the burner flame when you finish work. To do this, you just need to direct the tip of the needle with the flame under the water and thereby shut off the oxygen to the fire. ALWAYS EXTINGUISH THE FLAME FIRST AND THEN TURN OFF THE POWER TO THE GENERATOR - OTHERWISE THE EXPLOSION IS INNESS.
About water cooling units for welding torches
Water cooling units allow the welding torch to run smoothly at high power and without overheating. By means of connected channels (hoses), the water cooling unit makes the welding torch heavier and increases its dimensions - however, the possibility of continuous operation at currents above 200A from this device outweighs all the disadvantages. Therefore, in the presented material, we will try to consider in more detail all the nuances and issues related to water cooling units.
Content
- Description and purpose of welding torch cooling units
- Typical water-cooled torch cooler and how it works
- How to choose a welding torch cooling unit
- Liquid Cooling Units - Application Tips
Description and purpose of welding torch cooling units
A water-cooled welding torch allows you to use its full potential with duty cycle = 100% under any external conditions (for more information on what is duty cycle, see the link). It would be more accurate to say that in the presence of water cooling of the torches, pauses in the functioning of the welding process will be associated only with technological reasons for changing electrodes, adjusting parts and the period of shutdown of the welding machine itself - but not with overheating of the torch from prolonged operation.
The water cooling unit consists of two main devices - a cooler and a radiator. In the cooler (cooling unit), intensive cooling of the burner power cable is carried out due to the contact of its surface with the coolant. In the radiator, the heated liquid is brought to the optimum temperature and again supplied to the cooling pipes of the welding torch.
Typical water-cooled torch cooler and how it works
Typically, water-cooled welding torches have three hoses - two for connecting the circulating water (coolant) inside, and one for supplying gas. The water hoses are connected to the welding torch cooling units with threaded connections, the circulating liquid provides cooling of the torch power cable.
When welding at negative temperatures, welding torches are cooled using non-freezing liquids (Tosol, etc.).The compatibility of specific types of antifreeze with the operation of the water cooling unit must be found out from the manufacturer of this type of equipment or from our managers if you order the equipment from Tiberis. On some models of welding machines, nozzles for water inlet / outlet are provided, and inside them there is no water cooling at all - these connectors are designed specifically for the convenience of connecting water cooling units.
How to choose a welding torch cooling unit
To begin with, the water cooling of the burner can be incorporated into its design from the very beginning. This is due to the significant values of the welding current:
- For TIG torches (argon arc welding) - from 250 Amperes;
- For semi-automatic MIG torches - from 300 Amperes;
- For some models, the current “threshold” may have a lower value.
The use of water cooling units when working with welding equipment is usually associated with the need to weld long or standard seams. It is with this nature of welding that it is important to continuously cool the torch by circulating the liquid. If the volume of work is small or is of a sporadic nature, economical air-cooled welding torches can do it quite well at no extra cost.
For budget models of MIG welding semiautomatic devices and TIG machines, budgetary torch cooling units have proven themselves well, as:
| Svarog Super Cooler 6L | Foxweld WRC 300B |
They are highly reliable and affordable - but their main advantage is interchangeability... Having bought one such cooling unit, for example, for the Trafimet welding torch and similar, it can be successfully used in conjunction with this torch for the entire line of welding machines of the brands Brima, Svarog, Bars, Foxweld. And vice versa, any of these models of cooling units is suitable for the same Svarog equipment.
A different picture with premium welding machines. European and American brands have each cooling unit compatible only with the "native" welding machine, and with no other... This creates certain difficulties in the selection of devices for water cooling of burners - however, it has a great effect on the performance and durability of the equipment. We have compiled tables of interaction of devices and cooling units for the most basic premium foreign brands and devices for your convenience:
| EWM | |
| Cooling unit model | Welding equipment model |
| COOL35 U31 | Tetrix 300 and Tetrix 300 AC / DC |
| COOL40 U31 | Tetrix 230 and Tetrix 230 AC / DC |
| COOL41 U31 | Tetrix 300-2 |
| COOL50 U40 | For compact machines (TKM). |
| COOL50-2 U40 | For decompact devices (TDM). |
| COOL71 U42 | alpha Q 330, Tetrix 150 Plasma, Tetrix 300 Plasma, Tetrix 350 AC / DC Plasma and Tetrix 400 Plasma |
| COOL71 U43 | alpha Q 330, Tetrix 150 Plasma, Tetrix 300 Plasma, Tetrix 350 AC / DC Plasma and Tetrix 400 Plasma |
| ESAB | |
| Cooling unit model | Welding equipment model |
| Cool 2 | WARRIOR 400i / 500i CC / CV |
| Cool 1 | Origo Mig 4004i / 5004i, Aristo Mig 4004i Pulse |
| CoolMini | Caddy Tig 2200i DC |
| CoolMidi 1000 | Origo Tig 3001i DC |
| CoolMidi 1800 | Origo Tig 3000i AC / DC - 4300iw AC / DC |
| LINCOLN ELECTRIC | |
| Cooling unit model | Welding equipment model |
| COOL ARC 20 | Invertec V205 / V270 TP |
| COOL ARC 30 | Invertec V405TP |
| COOL ARC 34 | Invertec V270-T AC / DC and V320-T AC / DC |
| COOL ARC 25 | with Powertec and CV series power supplies |
| COOL ARC 50 | Power Wave C300, S350 and S500 |
| COOL ARC 45 | Speedtec 400S and 500S |
| KEMPPI | |
| Cooling unit model | Welding equipment model |
| MasterCool 10 | MasterTig MLS 3000/4000 |
| MasterCool 20 | MasterTig MLS 2300/3003 ACDC |
| MasterCool 30 | MasterTig MLS 2300/3003 ACDC |
| FastCool 10 | FastMig KM / KMS |
| FastCool 20 | FastMig Pulse 350/450 |
| KempactCool 10 | Kempact MIG 2530, Kempact Pulse 3000 |
It is necessary to clarify the very concept of water cooling of the welding torch. The optimal solution would be application of a special liquid, but not water (albeit distilled), if recommended by the manufacturer. The internal channels in the cooling blocks of welding torches have a small cross-section and ordinary water, when circulating, will lead to their rapid clogging, breakdown of the entire torch and other unpleasant consequences. Proprietary coolant will eliminate repair problems with a reliable warranty.
Cooling units of premium brands (for example, EWM), when the market for welding equipment was just nascent, welders instead of the original liquid poured vodka (yes, the cheapest).And such a sacrificial decision also cannot be called successful - there are practically no lubricating properties in alcohol-containing compositions, which leads to disastrous consequences and equipment failure in a fairly short time. Therefore, for EWM and other premium welding brands you must use a special coolant - Cooltec, which will not only provide high performance, but also protect the entire burner and the water cooling unit itself from breakdowns and malfunctions.
Liquid Cooling Units - Application Tips
Tips and tricks for the proper use of water cooling units for welding torches can be found in any more or less experienced welder. In short, they can be reduced to the following postulates:
- Welding in the cold it is impossible start with water in the welding torch cooling unit - first, replace the liquid with Tosol or another non-freezing compound approved by the manufacturer;
- If you are planning a long-term welding work in an industrial environment, then you need to acquire 1) A three-phase semiautomatic device with a power reserve 2) A good water-cooled torch 3) A proprietary block for it. Then the work of any welding intensity will not be interrupted by forced downtime and technological pauses, which will reduce operating costs and equipment payback time;
- When any Welding with currents of 200 amperes and above, a water-cooled torch will be a better solution than air-cooled equipment. Remember that the PV indicators for documentation are taken under "greenhouse" operating conditions - for air-cooled burners at maximum operating currents, they rarely exceed 35%;
- For stationary welding machines with three-phase current, the burner duty cycle may even be less than 35% - and they will need water cooling at typical welding currents of 160-180 Amperes, because many hours of welding mode is possible - and it cannot be performed without a water cooling unit. Except, perhaps, stretching the welding for a couple of days - but the result is important to us, not the process.
We hope that the presented material helped you decide on the choice of a cooling unit, but if you still have questions that are not closed, then contact our managers - they are as competent as possible in the selection of equipment.
Water seal and fuse:
Pay your attention to figure # 1 - there are two containers (I marked them A and B), well, and a needle from a disposable syringe (C), all of this is connected by tubes from droppers.
It is necessary to pour water into the first container (A), this is a water seal. It is necessary so that the explosion does not reach the electrolyzer (if it explodes, it will be like a fragmentation grenade).
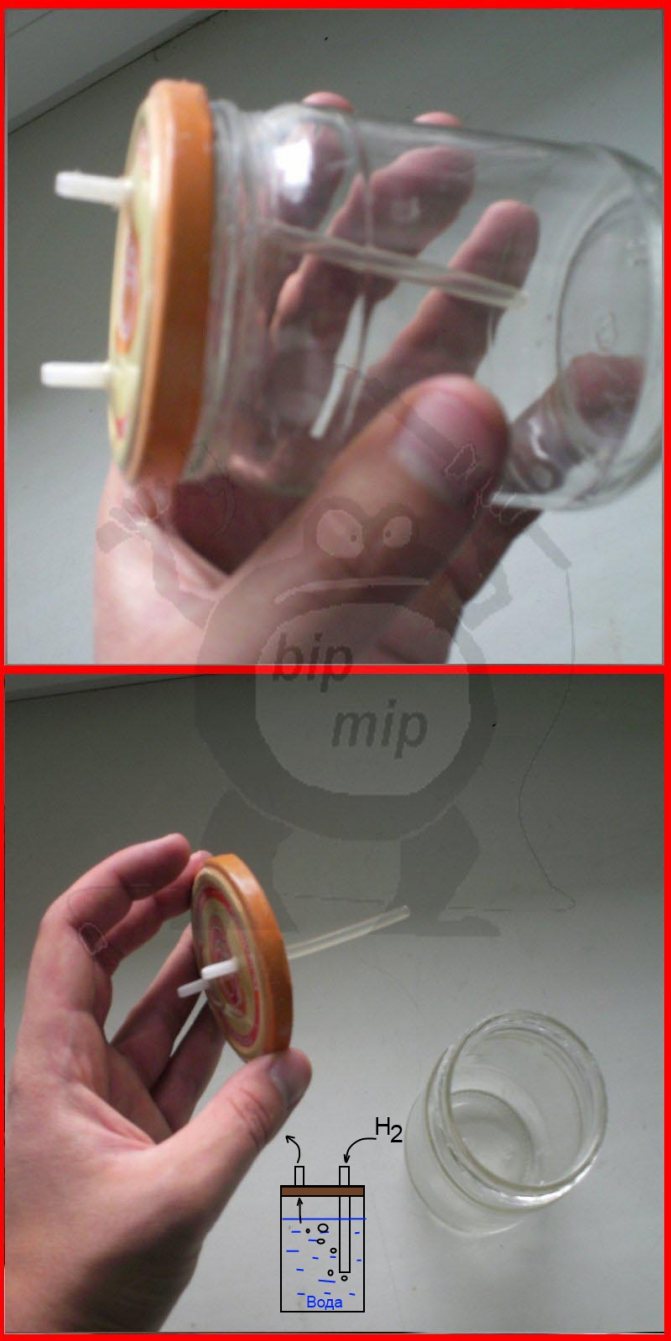
Figure №5 - Water seal
Please note that there are two connectors in the water seal cover (I adapted all this from a medical dropper), both of them are hermetically glued into the cover using epoxy glue. One tube is long, through which hydrogen from the generator should flow under the water, gurgle, and through the second hole go through the tube to the fuse (B).
In a container with a fuse, you can pour both water (for greater reliability) and alcohol (alcohol vapors increase the combustion temperature of the flame).
The fuse itself is made like this: you need to make a hole with a diameter of 15 mm in the cover, and holes for the screws.
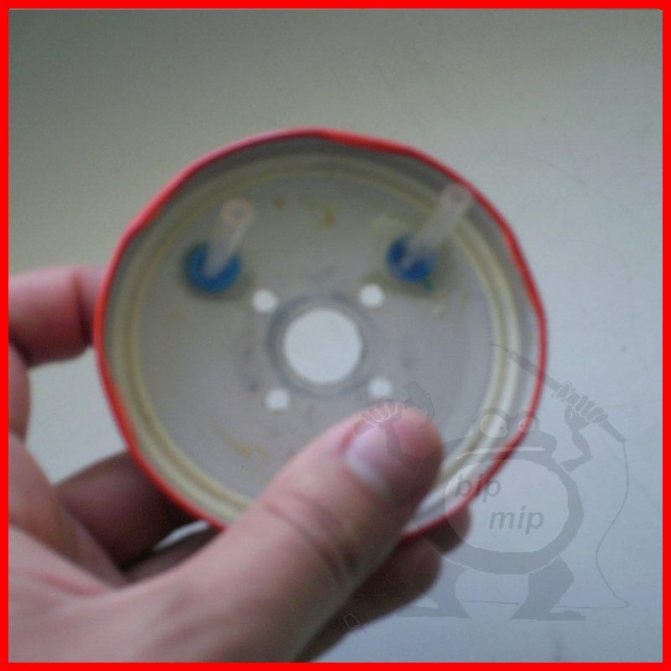
Figure №7 - How the holes in the lid look
You will also need two thick washers (if necessary, you need to expand the inner diameter of the washer with a round file), two plumbing pads and a chocolate foil or an ordinary balloon.

Figure №8 - Sketch of the safety valve
It is assembled quite simply, you need to drill four coaxial holes in the iron washers, cover and gaskets. First you need to solder the bolts to the top washer, this can be easily done with a powerful soldering iron and active flux.
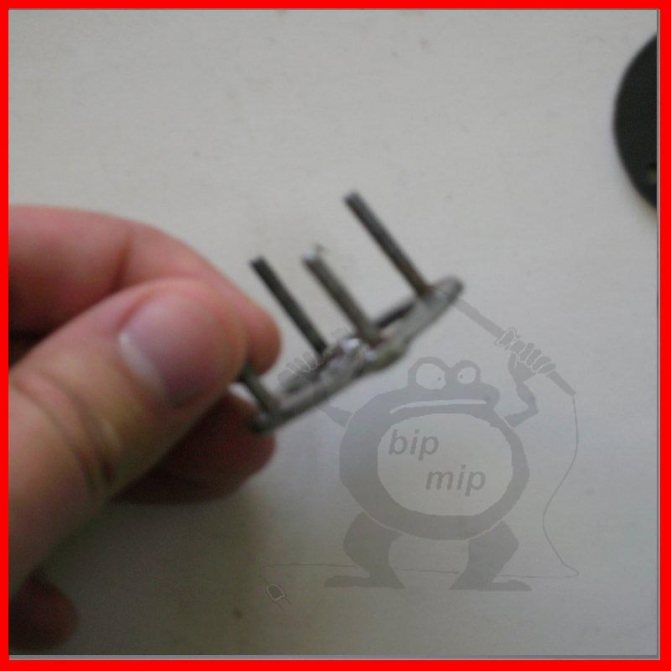
Figure №9 - Washer with screws
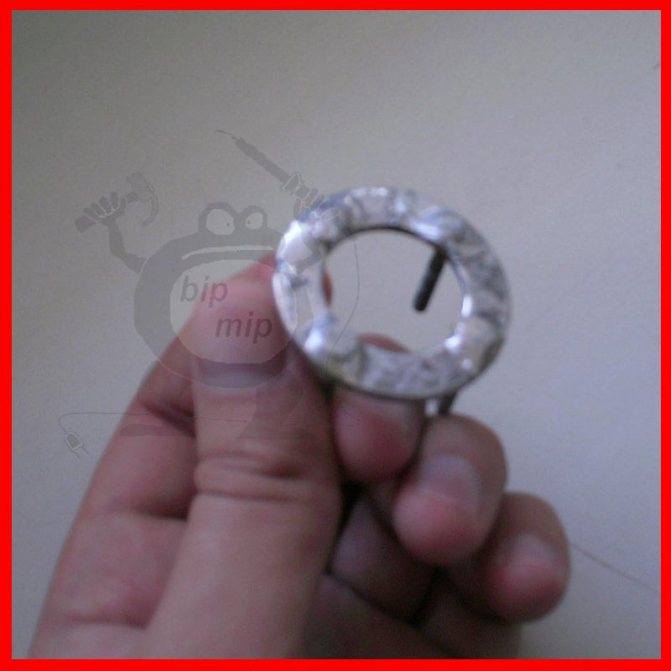
Figure №10 - Screws soldered to the washer
After you have soldered the screws, you need to put one rubber gasket on the washer and your valve itself. I used a thin rubber band from a burst balloon (this is much more convenient than putting on a thin foil), although foil also works quite well, at least when I tested my hydrogen burner for explosions, it was the foil in the valve.
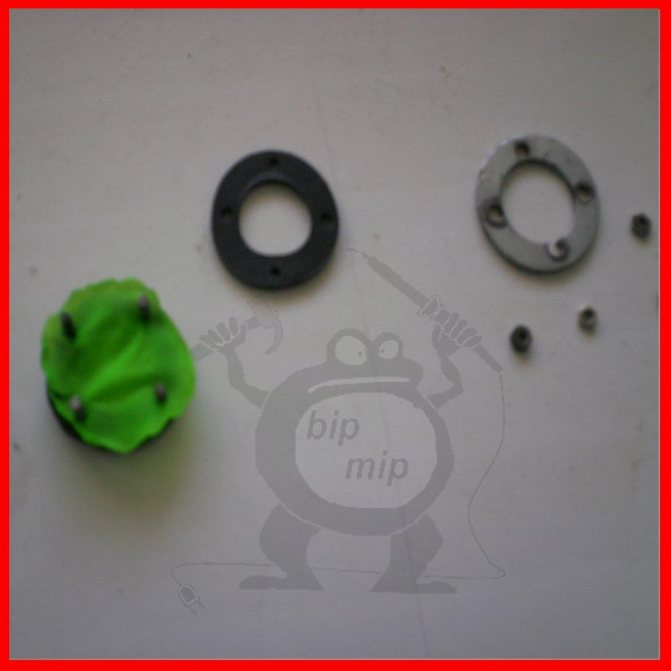
Figure №11 - Putting on the gasket and protective rubber
Then we put on a second gasket and you can insert the protection into the holes made in the lid.
Picture No. 12 - Finished valve
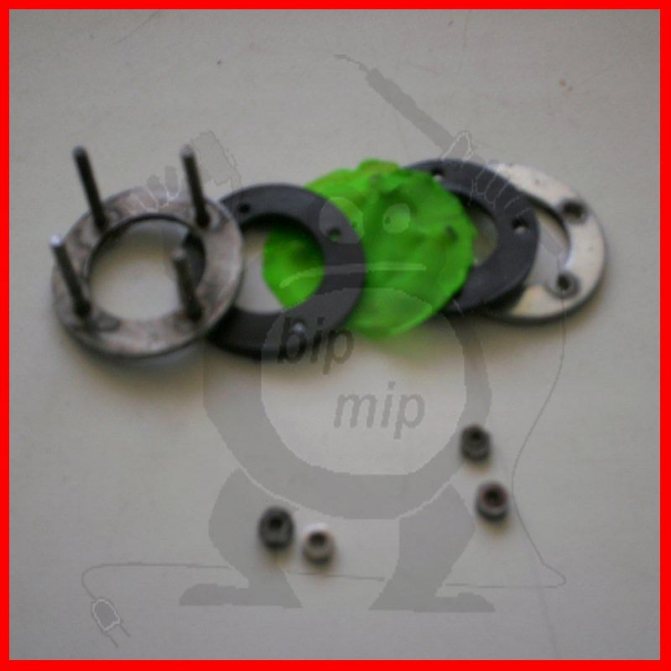
Figure №13 - Elements of protection
The second washer and nuts are needed to tightly and tightly fix the protection by tightening the nuts (look at figure 6).
Understand correctly and take into account, you can not neglect the safety rules, especially when working with explosive gases. And such a simple device can save you from unpleasant surprises. The protection works according to the principle “where it is thin - there it breaks”, with an explosion knocks out the protective film (foil or rubber band), and the explosive force does not go into the electrolyzer, besides this is also prevented by the water seal. Take my word for it, if the electrolyzer explodes, it will not seem enough to you :).

Figure №14 - Explosion
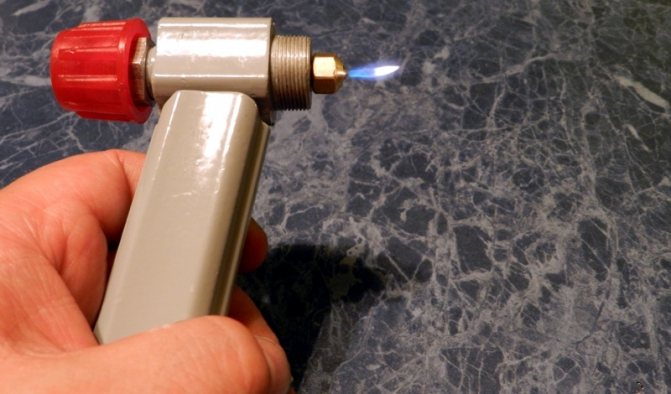
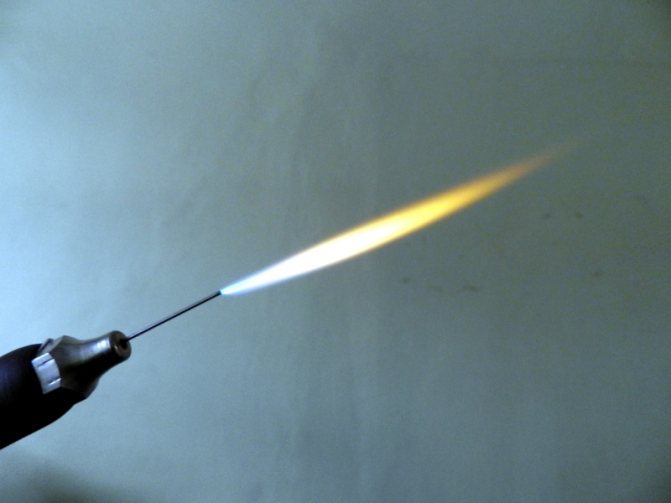
It should be understood that an emergency is necessarily inevitable. The fact is that the flame burns at the outlet of the nozzle (which is a fairly good needle from a disposable syringe) only because gas pressure is created (pressure is agreed).
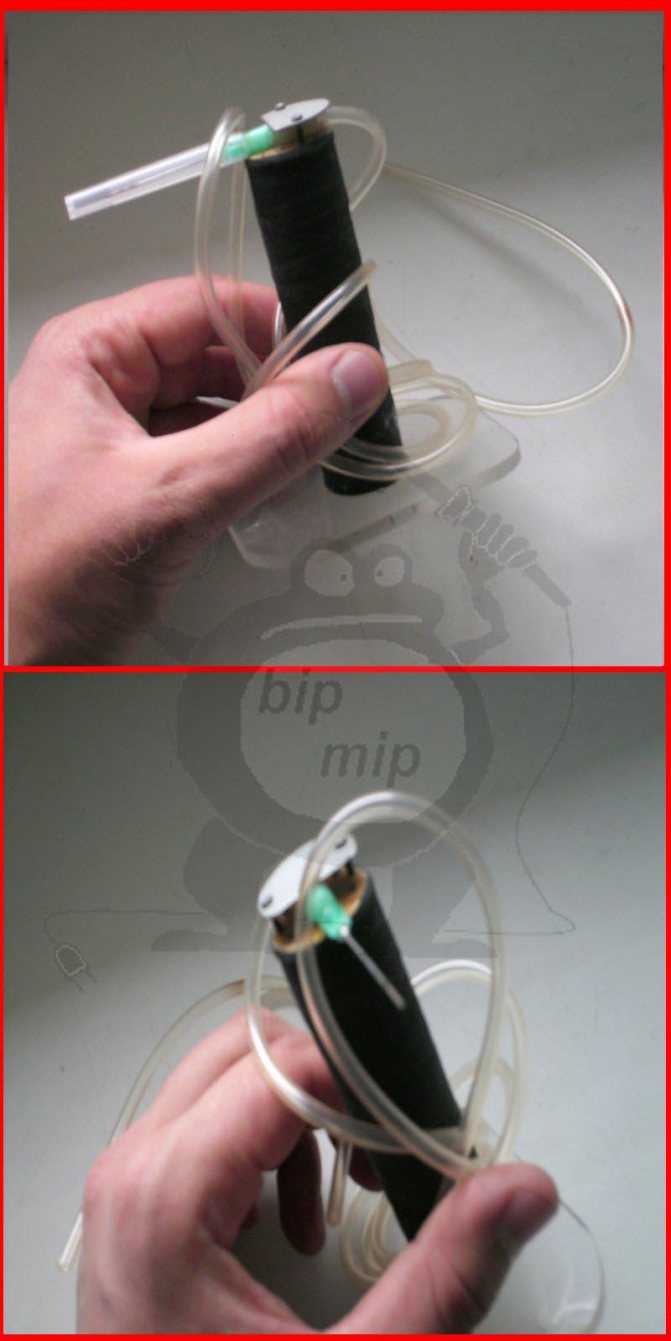
Picture No. 15 - Nozzle from a syringe, on a pedestal
For example, you are working with your burner and now the light is turned off, believe me! You will not have time to bounce off the burner, the flame will immediately go back down the tube and the explosion of the safety valve will thunder (it is needed so that it burst and not the electrolyzer) - this is quite normal when the burner is homemade - be vigilant and careful, stay away from the hydrogen burner and wear personal protective equipment!
Personally, I am not very enthusiastic about the hydrogen burner, and I tried to make it only because I already had a ready-made electrolyzer. Firstly, it is very dangerous, and secondly, it is not very effective (I am talking about my hydrogen burner and not about the burners in general) to melt what I wanted, it was not possible. And therefore, if you came up with the idea to make this type of burner, ask yourself a completely rational question "and it is worth it", since assembling an electrolyzer from scratch is quite a troublesome business, and you also need a powerful power supply that would be enough to match the hydrogen pressure and diameter of the outlet nozzle. Therefore, "if only it was" I do not recommend you to do it, but only if you really need it.
Thank you for visiting bip-mip.com
- DIY Chinese LanternIf you are a lover of beautiful crafts and original activities, or you.
- Jewelry jigsaw with your own hands A jewelry jigsaw, having a significant advantage over an ordinary jigsaw, can come in handy.
- Do-it-yourself jigsaw For curly cutting in low-melting sheet materials, it is convenient to use this way.
- Spring for side cuttersNippers, secateurs or metal shears are much more convenient to use.
- DIY stencilIf you need to apply a lot of the same type of drawings or inscriptions on.
"Hydrogen water": how businessmen make money on the illiteracy of buyers
Hydrogen water is a new product in the health food market that is gaining popularity among consumers, including through widespread advertising among famous people on social networks. Meanwhile, some users are confused by the very phrase - "hydrogen water". It's like “butter oil” or “meat meat,” they comment. However, the beverage manufacturers claim that regular consumption of this liquid has a rejuvenating effect.The correspondent of Vesti FM Tatiana Grigoryants could not resist and decided to order a couple of coolers.
CORR .: I went to your company's website and saw hydrogen water. And what kind of water is this?
ONLINE STORE MANAGER: Hydrogen water is water that is additionally enriched with hydrogen. By its properties, it is good for health, cleanses the body of all toxins. It is also good for the skin, especially for women, in terms of beauty, that is, it smoothes wrinkles.
In one of the online water supermarkets, they talk about the advantages of a hydrogen drink over regular water. But they warn: in order to achieve the desired effect for health and beauty, you need to drink it for at least two months.
ONLINE STORE MANAGER: It is better to drink it right away, before the hydrogen itself “comes out” of the bottle: it is very light, it “comes out” easily. In general, 2 - 3 bottles are drunk a day.
However, people of science are skeptical about assurances that hydrogen water "improves mood and improves appetite", as well as complexion and so on. The formula of water is H2O, that is, 2 molecules of hydrogen and 1 of oxygen. “How do you technically imagine the“ enrichment ”of water with hydrogen?” Asks the general director of the Main Control and Testing Center for Drinking Water, Candidate of Technical Sciences Yuri Gonchar. If you add another hydrogen molecule to the formula known to every schoolchild, it will no longer be water.
GONCHAR: It is impossible to dissolve it in any significant quantities in water, add it to water. Secondly, it would be completely useless there. And, of course, it would not in any way affect the composition of water, nor its quality, nor the human body. Because in any case, it is already part of the water.
In such beautiful landscapes, when I have a free moment, I involuntarily think about how quickly time flies and at the same time how much has been done in just four years! Many of you ask how it all began;) ... The idea of creating the ENHEL Group was born when I was looking for options to help my beloved grandmother suffering from diabetes. I was lucky and during my internship in Japan I met a doctor close to the Japanese imperial family and technologists working in the Japanese healthcare system, from whom I learned about the miracle of hydrogen water, that it is a real medicine and an elixir of youth ... I was skeptical, carefully studied the entire evidence base and eventually brought the apparatus for enriching water with hydrogen to my grandmother. To our great joy, after a year of daily (1.5 liters each) of using hydrogen water, my grandmother's blood sugar level dropped from 15 to 7, she got into shape, began to feel better, and now she has completely abandoned the pills. After this miracle, which I observe with my own eyes, I was simply obliged to bring this technology to our country. For a moment, from Japan, which, to put it mildly, is extremely reluctant to share its developments with foreigners. As a result of very complicated two-year negotiations, I nevertheless concluded an exclusive contract with the Japanese for the distribution and supply of hydrogen water enrichment devices to Russia, to the countries of the European Union, the CIS and the United Arab Emirates. So in 2014 I founded my company, and called it “ENHEL” - these are Energy & Heath, energy and health, two main values that permeate my life, and which we now carry in the lives of our clients. I am incredibly happy that this is how it turned out and I am charged with tremendous energy from those products (today there are already more than 250 SKU !!! ) that my company produces. Today it is not only hydrogen water, but also cosmetics based on molecular hydrogen, children's products, dietary supplements and youth technologies. And I was very imbued with Japanese philosophy - any situation is neutral, we add colors ourselves, everything is in our hands!
Posted by Julia Энngel ✳️ (@ yulia.enhel) Jun 30, 2020 10:09 am PDT
But even if one imagined, the expert says, that somehow the hydrogen in the water suddenly became “more hydrogenated,” then it would not have any effect on the human body.
GONCHAR: The most important thing is that hydrogen is the most abundant element in the Universe; it is found almost everywhere. But for a person, it is absolutely useless and has no value outside of connections. That is, its most important purpose for the human body is in the form of compounds in the composition of the acid, in the composition of water. Absolutely buttery oil - like sunflower oil without cholesterol or like non-GMO water. This is a standard trick for getting people to pay big money for nothing. Just for the water.
Or, as the people say, for air! Meanwhile, this "hydrogen water" is not cheap. The average price of a bottle weighing 0.25 grams is 250 rubles. If we take into account the recommendations of a consultant girl from the store, who insists that you need to drink “hydrogen water” at least 2 bottles a day, then this turns out to be 500 rubles a day, 15,000 rubles a month, and 180,000 a year. “To save money” there are special devices for enriching ordinary water with hydrogen. Its price reaches several hundred thousand, but you can buy a portable one - it is compact and inexpensive. And it costs “nothing at all” - 35,000. Only from the tap, water cannot be poured into it, they warn in the online store.
ONLINE STORE MANAGER: It is not recommended to pour the water from the tap there, because there is a lot of chlorine. Well, you yourself know what kind of tap water we have. In general, some customers order a separate 19-liter bottle from us at home. And they drink and cook on it. And someone buys a portable device.
The device can be “charged” with plain water, which is not enriched in anything, say the sellers. And it is better to buy liquid in the store where the device for its enrichment was purchased. Or the enrichment of water tycoons ...
Water burner - miniature autogen
The principle of hydrogen production by electrolysis of an aqueous alkali solution is used. Due to the small outer dimensions of the electrolyzer, it will also find a place on a small work table, and the use of a standard rectifier as a power supply unit for recharging batteries facilitates the manufacture of the installation and makes it safe to work with it.
The relatively small, but quite sufficient for the needs of the modeller, the productivity of the apparatus made it possible to extremely simplify the design of the water seal and guarantee fire and explosion safety.
Electrolyzer device
Between the two boards, connected by four pins, there is a battery of steel plate-electrodes separated by rubber rings. The inner cavity of the battery is half filled with an aqueous solution of KOH or NaOH.
A constant voltage applied to the plates causes electrolysis of the water and the evolution of hydrogen and oxygen gases.
This mixture is discharged through a PVC tube put on the fitting into an intermediate container, and from it into a water seal. The gas that has passed through the mixture of water and acetone placed there in a ratio of 1: 1 has the composition necessary for combustion and, discharged by another tube into the nozzle - a needle from a medical syringe, burns out at its outlet with a temperature of about 1800 ° C.
Electrolyzer composition:
1 - insulating PVC tube 10 mm, 2 - M8 stud (4 pcs.), 3 - M8 nut with washer (4 pcs.), 4 - left board, 5 - M10 plug-bolt with washer, b - plastic. tina, 7 - rubber ring, 8 - fitting, 9 - washer, 10 - PVC tube 5 mm, 11 - right board, 12 - short fitting (3 pcs.), 13 - intermediate tank, 14 - base, 15 - terminals, 16 - bubble tube, 17 - needle nozzle, 18 - water seal housing.
I used thick plexiglass for the electrolyzer boards.This material is easy to process, chemically resistant to the action of the electrolyte and allows you to visually check its level in order to add distilled water through the filler hole if necessary.
Do It Yourself (Knowledge) 1999-03, page 143
dry in the oven after the loaves. When completely dry, grind in a mortar or grind in a coffee grinder, sift through a fine sieve. Put one glass of honey on the stove, boil red-hot, when browned, add 1 glass of ground or crushed mustard, dilute with boiled and cooled vinegar, stir until smooth and immediately cork.
Mayonnaise
Provencal. Egg yolks - 3 pcs., Ready-made mustard - 5 g, salt - 7 g, sugar 10 g, refined vegetable oil - 400 g, vinegar 3% - 50 g.
Release raw egg yolks into a bowl, put prepared mustard, salt, sugar and stir thoroughly.
Then pour in vegetable oil in a thin stream, continuously stirring the mass so that the yolks have time to combine with it. Pour vinegar into the sauce and stir.
Natural mayonnaise sauce is used mainly for dressing cold vegetable side dishes. If sour cream and Yuzhny sauce are added to mayonnaise, then vegetable, meat and fish salads are seasoned with them.
Mustard dressing is prepared from mayonnaise, 2% vinegar, salt, ready-made mustard, pepper and sugar, which is moistened with cold vegetable garnishes, herring and added to the vinaigrette.
2nd recipe. In a deep plate, using a wooden spatula (a spoon is worse, but a broom is not good), grind the raw yolk, salt, sugar and ready mustard into a homogeneous mass. Then gradually rub vegetable oil into this mass in a circular motion as follows - first adding in drops, and then in a very thin stream. Each next drop of vegetable oil can be added only after the previous one is completely combined with the yolk mass.
When all the oil is combined, you should get a homogeneous thick yellow mass. Now you can pour in the vinegar, and the mayonnaise will turn white immediately. If it is prepared for children, then instead of vinegar, it is better to add sour cream.
For 1 yolk - a pinch of salt, 2 pinches of sugar, 1 / 2-1 tsp. ready-made mustard, 2.5 g of 3% vinegar or sour cream, 125 g of vegetable oil.
Question: Dovnorovich E.S., Murmansk
I am wondering how to ensure maximum safety when working with a hydrogen-oxygen burner?
Answer:
E. V. KUBASOV, Naberezhnye Chelny
On the safety of a hydrogen-oxygen burner
Dovnorovich E.S. asks, apparently, about such an apparatus in which hydrogen and oxygen are obtained by electrolysis of water, with NaOH or KOH dissolved in it for electrical conductivity.
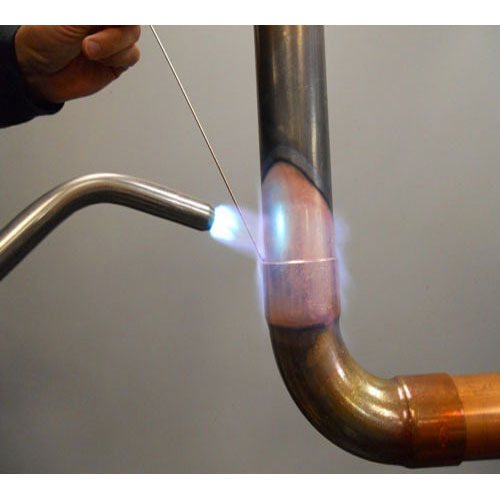
Several years ago I made such a device for my work and have some experience in handling it.
A hydrogen burner in a home workshop eliminates many of the problems associated with the use of a thin high temperature torch. It is especially good for jewelry work related to brazing with a melting point of 600-900 ° C. The undoubted advantages include constant readiness for work, ease of flame adjustment, the absence of any scarce fuel (gas, for example), the optimal constant composition of the combustible mixture (there are always two hydrogen atoms and one oxygen atom in water), the absolute absence of any odor and soot (the combustion product of the mixture is water). The latter is a very important circumstance for a master who has equipped himself a workshop at home. The only drawback is that if certain conditions and operating rules are not observed, the installation is explosive. The thing is that, unlike other burners - gas, gasoline, acetylene, in which the mixing of combustible vapors and oxygen occurs directly in the combustion zone, in a hydrogen-oxygen plant a mixture of gases in the required proportion is formed in electrolysis
141
Hydrogen burner: device, principle of operation, how to do it yourself
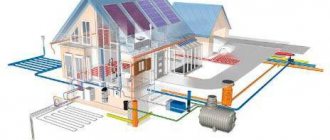
Many are accustomed to believe that natural gas is the most affordable and economical fuel. But it turned out that this product has a good alternative - hydrogen. It is obtained by splitting water. The initial component for obtaining such fuel is obtained free of charge. A DIY hydrogen burner for a heating boiler will help you save a lot and not think about going to the store. There are special rules and methods for creating a technical installation designed to generate hydrogen.
How is hydrogen produced?
Information on hydrogen production is often given by chemistry teachers to children in high school. The method of extracting it from plain water is called electrolysis in chemistry. It is with the help of such a chemical reaction that it is possible to obtain hydrogen.
The device, simple in design, looks like a separate container filled with liquid. There are two plastic electrodes under the water layer. An electric current is supplied to them. Due to the fact that water has the property of electrical conductivity, a contact is built between the plates with minimal resistance.
The current passing through the created water resistance leads to the formation of a chemical reaction, as a result of which the required hydrogen is produced.
At this stage, everything seems very simple - all that remains is to collect the resulting hydrogen in order to use it as a source of energy. But chemistry cannot exist without small details. It is important to remember that if hydrogen combines with oxygen, an explosive mixture is formed at a certain concentration. This state of substances is considered critical, which limits a person in creating the most powerful home-type stations.
The device and principle of operation of the hydrogen generator
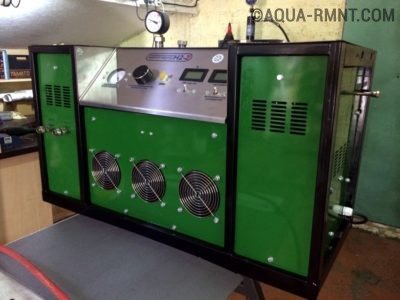
The factory hydrogen generator is an impressive unit
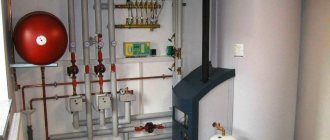
It is beneficial to use hydrogen as a fuel for heating a country house not only because of its high calorific value, but also because no harmful substances are emitted during its combustion. As everyone remembers from the school chemistry course, when two hydrogen atoms (chemical formula H2 - Hidrogenium) are oxidized by one oxygen atom, a water molecule is formed. This produces three times more heat than the combustion of natural gas. We can say that there is no equal to hydrogen among other sources of energy, since its reserves on Earth are inexhaustible - the world ocean is 2/3 of the chemical element H2, and in the entire Universe this gas, along with helium, is the main "building material". There is just one problem - to obtain pure H2, you need to split the water into its constituent parts, and this is not easy to do. Scientists have been looking for a way to extract hydrogen for many years and settled on electrolysis.
How does a hydrogen burner work?
To create hydrogen-powered generators with your own hands, the classic Brown installation scheme is most often used as the basis. An electrolyzer of this type has an average power and includes several groups of cells, each of which, in turn, has a group of plastic electrodes. The power of the created installation will depend on the total surface area of the plastic electrodes.
The cells are installed in a container that is qualitatively protected from external factors. On the body of the device, special nozzles are fixed for connecting a water main, hydrogen output, as well as a contact panel that acts as an electric current supply.
A self-made hydrogen burner according to Brown's scheme, in addition to all of the above, includes a separate water seal and a check valve. With the help of such parts, complete protection of the device from the release of hydrogen is achieved. It is this scheme that many craftsmen use when creating a hydrogen installation for heating a home area.
The principle of operation of forced draft burners
They are used in boilers with closed combustion chambers. The difference between forced draft burners and atmospheric counterparts is that the air for preparing the flammable mixture is supplied not naturally, but forcibly, using a fan. Therefore, boilers equipped with such burners are also called "turbo" or blast.
They provide for the stabilization of the "blue fuel" pressure, and therefore the influence of external factors is completely leveled. As well as "flame separation" is excluded, which is typical for atmospheric models when it rises sharply.
Hydrogen station for home use
How to make a hydrogen burner with your own hands? This question continues to be the most popular among owners of private houses who are trying to make a reliable and high-quality heating source. The most common way to create such a device is the following option:
- pre-prepare a sealed container;
- plate or tubular electrodes are created;
- the design of the device is planned: a method of controlling it and equipping it with current;
- additional modules are prepared for connection to the device;
- special parts are purchased (fasteners, hoses, wiring).
Of course, the master will definitely need tools, including special devices, a frequency counter or an oscilloscope. Once all the tools and materials are ready, the master can move on to creating a hydrogen heating burner for home use.
Device creation scheme
At the first stage of creating a hydrogen burner for heating a house, the master needs to make special cells designed to generate hydrogen. The fuel cell is distinguished by its completeness (slightly less than the length and width of the generator body), so it does not take up too much space. The height of the block with electrodes inside reaches 2/3 the height of the main building, into which the main structural parts are installed.
The cell can be created from plexiglass or textolite (wall thickness varies from 5 to 7 millimeters). For this, the textolite plate is cut into five equal parts. Next, a rectangle is formed from them and the borders are glued with epoxy glue. The bottom of the resulting shape should remain open.
It is customary to create a fuel cell body for a hydrogen heater from such plates. But in this case, experts use a slightly different assembly method using screws.
On the outside of the finished rectangle, small holes are drilled for holding the electrode plates, as well as one small hole for the level sensor. For a comfortable release of hydrogen, an additional hole 10 to 15 millimeters wide is required.
Platinum electrodes are inserted inside, the contact tails of which are passed through the drilled holes on the upper part of the rectangle. Next, a water level sensor is built in at around 80 percent of the cell filling. All free holes in the textolite plate (excluding the one from which hydrogen will come out) are filled with epoxy glue.
Generator cells
Most often, when creating a hydrogen generator, a cylindrical form of module design is used. The electrodes in this design are made according to a slightly different scheme.
The hole from which the hydrogen comes out must be additionally equipped with a special fitting. It is fixed with a fastener or glued. The finished hydrogen generation cell is built into the body of the heater and sealed from the top (in this case, you can also use epoxy resin).
Instrument body
A hydrogen generator housing for home use is fairly straightforward. But using such a design for high-power stations will not work, since it simply will not withstand the applied load.
Before installing the finished cell inside, the case should be well prepared. For this you need:
- create a fluid supply in the lower part of the body;
- make the top cover equipped with convenient and reliable fasteners;
- choose a good sealing material;
- install an electrical terminal block on the cover;
- equip the cover with a hydrogen collector.
Final stage
At the end of the work, the master will be able to get a high-quality and reliable hydrogen generator for the heating system of a private house. Further, only the final touches will remain:
- install the finished fuel cell in the main body of the device;
- connect the electrodes to the terminal block of the device cover;
- the plug installed on the hydrogen outlet should be connected to the hydrogen manifold;
- the cover is placed on top of the device body and fixed through the seal.
The hydrogen generator is now fully operational. The owner of a private house can safely connect water and additional modules for comfortable heating of a private house.
Rules for using the device
A hydrogen jewelry burner for home should have additional built-in modules. Of particular importance is the water supply module, which is combined with a water level sensor built into the hydrogen generator itself. The simplest models are a water pump and controller. The pump is controlled by the controller through a sensor signal depending on the amount of liquid in the fuel cell.
Auxiliary elements are very important for any heating design. Without automatic control and protection modules, a hydrogen-based generator is prohibited and even dangerous to use.
Experts advise purchasing a special system that regulates the frequency of the supplied electric current and voltage level. This is important for the normal functioning of the working electrodes inside the fuel cell. Also, the module must have a voltage stabilizer and overcurrent protection.
The hydrogen collector is a tube in which a special valve, a pressure gauge and a check valve are built. From the collector, hydrogen is supplied to the room through a special check valve.
The pressure gauge and the hydrogen manifold are very important parts in the hydrogen generator, with the help of which the gas is evenly distributed throughout the room and the overall pressure level is controlled.
Any consumer should remember that hydrogen remains an explosive gas with a high combustion temperature. It is for this reason that it is forbidden to simply take and fill the structure of the heating device with hydrogen.
Burners for lampwork - what are they, where to get them and how to make them yourself. Part 2
Looking for warmth
“1200 degrees Celsius? Isn't that enough? The glass starts to melt at about six hundred degrees! " - the most courageous and knowledgeable will say, and they will be right. But in the case of lampwork, not only the temperature is important, but also the characteristics of the flame itself: its volume or the so-called tunnel, the temperature distribution in the torch and the gas composition of the torch, which determines the oxidizing or reducing flame.
Glass flows lazily and slowly if not heated properly. In addition, it must be heated evenly, otherwise the bead may turn out to be uneven or not glossy. However, there is an excuse for the slowness of the glass flow - the creation of a bead is a leisurely affair. But uniform heating in a sufficient volume of the flame of the desired temperature and correct, in terms of the relative volume of the oxidizing and reducing zone, the composition of the torch are mandatory conditions. Therefore, we are looking for burners with a high combustion temperature, above 1200 degrees and with a long and voluminous torch, in which the combustion products are highly heated, as a result of which the flame has a large hot area of the oxidizing flame.
The air contains not too much oxygen, which supports combustion, only 20 percent by volume.Everything else is nitrogen, argon, carbon dioxide, and other gases. So it is they who are so inert that, without entering the combustion process, they do not allow the flame to heat up more, simply flying by and taking away heat. Therefore, atmospheric burners are not that hot. And, other things being equal, the burner will be hotter, in which the most complete combustion of fuel occurs, which is achieved by the stoichiometric (optimal), or close to it, the gas / air ratio (atmospheric oxygen).
The gas / atmospheric oxygen ratio depends mainly on the burner design, well, and a little on how much the gas supply valve is open (Do not forget about the Venturi effect from the first part of the article). The problem of imperfect design can be solved by making everything better and more accurate, but the combustion temperature can be drastically raised only by using another fuel, not just propane.
A practical solution to the problem is to use burners on MAPP gas.
MAPP is a mixture of liquid gases, methylbutcetylene, Propadien and Propana. MAPP has a high specific heat of combustion (J / kg) in comparison with propane and a high combustion temperature, which can reach 2927 degrees Celsius.
The gas pressure in the MAPP cylinders is significantly higher, in comparison with tourist propane cartridges, of the order of 9-10 atmospheres against 3 atmospheres of propane. Accordingly, at low temperatures, when the propane cartridge will no longer give any intelligible pressure, the MAPP gas cylinder will work.
The mass of gas in a fully filled cylinder is 400-450 grams, depending on the manufacturer.
MAPP gas cylinder, general view. A shock-absorbing deforming base cap is welded to the bottom of the cylinder.
MAPP gas cylinder, top view.
- Threaded fastener, fitting type CGA600.
- Polyethylene guide, rubber o-ring and shredder valve for gas outlet.
- Safety valve, for emergency pressure relief (just in case)
Guide and O-ring.
Shredder valve
There are many models of atmospheric burners for MAPP gas. Among them there are general-purpose burners that have a long continuous operation time and special-purpose burners designed for brazing copper and brass with high melting temperatures (760-950 degrees Celsius), which have a continuous operation time limited to 15-20 minutes. They do not have passive cooling of the nozzle and their design has a significant drawback - the nozzle heats up very much, since combustion partially occurs inside it. The flame of general purpose burners is much quieter, more uniform and has relatively large laminar (non-swirling) flow zones, while specialty burners have turbulent (swirling) flames. Due to the vortex movement of the gas-air mixture, air is sucked in in a larger volume, which leads to a more complete combustion of the gas, and, accordingly, to a greater heat release. But the tunnel, that is, the area of calm volumetric flame is absent, the burner heats up, as it were, pointwise.
Swirl flame burners are absolutely not suitable for lampwork - and the continuous operation time is too short, and the flame is short.
Vortex burner from Bernzomatic. Pay attention to the long and narrow nozzle, in which the elements are installed that cause the vortex flow of the gas-air jet.
I use a general purpose burner from Bernzomatic, which will be discussed later.
Burner Bernzomatic for gas MAPP.
- Flame diffuser with air radiator.
- An ejector tube (see part 1 of the article).
- The base of the burner, in it a nozzle, an adjusting valve, a socket CGA600 for attaching to a cylinder.
- Needle and stem of the adjusting valve with a handle (handwheel).
- Sealing gasket in the socket.
- The most interesting thing about the burner is a pressure reducing throttling valve to maintain a constant gas pressure in the burner, it is screwed into the socket.When the burner is screwed onto the cylinder, this valve, pressing on the stem of the Schredder valve in the cylinder, opens the gas.
Burner jet close-up. Hole diameter less than 0.1mm.
Channels inside the flame diffuser.
Flame splitter, inside view.
Flame divider, front view.
Pressure reducing valve.
Copper filter inside the valve.
Valve inlet.
The burner is screwed to the cylinder, the tap opens, the flame is ignited.
Burner flame Bernzomatic. Flame splitter work.
The flame of a Bernzomatic burner, colored by sodium ions during glass melting. Pay attention to the length and uniformity of the temperature zones. The full length of the torch is 13-14 cm.
Winding a bead in the flame of a Bernzomatic burner.
Result
These burners are used by some lampworkers when working outside the workshop (when conducting field workshops).
The duration of work on one initially full cylinder is from 6 to 2 hours, depending on the gas consumption.
It is already quite possible to use such a burner for work. It gives a high temperature, up to 2000 degrees Celsius and, due to certain design features, forms a flame with a fairly wide and long tunnel.
Burner advantages:
- On it, you can already get a pretty decent result.
- Low cost (2500-1500 rubles, depending on the store), coupled with a very high quality workmanship.
- Ease of use, mobility.
Disadvantages:
- Relatively expensive gas. One cylinder costs from 450 to 750 rubles. Chinese, as in the photo above, just 450-500 rubles.
- It is quite a real opportunity to burn some capricious glasses to stains of the restored pigment.
- And, nevertheless, the temperature is still insufficient for sodium glasses (such as bottle and window glasses).
To be continued…
How to determine the quality of the installation?
Creating a high-quality and safe heating system for your home on your own is a difficult task that not everyone can cope with. For example, even when considering the metal of which the tubes of the device and the electrode plates are composed, you can already face a lot of difficulties.
The service life of built-in electrodes directly depends on the type of metal and its basic properties. Of course, you can use the same stainless steel, but the operation of such parts will be short-lived. The temperature of the hydrogen burner should be around 5000 K.
Measurements are also of particular importance. All calculations should be carried out as accurately as possible, taking into account the required power, the quality of the incoming water and other criteria. If the size of the hole between the electrodes does not match the calculations, then the hydrogen generator may not start at all.