Heating devices that generate heat due to the combustion of fuel are not able to work normally without a chimney system or simply a chimney. Through the chimney, toxic combustion products are discharged into the atmosphere, which are dangerous to human health and life. However, in the chimney, together with the exhaust gases, a rather large amount of useful heat is carried away, which could still serve to heat the premises. In order to prevent precious heat from leaking into the chimney, you can install a special heat exchanger, which significantly increases the efficiency of the heat generating device.
Working principle and design
Currently, there are different options for chimney heat exchangers, the design and principle of operation of which are generally similar. The heat exchanger consists of a hollow body with inlet and outlet pipes. A "brake" mechanism is mounted in the casing for the exhaust gases. Typically, this is a system of axle-mounted notched valves. The dampers can be rotated, creating a zigzag chimney of different lengths. Adjusting the valves makes it possible to set the most effective ratio of heat exchange and draft in the chimney, while not violating safety standards during operation. There are also simpler models of heat exchangers, without a variable valve system.
The principle of operation of a furnace with a heat exchanger
Three options will be considered below:
- internal coil;
- external tank;
- located on the chimney.
Internal coil
Heat exchangers for a bath of this type are distinguished by the fact that they are mounted in a specially designated place in the furnace. Most often it is made of steel pipe and installed so that it is not directly affected by the energy of the flame. Moreover, it does not enter the zone with the maximum temperature. The best option is to install the tank in the path of the smoke. This allows you to increase the life of the equipment.
The advantage of the internal coil is good heat saving. The water will be heated while the steel or brick walls are heated. On the body of the sauna stove there are connecting pipes to which the elements of water heating and piping to the remote tank are connected. This option will heat the liquid much faster than other options, but should not be used for small ovens. The efficiency will gradually decrease due to the rapid escape of heated gases through the chimney.
The internal coil effectively shows itself in brick sauna stoves, which have several strokes. Thus, high-quality heating of the dressing room and shower is achieved.
External tank
A similar container, made of stainless steel, can be located in the immediate vicinity of the oven. Additional heat energy will come from infrared radiation, and the water will be able to heat up in the tank faster. The advantage is the ease of installation.
The disadvantage is the poor transfer of heat energy to the steam room. In addition, cold water is constantly required to refill the container.
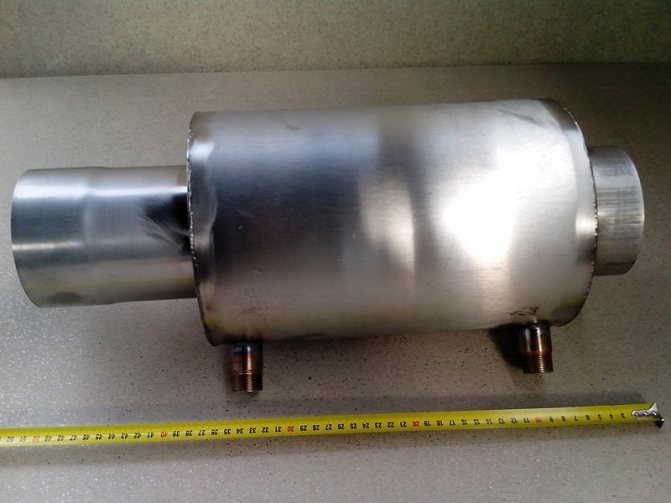
Chimney heat exchanger
According to the principle of operation, this option is the most profitable. The minimum efficiency of the unit is not less than 60%. High levels of energy efficiency are achieved due to the fact that the tank does not affect the correct operation of the sauna stove. Heating processes take place after fuel combustion, directly with exhaust gases.
Most industrial manufacturers of sauna stoves with heat exchangers use this method of heating water.The installation of the tank is easy, the only drawback is its cumbersome form and the need to constantly top up the water.
What material should be used
It is better to make a heat exchanger for a chimney from food grade stainless steel. Even at high temperatures, the physical parameters of this metal do not change, since the welds are quite strong, and nickel, when reacted with oxygen, creates a protective film that is resistant to acids and salts.
If we talk about the use of zinc, then when heated to 200˚C, it begins to evaporate, and at 500˚C, the concentration of vapors in the air reaches a critical level for humans. But if you have installed galvanizing on the device, and at the same time it does not heat up above 200˚C, then you do not need to worry. And you can use galvanized material, since it enhances the mixing of the air around the device. And although such a heat exchanger is not provided for constant heating of a room, but in order to quickly warm up, for example, a bath or an attic, this is a suitable option.
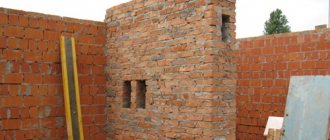
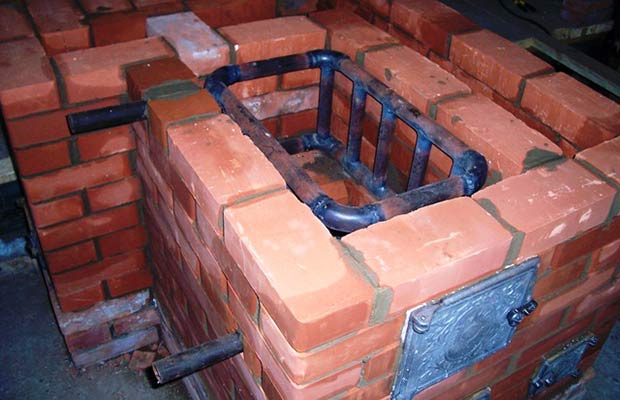
Self-installation of the heat exchanger is quite easy and simple. This device can be mounted on an ordinary stove and then bricked, like the oven itself. Laying bricks can also be performed on the edge - the stability of the structure will not suffer from this.
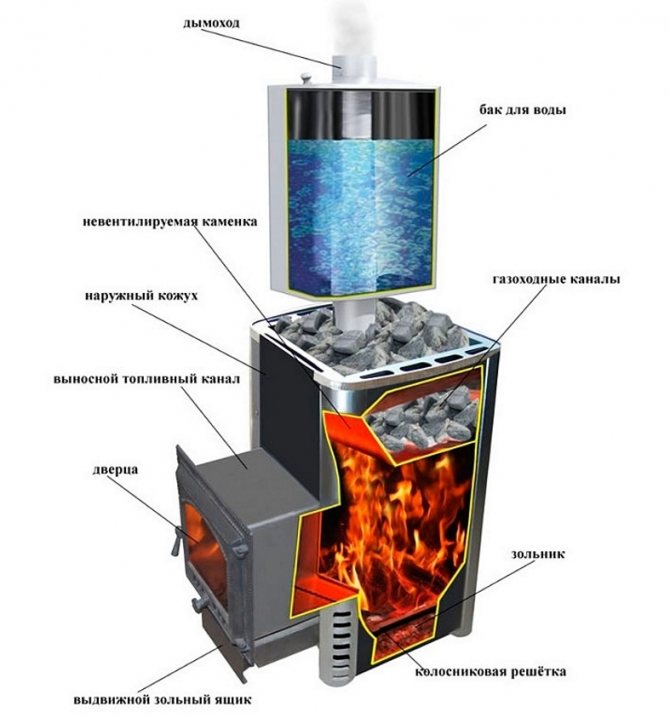
Sauna stove heat exchanger
How did our grandfathers wash in the bath? A large vat for water was embedded in the oven. While the stove was heated, water was heated in a vat, its volume (about 50 liters) was enough for the whole family. Cold water was taken from another container. People took a steam bath and then washed in the same room, which was not very convenient. The steam room was overheated and full of steam, and it was difficult to wash.
Steaming and washing at the same time is not very comfortable
It is not surprising that at present the owners of the baths want to increase the comfort of taking water procedures and separate the process of vaping and washing in different rooms.
The steam room, separate from the shower room, is aesthetic and comfortable
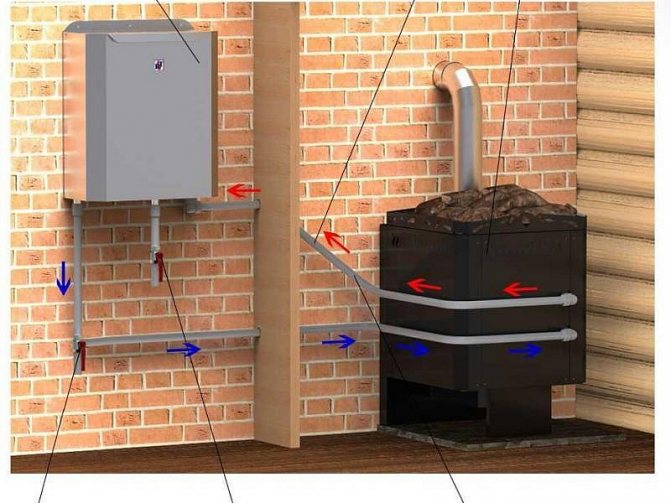
Issues with warm water are solved in two ways: using a separately installed electric boiler and using a heat exchanger that takes heat from the stove. We will not consider the first method, there is nothing interesting and complicated in it. In addition, a significant amount of electrical energy is consumed to heat a large amount of water, and its cost is currently constantly increasing.
Water heater in the bath
Let's talk about heat exchangers, give step-by-step instructions for the construction of some of them and practical advice on engineering problems of heat exchangers.
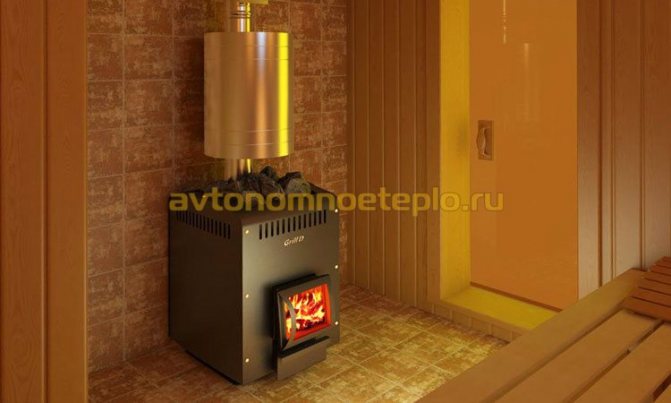
Sauna stove with heat exchanger
Heat exchanger in a sauna oven
The device of the furnace with a heat exchanger has proven itself so well that various options for the design of heat removal have appeared, with varying degrees of efficiency. The most common:
- Classic coil.
- Built-in flat heat exchanger (similar to two hollow trays connected to each other).
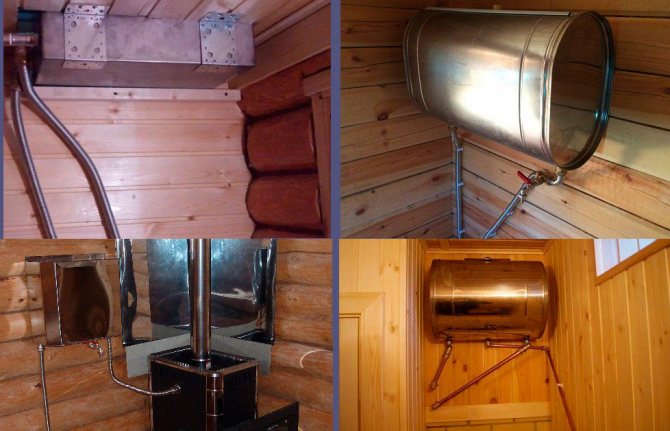
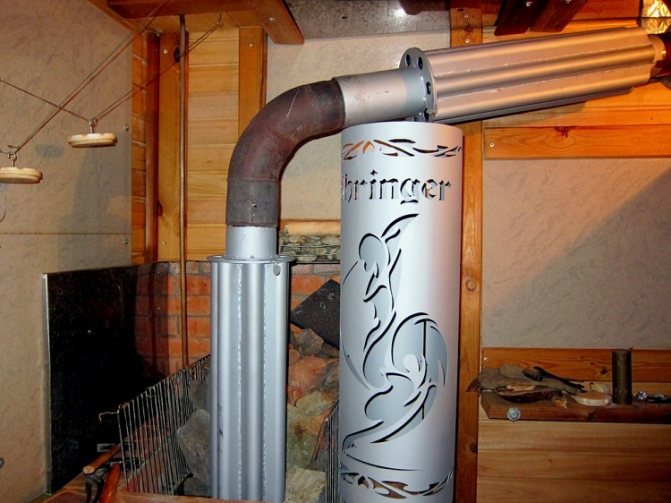
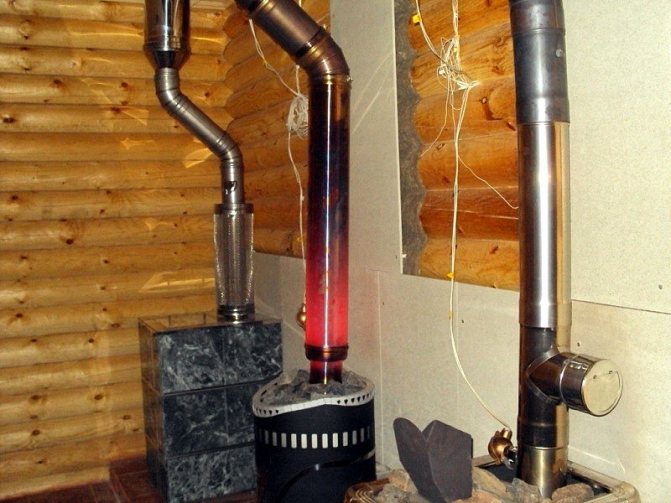
- Samovar heat exchanger installed on the chimney.
The water jacket surrounding the combustion chamber is used extremely rarely and is found in only 1-2 models of factory-made furnaces.
Meanwhile, sauna stoves with a heat exchanger have become the subject of consumer discussions. Some argue that the application is not practical, others, on the contrary, indicate convenience and comfort during operation.
What does a built-in or samovar heat removal device give?
- A heat exchanger in a sauna stove is needed to obtain hot water for washing. This task was the main one in the design of the structure.
- The possibility of heating in a bath from a stove with a water circuit - in fact, a metal stove becomes a kind of heating boiler.During the furnace, enough heat is generated to warm up the coolant and heat the required volume of DHW water.
The principle of operation depends on the device used. Efficiency is determined by several parameters:
- Reliability.
- Sufficient heat dissipation.
- Ability to work without using a heat exchanger.
By its design, it is possible to divide all water heating devices into built-in and built-on ones (samovar type).
Stoves for a bath with a water circuit for heating and the needs of hot water supply began to appear after ordinary water heat generators received good reviews. By its design, furnace equipment with an integrated water heating circuit is divided into several classes:
- The coil is the simplest device used in classic solid fuel boilers. A bent metal tube is located inside the structure. The shape is different and depends on the features of the internal design of the furnace. The coil is positioned so that the flame does not directly affect it, but heating is carried out by means of flue gases.
- A flat heat exchanger is a more complex device than the previous one. A flat heat exchanger for a sauna stove looks like two hollow plates connected to each other. In terms of thermal efficiency, the design surpasses the coil used in modern models of furnace equipment.
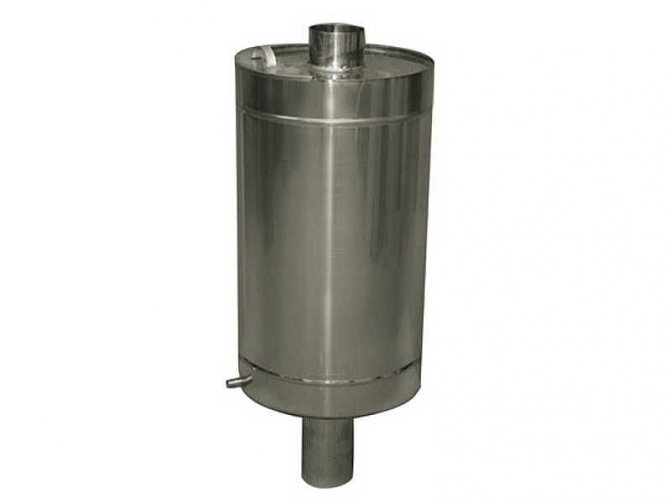
- Built-in tank - a separate container is made in the furnace, installed on top of the combustion chamber. The built-in horizontal heat exchanger heats up quickly and maintains the temperature as long as the oven remains hot.
- Water jacket - represents a cavity surrounding the entire combustion chamber and smoke channels. The design is often used in the production of solid fuel boilers, but has not been widely used in the manufacture of sauna stoves.
The principle of operation of an integrated heat exchanger in a sauna stove is as follows. The spiral or plate is heated by flue gases, the temperature of which reaches 450-500 ° C. When heated, pressure arises, forcing the coolant to circulate in the heating system. In schemes where an indirect heating boiler is used, the DHW is heated by heating heat.
Samovar type
Installing a heat exchanger on a sauna stove is a budget solution to the problem of hot water supply and heating. The hot water device is made in two ways:
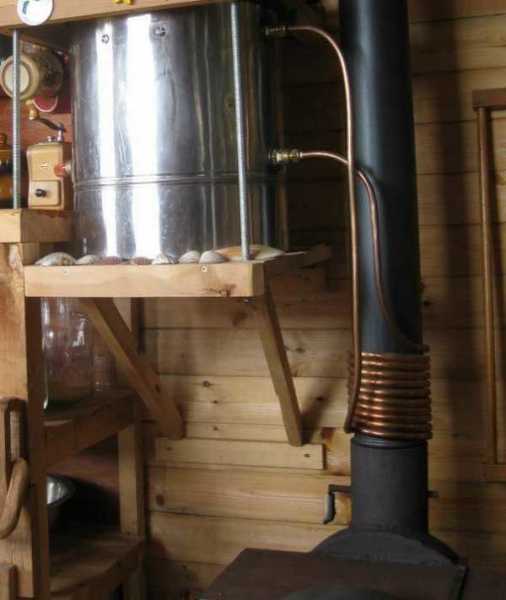
- Coil - a coil made of aluminum or copper is installed on the chimney. For systems with natural circulation, up to a storage tank or water distribution taps, the dimensions of the coil should not exceed 3 m. The optimum dimensions for a heat exchanger with forced circulation are 5 m.
- Samovar-type heat exchanger device - experts agree that it is this design that is optimal for a bath. The hot water for the shower is prepared gradually to prevent the liquid from boiling.
The movement of water in a samovar-type heat exchanger occurs according to natural physical laws. The heated liquid rises upward, pressure is created in the container.
The optimal volume of a samovar-type heat exchanger is chosen so that the water reaches the required temperature after 2-3 hours of intense combustion. The design is optimal for providing hot water supply.
Purpose and features
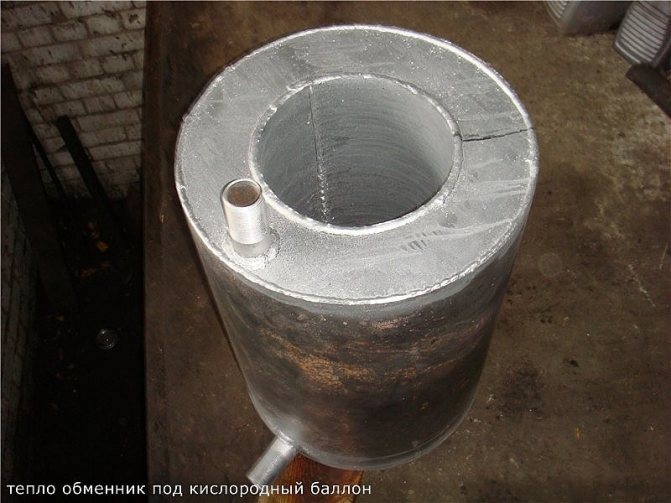
The heat exchanger is designed to take heat from the heated air circulating in the chimney. The design of the device depends on the diameter and shape of the chimney, the material used to create the heat exchanger, the power of the heat-generating device and the heat carrier.
Heat exchangers are classified, depending on the heat carrier, into liquid and air. Air-type devices are the easiest to manufacture, however, they are not the most effective.Such devices require better material and performance, but are more efficient than devices with an air coolant.
How to make a heat exchanger with your own hands
To make a device yourself, you need to decide on its type.
Below you will find instructions for heat exchangers in a hot water bath of two types: near the chimney, inside the stove.
Heat exchanger in the sauna stove near the outlet pipe
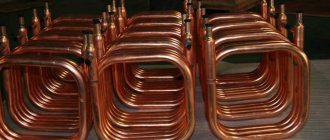
The easiest and most effective way to use copper pipes. Here, the diameter of the chimney is taken into account, relative to which it is necessary to take the length of pipes (up to 2 meters) with a diameter of about 10 mm. The smaller size of the copper fixtures greatly increases the rate at which the water in the tubes boils, and the movement of the liquid is limited. It is recommended to use a 10 mm pipe.
Flared adapters fit at both ends. Flaring is done with special tools. This procedure must be performed carefully. A level surface should be achieved to avoid leaks. Around the chimney, a copper wire is "wrapped" in the form of a stick in, the ends are connected to the water tank. The construction is ready.
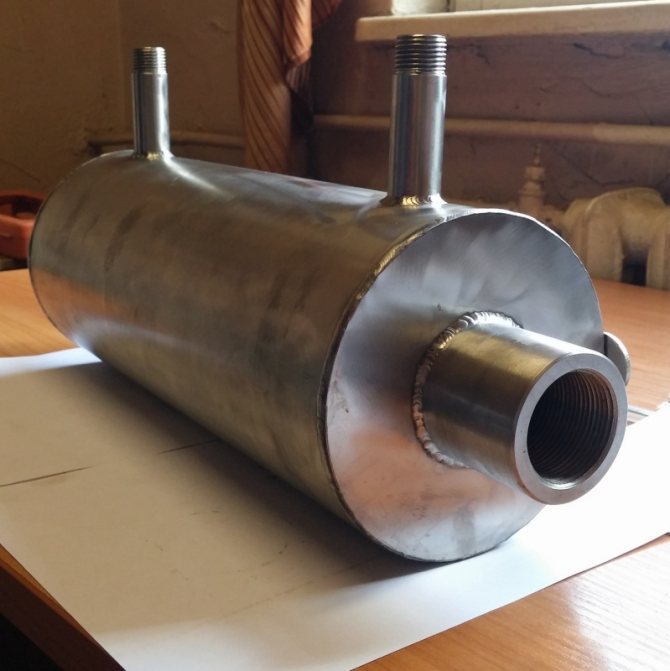
It is more difficult to equip a device with two metal pipes. The first should have a slightly larger size than the chimney, the second should have a diameter 10 cm larger than the first, steel 1-3 mm thick.
A similar heat exchanger for a do-it-yourself bath has the following algorithm:
- two pieces are cut from different pipes, 30 centimeters long. The ends are made even;
- two circles are cut out of a metal sheet, and holes are made with the diameter of the second pipe (smaller diameter);
- a piece is placed in the holes obtained and welded well. The welded seam should not have a lack of penetration;
- holes must be provided in the upper and lower parts for fastening the branch pipes. The entire structure must be sealed.
The device is ready, it remains to attach it to the chimney and make the piping. Use aluminum foil as thermal insulation.
Heat exchanger in the oven
Such units are highly efficient, easy to manufacture and have a simple design. They can be arranged in the form of several tubes or made in the form of a stainless steel tank.
This type of heater begins to be mounted together with the walls of the sauna stove. Its dimensions are selected depending on the dimensions of the main heating equipment. The inlet pipe, designed for the inlet of cold water, is located at the bottom of the structure, and the outlet comes out from above. This solution allows you to ensure the correct circulation of the liquid.
Internal heat exchangers are available in many different sizes, configurations, materials and locations. The optimal solution is selected based on the characteristics of the bath and equipment being arranged.
To create such a heater, you need to use only high-quality components, the welds are made hermetically. At the slightest leak, you will need to disassemble the brickwork.
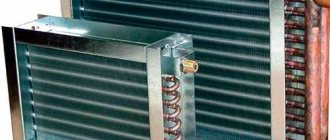
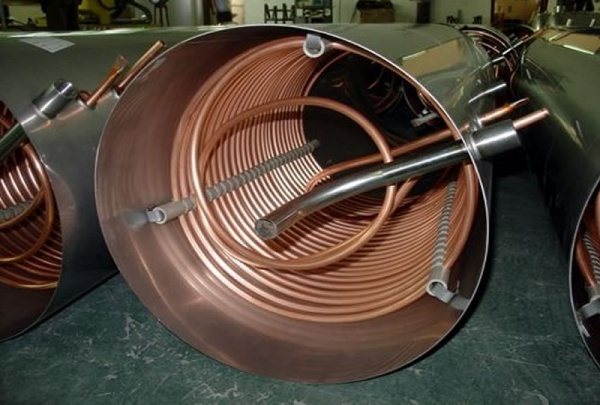
Liquid heat exchanger
The standard heat exchanger used with heat transfer fluid is a metal coil with a high coefficient of thermal conductivity in direct contrast to the inner surface of the chimney. For better heat transfer and safety, the coil is placed in a metal case and well insulated from the inside with a non-combustible insulation, usually basalt wool.
The entire structure is mounted on the chimney section. The ends of the coil are led out through the body of the heat exchanger and connected to the heating system, at the top of which an expansion tank is placed. Annealed copper tube is best for making the coil. In addition, such a heat exchanger, due to its high coefficient of thermal conductivity, will have dimensions 7 times smaller than a device made of steel.
The liquid heats up, and, expanding, rises along the coil, after which it flows through the pipe by gravity to the heating radiator. When it enters the radiator, the heated liquid displaces the cold coolant, which heats up again in the coil. Thus, the natural circulation of water through the system is carried out. To create a circulation of the coolant through the system, it is required to accurately calculate the length and diameter of the coil, maintain the angles of inclination of the supply and return, and much more. The significance of these calculations should not be underestimated, since an inoperative device is simply not as bad as the consequences of a water hammer that can occur when the coolant boils.
However, this type of heat exchanger also has its drawbacks, namely:
- the complexity of calculations and manufacturing;
- constant monitoring of temperature and pressure in the system;
- high flow rate of the coolant caused by the evaporation of liquid from the expansion tank. And if water is used, then if the system is not used in the winter, the liquid must be drained;
- a significant decrease in the temperature of the exhaust gases, which can cause a decrease in thrust and incomplete combustion of the type of fuel used.
However, despite these shortcomings, such a heat exchanger can be made independently by any person who knows how to handle the instrument and has at least school knowledge of physics.


Types of chimney heat exchangers
The main division of such devices is what exactly they heat. There are 2 options:
- Air. Heats up only in the room where the heat exchanger is located.
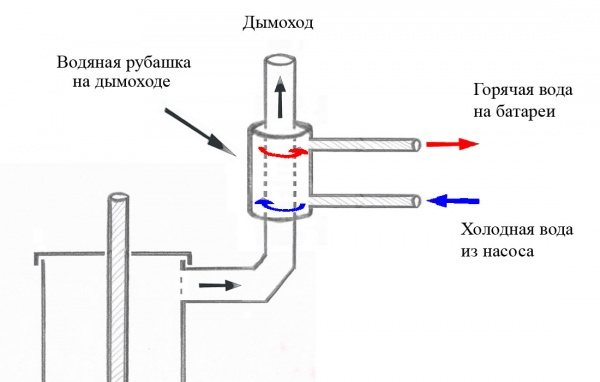
- Water. In this case, the economizer is located on the chimney, and 2 pipes are supplied to it. One at a time, cold water comes in. On the second, the heated one is removed.
Below we will consider the types of such products in more detail.
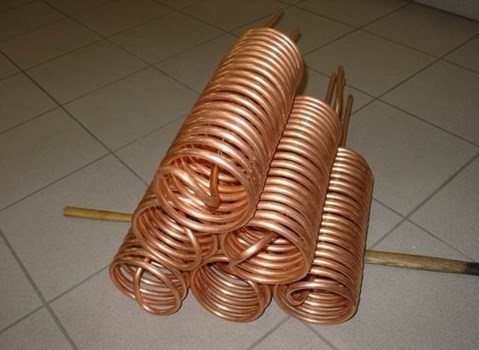
Coil (for heating water) (+ video with a corrugated coil)
The simplest water economizer is in the form of a coil (a pipe “wrapped” around the chimney many times). Water is supplied from one end of the pipe, passes through the coil, and exits from the other end. Heating occurs due to the large contact area of the coil with the hot chimney. The more turns, the larger the contact area, and the better the heating.
It is such a heat exchanger that is easiest to do with your own hands. It is better to use a copper tube for work.
Disadvantages of this option:
- It will not be possible to regulate the temperature of the water.
- It is difficult to calculate how long the coil should be - because the chimney temperature is not constant. Too short a coil - it can break (the water will just boil). Too long will not heat the water normally.
Register (for water heating) (+ video)
Factory product. In fact, this is the same copper coil, but enclosed in an outer casing, and manufactured according to calculations. That is, the length is not chosen at random, unlike a homemade coil.
Also, in register heat exchangers, the copper pipe does not come into contact with the chimney, but passes at a short distance of several millimeters. This reduces the likelihood of water boiling. And the outer casing looks more beautiful in the room, and improves the heating of the water in the coil.
Air heat exchanger
The simplest option is to weld steel pipes with a height of 0.5-1 m around the chimney.
Cold air is "heavier" than warm air, and sinks down. When it comes into contact with the hot pipe, it heats up and rises up, "yielding" from below the place to cold air.
In principle, the air in the room heats up in the same way from the chimney itself. The purpose of the convector (welded around the pipes) is to increase the heating area. The larger the area, the more heat it will give to the air.
In theory, it is possible to create an air heat exchanger by running empty pipes directly through the firebox, or through a chimney inside.But in practice it is harmful because:
- you can worsen cravings if you do it without calculations, with your own hands;
- contamination of the chimney will accelerate, and it will be difficult to clean the soot around the chimney.
There is also a more successful design that allows you to heat not only the room with the boiler, but also adjacent rooms located nearby, through the wall. For this, a closed body is “put on” over the tubes. Bottom - it is open (not deaf, that is, air can flow from below to the tubes). Another option is that there is an outlet from below through which air will enter the inside of the case for heating.
On top of the body, a pipe is diverted to the side (1 or 2 - depending on how many rooms you want to heat from the chimney). She goes through the wall and exits into the next room.
The principle of operation is as follows: cold air enters from below to the pipes heated from the chimney. It takes heat from them, and through a side pipe it enters the room through the wall.
Air heat exchanger
A similar structure, which is installed on the chimney of a heat-generating device, as a rule, consists of a metal case, in which several inlet and outlet pipes are mounted. The principle of operation of this type of heat exchanger is quite simple.
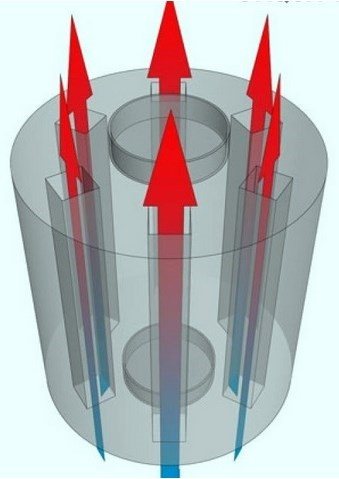
From below, according to the principle of convection, cold air entering the nozzles, after heating, leaves the upper part of the heat exchanger directly into the heated room. This principle of operation makes it possible to significantly increase the efficiency of the heat-generating device and reduce fuel consumption by 2-3 times.
It is quite simple to independently make a heat exchanger for a chimney, having a welding machine, a grinder, metal pipes of various diameters, desire and ability to handle the tool.
Material:
- metal sheet 350x350x1 mm;
- a pipe with a diameter of an inch and a quarter and a length of 2.4 m;
- a piece of pipe with a diameter of 50 mm;
- metal container or 20 l bucket of engine oil.
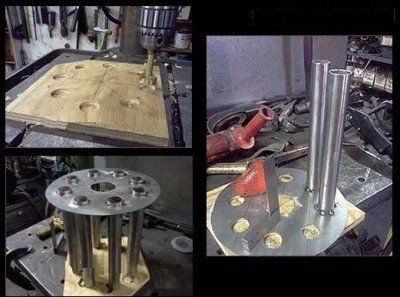
Manufacturing:
- create end parts, for which you need to cut circles from a sheet of metal. It is necessary that the diameter of the plugs corresponds to the diameter of the container prepared in advance;
- in the middle of the plug, a hole is cut out for a 60 mm central pipe;
- mark and cut along the edges of the circumference of the pipe holes in an inch and a quarter;
- there should be two such circles;
- cut a pipe with a diameter of 1¼ with a grinder into 8 equal pipes approximately 30 cm long;
- weld a 300 mm piece of pipe with a diameter of 60 mm to the central hole of the plugs;
- weld 8 sections of 1¼pipe around the circumference;
A similar construction should come out
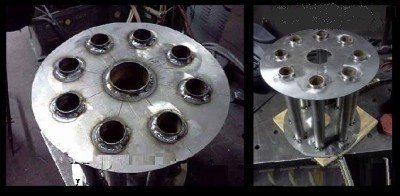
Next, you need to make a heat exchanger body from the prepared container. This will require:
- cut the bottom of the container with a cutting machine;
- make a hole in the center from the sides of the body along the diameter of the chimney;
- it is necessary to weld pipes of the corresponding diameter to the side holes of the body;
- Insert the prepared core into the housing and weld it to the casing. The finished structure must be painted with heat-resistant paint.
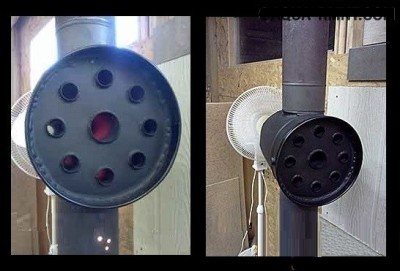
Now you need to install the heat exchanger on the chimney pipe and enjoy the warmth.
You can also watch the video of the whole process of making a heat exchanger with your own hands.


How to make a homemade chimney convector to heat the air? (+ detailed video)
To create the simplest convector that will improve air heating in the same room where the boiler is located, you will need:
- Welding machine.
- At least 8-10 thin steel tubes with a diameter of about 32 mm and a length of about 50-60 cm. Ideally, take food grade stainless steel. Worse, but also galvanized steel will do. In shape - usually take round tubes, but square or rectangular sections are also suitable.
Installation is carried out as follows: these pipes must be welded in a circle around the chimney, as close as possible to the firebox.
What is a chimney brush and how to make it yourself?
How to make a chimney in a garage: rules and instructions
Similar posts
Trumpet on Tin
This type of heat exchanger is quite practical and simple. In principle, the chimney is wrapped in a metal or copper pipe, which heats up constantly and the air moving through it quickly becomes warm. A spiral can be welded to the chimney using semi-automatic or argon welding. You can also fix it with tin, having previously degreased the chimney with phosphoric acid.
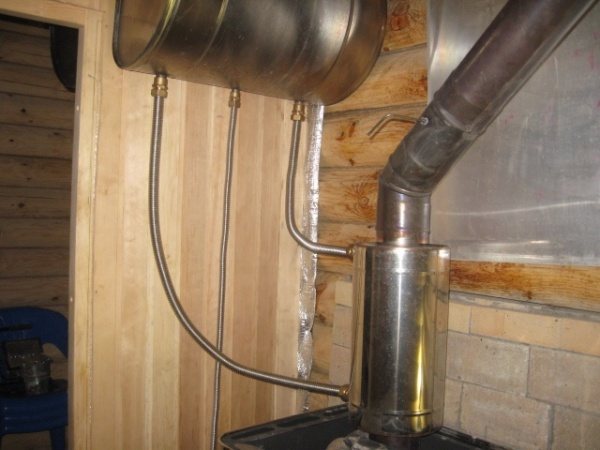
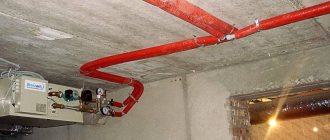
Heat exchanger installation
Many people who assembled the unit with their own hands are wondering how to properly install a heat exchanger for a sauna stove. The maximum effect that can be achieved from the device depends on this procedure. An important point is the mounting height of the water tank, it must exceed the mounting height of the heat exchanger. The installation and installation process should be carried out using metal, or metal-plastic pipes can be used, connected to the main elements of the system.
For everything to be done correctly, the following conditions must be met:
- hot water moves to the main tank at an angle of 30 degrees, if a pump is not provided for;
- the connecting diagram for connecting the heat exchanger of the bath provides for a pipe for supplying cold water, placed below at an angle of 2 degrees;
- there must be a water intake valve on the water tank;
- a tap is provided for draining water from the system;
- fasteners should not provide a tight fixation of pipes to the wall. During the heating process, the material expands, and incorrect fixings can cause an accident;
- the power of all heating equipment must be proportional, previously calculated;
- if the heat exchanger will be mounted on a chimney with a diameter of 115 mm, a lightweight structure should be made;
- at the joints of pipes and units, it is recommended to use seals that can withstand high temperatures. This will prevent fluid leaks.
Particular attention is paid to the material from which homemade or purchased equipment is made. Its main characteristic should be optimal performance at high temperatures. If this condition is not met, you need to select the appropriate material.