Important rules for warming a bath that everyone should know
There are a number of reasons why it is necessary to insulate the bath foundation:
- due to the large temperature difference in winter during the heating of the bath, condensation forms on the inside of the base, which significantly reduces the service life of the structure;
- the soil under the foundation in summer, in the heat, still keeps cool, the foundation heats up only from the outside. Condensation forms from the temperature drop, which will destroy the foundation from the inside all summer;
- in a bath with an uninsulated foundation, the heat quickly disappears and the steam room has to be heated all the time;
- in winter, the heaving of the soil has a destructive effect on the walls of the foundation, insulation will soften the pressure;
- a good layer of thermal insulation will protect the structure from mechanical damage.
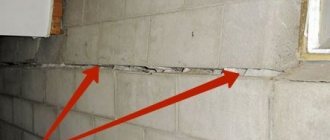
As a result, from constant humidity and pressure, the base will slowly collapse.
It is more effective to insulate the foundation outside the structure.
The basement of the bath can be insulated along the plinth from the outside, from the inside, or from both sides at once. The last method is the most effective, but laborious and costly. Since the bathhouse is associated with temperature extremes, we do not recommend performing only internal insulation. The foundation will freeze and quickly collapse. It is possible to carry out internal thermal insulation only in the most extreme cases, when external insulation is not available for some reason. There will be efficiency from internal thermal insulation, but the foundation will remain unprotected.
When the insulation method has been decided, it is necessary to choose the right material.
The method of insulation depends on the structure of the foundation and on the type of soil on the site. Consider the insulation of the most common types of foundation: tape, monolithic, columnar.
Thermal insulation of the strip foundation immediately solves two problems:
- the impact of the heaving of the soil is reduced;
- heat loss through the walls of the base is reduced.
The work is performed as follows:
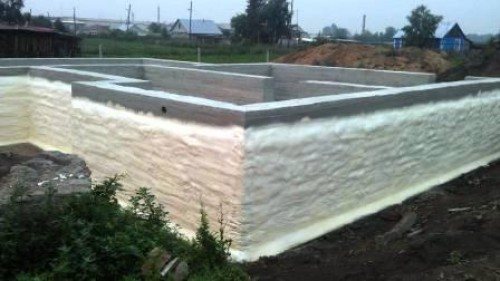
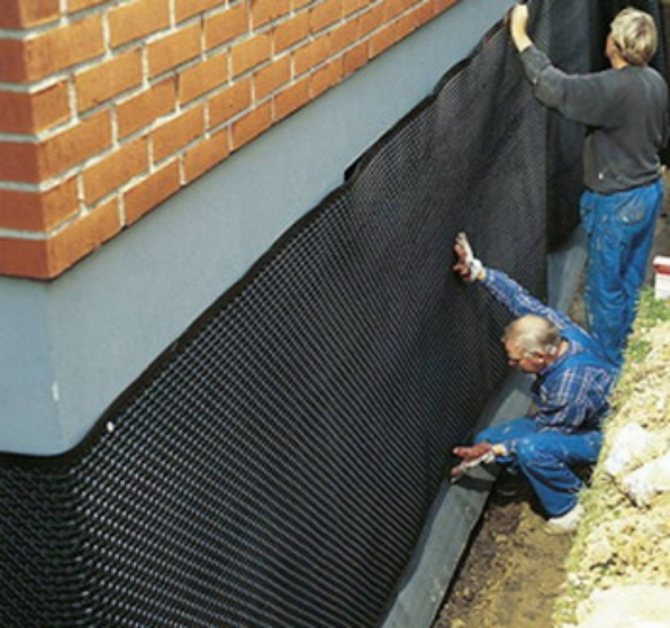
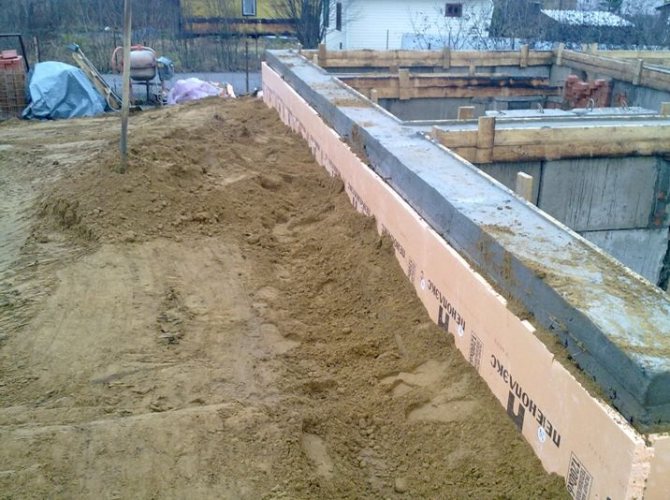
- The foundation is freed from soil around the entire perimeter. We dig a trench with a depth of at least the level of soil freezing and a width of 50 cm.The level of soil freezing can be found at the local geocenter, for central Russia the indicator is 1.5 m.
- A sand pillow of 15–20 cm is filled in. It is necessary to moisten and tamp the sand as thoroughly as possible. It is better to use coarse sand, it goes into the soil less.
- The foundation is coated with bituminous mastic in 2 layers. The waterproofing is allowed to dry.
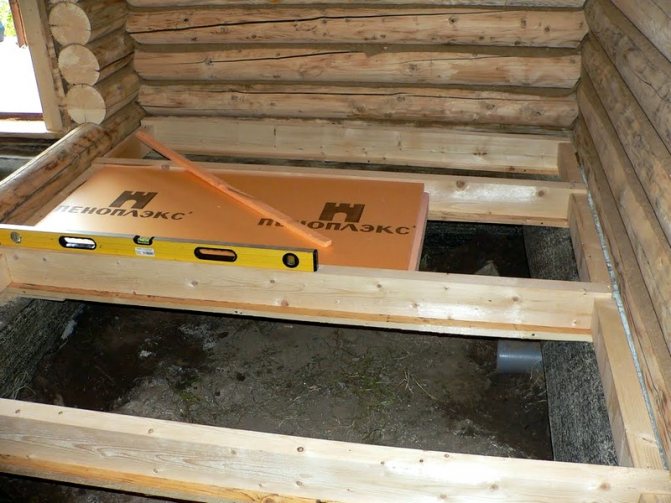
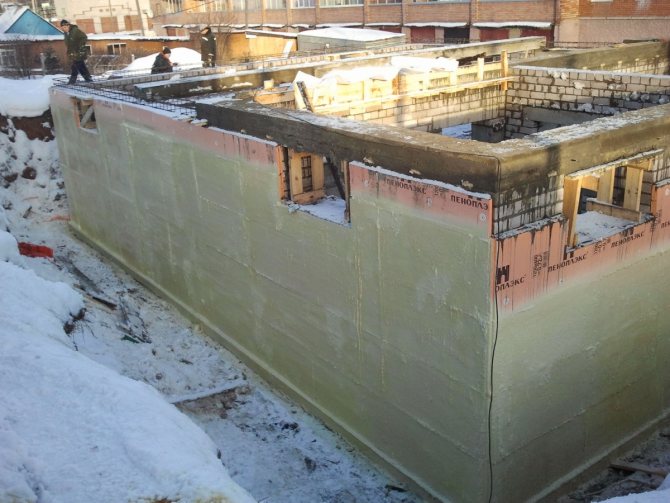
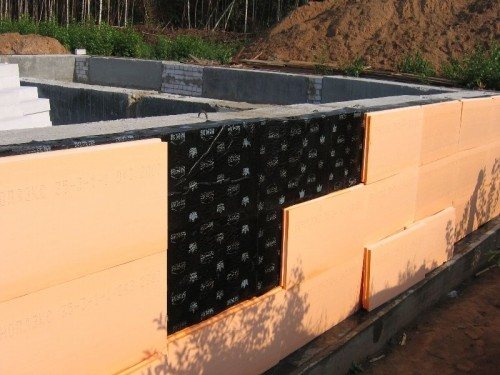
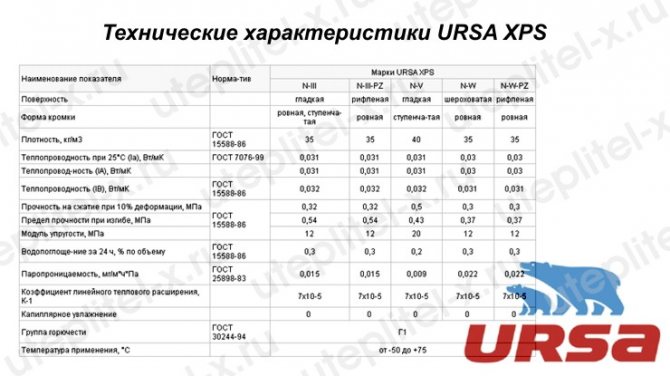
- Insulation is mounted. Its thickness is calculated separately for each region, for central Russia, mineral wool is taken 20 cm, polystyrene 15–20 cm. The seams are foamed with polyurethane foam. It is easier to take polystyrene with L-shaped locks, so the seams will be more tight. Glue the foam on a special adhesive and fungal fasteners.
- At the corners, the insulation is laid in a layer 1.5 times thicker, since the heat loss is the highest there.
- Expanded polystyrene can simply be covered with sand from the side and tamped. Polyfoam and mineral wool must be additionally protected with a 25 cm brick wall.It is simply laid out along the entire perimeter of the base.
- From above, a blind area is made from the basement at an angle of 15 0 from concrete. From above, the blind area can be decorated with ceramic tiles.
The insulation of the strip foundation is ready. It will hold back heat well and will not be affected by soil heaving and moisture. Heat loss in the bath will decrease by 45%.
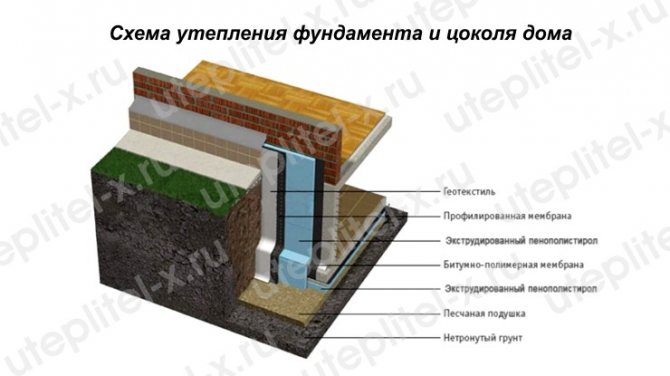
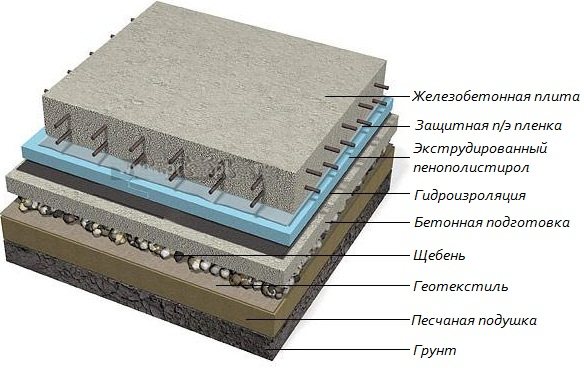
Strip foundation insulation scheme.
If it is impossible to insulate the foundation from the outside, you can perform work from the inside in the same way.
In case of subsiding and silted soils, a monolithic base is selected for the bath. It is already better to lay a monolithic foundation on a layer of hydro and heat insulator. But if the work is not completed, you can insulate the already finished structure.
https://www.youtube.com/watch?v=7mNC4LIX75I
Protection of slab-type insulation from liquid concrete is carried out depending on the type of base reinforcement. when the reinforcement is made with wire and metal rods, a PVC film with a thickness of at least 200 microns is covered over the thermal insulation. All joints are glued with double-sided tape.
If the reinforcement is performed using a welding machine, then a screed no more than 15 cm thick from a weak concrete solution or cement is made over the insulation.
Along the walls, the finished structure is insulated in the same way as the tape.
The most difficult thing is to insulate a columnar foundation. The free space under the bath is ventilated and the floors freeze quickly. Ask how to insulate the foundation of a columnar bath? The next steps:
- A trench 1.5 m deep and at least 50 cm wide is being dug along the walls of the bath.
- A sand pillow is poured onto the bottom, poured with water and rammed.
- A red brick wall is laid out on top in half a stone. The wall should just not reach the lower rim of the bath. This gap is foamed with polyurethane foam.
- The wall is coated with bituminous mastic.
- Further, the work is performed similarly to the insulation of the strip base. During work, the columns must also be closed from the outside with insulation.
The work is laborious and requires at least a week of free time. You will have to work hard, but it will be easier and faster to heat the bathhouse. And the steam room will last longer, which will delight your family. And let the steam be light, and the procedure useful.
Is there a need to insulate the basement of the bath, how justified is this process, will the insulated foundation reduce heat losses? There are actually a lot of questions on this problem, because in the old days no one was involved in the insulation of baths. Everything is so, but in the old days no one thought about it seriously.
So, experts have calculated that up to 20% of thermal energy goes through the floor, and accordingly through the foundation. So much for the unexpected fuel costs. What should be done to nullify this indicator? There are two options: insulate the floor and foundation. And since the topic of our article concerns the foundation, let's talk about how it can be insulated correctly.
It is more effective to insulate the foundation outside the structure.
- Competent calculation. This is the first and most important rule to ensure the most effective insulation result. Only an experienced specialist will be able to correctly calculate the thermal insulation depending on the total area of the bath or sauna, the number of rooms, the building material, the heating system, the number of people who can simultaneously visit the steam room, etc.
- Complex insulation. According to professional builders and connoisseurs of bathing, insulation should be both external and internal. Thermal insulation work begins with insulation of the foundation, walls and roof, and only then you can safely proceed to the internal insulation of the ceiling, walls and floor.
- Effective insulation. The requirements for heaters for baths and saunas are: high thermal insulation properties, durability, resistance to temperature fluctuations and direct exposure to moisture.


Wood pick-up technology
There are several ways to insulate a columnar foundation using a pick-up made of wood:
- Installation of boards vertically.
- Placing boards in a horizontal direction.
- Making a pick from bars or logs.
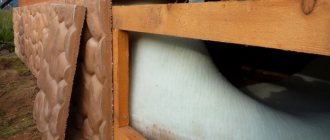
It is possible to insulate the columnar foundation by installing the boards vertically in this way: in a trench 200-400 millimeters deep, dug between the pillars, fine gravel and sand are poured into about one third of its part. A log with a groove is laid in a trench and a similar log is fixed to the grillage. In the grooves between the logs, boards are alternately inserted in an upright position.
To make a pick-up with horizontal placement of boards and insulate the columnar foundation, you need to: dig a trench between the pillars like the previous option. Fasten logs or beams with a groove to the posts. Boards (40-60 millimeters in thickness) are installed in the groove so that the very first bottom board fits on the trench pad, and all other boards would fit on top of it.
On the inside, a wooden plank fence is sprinkled with expanded clay, and its insulation is made.
To insulate the foundation with a log pick-up, logs are laid horizontally between the posts, as in the construction of a house from logs.
You can also insulate the foundation with brick and masonry. If a pick-up is being built from such materials, then you need to dig a trench, which will serve as a sole for laying bricks or stones. The brick is laid on a concrete screed, secured with reinforcement. The thickness of the stone walls is made within 30 millimeters, the brick is placed in 1-1.5 pieces. In order to avoid the occurrence of cracks and gaps between the posts and the masonry, it is not necessary to make a strong adhesion.
In buildings where high pillars are installed (from 0.7 meters), pickups are made of sheet insulation material. To insulate the foundation, a frame profile metal structure of the required section is first attached to the posts. Outside, sheets of corrugated board are hung on it, and from the inside they are insulated with sheets of polystyrene (expanded polystyrene). The gap between the sheets of insulation and the soil is sprinkled with heat-insulating backfill.
It is possible to insulate the finished structure of the filling under the foundation around the entire perimeter with plates of extruded polystyrene foam, which are attached to the outside of the filling with special glue. In this case, the foam plates are tightly adjacent to each other so that there are no gaps between them. Penoplex insulation is considered the most effective method that does not require waterproofing. However, in order to ensure reliable protection of the basement from moisture, it is advisable to provide the foundation structure with a waterproofing coating.
One of the finishing stages of finishing an already built building is the thermal insulation of its foundation, as this ensures comfortable conditions in the house. In solid foundations, the issue of their thermal insulation is solved simply, but in columnar foundations, this causes additional problems and work.
Insulation of the columnar foundation with a pick-up device is the easiest way to solve this problem. What is a pick-up, and how it is performed, we will consider below.
Types of taps for insulating a columnar foundation
Zabirka is one of the basement options, which is an accessory to columnar foundations and performs the function of protecting the space between the building and the ground from rain, snow and wind.
A variety of materials are used for picking up, affecting its structural design and construction technology. Let's decide on all these parameters for each specific option:
Wooden pick-ups. This option, in turn, has several subspecies, namely: made from boards, with vertical or horizontal installation of the latter, and made from logs or timber.
When making a pick with a horizontal arrangement of boards, installation is carried out as follows:
- a trench 200-400 mm deep is dug between the pillars;
- about one third of the depth is covered with sand and fine gravel;
- bars or logs with a groove are attached to the posts;
- boards, 40-60 mm thick, are inserted into the grooves, while the lower board lies on a pillow in the trench;
- then the bottom part, from the inside, is covered with expanded clay or other heat-insulating backing.
When the boards are installed vertically in a pick-up, a log with a groove is laid in a trench made according to the previous version, the second, the same, is attached to the bottom of the building, after which the boards are vertically inserted into the grooves.
In some cases, between the posts, logs are laid horizontally, similar to the construction of a log house.
Drawers made of brick, stone, etc. In the case of building a pick-up from these materials, a trench with a pillow is also needed, which is the sole for its walls. When made of stone, the thickness of the wall of the grout is made within 300 mm, from brick, it is placed in 1-1.5 bricks.
Drawoffs with insulation with heat-insulating sheets. In buildings installed on high pillars (from 0.7 m and above), the insulation of the underground space is performed in this way:
- a frame structure made of steel profiles of various sections is attached to the posts;
- from the inside, sheets of polystyrene, expanded polystyrene or other heat-insulating material are hung on the frame;
- outside, with self-tapping screws, sheets of corrugated board are fastened;
- the gap between the profiled sheets and the ground, from the inside, is covered with heat-insulating material.
With all variants of the manufacture of the filling, ventilation holes must be left in its opposite walls, 100-150 mm in diameter is enough. For the winter, these holes are closed with plugs.
Which of the presented options for insulating a columnar foundation is better and which one to choose from, can only be decided by the owner of the house.
Insulation of a columnar foundation - insulation technology
Insulation of a columnar foundation One of the finishing stages of finishing an already constructed building is the thermal insulation of its foundation, since this provides comfortable conditions in the house. In solid
When building a house or other building on an area with a high water content in the soil, a columnar foundation is used. Due to its qualities, it is ideal for light to medium-heavy structures. But due to the fact that under the house there is no space isolated from the external environment, an increased amount of heat, compared to other types of bases, is spent on heating the street. To avoid unnecessary expenses, you need to know how to insulate a columnar foundation with your own hands.
Material features
Penoplex is essentially a polymeric substance with a foamy texture. It is produced by extrusion of ordinary polystyrene. The use of the most advanced equipment results in a material with a strictly ordered structure. In it, small gas bubbles are distributed as evenly as possible.
Such pores have a diameter of 0.1 to 0.2 millimeters, they are completely closed and insulated. The foaming component of the material is lightweight freon, to which carbon dioxide is added. The material resulting from the reaction is chemically inert, that is, it does not enter into chemical reactions. Thus, the possibility of the development of processes of decay or oxidation of the insulation is excluded.
Expert opinion
Konstantin Alexandrovich
The main advantages of penoplex are high thermal insulation properties, combined with a high level of compressive strength. Another important parameter is the high-techness of the plates - they can be bent and cut without much difficulty, so that the insulation can be installed even in places with difficult access.
We suggest that you familiarize yourself with Whitefly in the open field how to get rid of
It is no secret that the heat-insulating qualities of any of the materials with a foamy or porous structure can be significantly reduced in the presence of high humidity.For penoplex, this property is not typical. The material absorbs moisture insignificantly during the first 7 or 8 days, while the pores at the surface of the material are filled.
There are three types of material:
- Penoplex marked 35.
- Penoplex standard.
- Penoplex-45.
Each variety differs from others in terms of specific gravity, mechanical strength and thermal efficiency. For insulation of floors in bath rooms, the first two types of penoplex are used.
Penoplex is a foamed polymer made by extrusion from general purpose polystyrene. Modern equipment allows the production of material with an ordered structure in which small gas bubbles are evenly distributed. Such isolated and completely closed microscopic cavities are about 0.1-0.2 mm in size. The reagent for foaming is light types of freon with the introduction of carbon dioxide into them.
Penoplex is a foamed polymer made by extrusion from general purpose polystyrene
By its nature, penoplex is chemically inert, which excludes oxidation or decay. The main goal of the development of this material is to provide high thermal insulation capabilities with low water absorption and very high compressive strength. An important characteristic is good manufacturability, i.e. it is easy to cut and bend, which allows it to be used in hard-to-reach places.
As you know, the thermal insulation characteristics of any foamed or porous material are sharply reduced under the influence of moisture, which is absolutely not characteristic of penoplex. A slight water absorption by the material is observed only for the first 7-8 days, when moisture fills the cells located at the surface.
Basic form of slab production: width 60 cm and thickness from 2 to 15 cm
The material is divided into 3 groups:
- Penoplex 35.
- Penoplexstandard.
- Penoplex 45.
Its types differ in specific gravity, mechanical strength and heat resistance. Insulation of the floor in the bath with penoplex is carried out by the first 2 types of material.
The main form of production of the slab: a width of 60 cm and a thickness of 2 to 15 cm. Sheets with a thickness of 10-12 cm are very popular. The standard length of the slabs is 120 and 240 cm, in special cases material with a length of 4 or 4.5 m can be used.
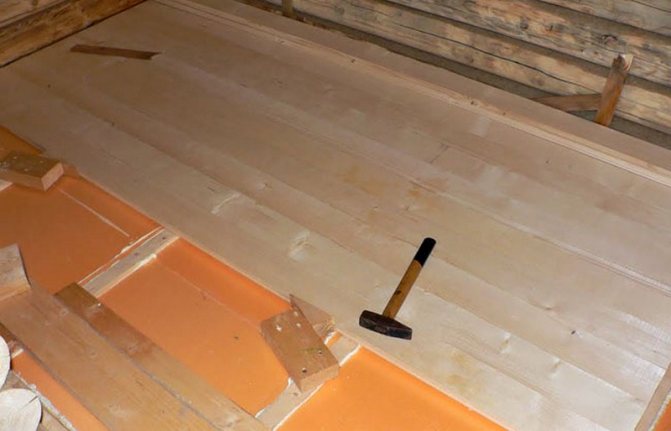
Do-it-yourself floor insulation in a bath with penoplex is done depending on its design and material. There are several options for its provision: insulation of the foundation, the basement of the log house and the floor.
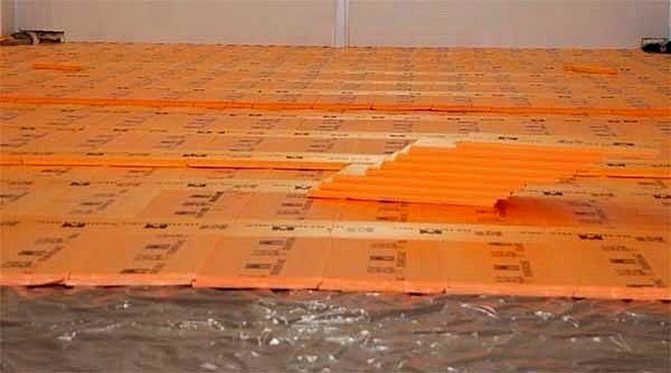
The process of warming a strip bath foundation involves the application of waterproofing using bitumen mastic. Penoplex sheets are attached using an acrylic-type adhesive.
The work is carried out in the following order:
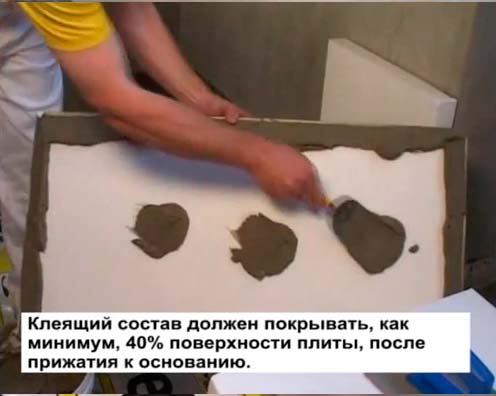
- The glue is applied to the starting board at 6-7 points, and then it is mounted on the lowermost area.
- The rest of the plates are fastened in turn, and they are combined with each other according to the "groove-thorn" system.
- Seams between the boards are sealed with glue or polyurethane foam.
- Installation of the second layer of foam is carried out in the same way, but the seams must be shifted relative to each other.
- After the second layer is sealed, a fiberglass reinforcing mesh is fixed. The joints are overlapped with an overlap of at least 8-10 cm.
- A layer of plaster is applied over the mesh.
- The final leveling of the foundation surface is carried out with a cement-sand mortar. Acrylic adhesive can be used as a leveling compound.
The basement is insulated in the following order:
- The base is covered with a waterproofing membrane.
- Foam sheets 10-12 cm thick are glued to the top of the base.
- A second waterproofing layer is applied on top of the penoplex.
- The next step is to install the geotextile filter.
- Pouring the cement-sand layer.
Penoplex sheets are attached using an acrylic-type adhesive
Construction of houses
67 votes
+
Voice for!
—
Against!
Until recently, no one really thought about the thermal insulation of the foundation, and all heat losses were compensated for by more powerful heating. Today, the policy of saving energy resources makes us look at the problem in a new way. It turns out that warming the foundation will not only avoid almost 20% of heat loss, but will also provide the foundation with comfortable conditions, increasing its service life. As practice has shown, properly waterproofed and insulated foundations are not subject to destruction longer, which means they "live" longer. In the question of what is better to insulate the foundation, a new material intercepted the palm from the good old foam plastic - extruded polystyrene foam. Despite the fact that this material costs almost twice as much as polystyrene, basement insulation with Penoplex is becoming a ubiquitous fashion. And all thanks to its unique qualities and durability.
- Meet Penoplex
- What is the best way to insulate the foundation - from the outside or from the inside
- Calculation of the thickness of Penoplex for thermal insulation of the foundation
- Penoplex foundation insulation technology
- Do-it-yourself Penoplex foundation insulation
- Excavation
- Foundation surface preparation
- Foundation waterproofing
- Insulation of the strip foundation with Penoplex
- Surface leveling
- Backfilling and warm blind area from Penoplex
- Insulation of the foundation with Penoplex: video
Meet Penoplex
Extruded polystyrene foam is a whole type of material produced from expanded polystyrene by foaming it at a high temperature. Seven of the gases of freon and carbon dioxide are added to the composition as a blowing agent. As a result, a strong material with a dense uniform structure is obtained, in which granules of 0.1 - 0.2 mm are enclosed.
Penoplex is the name of one of the Russian brands that produces extruded polystyrene foam for various needs, whether it is insulation of roofs, pipes, roadways, walls of a house or its foundation. Each of them has its own unique features that are relevant for a specific application site. For insulation of foundations, Penoplex Foundation slabs are used and, less often, Penoplex 45.
Benefits of using Penoplex for basement insulation obvious:
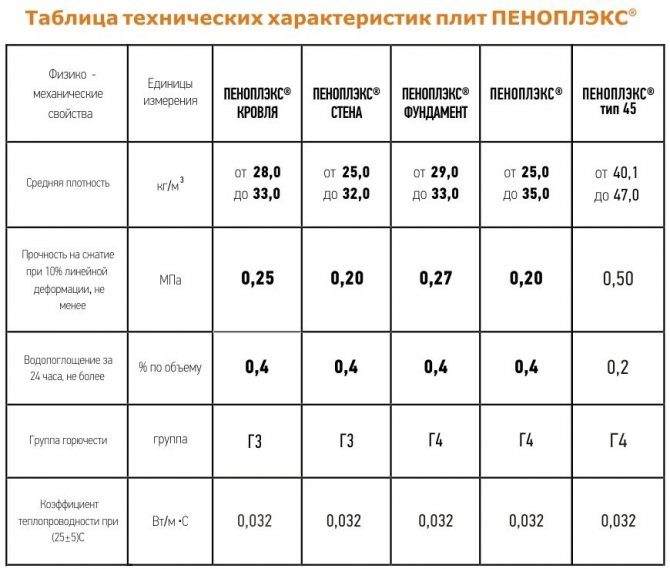
- Low thermal conductivity (λ = 0.03-0.032 W / (m × ° K)). This indicator is the lowest among the generally available insulation, which means that slabs of smaller thickness will be required.
- Exceptional compressive strength - 27 t / m2, which is very important, since colossal loads are acting on the foundation.
- Practically does not absorb moisture. Experiments have shown that for 30 days spent in water, Penoplex plates absorbed and filled with moisture only 0.6%. Given the constant influence of groundwater and rainwater, the low water absorption of the material guarantees the protection of the foundation from moisture, and the insulation itself will not collapse or change its properties from constant contact with water.
- Wide temperature range - from -50 ° С to +75 ° С. The material can withstand both severe frost and heat.
- Low weight facilitates installation work and does not add additional load to the foundation.
- Penoplex is not afraid of mold, does not rot and does not decompose. Mice do not start in it.
- Resistant to many aggressive substances that may be in the ground.
- The material does not emit harmful substances and vapors and is safe for use in residential construction.
- Penoplex slabs are easy to install, as they are made with the “thorn-groove” system, they are easy to cut, stick and attach.
- The material is extremely durable (up to 50 years).
Thermal insulation of the foundation with Penoplex slabs will ensure the durability of the structure and material of the foundation, as well as the basement or basement room.I would like to note that Penoplex Foundation has a fire resistance class - G4, i.e. is burning. But given the fact that the material will be hidden by a layer of plaster and primer, this is not a big deal.
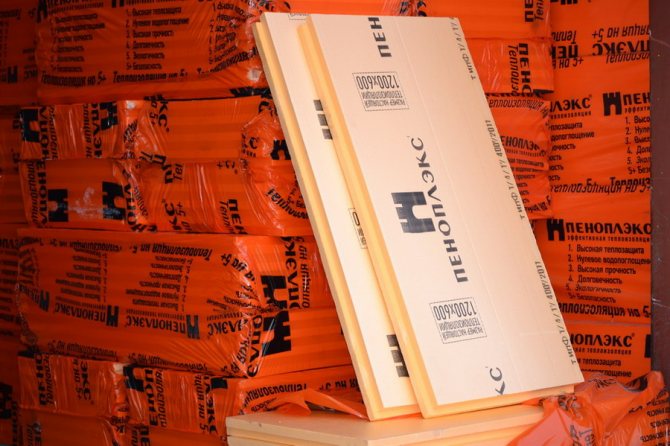
Penoplex Foundation is produced in slabs with dimensions of 600x1200 mm and a thickness of 20 - 100 mm (20, 30, 40, 50, 60, 80, 100). This allows you to select the material of the required thickness for each specific case.
What is the best way to insulate the foundation - from the outside or from the inside
The location of the insulation on the foundation - outside or inside - is very important. To protect the foundation as much as possible from the negative influence of the environment, it is necessary to insulate the foundation from the outside. But this is easier to do during the construction process than during the operation of the house. So, for example, those who want to insulate the foundation of an old house do not really want to dig out the walls of the foundation, since it is laborious, difficult and time-consuming. But you should know that the insulation of the foundation from the inside is actually the insulation of the basement or basement, but not the foundation, since the structure and material of the foundation remain unprotected and are subject to the influence of moisture, frost and heaving of the soil.
Advantages of outside foundation insulation:
- The foundation is protected from freezing, cold does not penetrate inside.
- The concrete of the foundation is protected from moisture and numerous cycles of defrosting and freezing, which prolongs its service life.
- Serves as an additional barrier for ground and storm water, presses and protects the waterproofing layer from mechanical stress.
- Copes well with seasonal temperature changes.
- An optimal microclimate is created in the basement or basement room.
- The dew point is shifted, which has a beneficial effect on the foundation material.
If you decide to insulate from the inside, be prepared for the fact that the foundation remains unprotected from frost, heaving of soil and water. As a result, seasonal changes in temperature, frost and heaving of soils will lead to cracks in the foundation and its deformation. Think, maybe it is worth doing everything right once, than limiting yourself to half measures.
Calculation of the thickness of Penoplex for thermal insulation of the foundation
The first question that interests you when insulating a foundation is how thick the material should be taken. To determine this, you will have to perform a number of calculations. Although the manufacturer indicates the minimum thickness of Penoplex for different regions of construction, it is still better to calculate everything yourself.
R is the heat transfer resistance for a specific region. For Moscow and the Moscow region, it is equal to 3.2 m2x ° K / W;
H1 - foundation thickness;
λ1 - coefficient of thermal conductivity of the foundation material;
H2 - the thickness of the insulation material (Penoplex);
λ2 - coefficient of thermal conductivity of Penoplex.
If we are going to insulate a reinforced concrete foundation (λ = 1.69 W / m * ° K) with a thickness of 400 mm (0.4 m), then we get:
3.2 = 0.4 / 1.69 + H2 / 0.032;
3.2 = 0.24 + H2 / 0.032;
2.96 = H2 / 0.032;
H2 = 0.0947 m. This is approximately 95 mm.
In total, it turns out that to insulate a foundation with a thickness of 400 mm, Penoplex will be required with a layer of 100 mm. Do not round down, it is better to take with a margin. For basement insulation with Penoplex, the price depends on the area that needs to be covered with slabs and on the thickness of the material.
For example, the height of the insulation is 2 m, the length of the walls is 10 + 8 + 10 + 8 m (for a house 10x8 m). It turns out that the area of insulation is equal to - 72 m2. The area of one Penoplex slab is 0.72 m2. To insulate the foundation, we need a minimum 100 slabs of material.
In order to avoid cold bridges and block all joints and cracks when insulating with Penoplex, it is recommended to lay the insulation in two layers with an offset, in a checkerboard pattern. If 100 mm of insulation is required, then two 50 mm boards must be used. In total, we need 200 Penoplex slabs 50 mm thick. There are 8 plates in a package, which means we buy 25 packages. Total insulation material will cost $ 930 - $ 950.
For basement insulation with Penoplex, the cost of insulation material is the lion's share of the budget. It will be necessary to add to it the cost of waterproofing, bituminous mastic for gluing insulation, dowels, umbrellas, cement for plastering the surface. All this is just a trifle compared to the total cost of insulation work.
Penoplex foundation insulation technology
Penoplex is a highly technological material. But in order to fully take advantage of its benefits, it is better to follow the technology of its application for different cases.
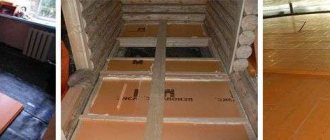
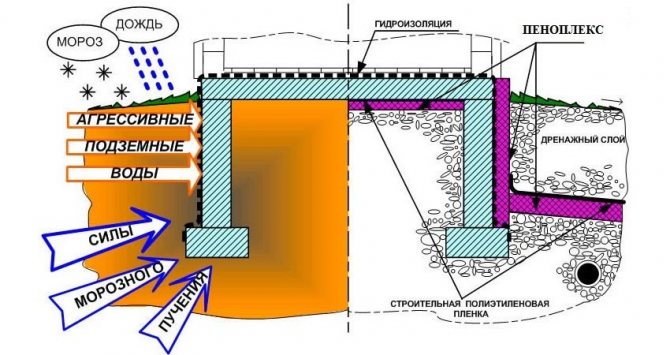
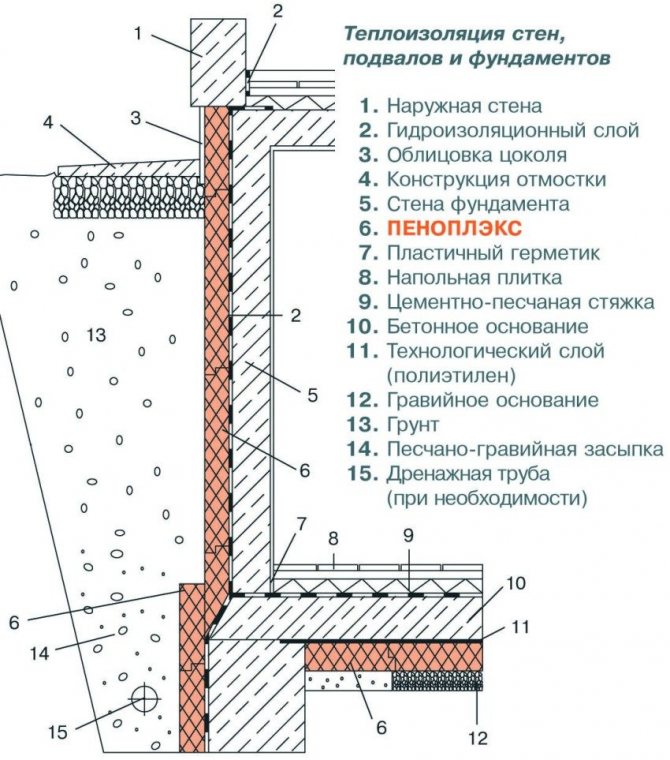
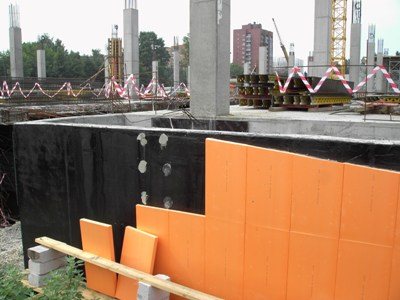
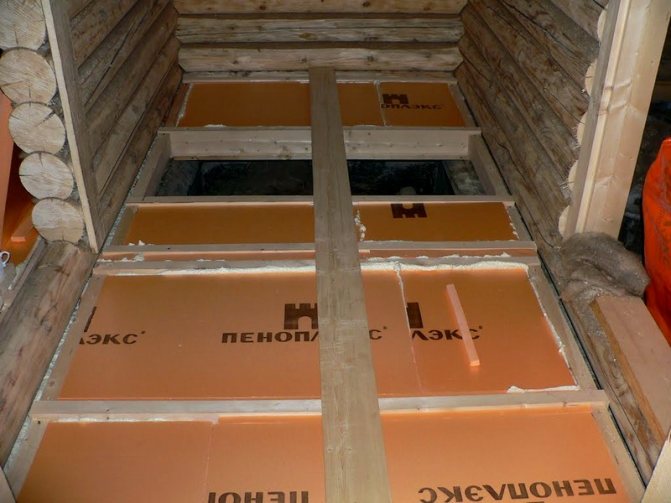
Insulation of the strip foundation with Penoplex (insulation cake from the inside out):
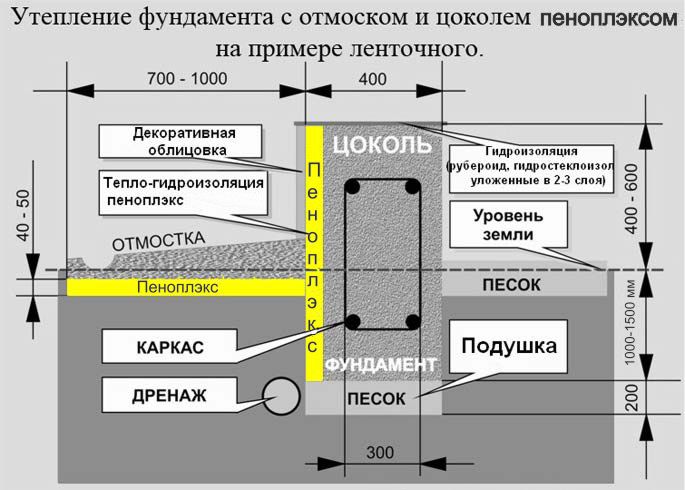
- Foundation wall.
- Waterproofing.
- Penoplex plates.
- A layer of cement-sand plaster.
- Backfilling with soil or sand, expanded clay.
- Penoplex slabs (horizontally) under the blind area.
- Blind area.
Insulation of the slab foundation with Penoplex (pie from bottom to top):
- Sand.
- Penoplex plates.
- Concrete slab.
- Waterproofing.
- Floor screed.
- Waterproofing the end part of a concrete slab.
- Penoplex slabs on the end part of the slab, laid from the depth of the sand bed to the very top - 40-50 cm above ground level.
- Penoplex slabs under the blind area.
- Blind area.
Please note that Penoplex slabs can be laid on the foundation slab directly under the floor screed.
Do-it-yourself Penoplex foundation insulation
All work on insulation of the foundation with Penoplex can be done independently, without resorting to the help of construction organizations. At least it will be possible to save on this. Of course, it is much more convenient to make insulation at the construction stage, even before filling the pit around the foundation. But if the moment is missed, and now there is a need to insulate the foundation of an old exploited house, then you have to sweat. Also note that re-digging the foundation can lead to cracks in it, as the house will sag unevenly. This is dangerous, so it makes sense to calculate the loads before starting work.
Let's consider just this more time-consuming option.
Excavation
The first task is to dig out the foundation. A trench is being dug along the perimeter of the whole house down to the sand itself, i.e. to the entire depth of the foundation, and at least 1 - 1.5 m wide. The depth of the strip foundation usually drops to the level of freezing of the soil in winter, this indicator can be found in the local geodetic service.
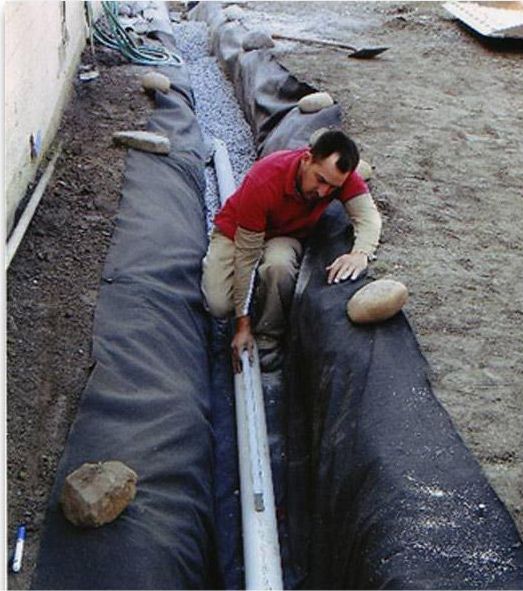
Despite the fact that Penoplex does not pass or absorb moisture, it still makes sense to equip a high-quality drainage. It is especially necessary if there is a high level of groundwater in the construction area or heavy floods. We equip the drainage at the level of the sand cushion under the foundation. We dig a shallow trench for drainage pipes around the perimeter of the whole house at a distance of 50-60 cm from the walls of the foundation. At the bottom of the trench, we pour sand with a layer of 5 - 10 cm, then rubble 5 - 10 cm, then we spread geotextiles, the edges of which we start behind the edges of the trench. Inside the trench, we lay drainage pipes with holes directly on the geotextile. The slope when laying drainage pipes should be at least 2 cm by 1 m.Then sprinkle everything on top with crushed stone with a layer of 10 cm, wrap the edges of the geotextile so as to wrap the pipe with them. The pipes must be diverted into a stormwater drainage well.
Foundation surface preparation
The wall of the foundation and plinth must be cleaned of soil residues, chipped pieces of concrete and other dirt. To do this, you can use a brush with hard synthetic fibers. After the surface is completely cleaned, it must be leveled. A smooth surface is the key to the durability of the waterproofing coating, which can damage any sharp protruding edge or piece.It is extremely rare, after some time of operation, the walls of the foundation remain perfectly smooth, therefore it is necessary to plaster them.
Aligning foundation walls:
- At a distance of 1 - 1.5 m from each other, we install and fix the beacons. Perforated guides can be used. We install the lighthouses at the full height to which we are going to fix the insulation - from the very bottom of the foundation to the level of 50 cm above the ground.
- We knead the solution: 4 parts of sand and 1 part of cement, fill with water and knead until a thick consistency, but the solution should not be dry. The liquid solution will drain off the surface immediately.
- Using a trowel, we throw the mortar onto the walls of the foundation. We make sharp movements with our hand, we begin to throw from the bottom up.
- When the entire surface is filled with a solution, we take a 2 m long rule, apply it to the lighthouses and stretch it from top to bottom, removing the excess solution. It is advisable to pull the rule not straight down, but to make slightly wavy movements.
- After the first layer has dried, you can apply the second one - leveling.
Important! If there were drops of more than 2.5 cm on the walls of the foundation, then additional reinforcement must be used for plastering. You can use a chain-link mesh fixed with brackets.
Do not continue working until the leveling mortar is completely dry. It will take from 7 days to 20 if the foundation was poured long ago. If we are insulating a new foundation, then it is necessary to wait a month until moisture is completely removed from the concrete.
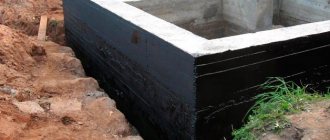
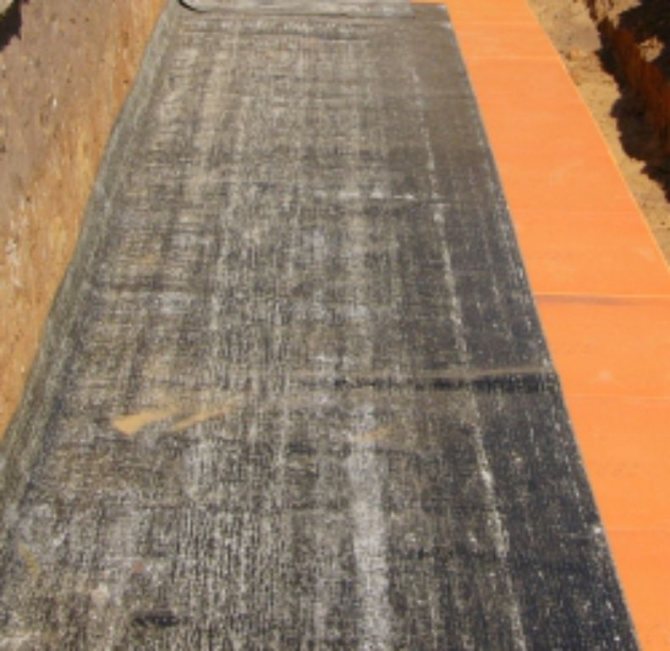
Foundation waterproofing
It is better to perform high-quality waterproofing of the foundation in two layers: the first is bituminous mastic, the second is Technonikol sheets.
Bituminous mastic you can buy it as ready-made - unpack and spread, or prepare it yourself from a purchased bar of bitumen. If you bought dry bitumen, then it must be melted in a container, then add used oil (motor) to it at the rate of 50 liters of oil for 120 - 150 kg of bitumen. The oil will add plasticity to the bitumen and then it will not crack during frost.
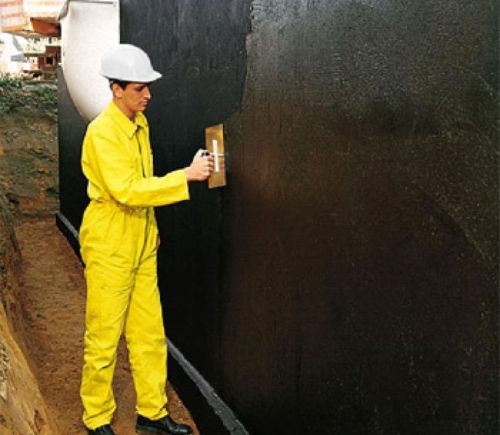
Using a roller, apply bitumen with a layer of 2 - 4 mm on the entire surface of the foundation and basement. We try to fill in all the cracks and small pores. When the bitumen is dry glue the TechnoNicol sheets. We glue the sheets from bottom to top, melting their back side with a gas burner. We keep the burner at a distance of no closer than 20 - 25 cm, otherwise TechnoNIKOL burns. We smooth each glued sheet, releasing air from under it. Glue the sheets with an overlap of 10 cm, then coat the joints with mastic.
Important! Many perform foundation waterproofing only with TechnoNIKOL sheets. This is not the best solution, since it does not allow filling small gaps and pores. And if moisture gets under the sheets, they will quickly peel off. But smearing with mastic protects the surface more efficiently, although the process itself is very dirty and laborious.
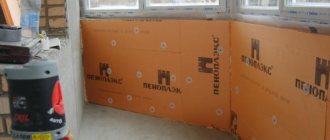
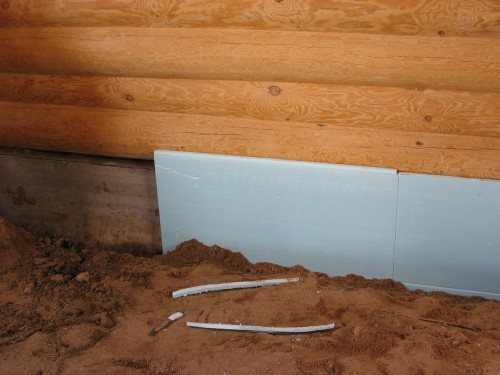
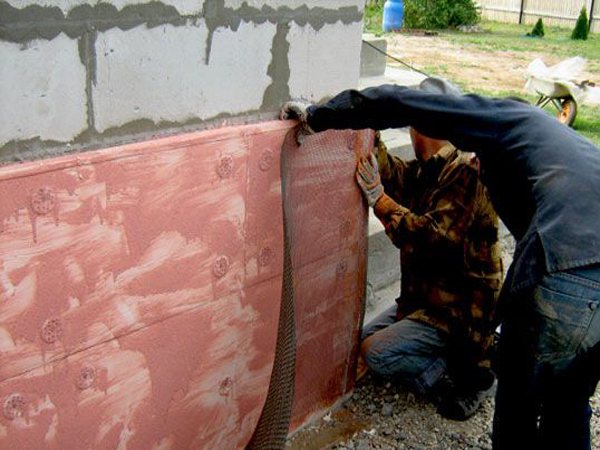
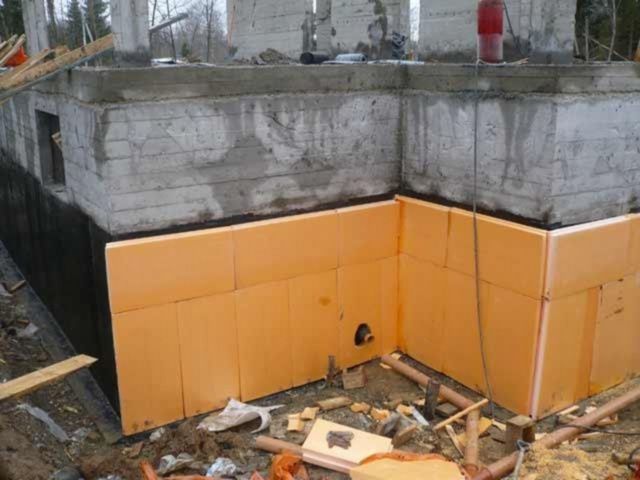
Insulation of the strip foundation with Penoplex
After the completion of the waterproofing work, you can proceed with the fastening of the insulation.
Important! A very important nuance - you may come across recommendations that in order to fix Penoplex slabs, it is necessary to reheat the bituminous waterproofing and glue the material on it, in fact, this is not worth doing. There is a high probability of damaging the waterproofing.
We fasten the Penoplex slabs to the foundation in a vertical position, starting from the bottom up. For fixing we need acrylic adhesive or any other adhesive based on inorganic solvents. Apply the glue to the Penoplex board pointwise - 5 - 6 points. Then we press the slab to the surface of the foundation and press it down to secure it. We wait 1 minute. All subsequent Penoplex slabs are also attached, only with the already fixed ones, they must be connected using the "thorn-groove" system. Fill the gaps between the boards with polyurethane foam or acrylic glue.
We also fix the second layer of Penoplex slabs - with glue, but with an offset to cover the joints between the slabs of the first layer.
Important! Fastening the Penoplex slabs on the part of the foundation that will be covered with soil cannot be done using dowels, mushrooms, as this can damage the waterproofing layer.
You can use the dowels only on the basement part, where the fixing is done by 5 dowels (120 mm long, 10 mm in diameter) for each plate. The dowel holes must be covered with acrylic glue. We continue further work only after the glue has completely dried.
Surface leveling
Now the Penoplex insulation must be protected from the effects of soils, for this we plaster the surface again.
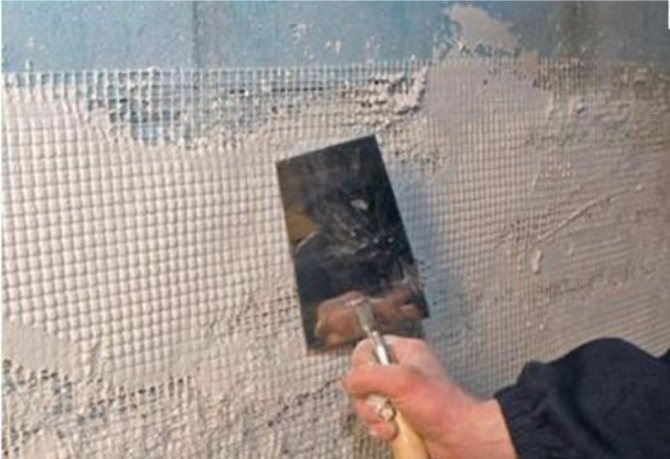
On top of Penoplex we fix a reinforcing mesh made of fiberglass, we join the canvases with an overlap of 10 - 15 cm so that cracks or chips do not form at the joints of the mesh fastening.
In some sources, it is recommended that all alignment be done with only one acrylic glue, applying it in several layers until the surface is leveled. But you can perform the classic leveling with a cement-sand mixture. After the plaster layer has completely dried, you can fill the pit.
Backfilling and warm blind area from Penoplex
Instead of soil removed from the trench, sand or expanded clay can be poured under the house to improve thermal insulation. Although it is possible to fill up the soil that was there. But not completely. The final stage of basement insulation is a warm blind area.
Approximately at a depth of 30 cm from the top, fill in a 10 cm layer of sand and carefully tamp it. Then we spread a waterproofing material from the foundation itself with a width of 1 - 1.5 m. It can even be an ordinary roofing material, the joints of which are thoroughly smeared with bitumen. After hardening, Penoplex plates are laid on top, the joints are coated with acrylic glue or filled with polyurethane foam.
When a layer of insulation is laid on the ground, you can equip a blind area from above. For this, a concrete screed is poured at a slope from the foundation of the house in order to divert waste and storm water from it.
The basement of the house, on which Penoplex is also fixed, must be decorated with stone, clinker tiles or in any other way.
Remember - a high-quality protected foundation is the foundation of your home. Make waterproofing and thermal insulation on time, and you will not have to regret it, and you will not remember about major repairs of the foundation for a long time. Penoplex is an excellent technological material, which is very convenient to use for warming the foundation, it is easy to install and does not require a special attitude towards itself. It is important to know only one thing - extruded polystyrene foam is destroyed by contact with acetone, benzene, alcohol and other organic solvents.
Insulation of the foundation with Penoplex: video
Why PENOPLEX is ideal for do-it-yourself bath insulation
To insulate the basement of the bath, you can use one of the following heaters:
- Minvata (glass, stone, etc.) is taken in the form of mats, it is easier to work with it.
- Expanded polystyrene or polystyrene.
- Bulk materials (expanded clay, sawdust).
The main requirements for insulation: do not absorb moisture and do not deform under soil pressure.
Mineral slabs can be used to insulate the foundation, but since they absorb moisture well and are subject to deformation, they are additionally protected with a brick wall or boards. Of the minuses, an unpleasant odor can be distinguished, which appears if the base is insulated inside the bath, deformation. In addition to all of the above, rodents like to settle in the mineral wool, which quickly breed and damage the thermal insulation layer.

The scheme of warming the basement of the bath with mineral wool.
The advantages include low price, high heat-saving properties, ease of installation.
Bulk insulation
Expanded clay and sawdust were used by our grandfathers.But the materials have a number of disadvantages:
- absorb moisture well;
- sawdust quickly rot;
- have low heat-saving characteristics.
Of the advantages, perhaps, only the low price and availability in any region. Sawdust, in general, can be taken free of charge at any sawmill.
When insulating the foundation, sheet polystyrene is often used. The material retains heat well and is not afraid of moisture. The price of insulation is low; you can buy it at any hardware store. The disadvantages include the low strength of the material. Manufacturers produce extruded foam, but the price is higher.
Basement insulation with polystyrene is durable and effective.
Expanded polystyrene also consists of gas bubbles, but the structure of the insulation is more dense. It is produced in the form of plates or foam, which is sprayed using special equipment under pressure. The spraying method is considered the most effective, since the heat-insulating layer is hermetically sealed. But the price for work starts from 600 rubles / m².
The short-lived and ineffective materials were replaced by modern insulation of the new generation Penoplex. This is extruded polystyrene foam, which has a dense cellular structure that does not allow moisture to pass through. As a result, the material does not lose its thermal insulation properties in extreme conditions with high humidity and temperature, which are inherent in baths, saunas or hammams for 50 years or more.
Penoplex is ideal for insulating the walls of a bathhouse from the inside, as it does not contain harmful toxic substances in its composition. Unlike natural materials, the insulation of a bath from a bar and a log of a bath with the help of Penoplex® is easy and simple.
An interesting fact: the only bathhouse, built in 2006 in Antarctica and listed in the Guinness Book of Records, is insulated with Penoplex® plates. On the continent, where the thermometer scale drops below –50 ° C at night, the bathhouse can warm up to 120 ° C. To insulate the walls, floor and ceiling of the bath, only 25m3 of Penoplex® boards were needed.
Warming process
Before insulating the foundation of the house, you should create taps that provide protection from precipitation and act as a basement, which allows you to even out the microclimate inside the house, save it from dampness and drafts.
The installation of the pickups is as follows:
- Digging a trench with a depth of 20 cm to half a meter between the foundations of the foundation.
- Backfill it by one third with sand and gravel.
- Securing beams with pre-prepared grooves for boards.
- The grooves accommodate boards about 5 cm thick and are properly attached.
- The pick-up is sprinkled with expanded clay from the inside.
- Then everything is ready for the installation of thermal insulation.
And let us consider this with an example of how the foundation is insulated with penoplex. By the way, the material itself has a number of advantages over other options - it is heat-resistant, has a high level of strength, is extremely durable, does not pose any danger to people and pets, is quickly and easily mounted and produced in plates of various thicknesses, so it is easy to choose the one you need. Its main disadvantage is its low resistance to flammability. It can be processed with a flame retardant, but this will reduce its environmental friendliness.
Installation technology:
- Covering the entire surface of the foundation with adhesive mastic (it is better to choose a specially oriented penoplex).
- To the zero level, simply press the foam boards against the walls.
- Dowels-umbrellas will be needed to fasten the penoplex between the zero level and the grillage.
- Holes are drilled in the base to use heat-resistant dowels.
- Dock the panels into the grooves, check the tightness of the docking and the width of the seams. The best insulation can be achieved with polyurethane foam.
Despite the simplicity, do-it-yourself foam insulation of the foundation is not the only option for thermal insulation.Other materials also have their own mounting technologies, and are often able to create competition.
For example, insulation of the foundation with foam. This material is the easiest to work with.
Installation technology:
- The insulated surface is thoroughly cleaned.
- All cracks and irregularities are closed.
- Foam plates are lubricated with special glue and fastened with plastic dowels, while working from the bottom up.
- A reinforcing mesh and a double layer of putty are applied on top.
But some even practice warming the foundation using extruded polystyrene foam. This material provides reliable protection against moisture penetration and excellent heat retention.
Installation technology:
- A waterproofing layer is applied to the base.
- In the case of waterproofing with rolled bitumen, it is enough to warm it up to a temperature of 55 degrees and start pressing the expanded polystyrene plates against it, working from the bottom up.
In the case of waterproofing from another material, a special mastic is used for fastening, applied in strips to the insulation plates, after which they should be pressed against the waterproofing layer.
The use of material for warming a bath
How to insulate the floor in a bath with penoplex?
There is a limitation under which the material can be reliably operated - these are temperature parameters - 50 ... 75 ⁰С. It is this characteristic that complicates its use in bathing conditions. Already at temperatures above 70⁰С in heated air conditions, the release of harmful compounds dangerous to humans can begin.
At temperatures above 70⁰С in heated air conditions, the release of harmful compounds dangerous to humans can begin.
In the sauna, the temperature rises to 90 ... 95 ⁰С, and with such heating, it is dangerous to use penoplex for interior decoration. In a Russian bath, the temperature of the steam room is 60 ... 65⁰С, which also raises doubts about the possibility of using the material, especially for insulation of the ceiling, where the overheated steam rushes.
Another thing is the floor in the steam room. Taking into account the laws of physics at the floor level, you can not be afraid of maximum temperatures, but in reality they do not exceed 45 ... 50⁰С below. Here, the cooling of the floor from the ground is essential. It should also be borne in mind that the floor in the bath is not covered with penoplex from above.
The material is used as thermal insulation, which is then applied with a topcoat. All this indicates the possibility of using penoplex in the steam room of a Russian bath. In any other bath rooms (washing, dressing room, rest room), the use of the material does not cause any doubts.
We invite you to familiarize yourself with Drainage of water in a bath with wooden floors
The material is used as thermal insulation, which is then applied with a topcoat
How to insulate the foundation?
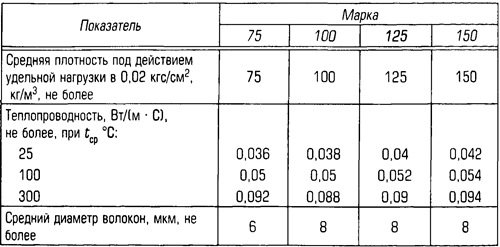
Mineral wool characteristics.
As a heater, one of the many materials can be used, the main difference between which is their cost:
- Polyfoam (expanded polystyrene) is very popular, easy to use, cost-effective (reduces heat loss by a quarter).
- Penoplex with high strength, durability and low thermal conductivity. In demand in the construction market.
- Polyurethane foam is the most effective foundation insulation, it perfectly reduces the level of heat loss. The only drawback is that you cannot do without special equipment during its installation.
- Mineral wool is a fairly popular material. Available in rolls or slabs. Convenient to use, has a fairly low level of thermal conductivity.
- Expanded clay - the most budgetary option for thermal insulation. Used as additional insulation. Before using it, it is required to create a formwork from the inside of the foundation.
To make the foundation warm, it should be remembered that the procedure must be carried out at least to the depth of soil freezing. This is individual for each region. Moreover, it is necessary to insulate together with the pick-up:
- Along the perimeter of the trench with the help of special glue, fix the foam boards (the best option for thermal insulation of the columnar foundation). In this case, the sheets should be as tightly fitted as possible to each other, without any gaps. In this way, you can reliably insulate the foundation from the inside.
- Carry out waterproofing work, which will reliably protect the underground space from moisture: fix the foam boards to the foundation from the outside. And then the base of the house will become not only warm, but also moisture resistant.
- Fill up the trench with earth or expanded clay, make a blind area.
Everything, excellent thermal insulation of the columnar foundation is ready, you can proceed to the next stage of construction work!
Required tools
When arranging a bath floor using foam boards with your own hands, you should prepare the following tools and devices in advance:
- grinder (when installing wooden floors);
- electric drill;
- screwdriver;
- sharp knife;
- scissors;
- furniture stapler;
- paint brush;
- putty knife;
- trowel and other tools for concreting and plastering;
- shovel;
- a hammer;
- mallet;
- roulette;
- building level;
- metal ruler.
Insulation of the floor in the bath with penoplex
Pile foundation finishing
Insulation of the basement from the outside with polystyrene foam and expanded polystyrene
The process of warming the pile foundation with penoplex differs significantly from the method described here. The insulation is attached to metal structures by means of laths fixed with welded brackets. Plates are mounted on the inside of the base / plinth. The front surface of the foundation is revetted with finishing materials.
The base of the dwelling, finished in this way, ensures the safety of the floors between the basement and the floor. The exclusion of the possibility of moisture penetration prevents damage to them by mold or fungal formations. There is no cooling of air in the rooms of the lower floor. The house is warm and cozy.
It should be remembered that acetone, alcohol, benzene dissolves penoplex. Work using these tools should be carried out at a reasonable distance from the house.
Tags: finishing, penoplex, insulation, base
«Previous post
Materials for thermal insulation of the foundation
Of course, you have to start with insulation. What can be used today to insulate the foundations of a bath? In principle, the lineup is not that big, because the foundation is not floors, and not walls, here are completely different operating conditions. Namely: large vertical and horizontal loads, high temperature drops, negative impact of the soil in terms of chemical and mechanical effects.
Therefore, experts offer several interesting options for warming the basement of the bath.
- Expanded polystyrene plates.
- Foam glass blocks.
- Brickwork with expanded clay, expanded polystyrene beads, perlite gasket.
Many may wonder what is mineral wool or glass wool. Nobody canceled them, but, as practice shows, more effective heaters have appeared that can better withstand the loads below the ground. This mainly concerns moisture. Therefore, those who are going to insulate the basement of the bathhouse should choose the simplest and cheapest option - the installation of expanded polystyrene plates.
Advantages and disadvantages of penoplex
Penoplex has a huge number of advantages and disadvantages that you should know about in advance.
Penoplex has a huge number of advantages and disadvantages that you should know about in advance. The advantages of the material include the following points:
- Low vapor permeability. Due to this, the penoplex can absorb only a minimal amount of moisture.
- Low thermal conductivity.
- It can withstand a fairly strong load due to its excellent compressive strength.
- It has a fairly long service life, which can be up to 40 years.
- Fast and easy installation.
- It belongs to the middle price segment and pleases buyers with a good price-quality ratio.
At the same time, penoplex also has some disadvantages, which, if not taken into account, then all insulation work will be ineffective.
- A fairly high fire hazard indicator.
- May be damaged by rodents.
- Penoplex has a higher cost than polystyrene.
In general, poplex can be called a very good material for insulating the foundation of a house, so today it is in great demand among buyers.
What you need to know about insulation
Penoplex is one of the environmentally friendly materials, of course, if the technologies were not violated during production.
But since we are talking about a material of artificial origin, the chemical components from it can evaporate over time under the influence of various factors. In this regard, the insulation is always covered with an additional variety of finishing materials.
In general, penoplex is completely safe for human health. But if the material burns, then it gives off very harmful fumes that can cause serious health problems.
Which penoplex is suitable
During the most suitable type of penoplex, it is imperative to take into account the general condition of the soil, the presence or, conversely, the absence of groundwater, the region of residence. In the case of the basement foam insulation, there are only two types of material that fully meet the required characteristics and allow you to get a really good result from use.
- Penoplex Wall. In practice, this material has repeatedly demonstrated the highest efficiency rate and therefore can provide reliable protection against moisture and other negative environmental influences. It allows you to keep the maximum amount of heat in the house.
- Penoplex Comfort. Often this material is used for additional wall insulation. This insulation was developed so that it was possible to independently carry out all the work related to the insulation of the room. Thanks to the use of this type of foam, you can get excellent results and keep the house as warm as possible for a long time.
Calculation of materials and components
In order to independently insulate the basement of a private house, experts recommend using Penoplex 45. The size of the slabs of this material is 60x120 centimeters. The weight of one slab does not exceed 2.5 kilograms. The thickness can be from two to ten centimeters.
Previously, it is worth calculating exactly how much material is required to insulate the basement. This can be done using a special formula, which indicates the area that needs to be insulated, as well as the size of the material used. It is worth noting that it is worth buying a little more material for insulation, so that all kinds of unforeseen situations can be avoided during installation work.
How to insulate the basement of a bath
So, we will assume that the foundation has been laid, now we can proceed to its insulation. Consider the option of external thermal insulation, the more this is an effective tool if the bath is already in operation, that is, it has been built, and it was decided to carry out insulation just now.
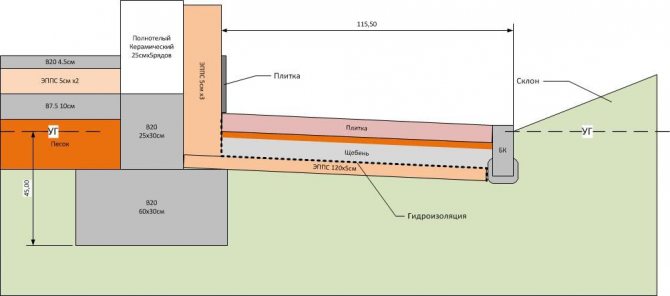
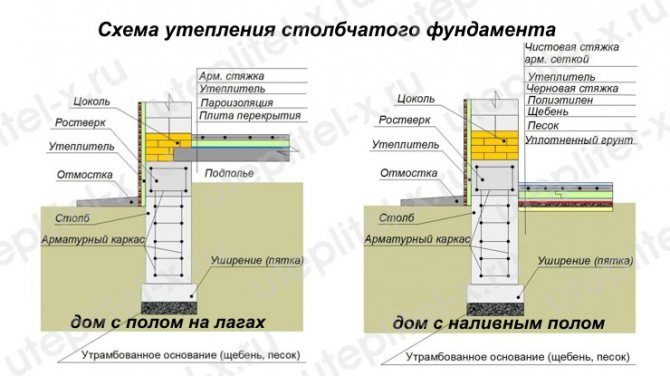
In order for you to understand the layout of the thermal insulation material, you need to understand the photo below, which shows all the structural elements of the bath, as well as the thermal insulation layer.
Here, number 1 is the foundation, number 2 is the wall of the bathhouse, under the three is the floor of the structure. 4 and 5 are thermal insulation.Number six is a protective coating, 7 is a pillow for the blind area, 8 is the blind area itself, 9 is a sand and gravel mixture (ASM), 10 is a drainage system and 11 is an insulating material laid under the floor base.
Pay attention to the figure again, which shows the thermal insulation. Please note that the layers of insulation are located both vertically and horizontally. The horizontally laid layer is laid to a certain depth, which is associated with the fact that to prevent the depth of seasonal freezing of the soil. After all, it is from this that the heaving of the soil will depend, which negatively affects the quality of the structure itself.
Since we are talking about thermal insulation, it would be appropriate to say about the thickness of the heat-insulating layer, about its depth of laying and laying horizontally in length. In this case, all these values are plotted on the drawing under different letter symbols. They directly depend on the so-called frost index (MI).
- MI is 20,000, the thickness of the vertical layer will be 70 mm. With this index, there is no need to install horizontal thermal insulation.
- IM is 70,000, the thickness of the vertical layer is 140 mm, the thickness of the horizontal layer is 80-90 mm, the width of the horizontal layer is 1.2-1.5 m.
It is believed that by laying the thermal insulation under the blind area, the problem of the thickness of the layer to be laid can be solved. The opinion is completely wrong, because in addition to the vertically directed coldness, lateral cold mainly acts on the foundation. This, on the contrary, will lead to an increase in the thermal insulation layer, which is laid under the blind area.
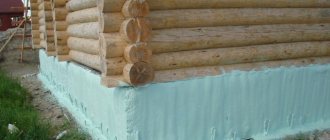
Now we turn to the very process of warming the basement of the bath. If the bath is active, then you will have to first dig a trench along the foundation. Its width should make it easy to go down into it and carry out thermal insulation processes.
- Add sand or gravel to the bottom of the trench, 10-15 cm thick.
- The concrete screed is poured.
- After drying, the screed and foundation are waterproofed with bitumen mastic. Waterproofing is applied with a roller and a brush.
- Expanded polystyrene plates are installed. They can be glued to the same waterproofing until it dries out, or fixed with special mushroom screws made of plastic.
- After that, protective measures are taken. For example, you can cover the insulated foundation with brickwork (in half a brick), install plastic panels, siding, and so on.
If the basement of the bath will be insulated with the installation of a horizontal layer, then you will have to dig a wide trench in accordance with the above tables, where the ratio of the dimensions of the layer to the MI is established. Here it will also be necessary to add sand or gravel, fill in the screed and carry out waterproofing measures. After which the trench is buried.
A prerequisite for warming the basement of the bath is the construction of a blind area.
- First, this device protects the foundation from natural precipitation. The length of the blind area is usually within one meter, so that water drainage is guaranteed.
- Secondly, this concrete device creates a certain thermal protective barrier if insulation is laid under it.
The angle of inclination of the blind area is 2-3%.
Insulation from the inside
Is there a need to insulate the foundation from the inside if insulation is done from the outside? Of course, there is no such need. It's just that this process is easier to carry out if there is an unheated basement under the floor of the bath. That is, you don't have to dig a trench and do all the processes described above outside. Indeed, as practice shows, it is quite difficult and is associated with a large volume of earthworks.
Therefore, it is recommended, if possible, to insulate the foundations of the bath from the inside. And here you can use a large list of heaters. In principle, the insulation process itself is carried out using the same technology, except for earthworks and screed pouring.
- Waterproofing is in progress.
- Insulating material is laid and fixed.
- Protective finish.
A prerequisite is insulation of the basement floor under the bath. For which you can use perlite or expanded clay, a layer of which is poured with a concrete screed.
When it is worth doing the insulation of the columnar foundation
Insulation of a columnar foundation means both insulation using heat-insulating materials, and simple sealing of spans between the posts, i.e. pick-up device. In the overwhelming majority of cases, a house on a columnar foundation also has a pick-up. It is performed in different ways, depending on the material of the posts; their heights above the ground; from architectural preferences, after all.
An example of a pick-up device.
Unfortunately, it should be noted that a modern energy efficient house cannot be built on a columnar foundation. Such houses are placed on monolithic slabs, completely insulated from the ground with a thick layer of rigid insulation. All other types of foundations (including columnar) assume so-called cold bridges. If there was a technical possibility to establish an effective thermal break between the support and the wall, then the columnar foundation would be one of the most economical and energy efficient at the same time. However, none of the existing insulation today is able to withstand concentrated compressive loads, such a force that the weight of a building exerts.
Now let's make a small but important digression on the financial side. It is impossible to reduce the construction cost estimate and increase the energy efficiency of the building at the same time. These articles are exactly the opposite in essence. Theoretically, it is possible to insulate all the building envelopes with such high quality that several hundred watts are enough for heating. But will there be any material benefit from this? Insulation also costs money. In addition, it has its own service life. If a the payback period of the insulation is equal to the period of its operation
, then such insulation cannot be called cost-effective. Warming is considered advisable if it pays off at least half of the time allotted to it.
However, there is another opinion. Some experts consider insulation as a kind of investment project. It is believed that young and energetic people have the opportunity to spend money on serious insulation, and this will insure them against serious operating costs in old age, when they can no longer earn much.
Economists would consider this not the most profitable investment, because funds can be deposited in a bank, and the interest will probably be enough to pay energy bills. Moreover, this will already be the so-called compound interest.
If you put $ 1000 in the bank at 10% per annum, then in 20 years your account will have $ 6727. This is taking into account the fact that interest on the deposit will be charged on interest and on the condition that the deposit will not be withdrawn. And that's only a thousand. And when insulating a house with a layer of 10-15 cm, ten thousand may be needed. Accordingly, with the contribution of such an amount, the profit will increase by an order of magnitude.
In general, you need to count everything. True, there is one unknown in this problem - the cost of energy resources in the future. In addition, money depreciates, life rises in price, there is no stability. So people come to the conclusion that it is better to warm up now than to pay fabulous bills all their lives and heat the atmosphere at the same time for their hard-earned money.
Do-it-yourself internal and external insulation of the bath floor
The bathhouse soars, the bathhouse rules, the bathhouse will correct a hundred ailment. This is how a popular proverb characterizes the bathhouse. Indeed, it is an inexhaustible storehouse of health and vitality.
Bath layout scheme.
Therefore, those who have the opportunity to build such a wonderful structure on their own site are really lucky. However, having a bath is one thing, but building it with your own hands is a completely different matter.
And first of all, because the structure should be strong, durable, and most importantly, capable of retaining heat for a long time. To do this, you need, at least, to know the specifics of construction work and the ability to select the right materials.
But any knowledge and skills fade into the background when dealing with issues related to keeping warm. This means that you will have to insulate the walls, the floor, and the ceiling.
Such an important element of the entire bath structure as its foundation cannot be excluded from this chain. It serves as the foundation of the structure, therefore, high-quality insulation of the foundation will significantly reduce heat losses and save on fuel.
From year to year, the Russian bath does not give up its popularity. But it is important to know that such a structure must be built in strict accordance with the norms and rules of construction work. Largely because of this, the relevance of the issue of methods of bath insulation remains high.
Starting to independently carry out work on the insulation of the floor overlap in the steam room with penoplex plates, it is necessary to prepare the following list of devices and various tools in advance for work:
- when arranging wooden flooring, a grinder will be required;
- electric drill;
- screwdriver;
- knife with a sharp blade;
- scissors;
- construction stapler (furniture);
- paint brush;
- spatulas;
- trowels and other tools designed for concreting and plastering surfaces;
- roulette;
- shovel;
- metal ruler;
- a hammer;
- mallet;
- building level.
We suggest that you familiarize yourself with How to insulate the foundation of a bath from the inside
How is the insulation of the concrete floor in the steam room with the use of penoplex carried out? In the absence of high-quality heat insulation, the concrete floor in the bath room will be cold. It is penoplex that is the type of insulating material that will help solve this issue without unnecessary difficulties. The insulation process will look like this:
- Stage one - waterproofing the foundation cushion. Moisture protection is achieved by a two-layer application of a special bitumen-based mastic.
- Stage two - laying an additional waterproofing layer from materials produced in the form of rolls. It can be a well-known and popular roofing material or a dense polyethylene film. There are also more modern types of materials, which include hydrostekloizol, as well as glassine. The insulation strips should overlap each other by 10-12 centimeters.
- Stage three - laying out foam sheets. They must be carefully aligned horizontally. This parameter is easy to check using a building level.
- Stage four - a special metal mesh is being installed for surface reinforcement. You can also use steel wire.
- Stage five - pouring a concrete screed. The mixture diluted according to the instructions is poured with a layer, the minimum thickness of which is 7 centimeters. You can achieve perfect surface evenness by placing beacons. The screed layer is most often formed in such a way that the slope falls in the direction of the water drain hole.
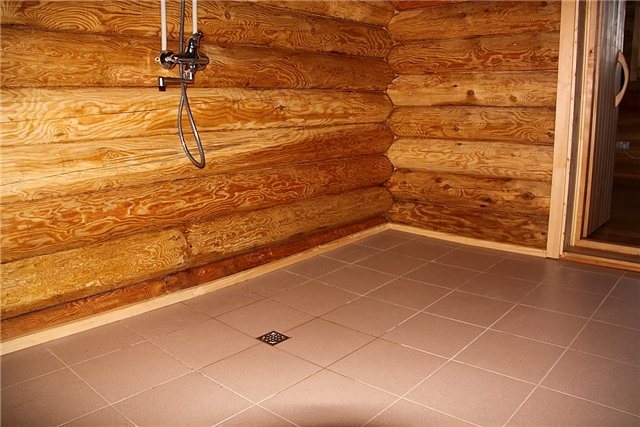
- The final stage is the installation of a decorative floor covering that has a decorative function. For a bath room, it is important to use wood flooring or laying ceramic plates.
For bath floors on a wooden base, the following procedure for laying foam boards will be relevant:
- Logs made of wood and the gaps between them must be well insulated from steam penetration. This task is optimally handled by one of the high-tech materials, which include a foil layer. Aluminum foil is also used in tandem with craft paper or polyethylene film. They are fixed on the logs using a construction stapler with staples. The seam must be sealed with adhesive tape.
- For styling, penoplex is suitable, having a thickness of at least 8 centimeters. Insulation layers are coated with additives to reduce its flammability and are placed in the space between the elements of the floor structure. Tile gaps must be sealed with acrylic based glue or foam for installation. Even before laying in the slabs, you need to cut out holes through which the water will be drained.
- The surface of the foam boards must be protected with a waterproofing layer from moisture penetration. The film is laid so as to partially cover the walls. The overlapping area of the walls is 15 to 20 centimeters.
- Final work involves the assembly of wooden flooring with the most tight fit of the floorboards in relation to each other. This floor is also called leakproof.
The insulation process can be started only after the base is carefully insulated from moisture penetration. In this case, a bitumen-based mastic is used as a means of isolation. High-quality fastening of sheets is achieved by using an acrylic adhesive.
The work sequence should look like this:
- Five to six "spots" of acrylic glue are applied to the starter plate. Then it is fixed at the bottom edge.
- The rest of the slabs are fixed along the perimeter by connecting the elements of the thorn-groove system.
- The joint areas are sealed with mounting foam or acrylic adhesive.
- The second layer of insulation must be installed taking into account the mandatory displacement of the seams in a checkerboard pattern. Places that will be covered with a layer of soil must be treated with acrylic glue for adhesion. The insulation can be attached to the plinth with dowels, the length of which is 12 centimeters and the diameter is 1 centimeter.
- The depressions in the attachment points are sealed with an acrylic adhesive, after which it remains only to wait for it to dry completely.
In the area of the basement of the steam room, the insulation plates will need to be additionally fixed with mushroom-shaped dowels. Acrylic adhesive alone may not be strong enough. To insert the fasteners, you will need to drill the insulation plates with a punch in such a way that the holes are in the base material.
- "Foundation";
- "Comfort";
- "Wall".
This room is a very important part of the bath. Quite a large part of the time is spent in it, and the floor is constantly exposed to moisture. Such a room should dry quickly enough, be equipped with a competent drainage system, keep warm and it is important that it does not come through.
Foam insulation
To insulate the foundation and basement, you need to take the following steps:
- Preparation for insulation of basement walls, cleaning of old plaster and debris.
- Unevenness of the walls and foundation must be leveled with mortar so that the foam plates are in good contact with the surface.
- Special glue is applied to the foam sheets.
- The foam is glued from the floor.
- The foam plates are additionally fixed with plastic dowels.
- A reinforcing mesh is glued to the foam sheets and a leveling mixture is applied to it.
- The last step is finishing with decorative materials.
Foreword
... How and with what to insulate the columnar foundation of the house with your own hands? Do I need to insulate the columnar foundation of the bathhouse and the house? Correct insulation of the foundation pillars will help preserve heat and protect the structure from early destruction. Consider in the article how to independently insulate the structure, what materials to use for thermal insulation, and also show a video on this topic at the end of the article.
The columnar foundation of a wooden house is used on difficult and heaving soils. The pillars are placed in the corners of the house and at the intersection of the inner walls, as well as along the perimeter of the building after 1.5-2.5 meters and below the depth of soil freezing on the site. The pillars usually rise above the ground by 0.25-1 meters.For the rigidity of the structure, a strip foundation is poured along the top of the pillars or strapping beams are placed.
What is a warm foundation for?
Comparison of the characteristics of thermal insulation materials.
Quite often you can hear the opinion that insulating a bath and its foundation is a waste of effort and money. This work, undoubtedly, is very laborious and painstaking, therefore, some believe that it is better to spend more firewood once a week in order to properly warm the floors and create a comfortable temperature regime than to properly insulate the bath.
But the premature destruction of the foundation and walls will very quickly make itself felt and make you recognize the erroneousness of this judgment.
In the warm season, the non-insulated foundation becomes covered with condensation. Air heated by the sun from the street penetrates under the foundation, where it meets a cold wall cooled by damp earth.
Moisture in the air condenses and falls on the concrete base in the form of dew.
Insulation outside and inside
Most often, the heat insulator is installed on the foundation and plinth from the outside.
The arguments in favor of this method of insulation are very strong. External thermal insulation:
- Protects from freezing when using any material, preventing the cold from entering the house;
- Contributes to the preservation of the strength characteristics of the base for a long time;
- Additionally, it prevents the penetration of groundwater, helps the waterproofing material to protect the columnar supports from moisture seepage or condensation;
- Withstands temperature fluctuations occurring in the basement during seasonal weather changes.
During the installation of the supports, it will be necessary to fill in a layer of heat-insulating material in the upper parts of the sinuses of the excavation, to make a drainage system of the soil around the support pillars and on top with a layer of extruded polystyrene foam. And also sheathe the outer parts of the supports with heat-insulating material.
Insulation installation
As a result, the inner side of the foundation is wet all summer. Over time, the wet surface is first covered with mucus, then mold. And after a few years, the foundation, and possibly also the walls, will require major repairs.
Basement insulation scheme using expanded clay.
In winter, with the onset of cold weather, the situation looks even more depressing. An uninsulated foundation becomes absolutely defenseless in front of pushing forces, under the influence of which it swells, distorts and rapidly collapses, the consequences of which can already threaten the entire structure. And then even carrying out repair work will not be able to correct the situation.
Taking into account the importance of the problem, its solution should be started at the stage of design and construction of the bath foundation. Fortunately, the modern market offers a wide selection of thermal insulation materials produced using advanced technologies.
Their main advantage is their small thickness and excellent heat-saving properties. Therefore, if you wish, spending quite a bit of money, and without resorting to the help of specialists, you can insulate the base of the bath yourself.
Thermal insulation of a columnar foundation
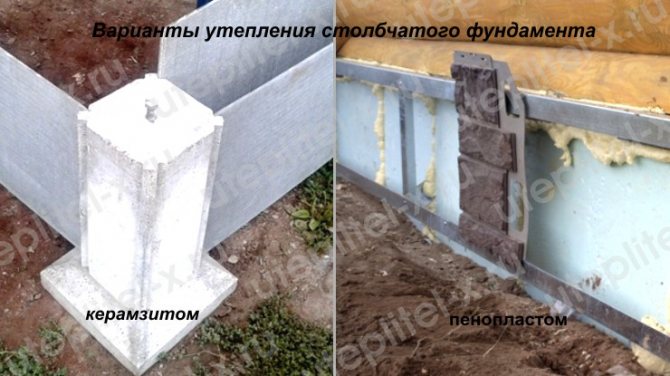
It is possible to insulate the columnar foundation with the help of a pick-up and a number of other additional insulation works. A pick-up is a boundary wall located between the posts. It can be constructed from various materials: wooden planks, brick, stone. Each type of pick-up from a particular material should be described in more detail.
The degree of warmth and dryness of the floors in the house, its protection from winds will depend on how technologically correct the filling is performed.
Arguments in favor of warming the basement of the bath
It is known that almost a fourth of the total heat loss in the bath is lost through the foundation.
Its freezing leads to premature aging and destruction of the waterproofing coating.At the same time, insulation of the foundation allows:
- reduce heat loss and heating costs;
- maintain an optimal and stable air temperature inside the bath;
- prevent the formation of condensation on the inner surface of the foundation;
- protect waterproofing from mechanical stress and damage, and increase its service life
Warming process
How to insulate?
You can use as heat-insulating material:
- Penoplex (expanded polystyrene boards) is the best material for. It is very durable and its vapor permeability is close to zero. The characteristics of the foam are unchanged even in water, since it does not absorb moisture.
- - its strength is not as high as that of penoplex. It is easy for them to insulate the inside and outside to protect against moisture. Foam is often preferred because it is cheap and easy to install.
- Expanded clay is a fairly cheap bulk. It is produced by firing clay.
- Mineral wool - easily absorbs moisture, it is better not to use it for external insulation. During installation, the cotton wool is covered with foil. If mineral wool is chosen as the quality, first create, lay and cover everything with a plate for protection.
In order to protect the air cushion between the floor of the house and the ground from the cold during the frost period, you first need to create a wooden frame between the posts. The next step will be to attach the foam boards to the frame with dowels and.
The seams between the plates must be properly treated with polyurethane foam. Next, you need to protect against possible mechanical damage and exposure to ultraviolet radiation. For this, either basement panels are perfect.
When creating a blind area, you need to remember that its height above the ground should be 10-15 centimeters, regardless of the material from which it is made (it can be concrete or). If the base is not provided between the posts, only the grillage needs to be insulated. If you use mineral wool to insulate the floor of the first floor, according to the technology, a layer of 10-20 centimeters must be laid between the floor beams and covered with a waterproofing film. After that, a floorboard with a thickness of at least 40 mm can be laid on top.
When building residential houses and country cottages, as well as garages and outbuildings with their own hands, they often give preference to the arrangement of columnar foundations with widened soles, which are erected from wood, stone or reinforced concrete. Columnar foundations are arranged only on homogeneous stable soils. To reduce heat losses and reduce the cost of heating the building, a set of special works is carried out - insulation of the columnar foundation.