
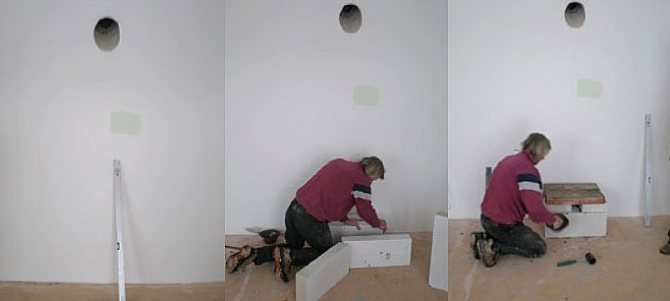
Preparatory work
Cladding bricks must be refractory.
- brick;
- cement;
- sand;
- reinforcing mesh;
- Master OK;
- shovel;
- grinder;
- container for solution preparation.
Silicate bricks are not suitable for cladding fireplace surfaces that reach high temperatures. It is necessary to buy refractory bricks. It is not subject to destruction at significant temperature changes, it is able to accumulate and gradually release heat. Masonry mortar can be prepared by hand.
This will require cement, sand and clay added for plasticity. It is recommended to pre-soak the clay, pour it with warm water and leave it for two days, only after that it can be added to the solution. Prepare in advance the decorative elements provided by the project. How to overlay a fireplace insert with your own hands?
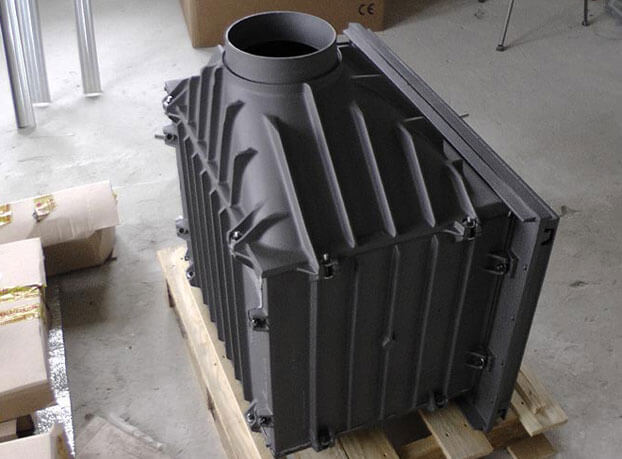
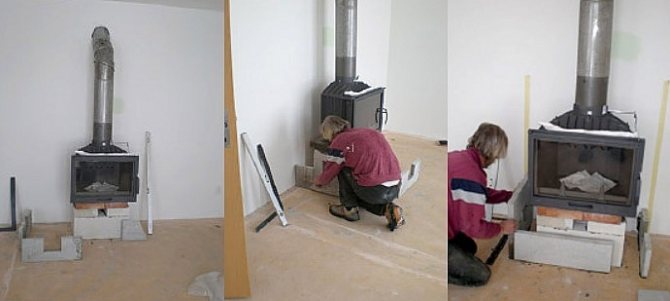
Metal fireboxes have a fairly large mass. However, the main danger arises from the strong heating of the structure. In order to make such a firebox safe, it is installed on a pre-assembled and fixed pedestal made of metal or concrete. Cladding also plays an important role.
Cast iron furnaces have a certain sequence of work, which you can familiarize yourself with below:
- In order for the design of the heating unit to warm up well, but at the same time not overheat or deform, a small gap must be left between the combustion chamber and the portal, a little free space, about 5-8 centimeters;
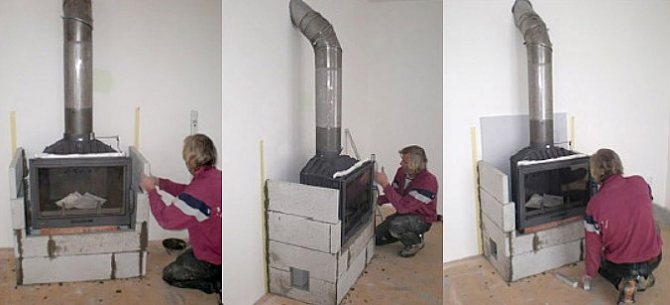
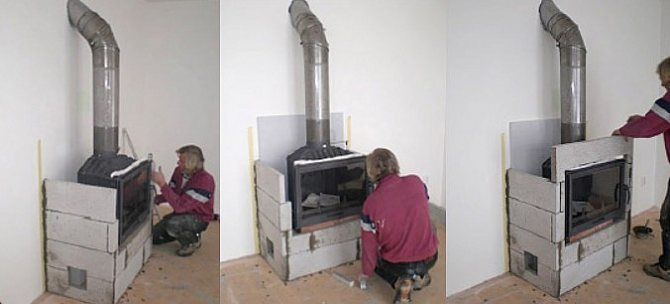
- The combustion chamber is pre-installed on a sheet of metal or a loaf base. Bricks are also laid only on a protected floor surface;
- Pre-soak the brick in cold water. The first rows are laid as tightly as possible. You also need to keep the same thickness of the seams, which ideally will be 3-6 millimeters;
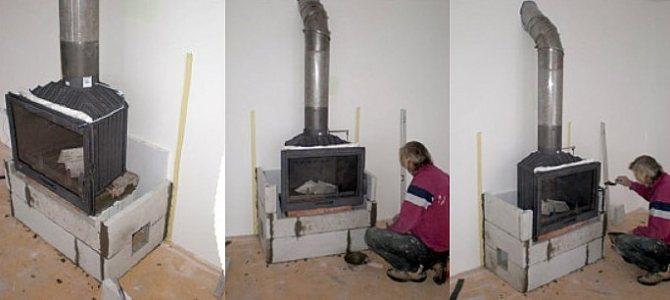
- In the same way, we lay the remaining rows, dressing is periodically performed. When laying the second or third row, several holes or so-called ventilation ducts are left;
- We use a plumb line and a building level in order to check the evenness of the structure and masonry of the rows;
- A brick structure should have a well-thought-out and convenient functionality. All compartments and elements are installed in such a way that, if necessary, free access to each area is provided.
After the brick fireplace portal is completely assembled, it is necessary to eliminate all excess mortar. After that, the fireplace needs time to dry completely and get a natural shrinkage. This can take from 7 to 20 days, depending on the size of the structure.
It is important to remember that if the dimensions of the brick base are very large, and the mass exceeds the weight of 600 kilograms, before building the portal and installing the firebox, you will need to make a foundation.
For an additional foundation, you will need to dig a hole, at the bottom of which rubble is compacted, reinforcing bars are inserted, and a special composition is poured.
Design, calculation and purchase of materials
The firebox is purchased - you can start the project. The power of the device is 13 kW, which is already 2 times higher than the calculated one. The calculation was carried out using a special calculator, having the size, power, dimensions of the device available, numerous photos and videos on the Internet were previously viewed. It was calculated that 225 bricks are needed for the front of the furnace.
We suggest that you familiarize yourself with How to repair a crack in a cast iron stove plate
A shaped kiln brick from the Engels factory was chosen for the construction. The brick was bought with a stock, as well as in a convenient format - by the piece at an affordable price. There were also bought doors for cleaners, which are needed to close the hot air outlets from the furnace and a damper for the air channel from the basement for good air ventilation.
It was decided to lay out the sides of the stove that go into adjacent rooms, and this is the kitchen and the bedroom, with full-bodied red brick, which was available. This can be done, since the parts will not come into contact with the fire. To prepare the solution, you can use a ready-made masonry oven mixture, which was purchased by 20 bags.
You also need a couple of bags of cement for pouring the base under the stove and chimney in this design: to the attic - a sleeve (heat-resistant stainless steel. This is 321 steel), lined with brick, then a sandwich will go through the attic and onto the roof. I have prepared a set of necessary tools, which is quite natural for such work. A grinder and a laser level are also needed.
We stock up on everything you need
The process of finishing a cast iron fireplace is a complex process that requires the use of special tools. For such purposes, specialists use a set of certain products and mechanisms:
- level;
- roulette;
- hammer pickaxe;
- plumb line;
- Master OK.
You also need to stock up on small containers for mixing the mortar and transporting it to the place of masonry (buckets, pallets, etc.). To cover a metal fireplace with bricks, you should also stock up on materials:
- Brick. This product must be designed for high temperature service. Building bricks should not be used, but refractory materials should be preferred. Many experts recommend buying decorative materials right away, which will exclude additional finishing on the outside of the masonry.
- Solution. You can make such a mixture yourself from clay, cement and sand, but this procedure requires adherence to a certain technology. It is much easier to buy ready-made masonry products that only need to be diluted with water to a certain consistency.
- Asbestos cardboard, metal corners, etc. All these attributes are auxiliary and are used to optimize the design (insulation, reinforcement, arches formation, etc.).
Making brickwork
Corner brickwork scheme.
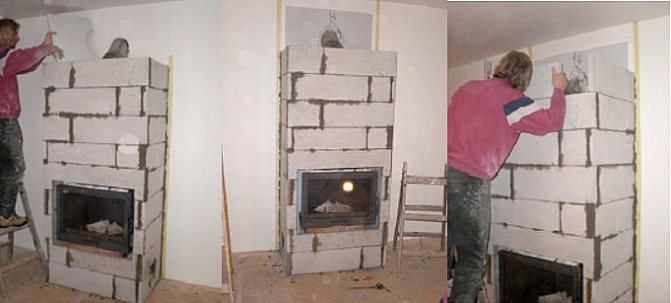
Cast iron furnaces begin to be lined from below. The lower part for any fireplaces is built according to a single scheme, according to which it is made in the form of an M-shaped structure with right angles. Particular attention should be paid to the calculation of the initial row, since the whole structure will rely on it. Incorrect placement of the first row of bricks can lead to cracks and breaks in the upper rows.
When forming the wall of the firebox, it is necessary to leave small distances between the bricks. They should be sized so that air can easily penetrate and not slowly leak out. It is from these holes that cold air will flow into the fireplace. Do not cover these gaps with mortar.
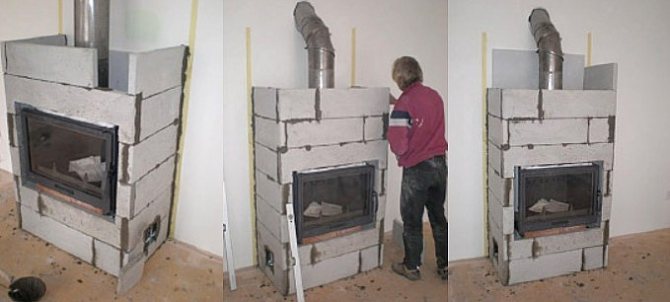
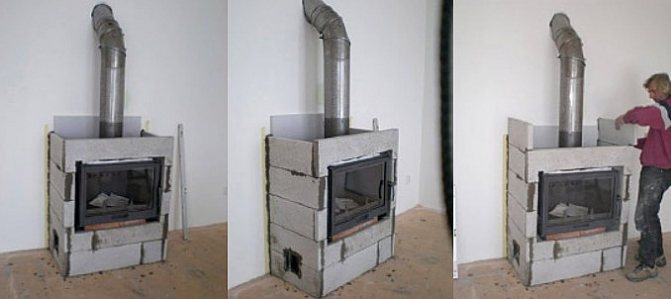
The top of the firebox is called the worktop. It is possible to cover the fireplace insert with bricks without forming a countertop, but it is this that gives the structure the greatest aesthetic appeal. You can build two such parts. One will be placed in the lower part of the firebox, the other in the upper. For the construction of the countertop, it is necessary to make a wooden formwork, the brick is cut to fit its dimensions.
The fireplace insert is laid evenly, the distance from the walls of the furnace to the cladding, according to building codes, should be 3-7 cm. This ensures the required air circulation. This technique allows you to provide the most efficient heating of the room without overheating the oven. Leaving a shorter distance can significantly reduce the lifespan of the fireplace.
It is worth remembering that the cladding should not touch the walls of the cast-iron firebox.
Pre-prepared countertops are laid in the lower and upper parts of the structure. In this case, take into account the weight of the resulting slab, it may be necessary to install a counterweight - the upper masonry.
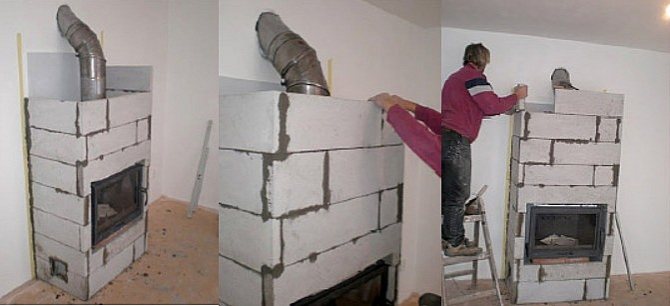
The final stage is the formation of the chimney. It can be either straight or tapered. The second type is considered more complex in execution, therefore, it is necessary to describe the construction process using his example. First of all, it is necessary to determine the value of the required slope, it should not exceed 4 cm per row. The bricks are laid with a uniform slope. Holes are made at a distance of 30-40 cm from the ceiling to remove the overheated air.
The chimney should not be located near flammable structures, this can lead to their deformation or fire. At a distance of up to 20 cm above the holes, the chimney passes into a metal pipe. If there is no pipe, this distance can be bricked. Thermal insulation of the chimney avoids heat loss.
Features and varieties of fireplace inserts
It is important to remember that the fireplace insert will work as efficiently as possible if certain conditions are met:
- the chimney must work reliably;
- the fuel used for kindling the fireplace must be of high quality and not have any harmful impurities;
- the skill of operating the fireplace is only welcomed.
The high-quality operation of the chimney is extremely important so that the draft is continuous, and all harmful combustion products formed in the process of fuel combustion are freely discharged outside. Therefore, the chimney device for the fireplace must be made flawlessly.
Certain requirements are also imposed on the chimney due to the fact that during the operation of the furnace it is imperative to take into account the following features of the chimney:
- the height of the chimney is directly proportional to the traction forces, therefore, in order to enhance this parameter, a longer chimney system should be equipped;
- A lot of small nuances, which are not always noticeable at once, contribute to a decrease in thrust: various cracks and chips in the pipe body, structural elements poorly adhering to each other, an unclosed furnace door, etc.
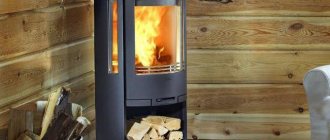
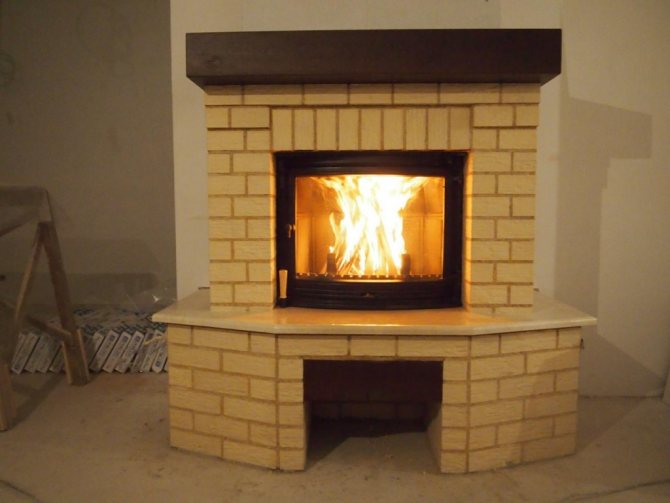
If we talk about the types of fireboxes, then it is customary to distinguish between two main categories: the most common open fireboxes and closed-type fireboxes. Each of these designs has both its advantages and disadvantages, which should be discussed in more detail.
A fireplace with an open firebox differs in that the owners can easily see the fire burning in it, which is often quite effective.
By the type of construction, such a firebox is a niche in the surface of the wall, for the arrangement of which it is first necessary to strengthen the fireplace foundation. Fireplaces with a closed firebox have a higher heat output compared to units with an open firebox, since the heated air does not escape outside as it happens in models without a door, however, the aesthetics are certainly higher for an open type fireplace.
A fireplace with a closed hearth has a number of undeniable advantages:
- the whole structure is very easy to use due to its compactness;
- installation of such equipment does not involve any difficulty;
- it is much easier to regulate the combustion process of fuel in such a structure than with open-type systems;
- thanks to the heat-resistant glass included in the design of such a furnace, any ignition due to the release of sparks and other unpleasant situations is excluded;
- the performance of fireplaces with a closed firebox is very high (as a rule, the efficiency is more than 80%).
In addition, all installation work, which includes both the lining of the fireplace insert and the external design, for a closed fire chamber is more expensive and more complicated.

Preparing masonry mortar
A stove, for which only a refractory brick is selected, will be much stronger if you prepare a high-quality mortar at home with your own hands. It is important to remember that since the oven is very hot, the composition must also be heat resistant. That is why it is recommended to use clay among the components. To knead, you need to follow the following step-by-step guide:
- In the prepared container, we need to mix two parts of sand and one part of clay. Keep the sand clean and free of lumps, dirt and plants. Pre-sift it through a special sieve and only then start mixing with other components;
- Next, water is poured into the two components in a ratio of 1: 4, mixing is performed, and the composition is left under a lid for 40-60 minutes, after which it is mixed well again. For these purposes, it is most convenient to use a construction mixer;
- In order to check the quality of the prepared mixture, a small piece needs to be rolled up and shaped into a rope, the thickness of which will be 10-12 millimeters. After that, it is formed in the shape of a circle. If no cracks appear on the surface and the consistency is similar to plasticine, then there is a lot of clay in the composition. To improve, it is necessary to add sand to the solution and after mixing, wait again for about an hour. If, on the contrary, the solution cracks strongly and a tourniquet does not form from it, add clay and let it brew.
The basis of almost any masonry mixture is a substance that is similar in composition to the material used for walls. Therefore, in the case of a brick fireplace, it is advisable to use clay solutions. The algorithm for their preparation is relatively simple and consists of several steps:
- Initially, sand and clay are mixed in a special container (2: 1). Please note that the sand mixture should be as pure as possible and consist only of this substance. Therefore, it is pre-sifted through special feed, which allows you to remove all organic components (plants, etc.) and large stones that cannot be kneaded to a uniform consistency.
- When the mixture is ready, it is poured with water in a ratio of 1 to 4 and the solution is allowed to acquire the desired plasticity. To do this, it is initially left for about 3 hours, then mixed thoroughly and then again allowed to stand for about an hour. To minimize evaporation of water, the container is closed with a lid or similar structure.
- At the end of the time, the mixture is checked. To do this, a small tourniquet is rolled out of it, about 1 cm thick.Then it rolls up into a ring with a diameter of about 5 cm.If during this process the solution looks like soft plasticine and there are no cracks, then there is a lot of clay in it. This is eliminated by adding sand and additional infusion. When it is difficult to form a ring with the help of a substance or it has large cracks, then this indicates a lack of clay, which must be added to it and left to infuse for some time.
Furnace finishing
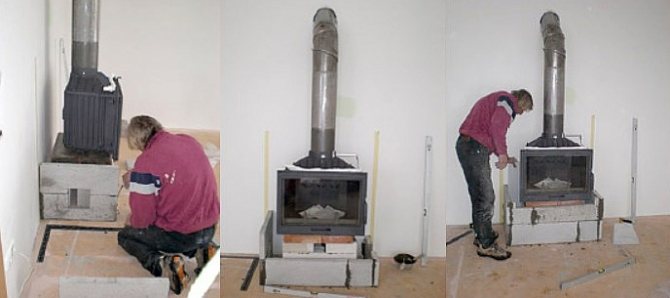
An iron fireplace is not only heavy, but also a relatively dangerous structure. Therefore, it must be operated in accordance with all safety standards, according to which it must be installed on a metal or concrete base. The process of finishing a fireplace insert is carried out in compliance with some sequential rules:
- To ensure the optimal level of heating and movement of warm air, a gap of about 5 cm must be left between the walls of the stove and the masonry.This parameter is taken into account when marking the base of the structure.
- The brick is placed on a flat surface, often using the same metal sheet that the oven is placed on. Therefore, when buying it, you need to take into account this small nuance.
- The first row should be solid without any holes or crevices. Before construction is carried out, the brick should be slightly wetted. The mortar is applied with a trowel in such a quantity as to form seams with a thickness of 3 to 5 mm.
- All subsequent rows are laid according to the same principle, observing the binding of bricks. In the second row, experts recommend leaving 2 small holes that act as ventilation.
- After placing several rows, it is imperative to control the level of the masonry and the verticality of each of the corners. To do this, use plumb lines or a flat rail.
- In the places where the doors are located, special openings are formed, which make it easy to access the firebox and perform the necessary operations with it. In the same way, the entire brick structure is built, observing the previously considered rules.
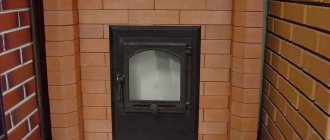
Upon completion of construction, the fireplace can be decorated with special clinker tiles that can withstand high temperatures. is selected individually and depends on the wishes of the owner.
Furnace construction
The construction began with the pouring of a reinforced concrete base 200mm thick. This is exactly what was required for the stove and chimney. The pouring was carried out on concrete floor slabs, having laid out the brick formwork. In the basement under the slabs, a base for the furnace was built from reinforced concrete blocks, which coincides with the dimensions of the furnace base. An air intake channel was punched under the closed valve. Laying began after the base was firmly in place.
The first row - solid was made with bricks "on the edge". A firebox stood on its legs without supports. Next, there was a row tab along the entire perimeter in accordance with the order. All rows were tied up. The solution was mixed in the container in small portions, first it was necessary to lay out the row "on dry" and saw through the bricks where it was needed. Before laying on the mortar, the brick had to be soaked. Seams should be made no more than 3-4mm.
3mm gaps were left between materials with different temperature expansions. As a result, it turned out that the fireplace insert was installed so that it did not come into contact with the brick parts. On the side of the bedroom and kitchen, at the bottom of the masonry, half-brick openings were made for the intake of cold air from the floor level. The masonry was covered from above with a sheet of metal and basalt.