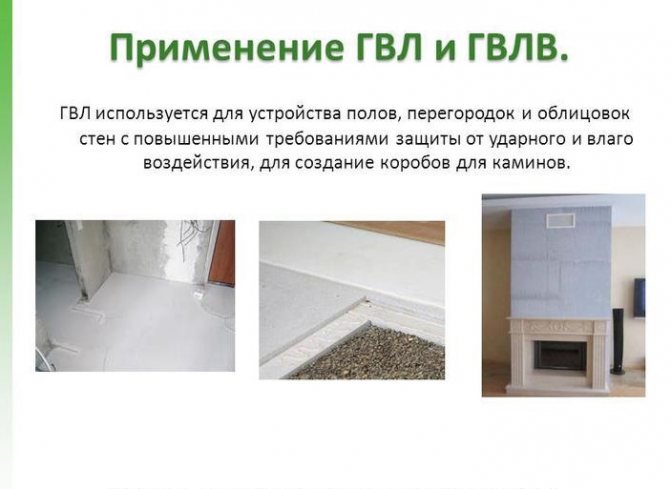
Technology and nuances of laying GVL on the floor under the tiles
Gypsum fiber materials have proven to be excellent when working on horizontal substrates. Due to its stable characteristics, the resulting surface is suitable for cladding with various products. Most often, the installation of GVL on the floor under the tiles in the house is complemented by the installation of underfloor heating. But in order to obtain a quality result, certain rules must be taken into account.
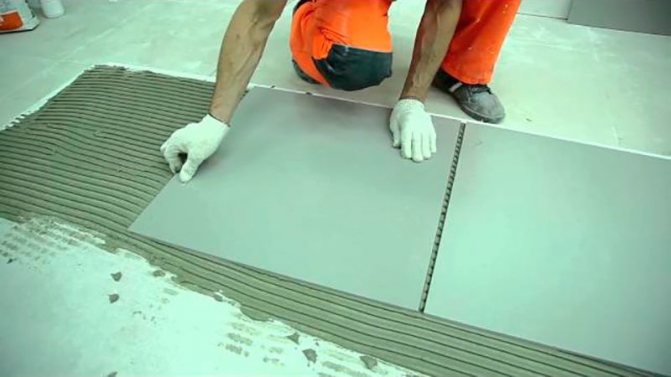
Laying tiles on gypsum fiber
To lay the tiles, you need to prepare the necessary materials and tools in advance. The general order of work is as follows:
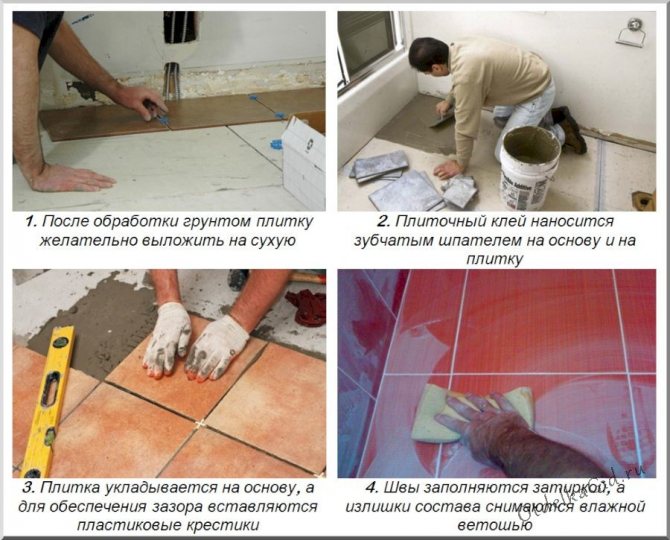
- The layout of the premises is being carried out. For this, lines are drawn from corner to corner and between the center of adjacent walls. This will allow you to stick products with a pattern fit.
- The substrate is primed in two coats to ensure good impregnation and allowed to dry.
- The starting point of the assembly is determined and the layout of the elements is created. Pre-calculation is often required.
- Glue is applied to the surface. You can mix it yourself or purchase a ready-made composition. Spread the mixture over the substrate using a notched trowel.
- You need to glue the parts in a clear sequence, for this the element is pressed and, if necessary, tapped with a mallet with a level adjustment.
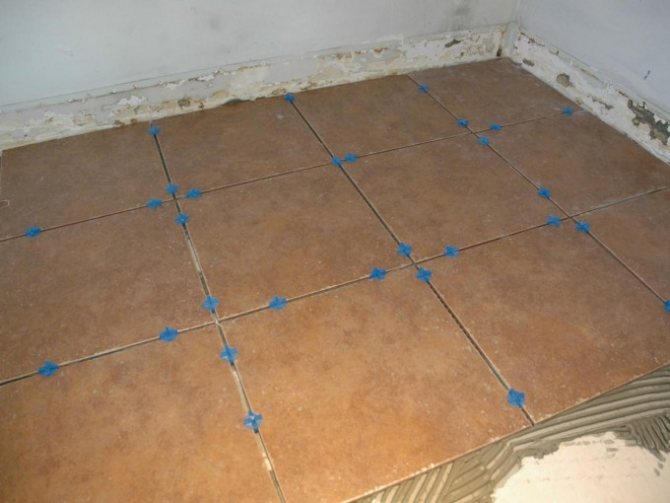
- Parts are exposed at intervals, joints are formed using plastic crosses or a tile alignment system (TPS).
- The outer fragments are trimmed taking into account the gap from the walls.
- The coating is left to dry, after which it is necessary to wipe the seams with a special mixture of the desired shade. The composition is applied to the joints and spread with a rubber spatula, the excess is removed.
When working with GVLV, tiles are laid on ordinary tile adhesive
If you do not violate the technology of the process, then the surface will last a long time.
Characteristics and features of the material
Gypsum fiber panels have a lot of parameters that distinguish them favorably from other sheet products:
- Strength. The homogeneous structure ensures high performance. This is due to the composition: gypsum and cellulose fibers, which give a reinforcing effect.
- Viscosity. Elements can be processed in various ways: sawing, milling, etc., this will not lead to damage to the structure and deformation of parts. It is due to this that a good result is achieved when installing a warm floor.
- Fire safety. The products do not support the spread of fire, which allows the slabs to be laid on various communication systems.
- Low thermal conductivity. The resulting gypsum-fiber surface can be used as additional insulation. But this greatly complicates the process of installing a warm floor, since the system has to be literally built into the sheets of gypsum fiber board.
- Wide range of applications. The slabs are suitable for concrete and wood substrates as well as for dry screeds. The sheets have a relatively low weight, therefore they do not exert a significant load on the bases.... The material can be laid by hand without the involvement of specialists.
The most important advantages of this material are environmental friendliness and fire resistance.
Application area
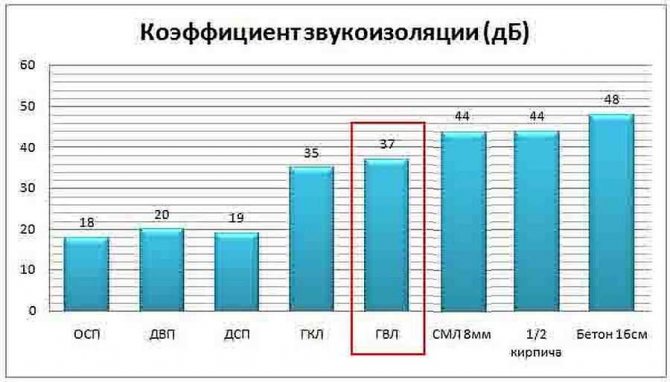
The use of gypsum fiber sheets significantly increases the soundproofing characteristics of the floor. Another advantage of this finishing material is the ability to retain heat, therefore, GVL for the floor combines the functions of a subfloor and insulation. Using GVL sheets, you perform the screed in a dry and clean way and you can immediately start laying the topcoat.
Dimensions of GVL sheets
There is a moisture resistant version of this material - GVLV, and ordinary GVL sheets. They are used in different rooms.
Moisture resistant sheets of gypsum fiber board are used in rooms with high humidity, and ordinary sheets are laid on the floor in residential and industrial premises, where there is no risk of leaks of water supply systems and high air humidity.

Installation features
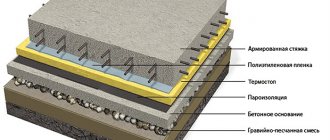
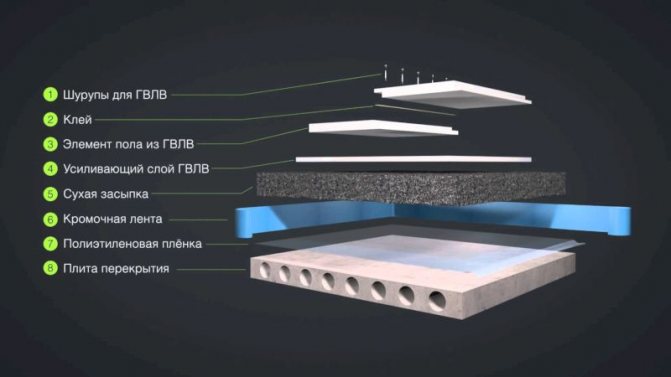
Components of a gypsum fiber screed
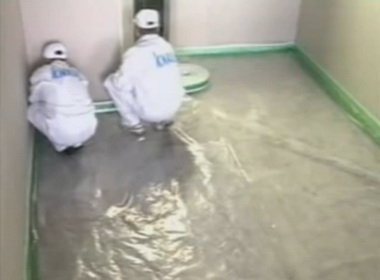
Before proceeding with the collection of dry screed from GVL sheets, a layer of waterproofing material is laid on a wooden or reinforced concrete base. For this purpose, expanded clay is most often used, since it levels and insulates the floor well. However, the very first layer that you put directly on the surface of the floors should be polyethylene with a thickness of 200 microns or more. On some floors, you can lay glassine or roofing paper. This very first layer will take over the vapor barrier function.
Expanded clay is poured onto the waterproofing film
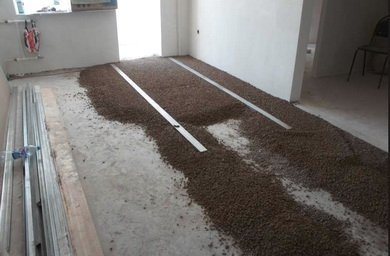
A layer of expanded clay with a thickness of at least 10 cm is poured over the rough screed
Video - What kind of backfill to choose for a dry floor screed
As additional layers between expanded clay and GVL sheets, you can put polystyrene foam boards. This technique guarantees increased heat and sound insulation and can be used, for example, in children's rooms. So you can get rid of neighbors' frustrations about your child's noisy games. Also, any engineering communications can be laid under the GVL sheets. Between the gypsum fiber board and the topcoat, you can mount a water or electric floor heating. This feature can come in handy when arranging a bedroom, nursery, kitchen, bathroom and hallway, in a word - in any room where additional heating of the floor and air in the room may be needed.
Communications are laid under the waterproofing film
Installation of a base floor made of gypsum-fiber boards of medium size, approximately 1.5 mx 1 m, with a thickness of 1 cm to 1.2 cm, is quite quick and easy, since it is based on the principle of "dry operations". The fastest floor installation is carried out using factory-glued double sheets with folded ends. If for some reason you cannot purchase double GVL plates, then simply lay the sheets in two layers. The second method, of course, is less convenient, but it allows you to get out of the situation and get a perfectly flat base floor.
Options for laying GVL on the floor
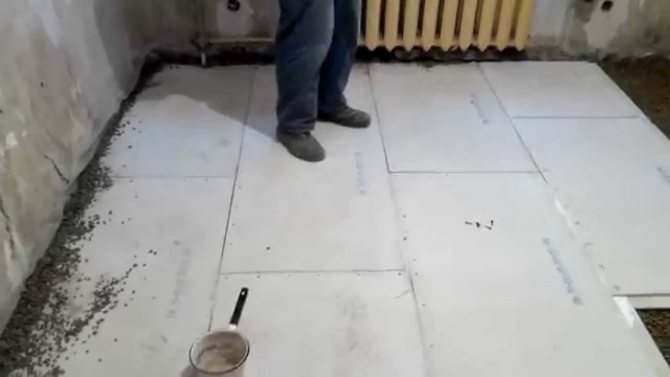
Laying sheets of gypsum fiber board on the floor
Laying GVL floor elements
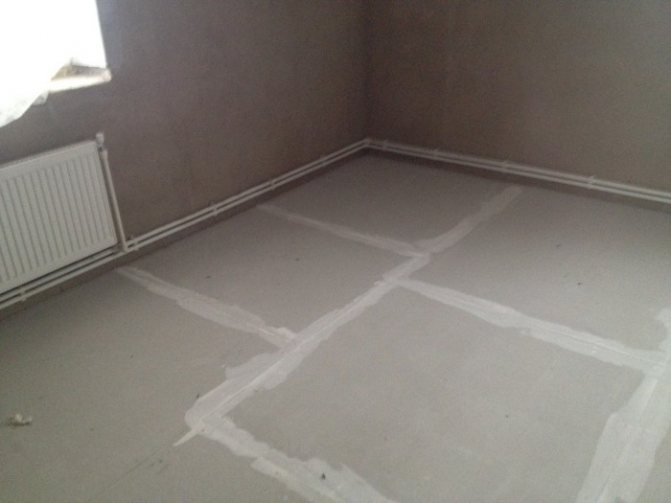
The joints between the floor elements are putty
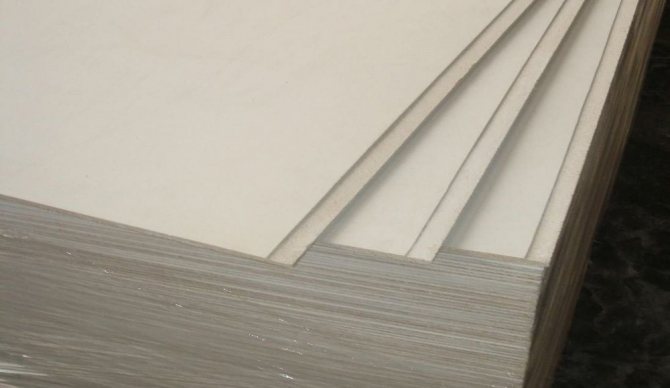
The standard length of GVL sheet is 2.5 m, and the width is 1.2 m. The most common thickness is about 10 mm. In order to avoid chalking, each sheet is impregnated with a water repellent agent and a specialized composition that prevents this phenomenon and acts as a primer. Each slab has one side carefully sanded.

Insulation under GVL
There are three main types of insulation for GVL:
- Dry backfill made of expanded clay or crushed slag on a concrete or wooden base.
- Thermal insulation layer made of polystyrene or expanded polystyrene. It can be laid on a concrete base or as an additional layer on expanded clay.
- Slabs of glass or mineral wool laid on a wooden or concrete base between the joists.
We invite you to familiarize yourself with the washing machine draws water when it is switched off.
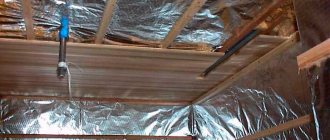
Figure 6. Mineral wool for floor insulation in a wooden house.
Other important characteristics of moisture resistant and conventional gypsum fiber sheets
| N / a | Name of characteristic GVLV and GVL | Value | unit of measurement |
| 1 | Humidity | less than 1.0 | % |
| 2 | Density | no more than 1200 | kg / m3 |
| 3 | Flexural strength | more than 5.5 | MPa |
| 4 | Hardness | more than 22 | MPa |
| 5 | Thermal conductivity | 0,22−0,35 | W / m * ºС |
What are the consequences of errors in the installation of gypsum board
It is important to strictly follow the installation rules. If you do not cut the folded edge of the sheets that will be located near the walls, then there is a high probability of the floor sinking in this place. Metal beacons left in the dry screed layer can lead to the fact that when expanded clay shrinks, deformation of the floor will occur. Be sure to use only dry expanded clay or dry it thoroughly, otherwise the floor is guaranteed to deform and you will have to invest your time and money in repairs again.
Video - Knauf dry floor screed with additional heat and sound insulation
Advantages and disadvantages of GVL boards
Among the advantages of GVL boards over other materials include the following parameters:
- resistance to moisture - in this parameter, GVL is superior to drywall and fiberboard;
- massiveness;
- high density;
- flexibility;
- environmental friendliness;
- thermal insulation;
- soundproofing;
- combustion resistance (confirmed by a corresponding certificate);
- GVL does not deform under the influence of temperature;
- easy installation;
- minimum amount of waste.
The disadvantages of GVL boards are as follows:
- the plates are heavy enough;
- it is important to follow the rules of installation and storage, in case of violations, an increase in fragility is possible;
- slabs are more expensive than drywall.
As you can see, this material has much more advantages than disadvantages.
Step-by-step instructions for installing GVL floor
Step 1
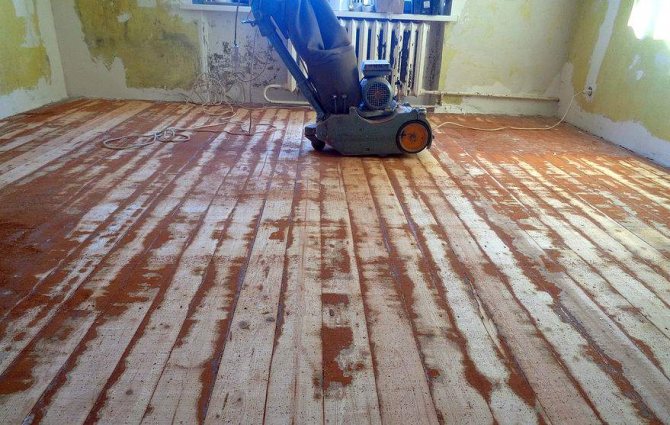
Before starting the installation of the GVL floor, you should dismantle the old flooring, boards, fiberboard sheets and logs on which the old floor lay. We remove absolutely all old materials, as a result, bare floors should remain. Be sure to thoroughly sweep the surface, remove all construction debris and, if possible, dust.
Step 2
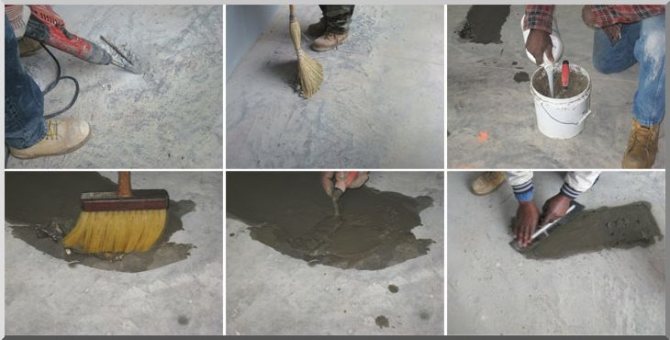
Cleared of old materials and debris, floors may have cracks and holes. They should be eliminated by pouring inside a fast-setting cement mortar with a marking of at least 150 or covering it with an assembly mixture. Alabaster is also suitable for this purpose.
Step 3
You will need a laser level for marking
It is necessary to mark the top level of the backfill. For this stage of work, you will need a laser or water level. The height of the location of the marks can vary from 2 to 6 cm. This range depends on the unevenness of the floors. As a result, the base floor will be located 2 cm higher, since the thickness of the double sheet of gypsum fiber board will be added.
Step 4
The slabs are completely ready for waterproofing. The entire surface should be covered with plastic wrap, if the floors are concrete, and glassine and bituminous paper can be laid on a wooden surface. The sheets of waterproofing material should overlap, overlapping each other by 20-25 cm. The edges should be glued with mounting tape.
The film should go over the walls and its edge should be at least 2 cm above the marks applied on the level. Adhere the waterproofing to the walls with mounting tape.
Step 5
If the floor of the GVL floor will be located communications, then all the wires must be carefully hidden in a protective corrugation and fixed on the floor. It is important to take into account that between the corrugation with wires and GVL plates there must be a layer of expanded clay no thinner than 2 cm. If necessary, correct the height of the marks.
Step 6
To exclude the appearance of so-called sound bridges, there are two options for working. You can glue the perimeter of the room with a 10 cm wide and 1 cm thick foam rubber edge tape.
You can also use mineral wool or polyethylene foam edging tape for sound insulation. These materials perfectly fulfill the function of protecting the finished floor from deformations that can be caused by thermal expansion.
After the installation of the soundproofing tape is completed, it is necessary to cut off the excess, focusing on the upper floor, including the backfill level and the thickness of the gypsum board.
Step 7
We start backfilling expanded clay. Carefully sprinkle expanded clay with a fraction of no more than 0.5 cm on the vapor barrier layer. Be sure to put on a respirator, since when expanded clay is poured out of the bags, a large amount of dust will inevitably rise into the air.
Step 8
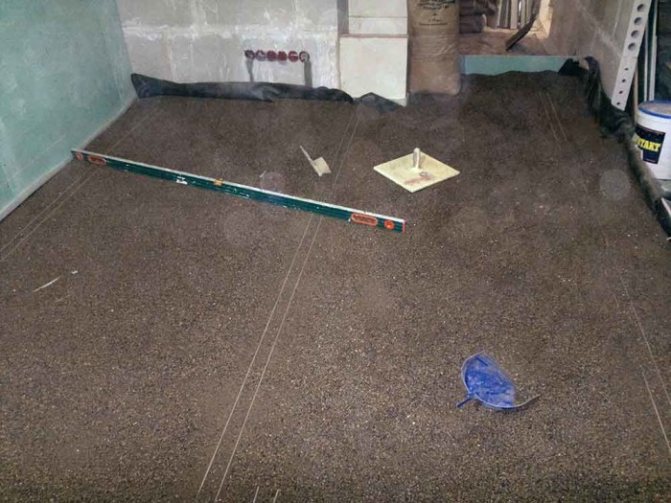
The next step is to level the expanded clay using metal profile guide beacons. Be sure to use a level when performing this operation. If you are using a water level, then when calculating the distance between the profile, be guided by the length of the level. The ends of the tool should lie on adjacent guides, which will subsequently serve as a guide and support for the rule. Some craftsmen find it convenient to use a water level instead of a rule. This technique gives additional control over the thickness of the expanded clay layer. Level the backfill meter by meter.
Pay particular attention to compacting material near walls, doorways and corners of rooms. Perform this work only in a respirator to prevent dust from entering the respiratory tract.
Leveling dry backfill
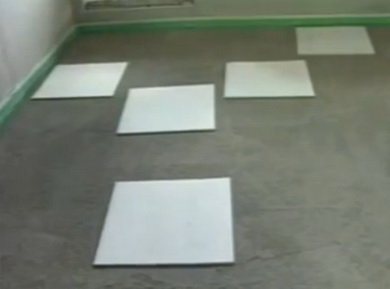
After completing this stage of work, be sure to remove the guides, and fill the resulting voids with expanded clay. In order not to deform the leveled and rammed expanded clay, use sheets of gypsum fiber board as special "islands". However, any similar materials are suitable for this purpose. For example, waste fiberboard or plywood. The size of the islands must be at least 50x50 cm.
Step 9
Additionally, the floor can be insulated and soundproofed, for this, sheets of drywall and foam are laid under the gypsum fiber board
Additionally, the floor can be insulated and soundproofed, for this, sheets of drywall and foam are laid under the gypsum fiber board
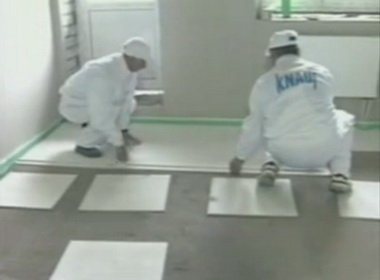
Laying starts from the far corner of the room
Joints are glued during installation
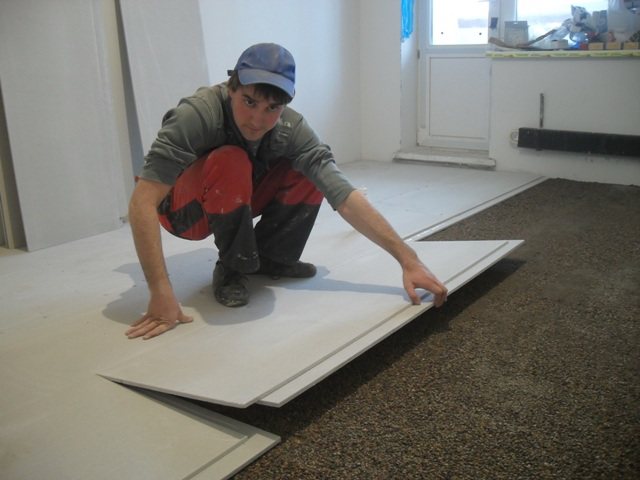
Laying GVL sheets
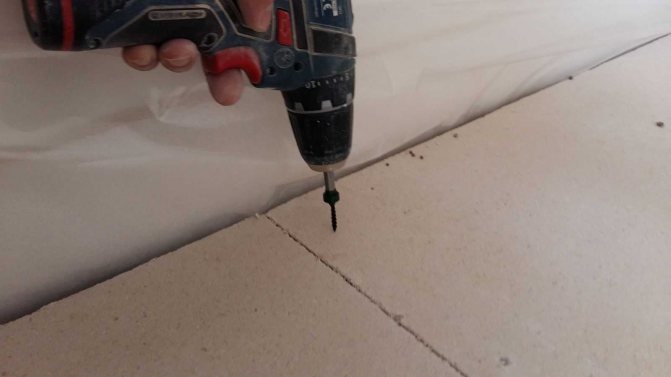
The installation of gypsum board should be started from the corner located farthest from the door. This will eliminate the possibility of damage to the leveled dry expanded clay screed. The edge of the sheet, located against the wall, must abut against the edging tape. The seam edges of adjacent slabs must be coated with PVA glue to obtain a strong "lock". Then, every 10-15 cm, it is necessary to screw in self-tapping screws with a length of at least 2 cm. Thus, the perimeter of each sheet will be strengthened in two ways.
When laying the second row of gypsum fiber boards, shift the joints so as to obtain the effect of brickwork. Use a jigsaw to adjust the slabs to size.
In cases where there is a very uneven floor base in the room and the thickness of the expanded clay layer is from 6 to 10 cm, it is necessary to lay the second one on top of the first layer of gypsum fiber board. When laying the second layer, work should be started from the corner opposite to the entrance to the room. Make sure that the seams between the slabs of the first and second layers do not overlap or overlap.
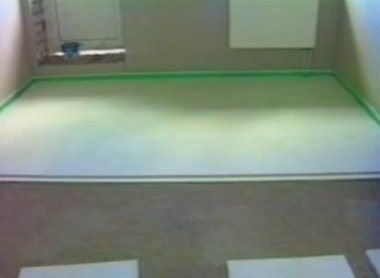
Finished work. Smooth and durable floor
Step 10
When the laying of the GVL floor is completed, you need to putty the seams between the sheets and those places where the screws are screwed. Additionally, you can use a reinforcing tape. When laying gypsum fiber board floors in the bathroom and in the kitchen, it is worth using special means for waterproofing joints with walls and seams between sheets.
You can start laying the final floor covering one day after the end of work with gypsum fiber boards, during which time the glue and putty will have time to dry. On top, you can put tiles, laminate, linoleum or any other covering. Use a specialized underlay if necessary.
Laminate can be laid immediately on the GVL floor
Video - GVL for floor
Further work on insulation
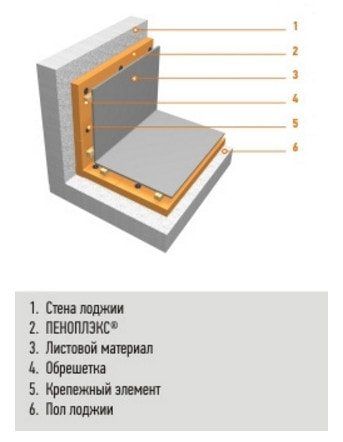
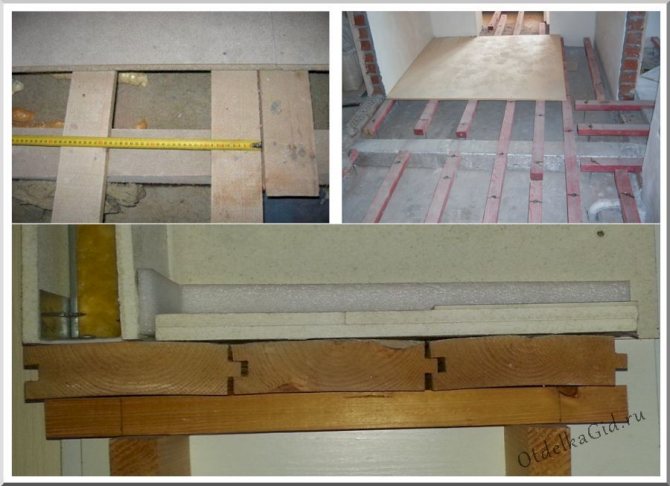
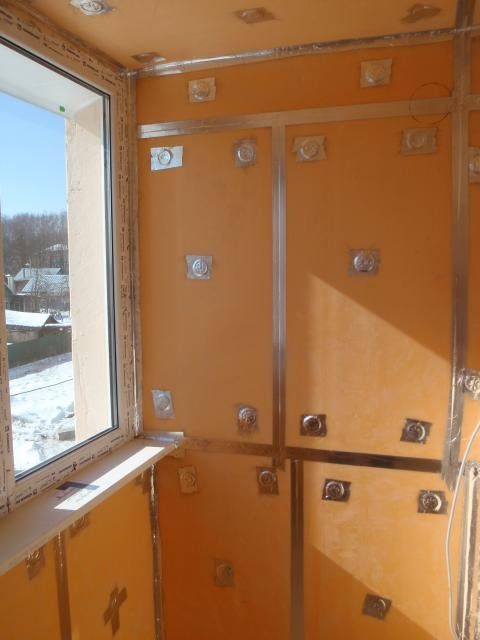
When the thermal insulation and vapor barrier material is fixed on the walls and ceiling of the loggia, you can proceed with the finishing plating. First of all, you need to install the frame. To create it, use a wooden beam of 20x40 mm in size, treated with an antiseptic. The frame is leveled horizontally and vertically and mounted with self-tapping screws and dowels.
Finishing is attached to the finished frame. For this, moisture-resistant drywall, plaster, lining, or facing plastic panels are often used (more about the installation of MDF panels). Finishing options for the insulated loggia.
As a result, you should have the following construction:
Installation of GVL floors, technology features
The rapidity of progress affects all areas of life, but it is especially noticeable in the construction market. Not even a month goes by here without the emergence of innovations. The innovations have significantly changed and simplified the technological processes of all stages of construction, making life easier for both professionals and beginners. Thanks to the use of advanced technologies, labor-intensive processes in the construction, reconstruction and repair of buildings, such as brickwork or concrete flooring, are replaced by new, simpler ones. An excellent way to make a high-quality and quick floor covering is to make a dry screed from GVL sheets. The work is carried out in comfortable conditions, without dirt and dust, with minimal labor costs.
GVL - getting to know the material
The usual drywall on large construction sites and when carrying out local repairs is increasingly replacing the new generation sheet material - GVL (gypsum fiber sheet). It is a polished slabs made of ordinary gypsum, but reinforced with reinforcement. For this purpose, fluff pulp is used - a product of waste paper processing. In the process of manufacturing, plates with the GVLV marking are impregnated with hydrophobic compounds. The peculiarity of gypsum fiber sheets, which favorably distinguishes them from drywall, is the absence of a cardboard shell, uniformity of the structure, which gives the material high strength characteristics. The technology, by its principle, is very similar to the Knauf dry screed.
Gypsum fiber for the floor: pros and cons
Gypsum fiber sheets are used for cladding any surfaces in apartments, private houses, public buildings. With the help of GVL, walls and ceilings are decorated quickly and conveniently. They are much better suited for sub-flooring than drywall or fiberboard. Gypsum plasterboards with moisture resistant properties declared by the manufacturer, when water hits their surface, quickly collapse and warp. In addition, GCR is quite fragile, with strong point impacts, it may split.
Gypsum-fiber boards behave in a completely different way in similar conditions. They differ:
- refractoriness - gypsum does not burn, the maximum harm that fire can inflict on it, surface charring;
- durability - the reinforcement gives the brittle gypsum a hardness sufficient for the use of gypsum fiber board as a floor covering;
- moisture resistance - water does not penetrate into the pores of GVLV (moisture resistant) boards due to the treatment with water repellent impregnation;
- low thermal conductivity - this indicator makes GVL sheets an ideal material for laying on the floor, they perform the function of insulation;
- resistance to low temperatures - unlike drywall, which can endure only four cycles of freezing and defrosting, GVL can withstand as many as 15 such cycles.
A small fly in the ointment in a huge barrel of honey - the cost of the material is quite high compared to drywall, however, it is justified by its merits.
Vapor barrier
This is a very important point. The vapor barrier creates a “thermos effect”. It is necessary so that moisture from the air on the loggia does not penetrate between the insulation and the wall, so it is attached only from the inside of the loggia, and not between the concrete wall and the foam!
The most effective vapor barrier is with foamed PE foam or foil PE film. Fastened with PE end-to-end on foam boards with double-sided tape or with polyurethane glue. Seams between PE sheets, as well as joints between PE and structures, must be glued with metal tape.
Choosing high-quality gypsum fiber sheets for the floor
How to choose the right GVL for a particular room? First of all, they pay attention to the price and the manufacturer. Well-known companies keep their brands and do not produce obviously low-quality products. Low cost signals low quality due to the use of low-quality components or marriage in the production process. By trying to save on material, you can lose much more time and money later when defective plates fail before the stated service life.
When installing floors in rooms with high humidity - kitchens, bathrooms, baths, saunas, special moisture-resistant GVLV boards are chosen. For other rooms, ordinary gypsum fiber sheets are sufficient. Between single-layer gypsum fiber board of standard or small-format sizes and sheets consisting of two layers, the latter are more often chosen for flooring. They are made of two slabs glued together with an offset and forming a locking system. Such material is especially easy to install. It is from it that the so-called "dry" screed is usually performed.
How to choose a drywall primer
Priming plasterboard surfaces, in addition to increasing the adhesion properties of materials, provides surface hardening and a quality finish.
According to the method of imparting certain properties to the surface, primers are divided into:
- water-repellent;
- deep penetration;
- adhesive;
- antiseptic;
- fireproof.
The choice of the composition depends on the purpose of the premises and the conditions for its further operation.
When choosing a primer for gypsum board, you need to pay attention to the finishing material that will be used indoors, namely:
- when painting, formulations with medium adhesive properties are used;
- for heavy materials (dense wallpaper, tiles), deep penetration primers are used;
- in rooms with high humidity, a water-repellent composition is used;
- uncertainty in the materials of subsequent finishing suggests the use of a universal composition for deep penetration.
Benefits of dry screed
Although the concrete coating is one of the most reliable, any master, having once laid a floor from gypsum fiber board sheets, is unlikely to want to mess with concrete mortar for the monolith next time. Moreover, gypsum fiber has a high hardness and is perfect for sub-flooring. They do not sag or creak, they are suitable for laying any floor covering.
Installation of gypsum fiber sheets is a pleasure, especially for professional builders. Amateurs who get down to business for the first time also easily cope with this non-dusty job.
The material is easy to cut, thanks to its low weight, it is easy to fit. Utilities are placed under the floors made by dry method, cable mats are laid for the installation of the "warm floor" system.
Base for dry screed
The basis for laying GVL sheets is both a concrete coating and a wooden floor. Before starting installation, standard preparation of the base is required:
- concrete screed - the surface is leveled, the cracks are filled with mortar, if necessary, coarse grinding is performed;
- lean concrete is a cheaper base option;
- wooden floor - the broken logs are being repaired, the gaps between the floorboards are sealed with a special putty.
When installing floors, special attention is paid to the horizontal surface. At all stages of work, from leveling the base to the device of the finished floor, control is carried out using a building level or level.
Insulation of the floor on the loggia with penoplex
Penoplex slabs are laid on the floor slabs. The insulated floor on the loggia can be created in several ways. This is a floor with a wooden base, pouring a concrete screed and pouring a screed with laying an electric underfloor heating on top of the laid foam boards. When insulating the floor on the loggia with your own hands, you must definitely observe the following regulations:
- If you are making a concrete screed, then before pouring it, be sure to install a strip of expanded PE around the perimeter to create a temperature gap. Then you can fill the screed with a thickness of 4 cm.
- When installing a “warm floor”, it is necessary to lay the foam boards on the floor panel, and perform a screed with the installation of an electric “warm floor” according to the instructions from the manufacturer.
- If you are laying the floor on wooden logs, then they should be installed in the longitudinal direction, then fix with polyurethane foam and cover with a tongue-and-groove board.
Since penoplex performs only the function of retaining heat, and not generating it, to create heat on the loggia, you need a source to generate it. The most effective solution is underfloor heating. You can also install electric heaters on the loggia - electric fireplaces, convectors, infrared and oil heaters.
GVL installation: 7 easy steps
Installation of sheets of GVL
- The finished base is covered with waterproofing material... For the concrete screed, a polyethylene film with a thickness of 0.2 mm is used. Glassine is laid on wooden floors. The edges of the waterproofing are placed with an approach to the walls, the joints are sealed with construction tape.
- Edge tape is glued along the perimeter of the walls - a strip of polystyrene 10 cm wide, 1 cm thick. This measure helps to prevent swelling and cracking of the gypsum fiber board.
- The entire surface of the base is covered with amorphous insulation to a thickness of at least 2 cm - expanded clay, perlite or coarse river sand. Carry out leveling it with a building rule. To make it possible to move around the lined insulation without fear of damaging the horizontality of the bedding, several "islands" are arranged.
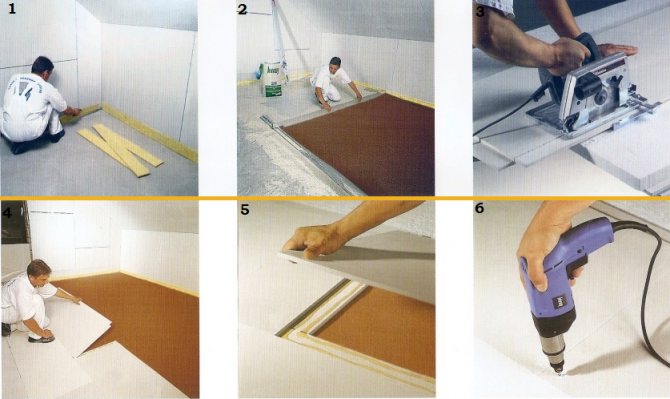
- From the wall opposite the door, begin the installation of the first layer of gypsum fiber boards... The folds are processed with PVA glue, in addition, the material is fastened with self-tapping screws in increments of 20-30 cm, depending on its size.
- The entire surface of the mounted sheets is treated with glue, the next layer is laid on them... The second layer must be laid in the opposite direction to the first, so that the material is staggered.
- Putty is used to seal the joints between the slabs, as well as the place of installation of self-tapping screws. Cut off the protruding part of the edging tape and waterproofing material.
- Lay the finishing floor - wooden boards, parquet, tiles, laminate, linoleum, PVC tiles. The coating is ready for use immediately after installation.
An example of the correct placement of sheets
The main mistakes when installing a floor from gypsum fiber board
GVL is a high-quality and durable material, but mistakes during its installation can lead to unevenness and defects in the floor. When working with gypsum fiber, be sure to:
- cut the sheets with a construction knife on a hard plane in order to avoid getting a low-quality edge that requires re-cutting;
- cut off the folded edge of the sheets laid against the walls in order to prevent them from sagging during operation;
- use only dry amorphous insulation - gypsum fiber will necessarily absorb moisture from expanded clay, this will lead to its deformation;
- dismantle the metal profile used for filling expanded clay - the insulation shrinks during operation, the geometry of the floor is disturbed;
- grease the folds with glue with high quality - poorly glued plates are not monolithic enough and make a ringing sound when walking;
- screw in self-tapping screws to a depth of at least 1 mm - an incompletely screwed fastener raises the top layer, creating bumps on the floor.
The use of high-quality materials, installation carried out in accordance with all the rules is a guarantee of the reliability and durability of the floor covering.
Video review of GVL flooring technology
Penoplex installation
For loggias that are not attached to a room, it is better to choose a 20-40 cm thick penoplex; for a combined insulation, the thickness of the insulation should be at least 40-60 cm.
1.Installation of insulation directly to the main surfaces:
The main insulated surfaces are the side and front walls, the ceiling and the floor, if it is also insulated with penoplex. Plates are attached to the surfaces with disc dowels with plastic cores - plastic "mushrooms".
2. The next stage is thorough foaming of all joints of structures with polyurethane foam.
Important! The foam should not contain toluene, which dissolves the penoplex, usually toluene is absent in summer foams, but is present in universal and winter foams.
3. The joints between the insulation boards must be glued with tape.
- Errors when insulating the loggia with penoplex
1. Often, when insulating a loggia with their own hands, the following method of installing insulation is used: they install a frame made of wooden slats or metal guides, between which foam plates are laid. And often this frame is then attached to a plasterboard finish, plastic panels or lining. Don't do this! This leads to the formation of “cold bridges and the appearance of condensation on the frame. The manufacturer of foam boards strongly discourages doing this.
2. Another common mistake is the installation of vapor barrier on the “cold side of the insulation, between the insulation and the wall - this can lead to the formation of condensation and moisture.
How to make gypsum fiber floors. Dry screed from gypsum fiber board.
A screed made of gypsum fiber sheets (GVL) is a proven technology for creating a leveling layer for floors. The base made of gypsum fiber board is durable, reliable, suitable for any floor covering - you can lay laminate, linoleum, carpet, ceramics, etc. Making floors from gypsum fiber sheets is much less time-consuming than wet screed.
What are gypsum fiber sheets
Gypsum fiber sheets are made from a mixture of gypsum and cellulose wool with various additives. Cellulose filaments inside the sheet reinforce the material, give it elasticity, eliminating the excessive brittleness of the gypsum. As a result, sheets of gypsum plasterboard, in comparison with gypsum crate, are much more bending and viscous, the material is supplied without a shell and does not crumble. The volumetric weight is 1.25 T / m3, which is more than that of drywall. But this is 2 times less than that of a cement-sand screed - 2.5 T / m3.
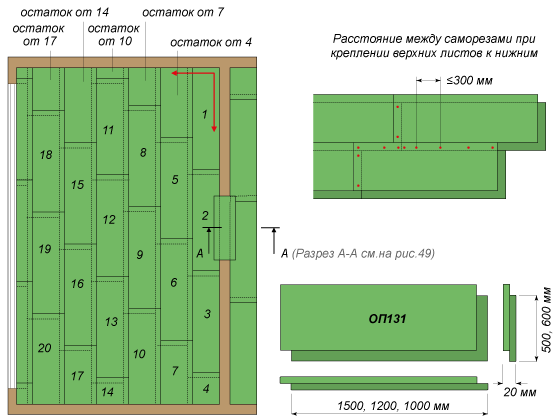
GVL sheets of various sizes are available. Standard - 1500x1200 mm - the same as for drywall, but with a thickness of 10 mm. But there can be small-format sheets -1000x1200mm, or other sizes of plates, for various purposes. For example, Knauf produces the so-called prefabricated floor made of gypsum fiber board - slabs of reduced size, but much thicker, weighing up to 18 kg in the expectation that one worker can lay the material.
GVL sheets can be with a regular straight edge or with a seam. Special sheets for creating floors are made with a wide rebate up to 10 cm, which allows them to be fastened between in one surface using PVA glue and screws.
Usually dry screeds lying on a continuous bedding or an elastic layer of insulation (mineral wool, expanded polystyrene) are created with a thickness of 2 cm or more.That is, two or three layers of gypsum fiber board are laid with the obligatory displacement of the seams between the layers.
The use of GVL in one layer is allowed provided that the bedding is accurately leveled and rammed, and a material with its own significant elastic resistance to bending is used as a floor covering - laminate, boardwalk, parquet, parquet board.
Distinctive features of GVL floors
From the point of view of the consumer, the base created with the help of gypsum fiber board laid on a layer of insulation or just sand filling is not much different from a concrete screed. It is firm and even, suitable for laying any type of flooring.
But the very arrangement of the floors is carried out without wet processes - cheaper and faster. In addition, the possibility of laying GVL up to 30 mm thick saves internal space, compared to a cement-baked screed on a layer of insulation. And also the weight of the screed made of gypsum fiber board can be several times less than the cement-sand one, which is important for apartments when creating floors on the ceiling.
In addition, there are advantages to the manufacturing process itself in creating the subfloor.
- GVL screed is created faster, less labor costs.
No curing time is required - the screed is ready for use at the time of creation.
Dismantling the structure is much easier compared to concrete options.
- GVL is a very moisture-consuming material, acts as a moisture stabilizer in a house or apartment, which affects comfort for the better.

The coating is afraid of water
But it is possible to use GVL only under the condition of the most reliable vapor barrier from a source of moisture. Gypsum can easily be saturated with water, while softening and increasing in volume, bending. So a wet base may swell. Therefore, usually GVL is not risked to be used in showers, swimming pools, bathrooms - where moisture can penetrate from the side of the room, even with complete waterproofing.
The same is true over the underground in the house - with poor ventilation and a violation of the vapor barrier, the gypsum can moisten to the state of moist soil under the house and problems begin. GVL is not used, like drywall, in basements, boilers, in some industrial premises ...
Even when laying on concrete slabs, for gypsum plasterboard, it is recommended to introduce a vapor barrier layer under the insulation and gypsum fiber board into the floor structure. And in the apartments there is also a layer of waterproofing on top of the GVL for protection in case of flooding ...
Sequence of creation of flooring and covering
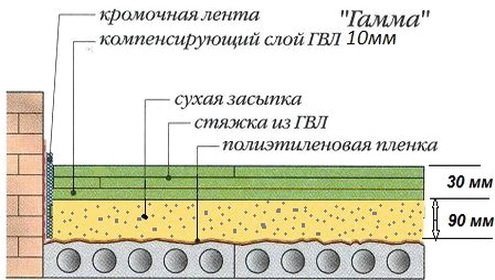
The concrete base is covered with a layer of vapor barrier - polyethylene with a thickness of at least 0.2 mm, while the overlap of the film strips should not be less than 200 mm, and it is also wrapped on the walls above the level of the finished floor.
A damper tape or expanded polystyrene with a thickness of 1 cm above the level of the finished floor is placed along the walls. The goal is to create an expansion gap for thermal expansion between the floating base and the walls, to reduce impact noise transmitted to the walls.
The next stage in creating a floor from gypsum fiber board is a leveling bedding. In the future, it should not sink, thicken, i.e. no precedent should be set for the sagging of the gypsum coating. It is recommended to use fine-grained expanded clay with a layer of up to 100 mm. If the layer is larger, then it is necessary to apply 3 layers of GVL, 10 mm each.
On the bed, long guide beacons are installed in one plane throughout the room. To do this, a continuous line of the backfill level is applied on the walls, using a water level or a laser builder. The spreading of the bedding is carried out only along the beacons installed at the same level. Otherwise, the floors will simply be uneven.
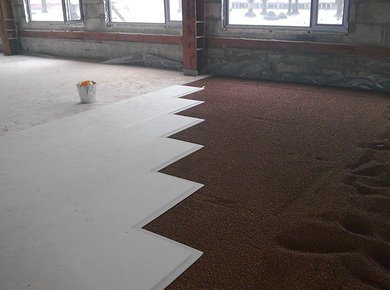
Usually, the bedding is leveled all over the room at once, and the laying of GVL starts from the far corner.Therefore, to move around the room where the floor from gypsum fiber board is being created, plates are used arbitrarily laid on the backfill.
GVL is laid in rows, while the seams are being bandaged in the rows. The seam offset is at least 20 cm. It is easy to do this by starting each subsequent row with trimming the GVL from the previous row. In addition to the displacement of the seams in the rows, there is an almost complete saving of material.
Cutting the material can be done with a jigsaw with a special file. And the fastening of individual panels to each other on the fold is done with PVA glue and screws, which are screwed in every 20 - 30 cm along the fold along its middle line.
There may be small gaps between the sheets. If the coating is not hard (carpet, linoleum), then all the gaps are putty.
If thin sheets of gypsum fiber board (10 mm) without folds are used to create floors, then they are laid in 2 - 3 layers. In this case, each layer is glued to the previous one. PVA glue is applied with a notched spatula to the laid bottom layer, and the top layer is always applied overlapping the seams with the bottom layer. Those. the middle of the top sheet should be where there is an intersection of the seams between the bottom sheets. Thus, a solid connected base is obtained, where elastic resistance to bending and fracture is provided by all layers at the same time, like a solid plate.
On elastic substrates made of insulation (dense foam, extruded polystyrene foam, mineral wool slabs for floors), thin sheets of gypsum fiber board should be laid in at least 3 layers under flexible floor coverings to achieve sufficient base rigidity.
As you can see, the work on laying a dry screed from gypsum fiber board can be done in the shortest possible time. For example, two workers can lay special folded sheets for the floor in one day on an area of up to 70 square meters, i.e. completely in a small house. It is also not difficult to make floors from gypsum fiber sheets with your own hands.

How to properly insulate and sheathe a balcony with penoplex
Do-it-yourself balcony insulation with penoplex
If suddenly the idea was born to improve the balcony or loggia and instead of a purely technical room to get additional living space that could be used all year round, you need to take care not only of a beautiful finish, but also of thermal insulation.
There are several ways by which you can insulate balcony surfaces. There are also several types of thermal insulation materials that can be used for these purposes. Recently, penoplex is often used for thermal insulation of loggias and balconies, a heater that is very convenient to use. That is why it is preferred when they want to save money on hiring hired specialists and do the work with their own hands.
Of course, in this case, we are not talking about external insulation with a penoplex loggia, since this is a difficult work, both from the point of view of the process itself and taking into account the height factor. But it is very possible to make thermal insulation on the loggia or on the balcony with your own hands using the mentioned insulation for this.
What is penoplex, what is its peculiarity
This material is also called extruded polystyrene foam, and this name reflects the essence of its production. By its chemical nature, this is a familiar foam plastic, simply produced in a slightly different way. The technology of its manufacture in this case is not of particular interest, so there is no reason to focus on this aspect. Much more important is the result, that is, the performance characteristics of the heat insulator:
- low coefficient of thermal conductivity;
- moisture resistance;
- bending and compressive strength;
- treated with antipyretics, therefore does not burn;
- does not emit toxic substances at normal and elevated temperatures;
- durability, service life without loss of properties up to 50 years;
- it is convenient to work, as it does not crumble, does not break, but, at the same time, it is easy to cut.

A negative property of extruded polystyrene foam is low vapor permeability, therefore it is not recommended to use it for external insulation of walls made of porous materials (foam concrete, shell rock).
However, in some cases, penoplex is indispensable, for example, for insulating plinths, concrete floor bases, as well as for thermal insulation of some types of roofs.
How to insulate a balcony or loggia with penoplex
It is possible to make thermal insulation of the inner surface of the walls and ceiling on the balcony with extruded polystyrene foam using the dry method (under the cladding) and wet (under the plaster). For floor insulation, this material is used mainly with the subsequent pouring of a leveling concrete screed.
Now about the listed methods of using penoplex in more detail.
Dry insulation.
- To insulate the balcony with penoplex, you must first assemble the crate from the corresponding galvanized profile or rail. It is important to take into account that the distance between the initial surface and the outer edge of the sheathing is slightly greater than the thickness of the insulation.
- Fasten the sheets of extruded polystyrene foam between the profiles or the strip. They can either be glued to the appropriate adhesive mass or fixed with special dowels (umbrellas). Here you can apply one of these methods of attaching insulation.
- Now you can make additional insulation of the balcony with penofol, which is a layer of foamed heat insulator with glued heat-reflecting foil. Penofol is fixed over the foam and the crate so that the reflective screen is directed into the room. Penofol has a small thickness, so it does not hurt when it comes to sheathing the balcony with your own hands.
- As a finishing material, you can use plastic panels, lining or drywall sheets (with subsequent finishing).
The advantage of this method is that there is, in fact, double insulation of the balcony with penoplex and penofol, which provides a very good quality of thermal insulation.
Sheathing with styrofoam for plastering.
- Clean the surfaces to be insulated and prime with a primer.
- Prepare an appropriate adhesive mass.
- Glue the surface to be insulated with sheets of extruded polystyrene foam. For this, glue is applied in slides in 7-9 places of a rectangular sheet (in the corners and in the center it is obligatory). Then a piece of insulation is pressed against the surface. In this case, it is necessary to control the verticality using the building level and the correspondence between the individual sheets using the rule.
- The heat insulator is additionally attracted by the umbrellas at five points (in the corners and in the center);
- From above, the insulation is leveled with plaster and reinforced with a fiberglass mesh. Then you need to apply another layer of solution to close the mesh, after which you can start finishing.
Insulation of the floor on the balcony with penoplex.
- Make the slab waterproofing. To do this, it can be covered with plastic wrap or treated with bitumen.
- Lay the extruded polystyrene foam tightly. Close existing gaps with polyurethane foam.
- Install beacons, which can be used as smooth wooden slats or a U-shaped guide profile.
- Pour the concrete screed.
- After the concrete is dry, you can install the finishing material on the finished insulated floor base.
Then the slots are filled with foam. After it has hardened, the nodules are cut off and sheets of reflective thermal insulation are placed on top of the penoplex - one-sided self-adhesive penofol with a thickness of 2 or 3 mm. The joints of adjacent sheets, adjoining to the facade and to the window sill timber are sealed with foil tape.
- The easiest is the first way.But the large distance between the lags, dictated by the width of the penoplex, imposes restrictions on the rough coating. The thickness of the plywood sheet must be at least 15 mm, and the thickness of the board must be 35 mm.
- The second way of laying is warmer due to the air gap, but takes up the usable volume.
- The third method is the most durable and reliable, but the most difficult to execute.
Penoplex is attached to the ceiling in the same way as to the walls, but is additionally nailed with plastic dowels in the form of umbrellas. Their advantage is that, being in the body of the insulation, they do not create cold bridges. A crate for drywall is mounted on top of the insulation. Instead of siding, decorative plaster can be used to finish the balcony.
It is applied in two steps. The first layer of plaster is applied with a layer of 2-3 mm, and the reinforcing mesh is embedded in it. The second leveling layer is applied after the first has dried. Once the walls are leveled and completely dry, they can be painted in any color. Separately, it is worth adding about water resistance, since when insulating a loggia this moment is extremely important.
Especially if the work will be done outside. You can carry out an experiment: put a piece of penoplex into a bucket of water and press it down with something so that it is completely immersed in water, and leave for 10 days. During this entire period, no more than 0.5% of the liquid will be absorbed, which means that it is negligible.
To facilitate the selection of the right plates, the manufacturer has released a whole line of products with self-explanatory names. So, on sale you can find: On the forums there are questions: “Is it possible to close the penoplex with drywall? Is it permissible to use these two materials when decorating a loggia? Polyfoam, polystyrene foam and drywall are quite "friendly" to each other. Installation of drywall to foam or foam is carried out using the same technology.
We will discuss such issues as how best to fix the penoplex to the walls, and drywall to the penoplex. Penoplex can be fixed with glue or dowels. In practice, these two methods are often used simultaneously with the aim of monolithing the insulation layer as best as possible so that no cold gets through it. It is recommended to add another layer to the insulation of penoplex drywall for the loggia - penofol, foamed foamed polyethylene foam. It will create a reflective screen that will help keep you warm.
You can fix penofol to penoplex with a construction stapler. Penoplex in the construction business is called polystyrene foam. It appeared on the market not so long ago, nevertheless it has earned high popularity among repairmen and owners of apartments or houses. The features of penoplex are as follows:
- To fix the foam sheets on the wall, the surface must first be leveled. This is not difficult to do, it is enough to simply eliminate the flaws and plaster the coating.
- When the plaster has dried, you can proceed with the installation of the penoplex. The process is carried out by gluing slabs of material on a special adhesive solution over the plaster.
Many people are faced with wall freezing in apartments, private houses, on balconies or basements. The problem is solved by installing insulation on the outside of the building, but sometimes it is more expedient, cheaper and more reliable to do it from the inside. A common option for insulation.
No metal or wood frame needed. It is used for insulating small flat surfaces: interior walls of apartments in panel houses, basements, garages; balconies and loggias. The process of making penoplex was invented over 50 years ago by American technologists. The structure of the material consists of many small granules (0.2 mm), which form an even surface. A foaming additive is introduced into these cells.
Under high pressure and when heated to a certain temperature, these granules are combined. The balconies in the apartments located on the upper floors are insulated inside.This work takes longer, and the cost of material also increases significantly, since it is necessary to mount the insulation not only directly on the walls of the balcony, but also on the floor and on the ceiling.
- The material does not tolerate prolonged exposure to the sun. Therefore, you must follow the rules for its storage.
- During operation, it can be damaged by rodents.
- Quite expensive compared to other materials.
Advice. Pieces of insulation are placed in a metal profile to prevent heat transfer through the racks. Another option is to fill them with foam.
- Glazing type.
- Thickness of used heat insulators and leveling layers.
- Types of finishes and coatings.
- Coordination of key dimensions. Especially important are the heights of the installation of window units and the levels of “clean floors and ceilings.
At the moment, penoplex insulation of a standard balcony in a Khrushchev building in Vladimir, Nizhny Novgorod or Rostov-on-Don will cost an apartment owner an average of 13,000 rubles.