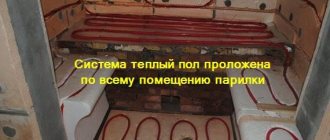

When it is required to install a stove in a bathhouse on a wooden floor, you can do this, while observing all fire safety requirements.
According to these requirements, the installation of a stove in a bathhouse on a wooden floor is allowed only if the floor is protected by non-combustible materials and is also isolated from the heat of the stove.
How can you implement such a scheme at the lowest cost and at the same time not burn your own bathhouse?
What is the purpose of laying a bath stove
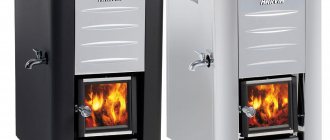
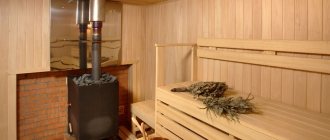
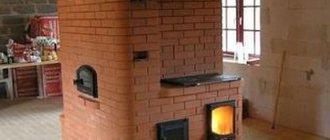
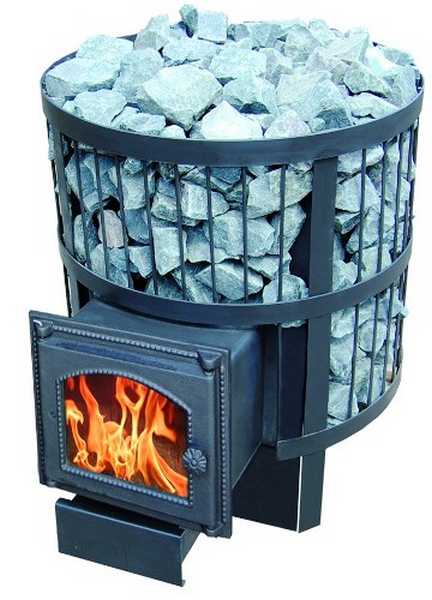
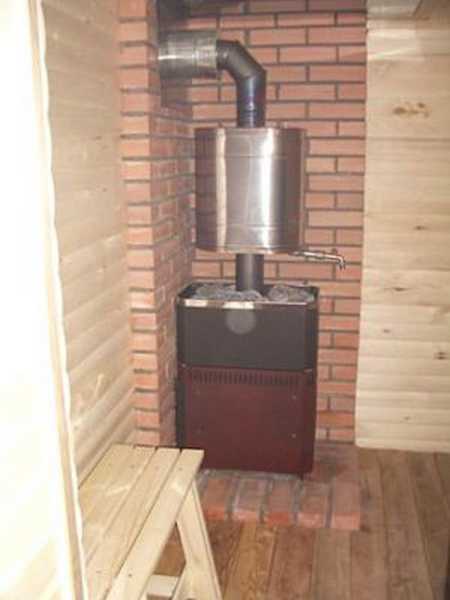
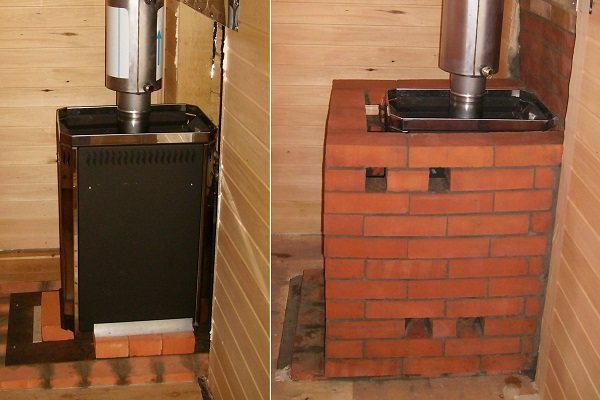
People who are well versed in "bathing" issues are sure that in order to create a "correct" iron bath stove, it should be well-covered with bricks. It is such a heater that is characterized by the supply of soft heat, light steam, while remaining hot for a long time.
Some people think that a significant disadvantage of bricking a metal stove in a steam room is that it takes too long to get the desired temperature in the steam room. Plus, in order to build a brick structure, a considerable amount of funds is required for materials. This is provided that you will do the laying yourself.
Given these circumstances, many people prefer metal bath stoves without bricking them. Although, over time, it becomes obvious that such furnace devices have a number of disadvantages that are absent in brick counterparts:
- fast heating, but also fast cooling;
- hard heat is emitted from the hot metal walls, which causes some discomfort for visitors in the steam room.
So how can you put the stove in the bathhouse so that it is cheap, beautiful and the quality of functioning of the structure does not suffer?
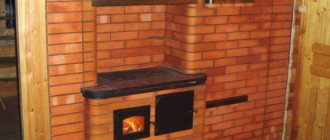
Craftsmen have found a universal solution: to protect against infrared radiation and in order to accumulate heat, it is necessary to install a kind of barrier in the form of a brick partition between the metal structure and the space of the steam room. Therefore, the optimal solution was found: it is necessary to cover the bathing unit with bricks. This option is relatively cheap and effective.
Other fire-fighting measures
So that a metal stove installed on a wooden floor in a bathhouse does not give you any trouble, you should also take additional precautions:
- Do not leave the sauna stove unattended during heating.
- Always close the fire door tightly with the latch and check this moment if you are going to leave the bath room.
- Use dry wood for the firebox, do not burn garbage, sawdust, wood dust in the furnace of the sauna stove.
- Make it a rule to heat a metal stove in a jar with small tabs of firewood.
What kind of brick to use
Before starting the main work, you must decide on the material. How to overlay the stove in the bath, what materials are used for this?
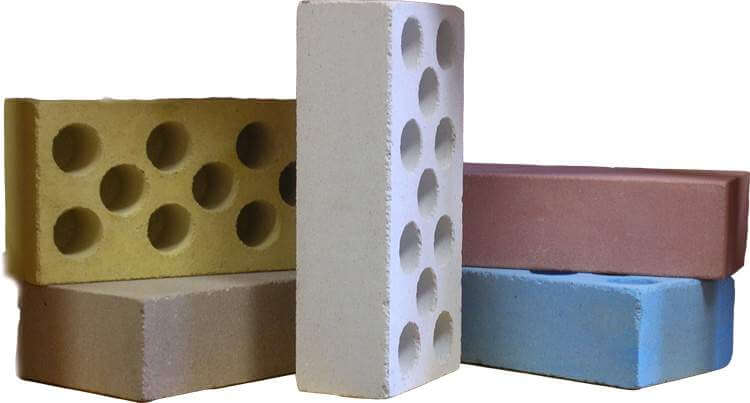
Often, such structures are erected from bricks available in the household. And this is normal, since everyone wants to spend the minimum amount of money, with the maximum return. Therefore, at home there is always a whole brick (silicate, red ceramic - full-bodied and hollow production, fireclay), or pieces of them.
If you start with a silicate brick, then it should be noted that such a brick is ideal for cladding a house, ancillary buildings. It perfectly tolerates the influence of atmospheric precipitation and therefore is durable. But for performing work on the lining of metal bath stoves, it is not at all suitable.The fact is that in bathing conditions such a brick will not withstand for a long time and will begin to collapse, since its main ingredient is slaked lime, which absorbs moisture well.
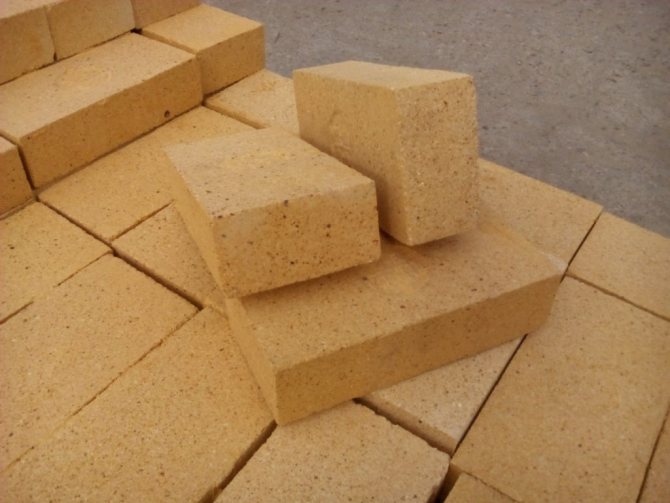
A good option for creating a thermal partition is a fireclay (refractory) type of brick. It easily tolerates sudden temperature changes and has a high heat capacity. True, the appearance would like to be the best. But this is not a problem, since it is also possible to revet the stove after lining with porcelain stoneware, as well as other materials.
Advice! It is advisable to cover the sauna stove with refractory bricks in cases where you have more than enough of it. And to acquire it for this purpose on purpose is very expensive. Therefore, you need to think about using it in another, more necessary place of the home construction site.
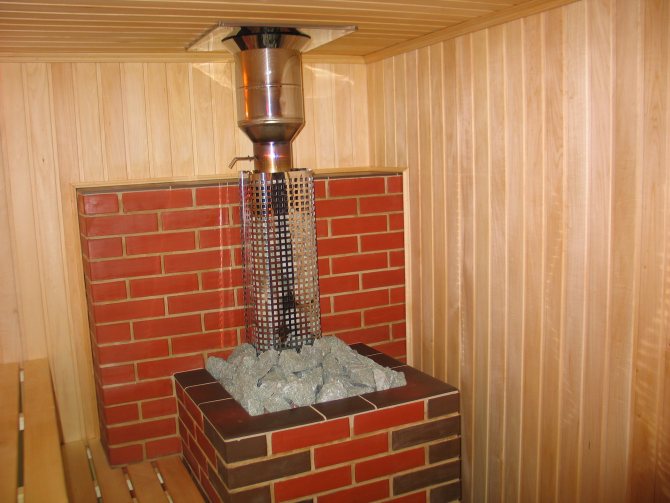
Refractory bricks are used in cases where there is a small distance between the masonry and the metal surface - from 1 to 2 cm. In this case, the brick will warm up to a temperature of 350-400⁰С.
When the gap is within 6-9 cm, then the heating will drop to 180-200⁰C, which is caused by a sharp increase in the air speed in the gap between the oven and the partition.
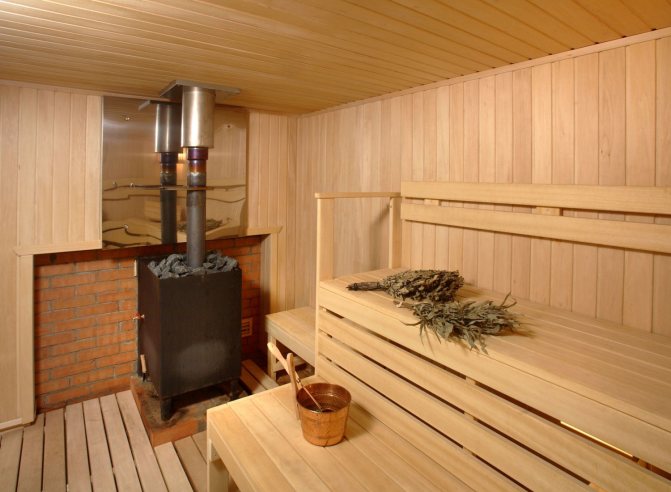
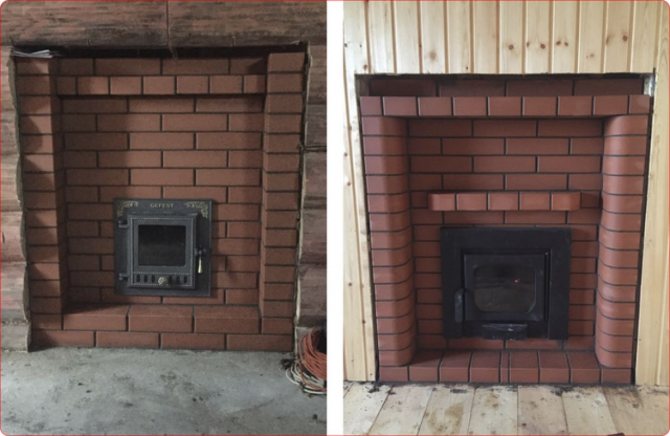
An excellent option for lining the stove in a bath is red brick. Preferably full-bodied, although hollow is also fine. But nevertheless, it is better to choose, if there is such an opportunity, the first option, since a hollow one has a small heat capacity and heat will not last long.
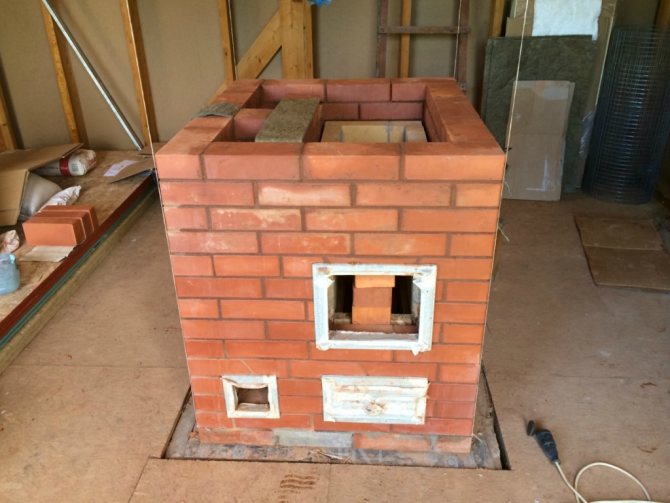
It should be noted that both the standard size of stones and their thickened version are used for lining a sauna stove with bricks. Usually they put the wall in half a brick, although it is practiced in a quarter. But in this case, it is necessary to additionally strengthen the wall, which complicates the matter a little.
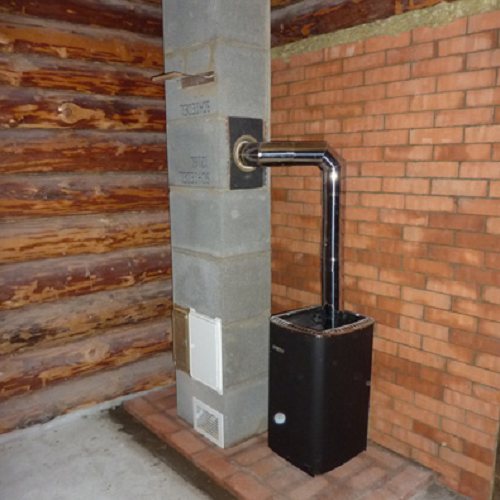
Features of the installation of iron stoves
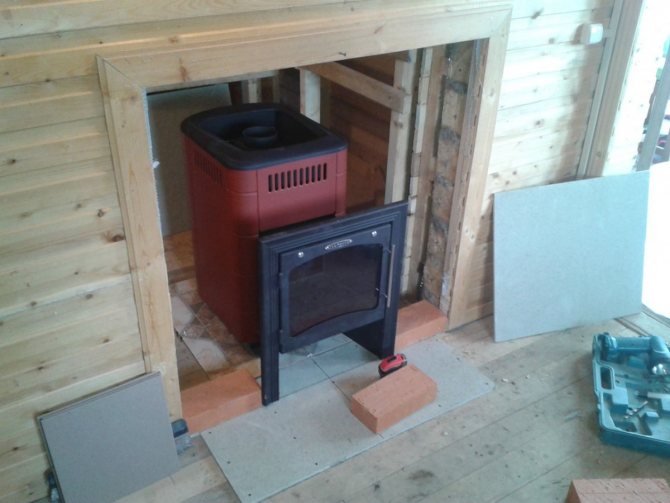
Pay attention to the fact that the installation of metal stoves must be carried out before the start of finishing work. There is one more feature of the choice of location: if you heat with wood, then it becomes necessary to constantly add fuel. This is not always convenient for those who are soaring. Therefore, the ideal location is a door outside the steam room for laying firewood. There are even special models with a remote combustion chamber, both home-made and factory-made.
Oven with a remote fuel compartment
When choosing a place for installation, pay attention to where the door will open (there are models that allow you to outweigh the door, in this case everything is easier). For example, if you put the stove in the far left corner, then the door should open to the right. Such little things determine the degree of convenience when using heating equipment.
When installing a metal stove, it is imperative to provide a chimney and a ventilation system. If the iron frame does not have a special screen that softens the harsh infrared radiation, then the heat from it spreads serious and the air dries up quickly. Therefore, the flow of cool, moist air from the street will be very useful.
How to install a sauna stove
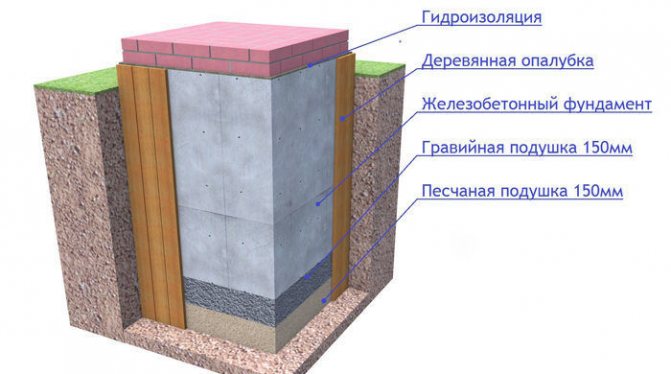
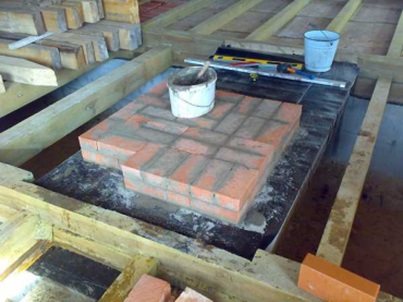
Arrangement of the foundation
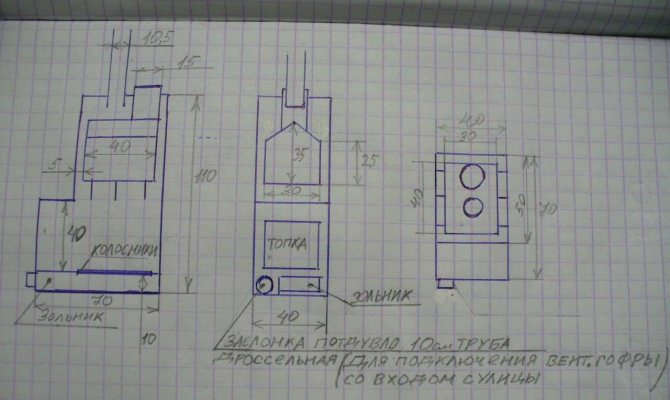
Now on the Internet you can find many drawings, photos, schemes for building a foundation for lining a furnace in a brick bath. What is this structure?
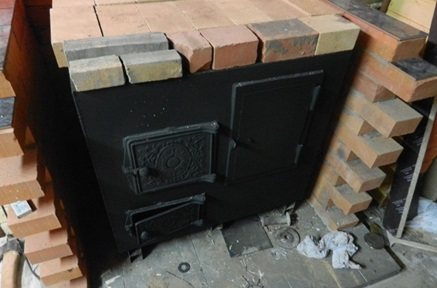
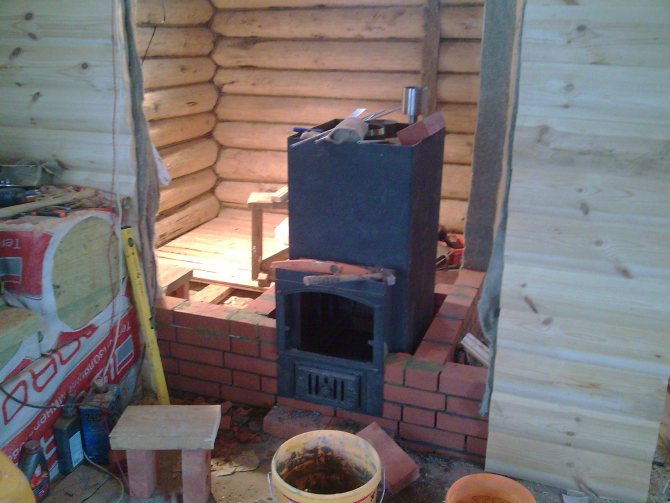
The foundation is made in the form of a quadrangular well, the height of which is equal to the height of the furnace. To close the metal walls, they use solid, or masonry with windows, through which not only fuel is thrown, but ventilation around the heating surface is also enhanced.
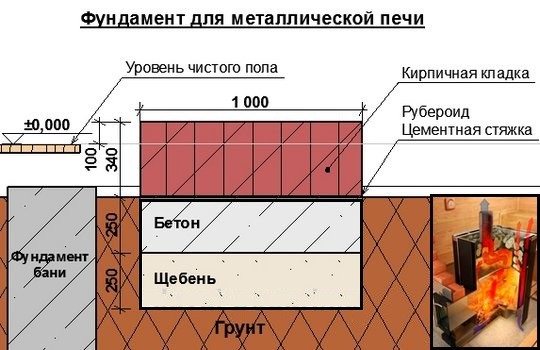
According to experts, wooden floor beams can withstand up to 650-700 kg of load. Although in practice, it is not recommended to give a load more than 400 kg per 1 m².Therefore, it is advisable to also strengthen the existing frame with an iron structure made of a corner (50 mm), or with piles of a screw nature, provided that about 180-200 bricks weighing 3.5 kg each go to the screen.
Important! Laying a classic strip foundation takes a lot of time and effort, but on the other hand, the structure will be 100% stable and fireproof.
Foundation construction algorithm
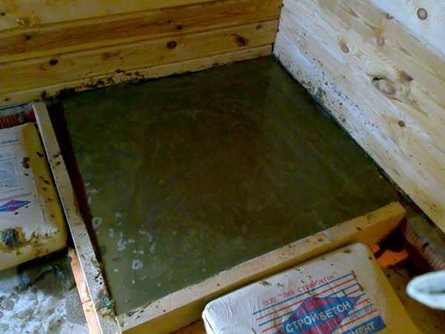
- Cut a square in the floor (if it is already mounted) of a certain size, dig a pit about 35-45 cm deep.
- Fill the bottom with coarse gravel, lay the waterproofing, install the formwork.
- Place pieces of reinforcement in the foundation frame, apply the required amount of mastic waterproofing, fill the structure with concrete about 15-20 cm above the ground.
- Bring the "pillow" to the floor level with an ordinary brick, on which the stove and the lining will be placed.
- Wait about 3 weeks for the concrete to shrink, then place thermal insulation, steel sheet (3-5 mm thick) under the oven.
Solution preparation
In order to qualitatively overlay an iron stove in a bath, it is best to use a classic clay-sand mortar. You can add a small amount (about a sixth) of cement grade 400 to it. This ingredient can only strengthen the whole structure, since the temperature of the future screen will not be high enough.
Important! Do not use cement-sand, tile and other types of mortars. The optimal, proven option for centuries, is a clay solution.
Since little clay is required, it is best to buy it at a building materials store. For villagers, such a problem as the acquisition of clay should not exist.
To prepare the solution, it is necessary to take sifted sand and mix it with clay in equal proportions. Add water gradually to form a thick mixture that can easily slip off the trowel.
What other materials are used for lining the oven in the bath
It turns out that not only bricks can be used to cover sauna stoves. Granite or marble slabs are excellent substitutes. They also tolerate temperature changes well, have a large mass and high thermal conductivity. In addition, such a finish will give the bath room an unusually beautiful and unique look. Not everyone can afford such a luxury, from a financial point of view. But if you have any remains, then you can use them to build an oven partition.
True, the installation of such slabs is a little more difficult in comparison with brickwork. To ensure a beautiful appearance of the lined stove, it is necessary that the work is carried out by a specialist. At the very least, the owner needs to at least consult with such a person.
Also, minerite slabs are used to equip the heat shield. With their help, the wall is mounted much easier and faster, even in comparison with masonry, and is able to withstand temperatures of 360-400⁰С. But the heat capacity of this material is low, so it can be used as a good partition that cannot accumulate heat.
Do you always need a foundation for a stove in a wooden bath
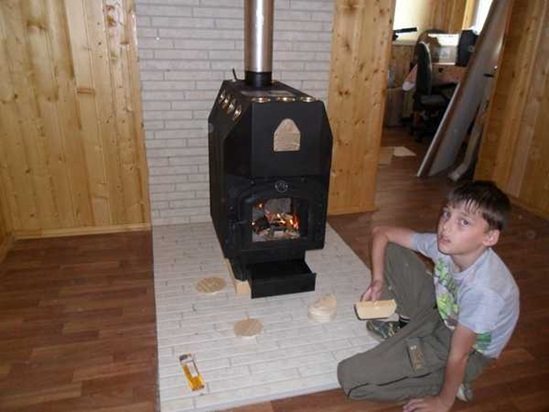
Many people ask what is the correct installation of a metal stove in a wooden bath. The answer is quite simple: the base must be reliable and strictly horizontal. In addition, it should not precipitate, have cracks, which, in combination, will contribute to the stability of the structure. Therefore, if you have reliably concreted the floor, then the question of the need for a foundation for installing a stove in a wooden bath is practically resolved. In such cases, the stove is mounted in the right place directly on the concrete. For the convenience of cleaning, for an aesthetic purpose, it is advisable to add it with ceramic tiles before that.
For combustible wood floors, a foundation must be built.Although, if in a complex, the mass of the stove with all the "bells and whistles" is less than 700 kg (just such a "mass" limit of good logs and wooden floor boards), then it is not necessary to build a separate base.
In the case of covering the stove with a reflective brick screen, installing a brick chimney, its weight increases significantly. Then it is necessary to build a separate foundation.
Typically, foundations are built 12-20 cm larger than the dimensions of the furnace device. Their depth should be equal to the depth of the bath building. It is not recommended to tie the base of the bearing walls to the foundation for the furnace, since unwanted cracks and even destruction can form in the base. In height, the foundation of the sauna stove should be 20 cm below the plane of the floor.
For the construction of the base, we use the standard algorithm. This means that you first need to dig a pit, then install the formwork, fill it with rubble inside. To make the base more durable, it is recommended to place a reinforcing mesh in the formwork. After that, prepare a concrete solution in a ratio of 1: 3 (cement-sand) and pour it onto the crushed stone. After the surface has hardened, cover it with a double waterproofing layer (best of all with roofing material). After that, lay 2 rows of bricks and the foundation is ready for use.
Some helpful tips
In order for the brick lining to be correct and to serve for more than one year, you should use the following recommendations:
- laying is done in the usual way with dressing in half a brick;
- you cannot associate the structure with bath walls;
- maintain a seam with a thickness of 5 mm;
- leave a gap of 3-5 cm between the metal walls of the stove and the screen;
- in the lower rows, it is imperative to make openings through which cold air would freely enter. Accordingly, in the upper ones there are the same holes for the hot outlet. Both from below and to overthrow there should be no more than 2 or 3 openings, otherwise the wall, like a heat shield, will not perform its direct function;
- after laying each row, it is necessary to check its level: verticality and horizontalness should be observed everywhere;
- carefully remove the remains of the solution both from the inside and from the outside.
Important! If there is a convection casing in the stove, it must be removed before covering.
Methods of wrapping
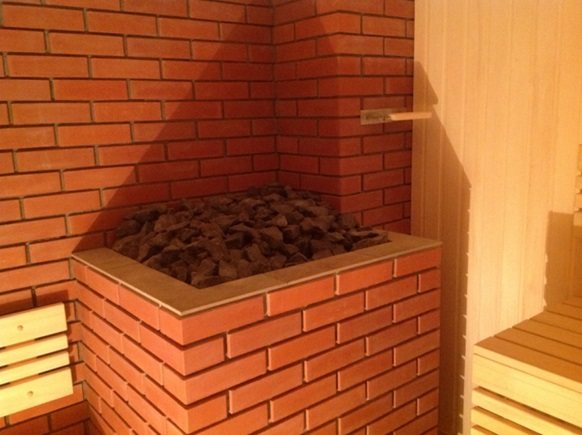
Basically, stone cladding is used to act as a heat shield for a stove. Due to the fact that such a structure does not lend itself to the main thermal effect, it can be constructed in the form of:
- Solid cladding, which is characterized by rapid heat dissipation, which causes a decrease in the productivity of the furnace. In this version, the cladding is rarely performed, and most often to give the metal stove decorative elements. At the same time, the quality of heating is in the background.
- A heat shield that will look like a small stone fence. This option is quite comfortable for others and helps to increase heat transfer.
- Convector facing with air vents. This structure is the most optimal for bathing needs and is suitable for any metal structure, regardless of the size of the steam room.
Covering process
The brick laying technique to create the heat shield is almost the same as building the brick kiln itself.
Important! The main thing is to perfectly align the first row.
After that, you should start laying the corners, while not forgetting to tie up the rows of bricks.
There is no need to rush, as it is recommended to do the styling for 2 days. This is due to the fact that on the first day it is necessary to level the base and lay only 5 rows. And on the next, after checking the shrinkage in advance, lay out the remaining 8 rows.
Important! For better adhesion of the mortar to the brick, it is necessary to immerse each pebble in salt water for 12-15 minutes.
Do not forget about the control over the horizontal and vertical lines in the laid rows.
It would be nice to use steel wire or mesh as a bandage for corner bricks. You can also reinforce a whole row with reinforcement or fiberglass. In the latter version, a mounting belt can be made on the surface of the row for the purpose of embedding 4 mm plastic. To reinforce fireclay bricks, it is best to use iron materials.
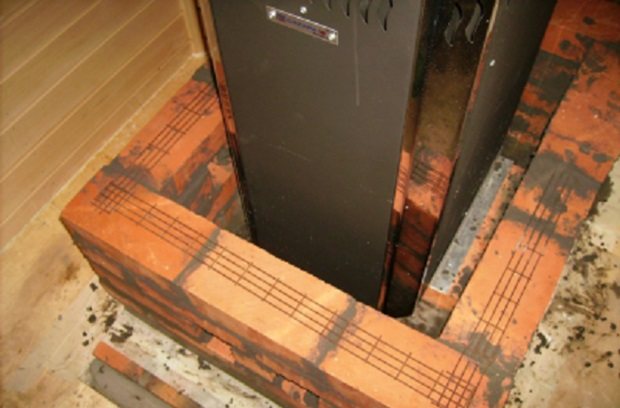
The cover is best done in the form of a well with 2 rows of windows: at the top and in the middle of the structure. The ideal option is to use half a brick placed at an angle to the wall as a lintel. Thanks to this design, the air in the gap begins to move better, which leads to a decrease in the temperature inside the well, excluding, at the same time, excess heating of the air inside the steam room.
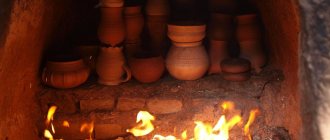
Quite popular are designs with a finish inside the well using a bath stone. This option prevents water splashes from stones from entering the gap between the screen and the oven. And this is good, since heated chamotte and, moreover, red brick is easily destroyed by hot water.

The metal sauna stove is lined not just for beauty. As evidenced by numerous reviews, thanks to such an event, the atmosphere in the steam room is significantly improved. And this despite the fact that every owner of the bath can do the brick lining with his own hands, if there is no opportunity to build a brick oven. Therefore, the work will be carried out with minimal financial costs, with high quality, as a result of which the bath will have not only an attractive appearance, but also an internal thermal environment that is beneficial to health. Good luck!
By darkdreamer Published 03/28/2018 Updated 04/11/2018
Surely, you have repeatedly wondered why the stove in the bath is lined with bricks. A person who is far from construction has no idea whether this solution is purely artistic or whether there is some practical meaning behind it. Today we will tell you not only why you need it at all, but also how you can do it yourself. Moreover, if you seriously decided to tackle this issue and scrupulously study the basic technologies for starting construction.
Why is this done?
And really, what for? It seems that the metal oven, which is used in the overwhelming majority of cases, looks more than reliable and absolutely does not need any improvement. Moreover, even a beginner can make such a stove with his own hands. However, this is a typical superficial opinion, which is completely devoid of any sober knowledge of the actual state of affairs. In fact, there are several reasons why the iron stove in the bath is also finished with bricks.
- in a heated state, iron can negatively affect human health through radiation;
- iron does not stay hot for long - and it takes a lot of time and resources to maintain the desired temperature in the room;
- there is always a risk of overheating and loss of performance of the oven, therefore the metal part of the oven needs to be insulated.
But if you use a brick, you can get quite significant advantages:
- the steam becomes more humid and pleasant;
- heat spreads through the steam room more evenly;
- the appearance of the stove becomes attractive, and with an original finish, you can even achieve that this element of the bath will be a real design revelation.
What conclusion should be drawn from this? If the stove is not brought back to normal in a timely manner, then instead of the expected pleasure from the steam room, you can get dry and indistinct steam, as well as bad mood and disappointment. But with a brick, the heat is retained longer, and the use of a bath widely pushes the boundaries of comfort.
Which brick to choose?
Most often, 2 types of bricks are used:
On the one hand, chamotte is more attractive: solid heat resistance, strength and relatively longer heat retention allow us to hope for perfect efficiency. However, it has one significant drawback - its cost. Whatever one may say, but it is quite high. Therefore, most often the stove in the bathhouse is decorated with ceramic red bricks. It does not retain heat as well as chamotte, but it has similar characteristics in terms of refractoriness and density.
Guide to action
The process itself does not cause any particular difficulties and is quite within the power of even people who do not have building skills. However, if you force it and break the sequence of technological stages, then you can get a result that is far from the expected one. Therefore, we offer you step-by-step instructions so that, in full accordance with its points, you can qualitatively overlay an iron stove in any bath with a suitable brick and be satisfied with the result.
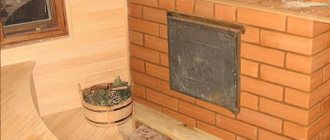
Foundation decoration
Usually this stage is performed already when the oven is being made directly. However, if for some reason you lost sight of the need to build it, then nothing terrible happened. True, for this you will first need to dismantle the furnace.
- decide on what size the base will have;
- build a wooden formwork - it is best to use plywood boards for this;
- cover the boards with roofing material - this way you protect them from moisture and subsequent rotting;
- pour fine gravel and sand into the pit, and then fill it with cement mortar;
- it is best to cover the base with a reinforcing mesh and allow time to dry - usually no more than 3 weeks.
Foundation construction
Arrangement of the base for the furnace is carried out in stages:
- Dismantle the wooden floor.
- A pit is dug with a depth of 50 centimeters in accordance with the dimensions of the unit, adding 20 centimeters on each side.
- Crushed stone and sand are poured onto the ground and laid in a 25-centimeter layer.
- Waterproofing is carried out using a double layer of roofing material.
- Formwork is made of boards. Reinforcement is required if the chimney fuel structure is too heavy.
- When preparing the solution, take 3 parts of river sand for one part of water. The mixture is poured into the formwork and leveled using a level.
- The screed is covered with roofing material and laid in one or two rows of bricks.
- The unit is mounted after completion of the foundation arrangement.
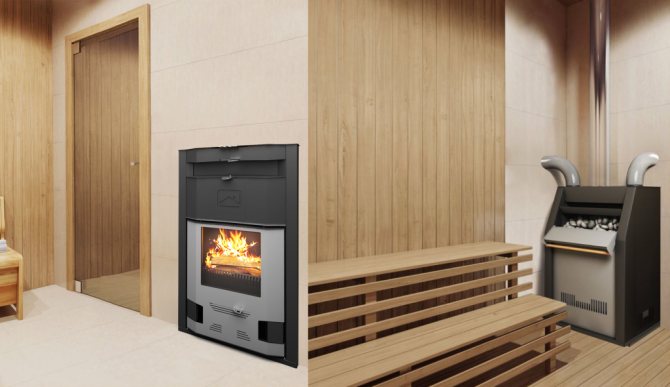
A Few Practical Tips for Choosing a Remote Fireplace Metal Furnace Project
You should briefly dwell on this issue, knowing some of the details will allow you to avoid troubles during its operation.
| Advice | Photo | Description |
| Heating water. |
Heat exchanger-register for the furnace, internal
Heat exchanger tank per pipe
Very important! Not all stones are suitable for the heater, some may emit carbon monoxide when heated. There are quite a few such stones, but there is one universal advice - never take stones with streaks or splashes of white!
Video - How to make a metal stove for a bath with a remote firebox with your own hands


Features of the design solution
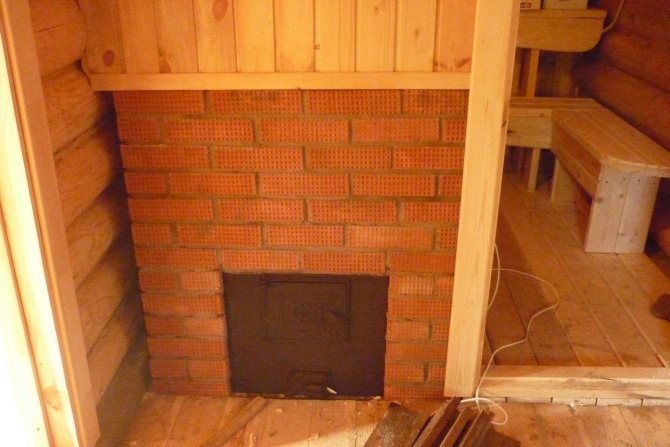
They produce units with a remote firebox made of cast iron alloy or steel. They have a significant difference in comparison with standard stoves - this is a remote channel, which can be removable in heavy structures and welded in light ones made of stainless steel.
In the first version, the firebox door can be placed both in the adjacent room and outside the building, on the street. Thanks to this solution, two rooms will be warmed up at the same time, there is no need to equip a place for storing firewood in the steam room, and smoke will not get into the room where people are resting.
The remote channel is made either pyramidal or rectangular. It is made wider at the point of attachment of the door than near the firebox.A model such as a stove for a bath with a firebox from a dressing room, which has a panoramic glass on the door, looks more attractive, as can be seen in the photo. You can control the amount of fuel without opening. Thanks to the combustion channels and glass blowing, soot settling on the internal elements of the furnace is excluded.
The main part of the furnace structure is placed on a foundation specially equipped near the partition. To separate from it, thermal insulation is used. It can be placed on either side of the door, depending on the layout of the room. If there is no furnace door in the steam room, space will be saved in it, and the unit can be located in any convenient place.
Also, a remote firebox can be placed outside the sauna building. This option is not entirely convenient, since in order to add fuel, you will need to leave the building and onto the street. Installation of the stove in a bath with a remote firebox is fully justified only when servicing commercial saunas, when an employee monitors the operation of the unit.

Furnace installation
You have already decided where the firebox will go. This does not have a particular effect on the technology of construction work, but it does affect the comfort of using the bath.
Step 1. Mark the firebox outlet. Cut a hole for the firebox. The hole should be 20-30 centimeters more along the perimeter than the firebox.
Opening scheme for a furnace with a remote firebox
Step 2. Solve the chimney issue. We recommend that you do not take it out on the roof for several reasons. First, there is no need to do quite complex and time-consuming work to ensure fire safety on the ceiling and roof. Secondly, any additional "holes" in the roof significantly increase the likelihood of leaks in these places. Thirdly, it is much more expensive and more complicated, it requires the use of various additional elements for roofing, depending on the specific material. We recommend bringing the chimney through the wall - quickly, cheaply and reliably.

Options for connecting a chimney to a sauna stove
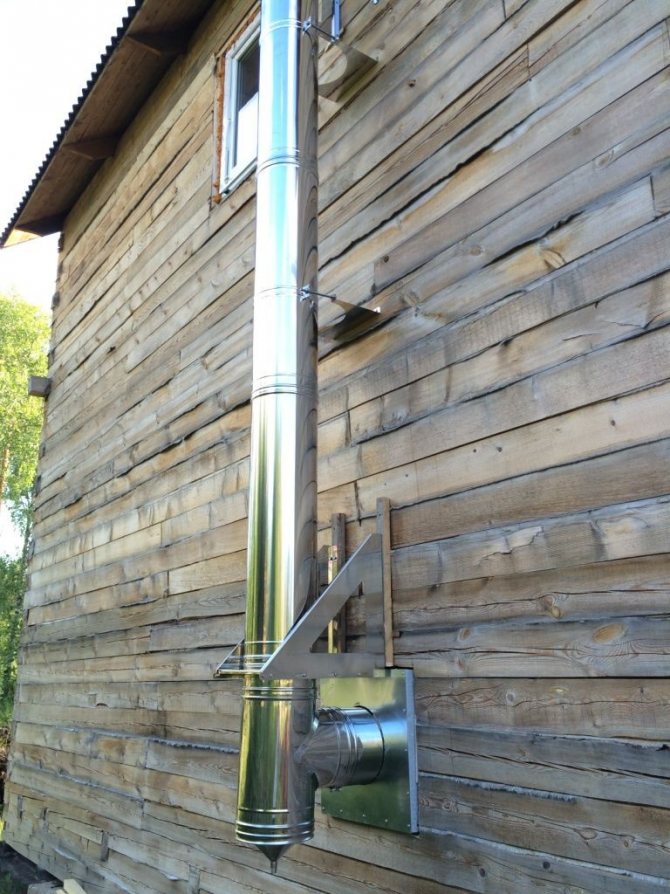
Exterior view with mounted chimney
Step 3. Make holes in the wall or ceiling and roof (depending on the way the gases are discharged). And in this case, the holes should be oversized.
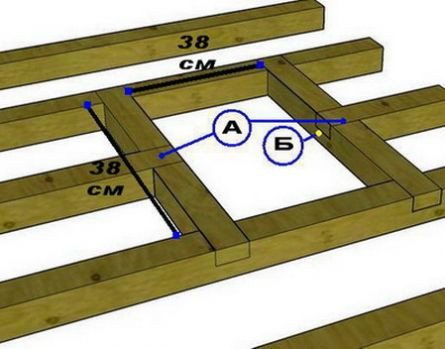
Chimney duct size
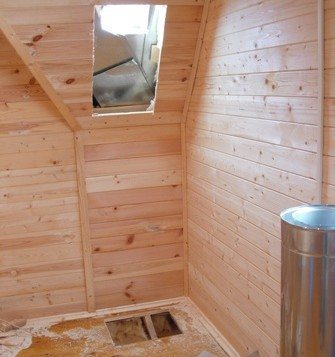
Holes in the roof and in the ceiling are cut for the installation of the chimney pipe
Dimensions of the ceiling cut-out for the chimney
Step 4. Temporarily install the stove in its place, check the position of the remote firebox and chimneys. If necessary, correct the position of the holes, make precise markings. Collect all the elements of the stove and chimney. Assemble the gas exhaust pipes, adjust their dimensions, determine the methods of fixation and thermal insulation. We will talk about installing pipes a little later. This is a very important and rather complex topic.
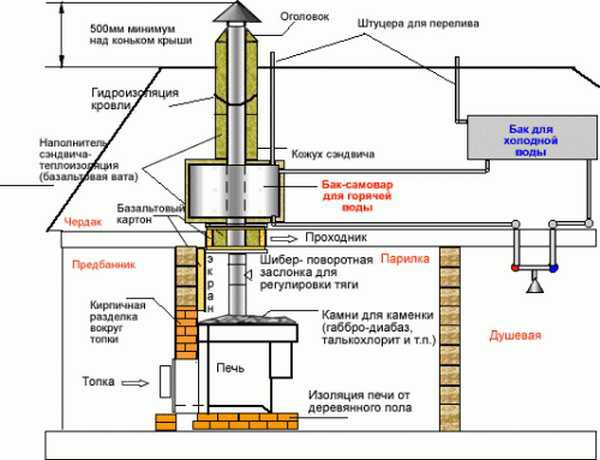
Sauna stove installation diagram
"Fitting" work has been completed successfully - you can proceed to the capital installation of the furnace with a remote firebox.
Where is the best place to place the firebox in the bath?
The door of the remote firebox can be installed in several places - a washing room, a rest room or a dressing room. If there is enough free space, you can use any of the options. However, in the first case, you will need to be especially careful when looking for a place so that there is firewood in it. protected from getting wet... You also need to take into account that gas can penetrate into the room.
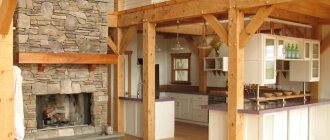
The rest room is perfect for these purposes, because it is rather dry here, and besides, watching the firewood burning through the glass door will be extremely pleasant for everyone in the bath.
In winter, the door can even be slightly opened, then it will become warmer in the dressing room. Provided that the stove has a beautifully designed design, in addition to everything, it can become an interior decoration.
In any bath, there is necessarily a dressing room - a special room that performs the function of a vestibule. It is not intended for taking water treatments or for relaxation. Therefore, if you decide to store firewood here, then they will not create any inconvenience to anyone. It is best to allocate a separate room for the door, then people will not be able to smell the smoke, no matter what room they are in.
Security measures
A metal furnace is a potential threat to people and the structure itself, because during operation, the structure heats up to critical temperatures. To avoid unpleasant consequences, you need comply with fire safety rules.
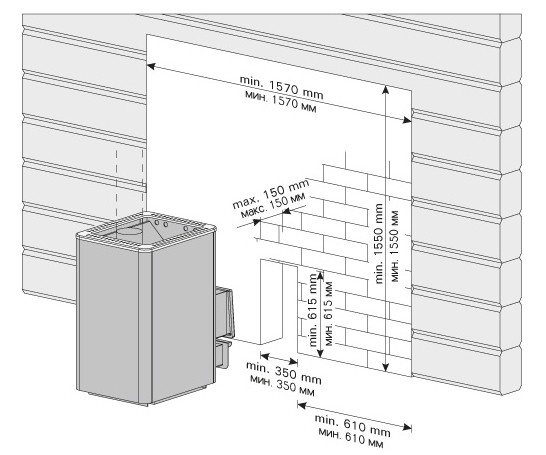
- It is recommended to choose a place for the metal stove no closer than 50 cm from the wall of the building. A heat shield made of insulating material must be installed next to the partition through which the combustion channel is led out.
- To protect against overheating, a single layer of thermal insulation can be installed on the side wall of the bath, which can be a metal or fiber cement sheet up to 1 mm thick. In this case, it is allowed to install the stove relative to the wall no closer than 25 cm.In the case of using a double layer of insulation, the space can be reduced up to 12.5 cm. The insulation material is not installed on the wall end-to-end, but necessarily with a gap of 3 cm. that it is not in contact with the ceiling and floor. The upper part of the stove surface must be removed from the ceiling at a distance of at least 1.2 m. Fire safety rules determine the optimal distance from the firebox door to the nearest door, which must be at least 1.25 m.
- The combustion channel must be located at least 40 cm from the wooden wall. If there is a protective screen on it, then this distance can be reduced to 25 cm. In order to increase protection against fire, you can additionally cover the metal walls of the heater with brick or stone. A steel sheet is laid directly under the furnace itself, which will prevent the occurrence of a fire hazard due to accidentally falling out coals. It must be chosen taking into account the following dimensions: the width should be 20 cm greater than the channel width, and a 40 x 40 cm square must be laid in front of the door.
Some manufacturers offer stoves for a bath with a remote firebox, which no need for additional bricking... This is ensured by the fact that they have steel protective screens for walls and floors.
Installation and construction works
Some useful knowledge to simplify fire safety work. The ignition temperature of the phosphoric head of the match is + 200 ° C, the temperature of spontaneous combustion of wood, depending on its moisture content, ranges from 350 ° C to 450 ° C. Why do we remind this? There is always high humidity in the bath, do not be too afraid of overheating of the walls and spontaneous combustion of a log house or floorboards. But do not neglect the elementary rules of fire safety, all work must be done wisely. They need to be done slowly and very carefully.
Let's start with a remote firebox. It is better to fill the gap between the firebox and the wall with red brick. Brick on both sides can be plastered or sheathed with sheet metal. If there is a remote firebox in the bathhouse, nail a sheet of galvanized (or any other) iron about 40 × 40 cm in size to the floor. If you wish, you can put asbestos under it, but we do not recommend doing this. First, asbestos releases carcinogenic substances and is banned for use in all developed countries. Secondly, even without asbestos (or other insulating material), the probability of a floor fire under the iron sheet is zero.
Fuel line dimensions and wall cut-out
One of the final stages of installing the stove is making a hole in the wall of the bath to accommodate the external channel. To correctly determine the size of the opening in the partition, it is necessary focus on the width and height of the channel... You also need to remember to take into account the length of the stove legs. When calculating the distance from the remote firebox to the surface of the combustible base, it is first of all necessary to take into account the power of the heating device.
You can find out the optimal distance from the product passport. If the stove for the bath was built by hand, then the fire safety standards, taking into account the maximum power of the stove, can serve as a guideline:
- 40 cm - for devices without protection;
- 25 cm - with metal thermal insulation.
When calculating the dimensions of the opening, the length of the fuel channel can be disregarded, since the wall thickness is already sufficient. If the installation of the remote channel was done correctly, then the distance between the main structure and the partition should be not less than 5 cm... Additionally, it is necessary to protect the wall surface from fire with a fire-resistant material.
The area around the perimeter of the fuel channel going through logs or beams must be bricked. The material is placed in such a way that a gap of 20-25 mm remains to the firebox. It is left in case of thermal expansion of the metal. A heat-resistant material is placed inside the gap, for example, asbestos cord or basalt wool. The heat insulator used must be able to withstand temperatures up to 1000 ° C. Therefore, glass wool, which has a melting point of 400 ° C, cannot be used for this purpose.
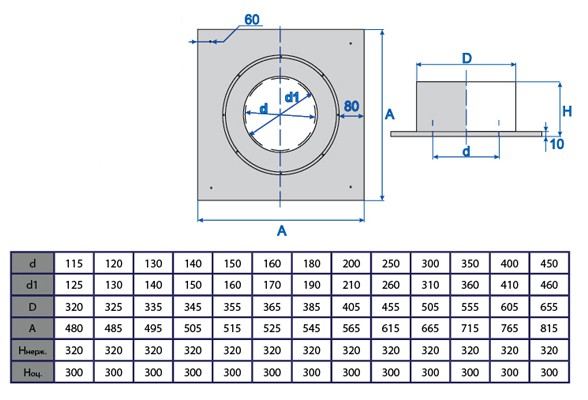
If the outlet of the remote channel is made in a brick wall, which will subsequently be finished with wooden clapboard, then an indent of 10 cm must be made from the opening in all directions. This site requires fasten stainless steel sheets... They are installed on both sides of the wall, having previously cut out an opening for the external firebox. When placing the remote channel in a brick or concrete structure, the hole is made with dimensions of 40-60 by 25-50 cm.
According to the rules, it is necessary to start performing this work with the installation of the furnace, then it is covered with bricks, and only at the final stage a wooden partition is erected next to the finished structure.