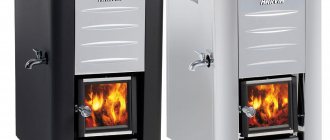
Do-it-yourself Swedish stove with three heating modes
Swedish stoves differ from other heating and cooking stoves by the presence of a heating shield in the rear part. In this brick shield, a system of gas ducts is arranged: from vertical or horizontal. The smoke passing through them heats up the structure, and the premises are already heated from it. The system turns out to be efficient and economical: the heat that went into the chimney in a traditional Russian stove is used to heat the premises. But both systems for building a shield (vertical and horizontal) have disadvantages.
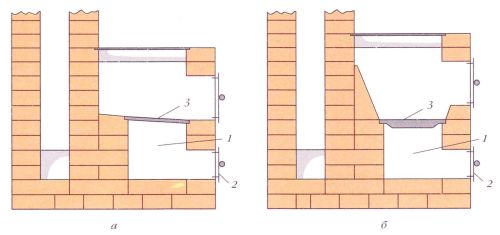
With the horizontal arrangement of the gas ducts, the entire flap heats up evenly. But, such a system requires a large number of cleaning holes and, accordingly, doors on them. Considering that furnace casting is not cheap today, these doors significantly affect the final cost.

Heating plate for a Swedish oven with horizontal and vertical flue ducts
With a vertical arrangement of gas ducts in Sweden, there can be one cleaning hatch. But there is another problem: while the furnace is being heated, in the first channel, on the side where the hot gases from the furnace enter, the shield will be noticeably hotter than in the third - at the outlet. Since the flap is usually located in two rooms, one of them will be much warmer than the other.
There is also a third type of flap device: bell-type. It combines the advantages of both systems: one cleaning window is required, the entire surface warms up evenly, and less brick is required for construction. Moreover, with such a construction, the furnace cools down more slowly: the warmest air is kept in the tops of the hoods for a long time, and the "draft" from the doors passes only in the center.
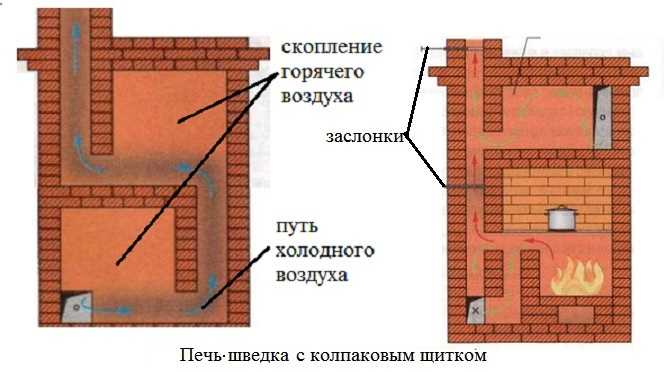
When using the hood principle of construction of the shield, the heat is retained longer
From all that has been said above, it follows that the most economical and effective Swedes with shields built according to the bell principle. They are easier to control: it is possible to organize a "summer" and "winter" mode of operation, in which only a small part of the shield is switched on (in summer) or the heating power weighs in: in winter. There is even a variant of a Swedish stove with three combustion modes: an "autumn" mode is added, in which a little more than half of the chimney channels participate in the smoke circulation.
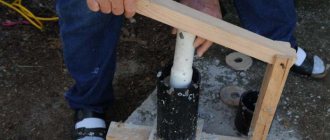
Peat furnace device.
The height of the furnace can be 70 - 80 cm. The dimensions of the grate depend on the degree of peat moisture: when using dry briquettes, you can use the same grate as for firewood, for wet peat the grate should be larger. Gaps in the grating should be no more than 8 - 10 mm.
The walls of the firebox must slope towards the grate. Since the combustion of peat produces a lot of ash, the ash pan should be larger.
For peat of high humidity, two grates are installed, this provides a greater air flow. In this case, the height of the firebox should be at least 80 cm, width at least 40 cm. Holes are drilled in the valve.
Dimensions of the furnace The width of the furnace in small furnaces should be at least 20 cm, in large ones - at least 30 cm The height of the furnace, counting from the grate, should be at least 65 cm for peat, at least 80 cm for firewood, and for coal - at least 70 cm. The amount of fuel is put into the furnace so that there is a free space of at least 30 cm between it and the top.
General Provisions
Ceramic brick
For the laying of stoves and fireplaces, solid ceramic bricks of the 100-200 grade are used.The main criteria for determining the quality of red ceramic brick are: 1) the absence or a small number of small hairline cracks on its surface; 2) uniform firing (the same color) in its entire mass, which is determined when a brick is split in half.
Refractory bricks Fireclay (ША-8, ШБ-8, ШВ-8) bricks have dimensions of 250х124х65 mm. Note: the indexes "A", "B", "B" mean the degree of refractoriness of the brick.
They are used for lining fireboxes: 1) stoves that will be operated in a long-term mode - stoves that do not have a brick overlap of the firebox (kitchen stoves of all types, barbecue fireboxes). Cooking stoves are also lined to reduce the size of the firebox, i.e. optimizing the amount of firewood bookmarks; 2) furnaces operating on high-calorific fuel (coal, diesel fuel, gas); 3) large household stoves with a capacity of over 3000 watts.
It is prohibited to use hollow (slotted) and silicate bricks for laying furnaces. When laying fireplaces, it is allowed to use finishing slotted ceramic bricks in places that are not the walls of the firebox, smoke collector, chimney, otter. These places are: the second circuit of the firebox with a thermal gap device, fireplace shelves, niches, peripheral cutting rows.
To improve the appearance of stoves and fireplaces, solid ceramic bricks with radially rounded corners () can be used.
Furnace fuel
They are firewood (in the absolute majority), coal, peat. As for firewood, only dry ones should be used - they burn faster and with the earliest possible return of calories (their moisture content should not exceed 35%, otherwise, with other criteria, the moisture released will begin to combine with soot, forming a black condensate that will flow down) and more dense (they generate more heat). Therefore, it is advisable to heat with birch (alder) wood. Conifers are better suited for construction purposes, their waste goes to heating only in the absence of other firewood. By the way, less soot is formed from dry wood.
Chopping firewood is not easy. It is necessary to strive to make the logs even in thickness - then they will begin to burn at the same time, therefore, the stove will warm up well and quickly. Usually, the size of the logs does not exceed 50 x 8 cm. Chopped firewood, folded in a cage under a canopy on the street and blown by the wind, becomes dry only after a year.
Coal should not exceed 4 cm in thickness, and peat (certainly dried, cut into pieces or briquetted) should not exceed 20 x 6 cm.
Part 2: A beginner's guide to stove-makers
Chapter 10 Clay, Sand, Water and Additives
In the first part of the book, I already briefly talked about a number of parameters by which you need to choose clay, sand and brick. Here, I will only supplement this information with information necessary for every stove-maker.
Before packing fresh clay for transportation to the place of work, you should first assess its quality
It is important to know that too oily clay and clay, even with the slightest presence of stones, will increase the laboriousness of preparing the oven solution (with manual mixing). Too skinny clay will seriously weaken the strength of the furnace seam.
And clay, heterogeneously deposited in the soil or with admixtures of earth and foreign fractions, will create inevitable problems in the preparation of a high-quality furnace solution.
Excessively greasy clay
to the touch it resembles very sticky plasticine. It is impossible to tear off the freshly cut plastic of such clay from a shovel with either hands or feet. It can only be cleaned with an additional small spatula or trowel. Such clay will give a ratio of clay to sand from 1: 4.5 to 1: 6. The oven solution after the hardening time will be very strong, but in the absence of an electric clay mixture, the process of preparing a high-quality oven solution (manual mixing) will be extremely laborious.
Taken out of the ground overly skinny clay
by its properties it is more reminiscent of sticky dusty sand. The stickiness of this material is very low. However, if there is no choice, what to do. There is no need to add sand to such clay. The above two types of clay are very rare in central Russia.
Medium fat clay
gives (in the overwhelming majority of cases) the ratio of clay and sand 1: 1.5 and 1: 2 (and very infrequently 1: 2.5 and 1: 3).
The rules for using sand and water are detailed in chapter 1.
Additives
... Abroad, some stove-makers traditionally add 10-15% cement to the mortar. Table salt is also recommended (100-200 g per 10 liters of water). However, according to my many years of observation of the processes taking place in the oven masonry, a well-tested clay-sand oven solution does not need any special additives. He will be strong enough anyway. And if the furnace firebox and the adjacent zones are torn apart at the seams due to severe temperature changes, then not some special additive is needed, but a special procedure for laying bricks in the furnace (lining). The lining proven over the centuries and the competent selection of the cross-section of the smoke channels (see chapters 15 and 28) will protect the furnace from serious ruptures in the furnace seams more reliably than the use of some special additives, and even more so the wire binding of the furnace.
I also heard about some particularly complex and even "secret" additives in the most intricate compositions and proportions: ash, cement, chicken eggs, etc. But I did not consider it necessary to show interest in them.
Experience shows that the best "additive" for furnace mortars is the ability to correctly select the ratio of clay, sand and water, as well as the reasonable use of fireclay mixture and fireclay bricks in cases where technical standards and common sense require it.
... For more details, see paragraph 13 of Chapter 18 of this book.
Design features of our ovens
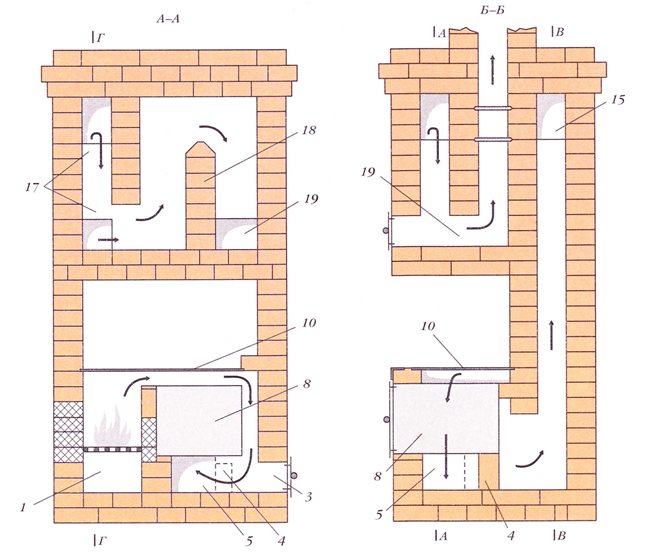
With a wide variety of stoves, it is impossible to use only one single smoke circulation system in them - each stove has its own dimensions, purpose, and other features, on the basis of which one or another smoke circulation system that is most appropriate for a given furnace is used: is the ability to direct the first, hottest flue gases along the lower part of the furnace, and the disadvantage is the inability to provide good conditions for traction due to the large length of the channels. Vertical ducts are of limited use due to the fact that they require good conditions for draft (from the grate to the head of the pipe at least 6 meters) due to the long distance of the downward movement of flue gases. In kitchen hearths and large heating and cooking stoves, the use of a duct system with vertical smoke flows is justified in high one-story houses and on the first floors of two-story houses, because the flue gases move slowly here and manage to heat up the furnace mass well (high efficiency). Under good conditions for draft, horizontal channels with a minimum (one or two) number of revolutions are used in large heating, heating and cooking stoves and heating shields of Russian stoves. In kitchen hearths and small heating and cooking stoves with good draft, the use of horizontal smoke flows is unjustified. Flue gases move quickly here (excessively strong draft) and the stove mass heats up weakly, which leads to excessive consumption of firewood (low efficiency). The disadvantage is that these furnaces have to arrange a large number of clean holes. In rooms with low ceilings (small garden houses, temporary huts, garages, etc.), where the distance from the grate to the pipe head is less than 5 meters, the only option in all types of furnaces is to use horizontal channels. Weak draft in this case allows the flue gases to move slowly and warm up the furnace mass well; 2) In the bell-type smoke circulation system, the flue gases first flow upward and the already cooled ones go down the “bell”. The draft in the furnaces of the bell system is confident, but the main disadvantage in large furnaces is overheating of the upper part and weak heating of the lower part.We found the application of this system in small stoves, where the walls of the firebox are the outer walls, and above the firebox there is a bell-type convector. The heating of the surface of such furnaces occurs evenly over the entire height, which is the main requirement for furnace heating; 3) Heating-cooking and heating stoves, with the location of the smoke ducts on the sides of the firebox, are designed using a combined smoke circulation system, which includes a duct and bell system. The combined smoke circulation system is devoid of the disadvantages of duct and bell systems, because the first hot flue gases through the channels first pass along the lower part of the furnace (a small length of channels), and then enter the bell-type convector located in its upper part. This ensures uniform heating of the entire surface of the furnace; 4) A widespread type of stove heating is heating and cooking stoves and kitchen hearths, for which the two-level smoke circulation system developed by us and tested over many years of operation is most suitable. With this movement system, the first, hottest flue gases first enter the lower half of the heating shield and heat it up to the upper half. At the same time, the surface over the entire height of the shield heats up evenly, and the heat transfer to the room due to predominantly lower heating is much better than in kitchen hearths with vertical smoke flows, where the top of the furnaces is heated to a greater extent (the effect of the bell system).
Of great importance in the design of stoves is the binding system, which means the arrangement of bricks in the masonry relative to each other, their combination between the outer and inner walls, in the overlap of the firebox, the ceiling and other elements of the stove. A good dressing system ensures the durability of the furnace, its operability throughout the entire period of operation and fire safety, i.e. the tendency to burnouts between the outer and inner walls of the masonry is excluded, in which the flue gases would not go through the smoke flows, but would break through by a short path from the firebox into the chimney, leaving a significant area of the furnace surface cold ().
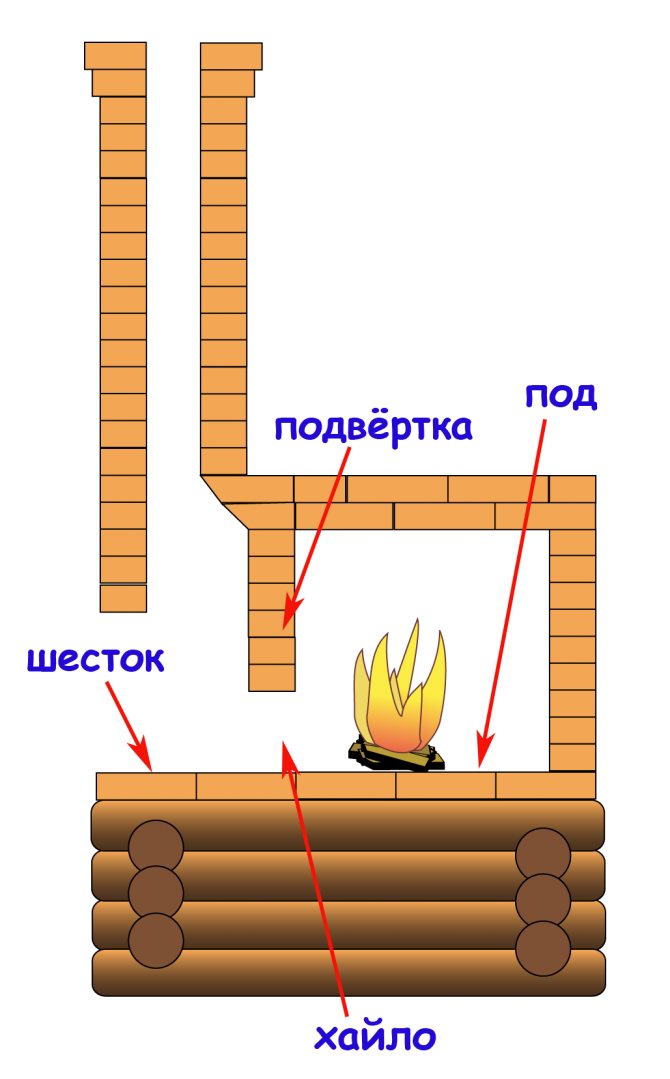
Firebox device (firebox).
The most important part of the stove is the firebox (or firebox). A stove with a properly arranged firebox will save firewood and heat the room faster. A properly arranged firebox must be considered one that will provide a sufficient amount of air in the combustion zone, hold a sufficient amount of fuel and maintain a high combustion temperature.
To ensure sufficient air flow to the fuel for combustion, furnaces are made with a grate and a blower. The grate is a cast-iron grate installed in the furnace and serving to maintain a layer of solid burning fuel. To supply air to the fuel, the grate has longitudinal holes or slots. For large furnaces, the grate is made of separate elements - grate.
Blower - a hole in the furnace below the firebox, which serves to improve draft.
The grate is placed in the middle of the firebox below the firebox door for one or two rows of bricks, guiding the slots along the length of the firebox. The grate is placed with a slope towards the door 2 - 3 cm in small ovens and up to 4-5 cm in larger ovens, so that the grate rises to the chimney. Due to this rise, the fuel burns more evenly and the smoke is easier to separate from the flame, without accumulating in the firebox.
Itself under the heating stove, respectively, should also rise to the back wall of the stove.
IMPORTANT !!! A gap must be left between the brick and the lattice, as the lattice, when heated, expands and destroys the masonry.
It is recommended to lay out the firebox from fireclay bricks.
Peat with normal moisture content (25–30%) and coal (the latter burns only on the grate) burns well in firewood stoves.
To burn more humid peat and peat crumbs, two grates are placed in the furnace.A horizontal grate is placed in the back of the hearth, and with a slope towards the rear grate - in the front of the firebox. Peat is kindled on a horizontal grate. When it ignites, the firebox is loaded with the rest of the fuel, while closing the inclined grate. To prevent small particles of peat from spilling through the grate, the gaps in it should not exceed 8-10 mm.
In the furnace for burning coal, it is necessary to provide an enhanced supply of air to the combustion zone. This condition is satisfied when installing a grate equal in size to the hearth of the furnace. The grate itself, when using this type of fuel, must also be reinforced. The grate height in it is not less than 40 mm.
The ash pan (or ash chamber), located under the grate, serves to accumulate unburned fuel residues there. Another important function of the ash pan is to supply air to the combustion zone.
The height of the ash pan is usually three layers of brick.
A hole (blower) is made under the firebox (directly under the grate) in the ash chamber and a blower door is installed on it, regulating the air flow to the burning fuel.
The highest calorific value is possessed by coal - 5500 - 6500 kcal / kg, peat - 2500 - 3500 kcal / kg, firewood - 2500 - 3500 kcal / kg. To improve the quality of firewood, they are naturally dried.
The shape and dimensions of the firebox depend on the type of fuel. Firewood and peat give a large flame during combustion and contain many volatile substances, therefore the furnaces must be large.
How to build a stove
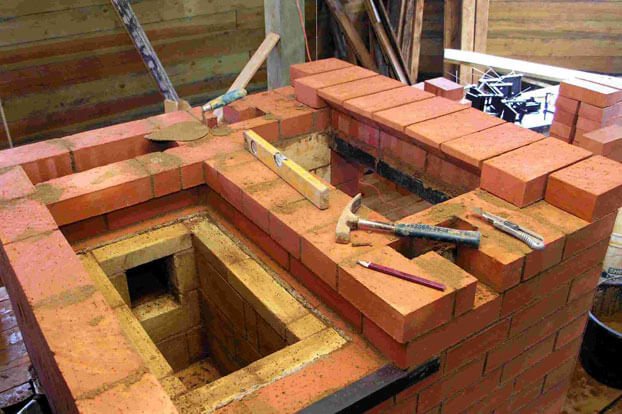
The layout of a brick oven is a sequence of actions. Compliance with them is essential. The material needs processing and precise styling in order to avoid flaws as much as possible, which will then affect functionality. The stove is a heavy structure that needs a solid concrete foundation, which must be insulated with roofing material. If the house is already built on a monolithic foundation, which makes up the entire floor area, you do not need to make a special foundation for the stove.
The work should begin with the fact that a row of bricks or large crushed stone is laid, which is covered with mortar and smoothed. The next row will already make up the oven. Experts advise, for a start, lay out the bricks in the place where it is supposed to lie in order to fit all the dimensions and exact location. Also, you need to soak each one in water for ten minutes. If chamotte is used, then it is enough to wipe it with a wet rag. Before starting work, you need to calculate where the chimney will go. If the construction takes place in an already finished building, it is worth calculating the place so that it is convenient to make a hole in the roof and interfloor floors.

The first row is laid out so that the horizontal lines are oriented along one of the walls. In the place where the stove is as close as possible to the walls, you need to lay out the second brick. This will ensure fire safety. A metal grate is installed in place of the firebox. There will be several of them in the design. One of them will share the firebox with a compartment for collecting ash. In the second row, take into account the free space for the chimney and the connector in the masonry under the lower door. There will be two of them. Small - for cleaning ash, the second - opens the firebox and has a large size. The doors are securely fixed with a wire between the bricks and smooth the joint with mortar. After the third row, you need to lay out two rows of bricks on a spoon, cover it with a number of fireclay refractory bricks. This will serve as the basis for the firebox grate. After that, the door of the future firebox is strengthened, and its walls are laid out. The vault is formed from fireclay bricks. There will be a fireplace next to the firebox.
This design requires significant reinforcement. This can be achieved by laying horizontal metal corners, securing them with refractory bricks.The fireplace grate is flush with the masonry. When this part of the stove is ready, they begin to lay out the chimney and divide it into wells. The arch of the fireplace is laid so that it goes over to the chimney. At this stage, after the formation of the first row of its walls, the space is divided into wells, the doors are fixed, with the help of which the soot is removed from the chimney. When everything is ready, the previously removed bricks that formed the wells are returned and fixed with mortar. The chimney is laid out to the very ceiling, periodically laying the reinforcement
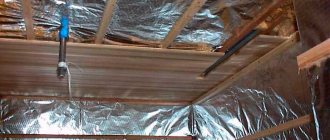
It is very important to make empty space and cornice under the top. A sheet of tin is placed on top of the wells, fixed with two rows of masonry
This work is already being done in the attic. Here the chimney is divided into two compartments, to each of which valves are mounted. The walls of the chimney, which comes from the stove, need to be strengthened and when it reaches the roof, bring it out slightly above the ridge.
Firebox device (firebox).
The most important part of the stove is the firebox (or firebox). A stove with a properly arranged firebox will save firewood and heat the room faster. A properly arranged firebox must be considered one that will provide a sufficient amount of air in the combustion zone, hold a sufficient amount of fuel and maintain a high combustion temperature. To ensure sufficient air flow to the fuel for combustion, furnaces are made with a grate and a blower. The grate is a cast-iron grate installed in the furnace and serving to maintain a layer of solid burning fuel. To supply air to the fuel, the grate has longitudinal holes or slots. For large furnaces, the grate is made of separate elements - grate.
Blower - a hole in the furnace below the firebox, which serves to improve draft.
The grate is placed in the middle of the firebox below the firebox door for one or two rows of bricks, guiding the slots along the length of the firebox. The grate is placed with a slope towards the door 2 - 3 cm in small ovens and up to 4-5 cm in larger ovens, so that the grate rises to the chimney. Due to this rise, the fuel burns more evenly and the smoke is easier to separate from the flame, without accumulating in the firebox.
Itself under the heating stove, respectively, should also rise to the back wall of the stove.
IMPORTANT !!! A gap must be left between the brick and the lattice, as the lattice, when heated, expands and destroys the masonry.
It is recommended to lay out the firebox from fireclay bricks.
Peat with normal moisture content (25–30%) and coal (the latter burns only on the grate) burns well in firewood stoves.
To burn more humid peat and peat crumbs, two grates are placed in the furnace. A horizontal grate is placed in the back of the hearth, and with a slope towards the rear grate - in the front of the firebox. Peat is kindled on a horizontal grate. When it ignites, the firebox is loaded with the rest of the fuel, while closing the inclined grate. To prevent small particles of peat from spilling through the grate, the gaps in it should not exceed 8-10 mm.
In the furnace for burning coal, it is necessary to provide an enhanced supply of air to the combustion zone. This condition is satisfied when installing a grate equal in size to the hearth of the furnace. The grate itself, when using this type of fuel, must also be reinforced. The grate height in it is not less than 40 mm.
The ash pan (or ash chamber), located under the grate, serves to accumulate unburned fuel residues there. Another important function of the ash pan is to supply air to the combustion zone.
The height of the ash pan is usually three layers of brick.
A hole (blower) is made under the firebox (directly under the grate) in the ash chamber and a blower door is installed on it, regulating the air flow to the burning fuel.
The highest calorific value is possessed by coal - 5500 - 6500 kcal / kg, peat - 2500 - 3500 kcal / kg, firewood - 2500 - 3500 kcal / kg. To improve the quality of firewood, they are naturally dried.
The shape and dimensions of the firebox depend on the type of fuel. Firewood and peat give a large flame during combustion and contain many volatile substances, therefore the furnaces must be large.
Furnace ordering
Before you start laying the oven yourself, follow a few simple preparatory steps.
Soak the brick first. To do this, the bricks need to be dipped in clean water and left there for about a day. Water will fill the pores in the brick structure. Due to this, in the future, the building material will not absorb water from the clay mortar.
Prepare a clay solution. It will consist of ground clay, some sand and clean water. The specific ratio of the components is selected in accordance with the characteristics of the clay.
It is important that the finished solution has normal plasticity and a homogeneous structure. On average, it takes about 20 liters of mortar to lay hundreds of bricks.
1 row. It was previously noted that this row should be laid out exclusively at the building level with additional verification using a square. Lay out this row in solid masonry. Inside, the use of halves of bricks is allowed.
2 row. Lay out in the same way as the 1st row. Be careful and do everything in strict accordance with the technology, because the first two rows serve as the base of the furnace, which should be as reliable as possible.
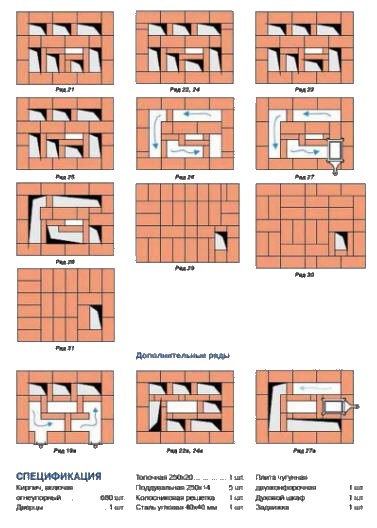
3-4 rows. Continue laying, gradually forming the ash chamber. At the same stage of masonry, the door of the said chamber is installed. Additionally, 3 doors for cleaning hatches and a door for a blower are mounted. On the back of the Swede, lay out the chimneys. They are placed in a vertical position and communicate with the combustion chamber through a hole, which is equipped in the process of laying out the furnace.
5 row. Install the finished oven and place the grate of a suitable size in it. Form an overlap for the cleaning hatches and the blower door.
6-10 row. Lay out the walls of the combustion chamber and oven. A partition made of fire-resistant bricks is laid between the combustion chamber and the oven. The brick must be laid out on the edge. The partition should be one row lower than the chamber itself. After the tenth row is ready, lay a standard steel corner and an additional cast iron plate from the front of the structure. Use steel wire and a 2 cm layer of clay to secure the corner.
11 row. Complete to the end the overlap of the channel through which the cast iron plate and the right wall of the furnace are separated.
12-16 row. Lay out the brewing compartment and 3 vertical flue pipes. Lay out the chimney holes from refractory bricks.
17-18 row. Form a cover over the brewing compartment. To form the overlap, use the sheet steel laid in the previous steps and a corner of the same material.
19-20 row. Attach 2 hatches for cleaning the flue gas ducts to the front of the door structure.
Row 21-28. Lay out the chimney ducts. Don't forget about bandaging your stitches. In the process of laying out 27 rows, install a convenient latch. Leave a technological opening above the installed smoke damper through which the gas ducts will mate with the air ducts.
Row 29-30. Lay out the chimney overlap. At this stage, the width of the perimeter masonry must be increased by 50 mm. Thanks to this expansion, the cornice will be formed.
31 row. Bring the dimensions of the overlap to the structural dimensions of the 27th row.
32 row. Start laying out the chimney. The standard chimney design has dimensions equal to 130x250 mm.
At this, the layout of the oven can be considered complete.In the end, it remains only to complete the chimney device, and also, if desired, finish the stove, for example, with paint or ceramic tiles. Additionally, you can buy a variety of accessories, for example, for storing fuel.
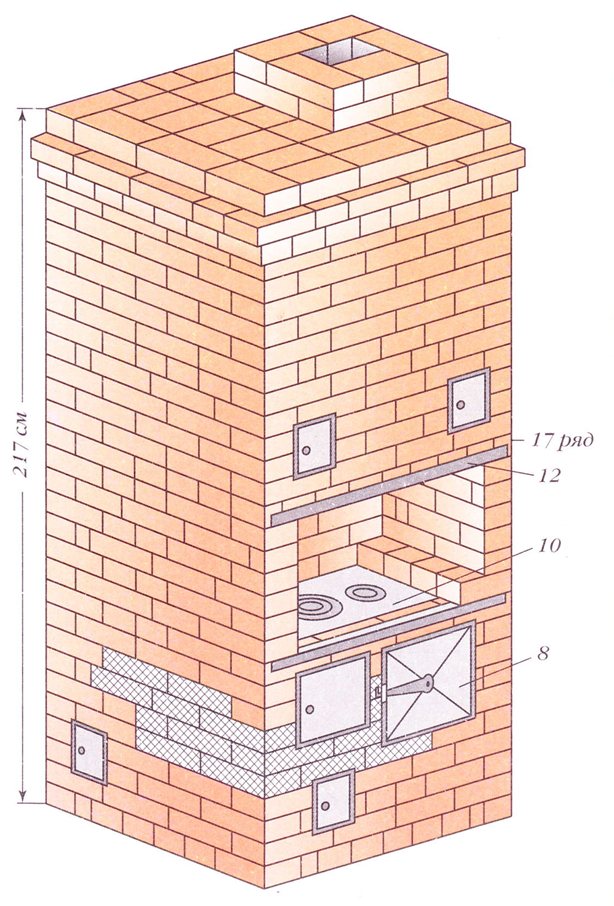
Stove Shvedka (front view)
Building a staircase in a house is not an easy process, but doable. The main difficulty lies in calculating the angle of inclination and parameters of the span, because not only ease of use depends on this, but also the durability of the structure. Strong and beautiful flatter ...
Materials for the Swedish stove
When creating this structure, two types of bricks are used: red and chamotte (refractory) - raw bricks are sometimes used instead. Before laying, the material is soaked in water for 24 hours. The foundation of the unit is laid on cement mortar, and the structure itself is laid on clay. The durability of the "Swede" depends on the quality of the clay mortar - the higher it is, the longer the stove will last.
Whatever the order of the Swedish stove, metal parts are necessarily present in the design - dampers, doors, latches. Most often they are made by the cast iron method. For floors, metal corners, reinforcing mesh, tires and metal sheets are used. Various finishing materials are often used, but the Swedish woman is usually simply painted with lime. But there are also structures decorated with decorative stone, tiles and other things.
To order the oven you will need:
- solution container;
- metal sieve with meshes of 1-2 millimeters;
- a hammer;
- bayonet shovel;
- Master OK;
- plumb line;
- level.
Calculation of the amount of bricks, clay and sand
The number of bricks per stove or fireplace is given in the project catalog and in the project documentation itself. The calculation of the total number of bricks for building a stove or fireplace is made up of: quantities according to the project + horizontal cutting + vertical cutting + pipe riser + otter. The calculation is shown in the table:
| Number of bricks per stove (fireplace) | Horizontal groove with internal section of the smoke channel | Vertical cuts | Pipe riser with an internal section of the smoke channel | Otter with internal section of the smoke channel | |||
| 130x130 mm | 130x260 mm | 130x130 mm | 130x260 mm | 130x130 mm | 130x260 mm | ||
| Contained in the catalog of projects and project documentation | 135 pcs. | 160 pcs. | The number of bricks on them depends on the installation of the furnace relative to the walls of the building. | 56 pcs. for 1 m / r. | 70 pcs. for 1 m / r. | 100 pieces. | 150 pcs. |
Consumption of clay and sand at the stage of their preparation: clay - 4-4.5 buckets; sand - 5 buckets per 100 bricks.
In projects of ovens with glass doors, their brands and e-mail addresses of purchase are indicated. The dimensions of the foundation should be wider in all directions by 50-100 mm. the dimensions of the oven in plan. The height of the foundation must be 140 mm lower than the finished floor. The concrete foundation is insulated with two layers of roofing material or roofing felt. The wooden foundation is insulated with felt dipped in clay milk. The distance from the stove ceiling to the unprotected wooden ceiling of the room must be at least 350 mm. The catalog indicates the minimum ceiling height of the room at which this stove can be installed. With a higher ceiling height in the project, the rows of the stove masonry are indicated, which must be repeated. The height of the stoves in buildings with concrete slabs is not limited. Cooking stoves and trestle beds of heating and cooking stoves can be installed on a common foundation and with their installation on a pre-reinforced floor: 1) when installing a stove with a trestle bed and a heating shield with a stove on a common foundation, they can be tied into a single body; 2) if the kitchen stove or trestle bed of the kitchen hearth is installed on a pre-reinforced floor, and the heating shield or stove is installed on a foundation resting on the ground, then they cannot be tied up into a single body due to the settlement of the foundation.At the same time, the floor under the slab or trestle bed is insulated with two layers of felt dipped in clay milk, which are covered with a sheet of roofing steel. In this case, the weight of the stove or trestle bed should not exceed 700 kg. To reduce the weight of the trestle bed, the side walls can be laid out of heat-resistant foam concrete blocks (bricks).
Peat furnace device.
The height of the furnace can be 70 - 80 cm. The dimensions of the grate depend on the degree of peat moisture: when using dry briquettes, you can use the same grate as for firewood, for wet peat the grate should be larger. Gaps in the grating should be no more than 8 - 10 mm.
The walls of the firebox must slope towards the grate. Since the combustion of peat produces a lot of ash, the ash pan should be larger.
For peat of high humidity, two grates are installed, this provides a greater air flow. In this case, the height of the firebox should be at least 80 cm, width at least 40 cm. Holes are drilled in the valve.
Heating furnace size
Dimensions of the furnace The width of the furnace in small furnaces should be at least 20 cm, in large ones - at least 30 cm.The height of the furnace, counting from the grate, should be at least 65 cm for peat, at least 80 cm for firewood, and for coal - not less than 70 cm. Fuel is put into the firebox so much that a free space of at least 30 cm remains between it and the top. If these conditions are not observed, unburned fuel particles (soot) enter the chimney and settle there, saturated with carbon monoxide. If a sufficient amount of soot accumulates in the chimneys, carbon monoxide poisoning (“burning out”) is possible when the valve is closed.
Furnace design procedure
The layout of the stove in question is carried out in accordance with the order. This, as already noted, is a special diagram on which the order of laying out each row of the structure is indicated. There are standard orders. In the absence of skills in laying out stoves, it is strongly recommended to use exactly one of the standard schemes.
A well-designed order will allow you to significantly reduce the time and money spent on building a stove. The work will be carried out according to an accurate and easy-to-understand flowchart to maximize efficiency.
Having figured out the order of the Swedish stove before the start of construction, you will be able to lay out the unit on your own, without attracting third-party craftsmen to work and without spending money on paying for their labor.
In the expanded order, it is additionally indicated which materials and at what stage of work must be used.
Study the suggested ordering and additionally pay attention to the following points:
- The Swedish oven design includes a blower. This point must be remembered in the process of self-arrangement of the stove;
- the first row of bricks must be perfectly aligned. Any displacement will lead to the appearance of various violations that will negatively affect the quality and reliability of the finished furnace unit. To check the evenness of the masonry, use a building level;
- the correctness of the calculation of the angles must be checked - they must be strictly 90 degrees. Check the corners with the appropriate tool called a square.
The reliability, efficiency and durability of the Swedish stove largely depends on the correct layout of the first row, remember this.
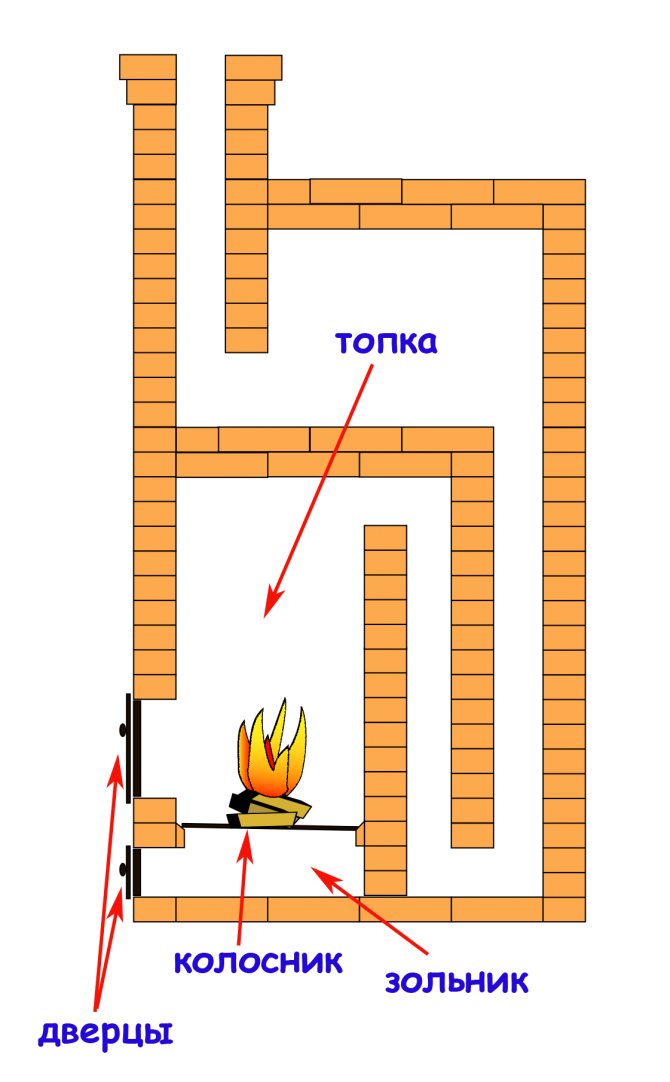
Laying of fireboxes of all types of Russian and bread ovens
The lining and overlapping of the fireboxes of the stoves, where baked goods and other products are baked, are made with red ceramic bricks. Red brick gives a softer and more lasting heat (the lining here serves to accumulate internal heat) absorbs moisture well, compared to refractory bricks, which creates optimal conditions for baking, stewing and simmering products. Refractory brick, in comparison with red brick, has a denser structure, heats up faster to a higher temperature and cools down faster. This leads to the fact that in the fire chamber, where the lining and roof are made of refractory bricks, any baked goods quickly become crusty and under-baked inside.Moreover, refractory bricks in the humid environment of the fire chambers of Russian stoves quickly collapse in layers, by the thickness of the absorbed moisture. This also applies to heating stoves with high humidity wood burning. The disadvantages of using refractory bricks include the fact that its thermal expansion is much higher than that of red bricks, and when the arch is supported on the main walls of the firebox, half a brick thick, they are subjected to greater stress and, for this reason, are short-lived.
What material is better to use for well masonry
material and tools
First, choose the right construction tool, you will need:
- scapula
- hammer pickaxe
- ordering
- building level
- mortar shovel
- the rule
- cord mooring
- plumb line
- jointing
After checking the tool is available, you can start laying the well.
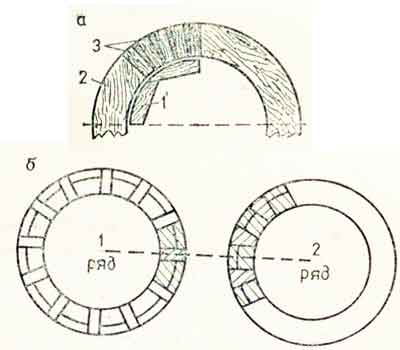
Well brickwork is made of ordinary ceramic bricks, silicate bricks are not suitable for a number of their characteristics. When laying bricks, decide on the masonry method. This can be the butt row or spoon method. Correct bandaging of the joints during brick laying is the key to the strength of the structure.
Round brick wells are laid in stitch rows. A poke is called the short side of the brick, respectively, the spoon is the long
It is important to properly lay brick lintels. When laying lintels, bricks are laid, narrowing inside and expanding outside
Seal the gaps between the bricks tightly with mortar, avoiding voids.
Brickwork technology
stages of laying a well
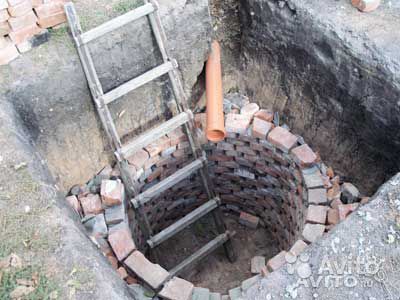
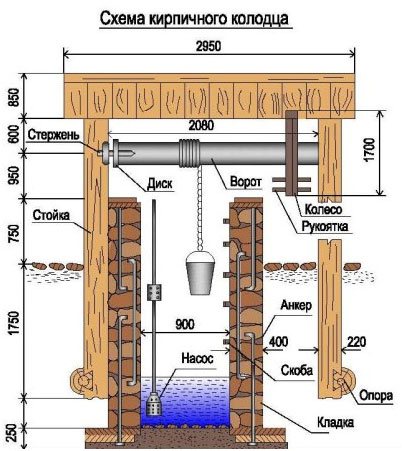
Before laying a brick well, a concrete base 10-15 cm thick is arranged. The soil under the base must be carefully leveled. Be sure to use level gauges.
Check carefully that the bottom of the well is horizontal. Make three round frames, the diameter of the upper one is 1 meter, the size of the lower frames increases proportionally. The two upper frames are made of wood, the lower frame is made of metal.
To be sure of the correct shape of the future well, make a template. With the help of hooks, it is attached to a brick row and the laying of a brick well will pass calmly and confidently.
general sectional diagram of the well
If you use a template, even without professional skills, you will definitely complete all the work.
While laying, gradually raise the template to the next level of the row. To strengthen the brick layer, lay reinforcement every five rows. Lay reinforcement at a distance of 20-25 mm from the edge of the masonry.
Make sure that during the work the brickwork does not rest against the intermediate frame. Frames must be vertical and horizontal, their installation is checked with special devices. Check the level regularly during all work with a plumb line and a level. Place the brickwork at a distance of 50 mm, lay the area between the brickwork and the frame with mortar, to save and strength the mortar, fill in crushed stone.
Consider the following points when laying:
- The freshly laid mortar should be carefully compacted so that there are no gaps and voids. Then you need to squeeze the frame to fit snugly against it.
- If water is supposed to come from the side holes, provide small holes in advance for fixing the filters at the bottom of the masonry, filtration takes place by inserting porous concrete.
- Both outside and inside the brickwork, a layer of plaster must be applied. For the outside, it is necessary to take into account the dimensions of the pit in which the brickwork is made with a well. For the inner wall, the final diameter of the well. The solution is taken at the rate of 1: 1 or 1: 2 and is produced quickly, the longer the solution is idle, the weaker the plaster in consequence.
example well diagram
- When laying a rounded well, a gradual narrowing is made towards the top of the structure. To do this, the transition from the bottom to the top of the well is done with a gradual overlap of up to 3 cm.The narrowing is made on three sides of the well, leaving the fourth side vertical along the entire height of the masonry. Running brackets are provided on this side. They are built into a brick wall in a checkerboard pattern along the way and form a staircase. For a long service life, the staples are painted with waterproof paint before embedding them in the brick wall of the well.
Never forget about the rules for operating a well. Sometimes there is a need to clean the well and it is necessary to go down into the mine. Before performing such manipulations, be sure to check the air in the well for the presence of carbon dioxide. To do this, you need to lower the lighted candle into the well. If the flame does not go out, then you can safely go down into the mine. Otherwise, within 20-30 minutes, the well must be ventilated using an exhaust fan.
Carefully keep children away from the well. The well must always be closed with a special cover. To avoid children playing and getting debris into drinking water. How the well is arranged, see the video in more detail:
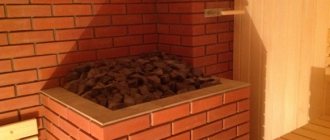
Large furnaces
Large furnaces have furnace dimensions 73 × 73 cm. The power of such devices is 40 kW, which allows heating a steam room up to 50 m³. The maximum loading of a bath stone is 250 kg. In addition to a lot of good steam, this gives you the opportunity to steam for 6 hours without worrying about additional loading of firewood.
In addition, there is an original development of sauna stoves with a metal mesh around the firebox. The stoves are relatively small in size for sauna stoves, but they can accommodate a large number of stones: the backfill is located around the chamber, and not just inside. This design warms up the room more slowly, but keeps the heat longer and produces more steam. Another advantage of stoves with a mesh heater is that steam of different temperatures can be produced. When water is supplied to the lower part of the stove, hotter steam is generated and softer to the upper part.