Home / Design
Back to
Published: 06.02.
0
15
- 1 What does a bathroom faucet consist of?
- 2 How much does it cost to install a mixer?
- 3 Criteria for choosing a bathroom faucet
- 4 Installation of an expensive crane
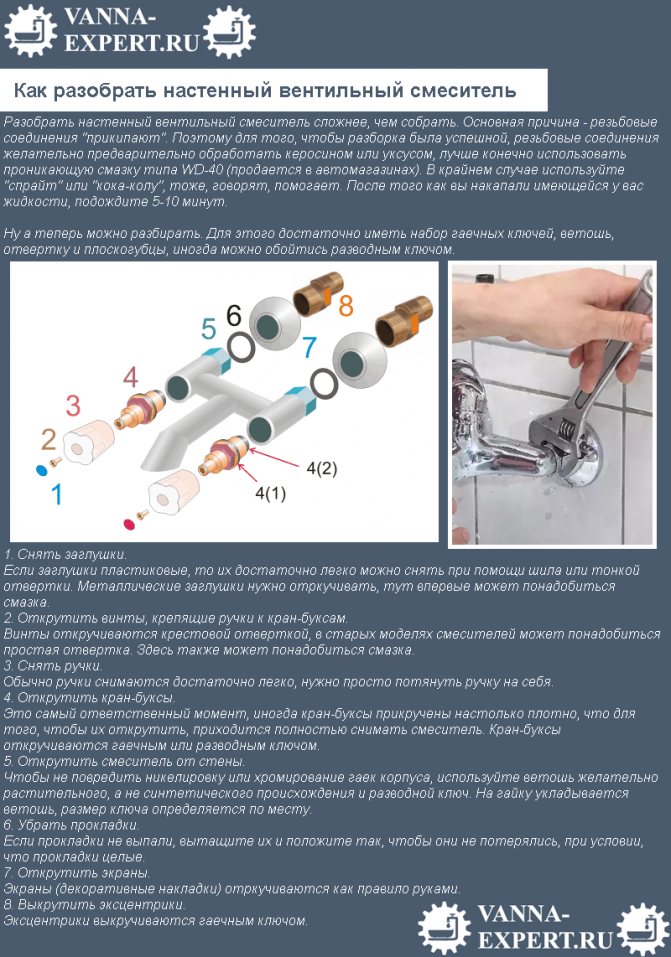
- 5 Dismantling the old mixer
- 6 Methods for installing a faucet in a bathroom
- 7 Installation Tricks
- 8 Installing a wall-mounted bath mixer
- 9 Installation and connection diagram
- 10 Nuances of installation
- 11 Required tools
- 12 Preparatory work
- 13 Installation details
- 14 Some helpful tips
What does a bathroom faucet consist of?
Before dismantling and installing the mixer in the bathroom, you need to figure out how it looks and what parts it consists of. In addition, knowing how it is staffed can help avoid unscrupulous sellers. Packaged sanitary ware consists of the following items:
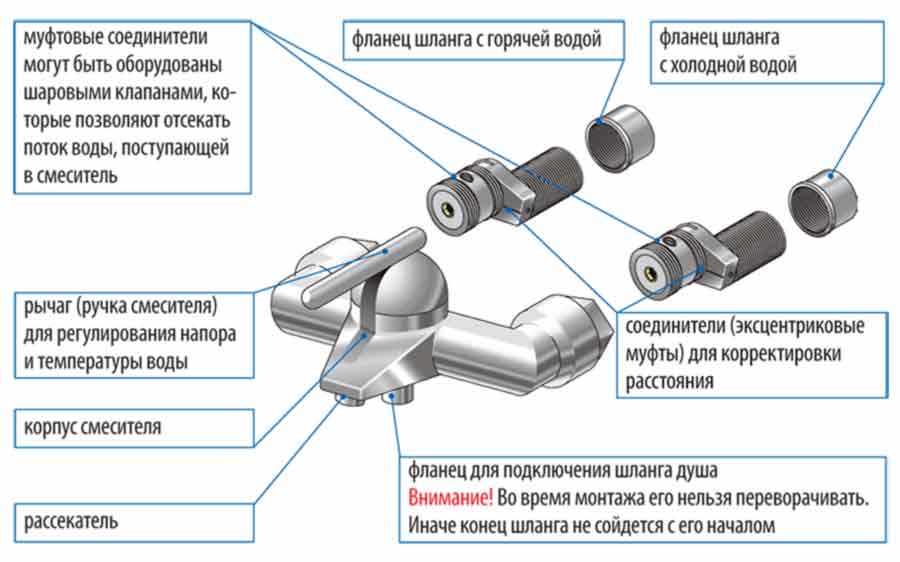
- Housing. Its standard scheme is as follows: two nozzles for supplying hot and cold water, two sockets and a spout;
- Shower hose. This is the part of the system that connects the mixer body to the shower head. Since this part is the most frequently out of order, it is not recommended to save on it.
Before installing the faucet in the bathroom, let's figure out what types of shower hoses there are, because their choice is huge: from plastic products with metal wrapping, to improved models with anti-twist protection and a silicone layer on a metal braid.
- Shower head (also called shower head). Shower heads from the simplest ones with two or three standard modes, to half a dozen functions for creating a soft aerated, massage or jet stream, "economy" mode and many other pleasant shower options.
- Eccentric. This type of shower adapter is elongated, rounded, with one edge attached to the mixer and the other to the pipe. The length and size of the eccentrics is individual for each model.
- A gander called a spout or curl. The most common gander models are J, C and L-shaped.
- Decorative shades.
- Rubber or silicone gaskets.
The nuances of installing a mixer in the bathroom with your own hands video
However, checking the equipment is not always enough, since to be completely sure that there is no defect in the purchased product, it is necessary to ensure the integrity of the thread of the eccentrics and fastening nuts. Assembly instructions are included with the plumbing. Assembling and disassembling it is quite simple, you can see this by watching the video tutorial on assembly.


Preparatory work
First you need to prepare the bathroom. Put all bathroom accessories in a closet, which can be tightly closed, or take them to another room. Turn off the hot and cold water at the bathroom faucet. Then, using ordinary film or oilcloth, close the bathtub, shower stall and sink on all sides. It is advisable to close the existing shelves and cabinets, since installing a new mixer is somewhat dusty.
Now start dismantling the old mixer. Perhaps this is the most time-consuming stage of work. Dismantling should be extremely careful, especially if there are tiles in the bathroom. After all, even a minor scratch or splinter can greatly spoil the entire aesthetic picture of a room. In addition, you will need to try to destroy the wall as little as possible during dismantling. Otherwise, you will then have to close up large holes with a solution.
How much does it cost to install a mixer?
Firstly, there are different mixers: for concealed installation, open installation, with levers, valves, thermostatic, non-contact. When installing a mixer in the bathroom, it is necessary to take into account all the nuances of the equipment and the original piping in the bathroom.
Old and new houses differ from each other: different water supply systems, different pipes, different conditions of the sewerage system. Our specialists serve dozens of houses in different districts of Moscow and are well acquainted with the peculiarities of Khrushchev, new buildings, Stalin-era buildings.
The cost of installing a mixer in the bathroom depends on the type of bath, the type of mixer, the availability of supplied communications, the need for additional equipment. Call our specialists and briefly describe the task, then we can name the approximate cost of the service.
To determine the cost of installing a faucet in a bathroom, a plumber needs to know:
- mixer type;
- type of mounting (hidden on the wall, on board, hidden on the rack);
- your plans (current renovation, complete renovation, renovation in a new building);
- mixer brand.
The master will be able to give the most accurate and objective assessment of the cost after determining the scope of work.
Important details
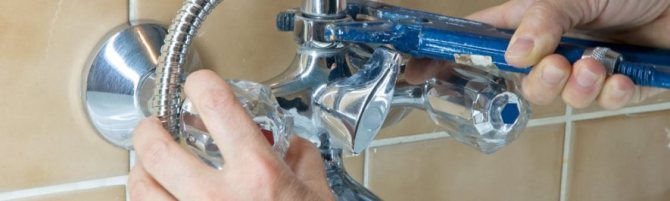
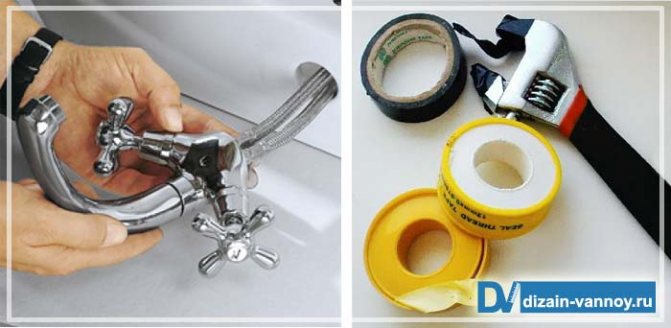
When tightening the nuts with a wrench, be sure to put a piece of a rag between them, this way you will not scratch the mixer. If the faucet is damaged, the key for it will automatically void the warranty.
Before installing, tighten the brass bushings on the mixer with a hexagon # 10, which press ¾ nuts on the body.
Installing a faucet in the bathroom yourself is not a very difficult matter, the main thing is to carefully and carefully follow each point when installing the faucet. As a result, you will be delighted with the new wall-mounted faucet, which you were able to install yourself.
Criteria for choosing a bathroom faucet
How to install a faucet on the wall, what are the most common methods? Firstly, this is the replacement of the old one, and secondly, the installation during the repair.
In order to replace the old plumbing with a new one, first of all, you need to choose the right one. It is not difficult to do this, since the current range of products offered by plumbing stores makes it possible, taking into account financial capabilities, to choose a mixer, both domestic and foreign. Below are the characteristics to look out for when buying:
- Weight. Even if you are not an expert, and are not able to distinguish stainless steel from brass, the quality of a product can be determined by its mass. Too lightweight product indicates its small thickness and fragility of the device.
- Metal. If the consultant in the store offers a choice of silumin and brass mixer models, give preference to the second one. Silumin is not very durable, its composition is an alloy of silicon with aluminum, products made from it have a minimum weight and can be deformed during installation.
Many novice craftsmen make a standard mistake when choosing products from it due to the low price. The highest viscosity of the alloy is possessed by brass models, which do not allow the clamping nut to burst with light deformations and installation. In addition, brass fixtures are less susceptible to corrosion.
- Dimensions. This characteristic concerns not so much the size of the mixer as its correspondence to the place of installation to the bathroom wall. In the case of an incorrect selection of a model (excessively long or short, massive or, conversely, a miniature crane and other inconsistencies) or does not correspond to the installation site, it can not only look ridiculous, but also quickly fail.
Installation of the on-board mixer
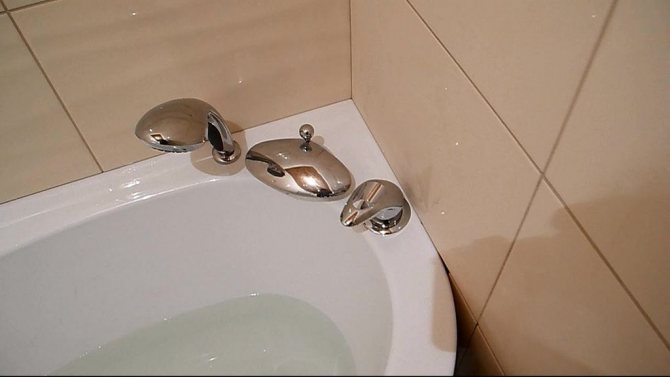
On-board mixer
Very convenient position of the mixers, facilitates the process of adjusting the water temperature, looks spectacular. It can be installed not only in sinks, but also in bathtubs.The only prerequisite is the presence of special technological holes. As far as ceramic sinks are concerned, they all already have factory holes. How to make holes in an enamel and acrylic bathtub?
Instructions for drilling holes in an enamelled bathtub
The work is quite complex and requires certain skills and care. To make holes, you need to have a marker, a feather drill for ceramics and glass, a screwdriver or drill, tape and plasticine.
Step 1. Mark the location for the hole. Seal it tightly with tape, preferably transparent.
Step 2. Make a small collar of plasticine, about 0.5 cm high and twice the diameter of the hole. Glue the plasticine firmly to the bathroom, pour water into the resulting container.
Step 3. Drill a Ø 5–6 mm hole in the center of the mark with a metal drill. The rotations of the drill or screwdriver are small, maximum 500 rpm. Do not press down hard on the drill. Drill carefully, the thickness of the bath is small, do not allow a situation where the drill falls sharply and the chuck hits the bath.
Step 4. After the through hole is formed, the water will go away. Clean the surface at the drilling site. Make a small cap out of plasticine and fix it under the hole on the back of the tub. The fixation must be airtight and retain water.
Drilling a hole for a mixer
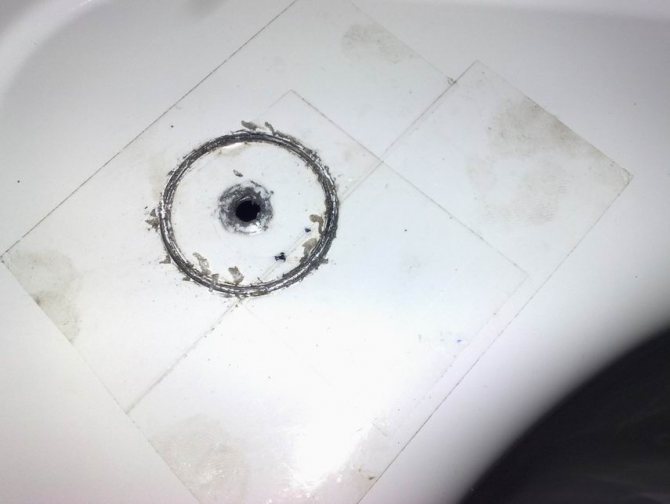
Step 5. Insert a Ø 10–12 mm drill bit and increase the hole diameter. Remove the tape with a shoulder, clean the surface from chips. Remove the bottom cap.
Finished hole
The main hole is ready, now you need to work with a rubber and emery cloth nozzle, the revolutions of the chuck are maximum, the pressure is minimal. Make markings for the mixer elements, cover the surface with transparent tape. It will minimize the risks of enamel chipping. The slower you work, the better the edge of the hole. If there are small chips, it doesn't matter, they are covered by the mixer surfaces and become invisible. All work will take approximately 2-2.5 hours.
Video - Drilling an enamel bath
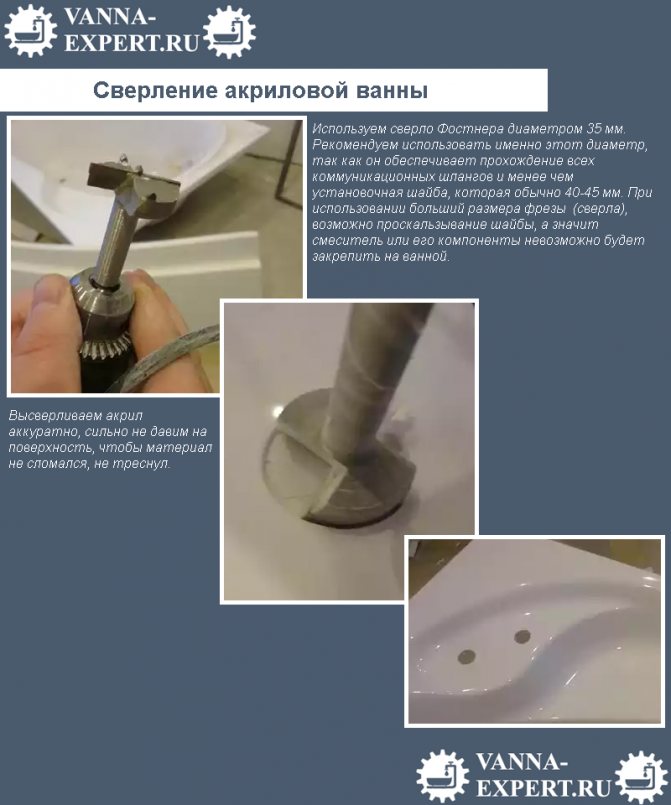
Tips for drilling holes in an acrylic bathtub
There are no problems with this material. It is necessary to use a crown of the appropriate diameter. It is recommended to make a plasticine sideboard for cooling, otherwise, if the technology is violated, the edges may melt or change their original color.
Important. The tool must be completely serviceable, no beating of the chuck is allowed. The crown is sharp, work is done slowly.
The holes are prepared, you can start installing the mixer on the side.
Step 1. Buy the right mixer, read the instructions for use.
Mixer kit
Devices with small spouts are mounted on the sides of the bathroom and the sink; another hole may be needed to install the shower. It is advisable to do the installation work during the installation of the bath, in this case it will be possible to hide the pipelines.
Step 2. Insert the mixer into the special hole, select its optimal position.

On-board mixer markings
Drilling an acrylic bath
Step 3... Put on a rubber gasket and a special figured washer from the bottom of the mixer, tighten with a clamping nut. At first, tighten the nut to the stop by hand, with a wrench, tighten no more than half a turn.
Step 4. Connect the hot and cold water connections to the corresponding pipes.
Installing the mixer on the side of the bath
Step 5. Check the tightness of the connections with a piece of paper.
The mixer is installed in the sink in exactly the same way.
How to remove an old mixer
Old mixer
Such situations often arise, ignorance of the dismantling algorithm or incorrect actions can cause unpleasant situations.Dismantling old mixers must be done skillfully, each device must be approached individually.
- Examine the faucet carefully. Pay attention to the size and function of all nuts. Prepare the appropriate locksmith tools.
- Carefully remove limescale and solid oxides from visible threads. If there are a lot of them, then you can use solvents.

Scale remover
- Try to unscrew the nuts with a wrench, do not use too much force. If the nut is jammed, make a half turn in the opposite direction, and then unscrew it again. Due to such actions, the thread is freed from various solid particles.
- If the mixer is very old, it is recommended to wet all threaded connections with mortar before dismantling, and repeat the procedure several times. For these purposes, a toilet bowl cleaner is excellent; it contains hydrochloric acid. Hydrochloric acid dissolves most solid deposits.
Technical liquid VD-40
- Check the condition of the eccentrics. If they are working and the thread in diameter is suitable for new mixers, then you should not touch them. This will greatly simplify the dismantling process. In addition, the old eccentrics were made of high-quality alloys; in terms of physical strength, they are much superior to today's ones.


How to disassemble a wall-mounted valve mixer
During dismantling, situations arise when part of the eccentric thread breaks off and remains in the pipeline fitting. Let's say right away that the situation is very unpleasant, in some cases it will be necessary to change the fitting. And it can be located under plaster and ceramic tiles - you need to groove the wall, and then return it to its original state.

The eccentric has broken, how to unscrew it?
But do not rush to gouge the walls, try to unscrew the broken off eccentric thread. To do this, you need to prepare a special device. The inner diameter of the eccentric is about 15 mm, the same width should be the device. It can be made from sheet steel with a thickness of 1–2 mm. Cut a piece from it 3-5 cm long and 15-20 mm wide. Grind one end with a grinder with a triangle. This end should be inserted into the inlet of the broken-off threaded portion.
Next, the unscrewing process begins. If you have an assistant, great. Let him gently tap the device with a hammer and press the sharpened end against the part of the eccentric remaining in the thread. At the same time, use a wrench or pliers to unscrew the broken element. If everything is done correctly, then in 90 cases it is possible to solve the problem. You do not need to make much effort, do all the work slowly and very carefully.
Video - Removing the old mixer
Video - How to change the mixer
Installation of an expensive crane
To install the mixer in the bathroom correctly, you need to understand the design of products from different manufacturers and know the intricacies of installing taps of a particular brand. Especially if you have chosen a good European option - many of them are now equipped with a water saving system.
An incorrect installation will reduce all the advantages of an expensive purchase to zero. If installed incorrectly, you can pinch rubber gaskets, poorly insulate pipe joints and assemble the valve incorrectly. Professional installation of a faucet in the bathroom will extend its life.
Crane installation
Installing a faucet in the bathroom
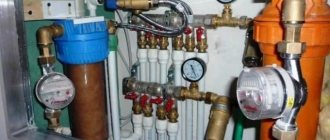
Sooner or later, even the highest quality mixer requires maintenance or repair. The work is carried out when the water supply is turned off, for which it is necessary to install a tap in the bathroom, blocking the access of water from the main pipeline. Taps for installation are provided directly on the pipeline, if it is transit, or are its end if a dead-end branch of the main is inserted into the bathroom.
- Before putting the faucet in the bathroom, the faucet installed on the line below the installation site is closed. Also, if possible, locking devices existing on the line are opened. This will relieve pressure in the main pipeline and allow safe work. Collapsible valves or gate valves are often installed on main pipelines, which may require replacement of the sealing elements.
- Before assembling the faucet in the bathroom, the threaded connections of the faucet parts are sealed.
Tip: It is better to do this with a good quality tow made of fine fibers, which provides a better seal than a tape made of fluoroplastic sealing material.
- Before screwing on the faucet in the bathroom, it may be necessary to cut or restore the previously cut thread, which, even with minor damage, may not provide the necessary tightness of the connection. This operation is performed using any threading tool. When using plastic pipelines, it is necessary to think about how to fix the faucet in the bathroom, so that when it is opened and closed, it does not create destructive moments of forces leading to depressurization of joints and destruction of highways, because the strength of plastic is also not unlimited.
- Mixers with separate control devices include two taps, which are installed in the mixing chamber, which is also the mixer body. Therefore, it is imperative to dwell on how to make a faucet in the bathroom, mounted in the mixer body. After shutting off the water supply, it is necessary with a tool with soft sponges, avoiding excessive efforts to unscrew the valve from the body and carry out repair or maintenance work.
For your information: Sometimes the debris found in abundance in our pipelines interferes with the normal operation of the crane.
If you want to perform any of the listed operations yourself, you can see a photo on how to install a faucet in the bathroom. They clearly show the tool used or the order of work. The work is very simple and does not require high qualifications. The only thing to remember: the pressure in the water supply system is about 6 atm and it is simply impossible to hold such a pressure with your hands, and the temperature of hot water sometimes reaches 50 degrees, and before connecting the tap to the pipeline, it is imperative to make sure that the water is reliably shut off.
Bathroom sink faucet
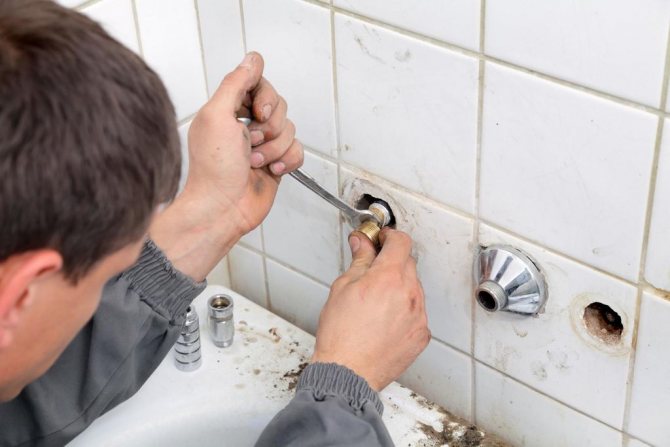
Dismantling the old mixer
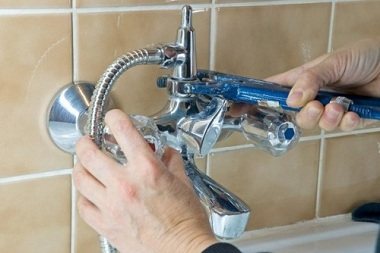
Removing an old faucet in a bathroom is a fairly straightforward task. To do this, you will need pliers and wrenches - gas and adjustable. Dismantling is carried out in several steps:
- Shut off the water supplied both through the main line and from the electric boiler or gas water heater;
- Drain the water remaining in the system;
- Remove the tap from the wall. Do this very carefully, taking care not to break the thread of the fitting in the wall;
- Clean the threads on the reinforced-plastic pipes in the wall from the winding.
Types of mixer designs

Before making a faucet in the bathroom, you need to choose a suitable design.
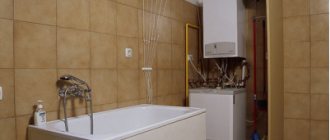
The bathroom, as well as in other sanitary or utility units of any modern home, uses hot and cold water supply.
As you know, the temperature of hot water is quite high, cold water has a very cool temperature, and for most needs, a medium degree of heating is needed, which will allow normal hygiene or household procedures.
To obtain a flow of the required heat, mixers are used that allow you to mix cold and hot water in the right proportions.
We are talking about a bathroom, so we are primarily interested in the ability to take a bath or shower, wash hands, wash, etc.This assumes the presence of a mixer that can provide a sufficiently fine tuning of the crane operation with minimal effort on the part of the user.
In the bathroom, not only functionality is important, but also beauty and comfort.
In addition, it must be borne in mind that at least two types of plumbing are possible in the bathroom, since there are almost always two water intake points - a bathroom / shower and a washbasin. Sometimes, of course, there are devices that serve both of these points at the same time due to the turns of the crane gander, but this is rather an exception and an example of how not to do it.
So, two types of faucets can be installed in the bathroom:
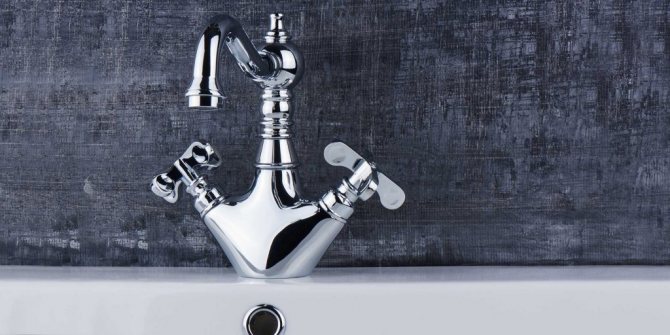
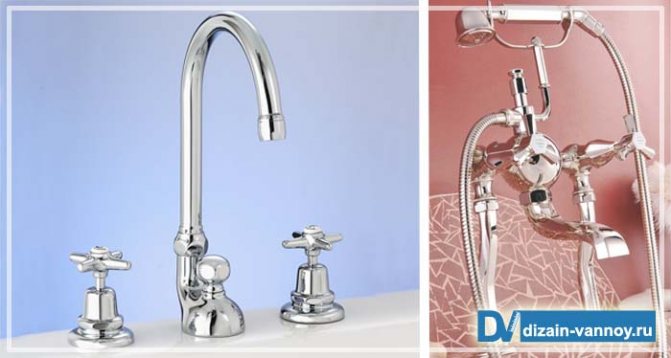
- Washbasin fittings... They have two entrances (hot / cold water) and one exit (tap gander). Structurally designed for installation on a hole in the rim of a washbasin bowl, less often for wall mounting;
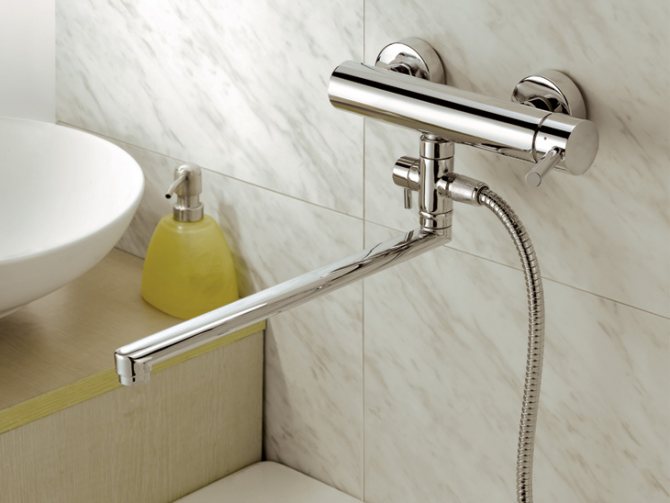
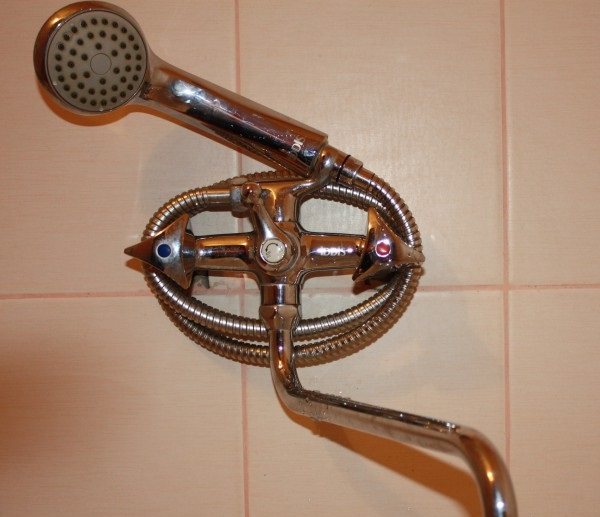
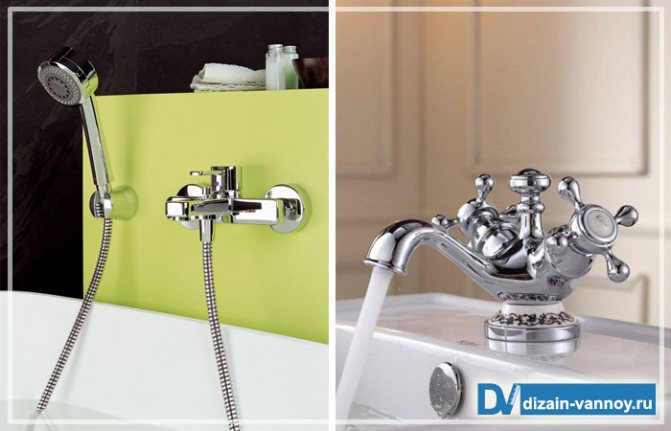
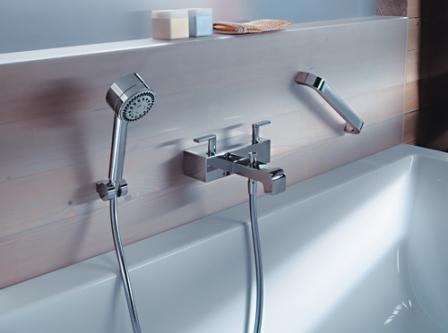
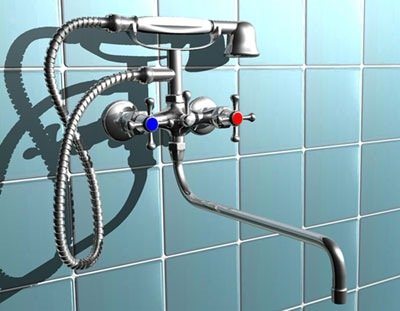
- Appliances for installation in a shower cubicle or in a bathtub area... They have two entrances and two exits: one for the gander of the tap, the other for the shower head. Sometimes, in addition to the tap and shower, there is an additional shower head with a flexible hose. They can be mounted on the wall (most often) or on the side of the bathtub.
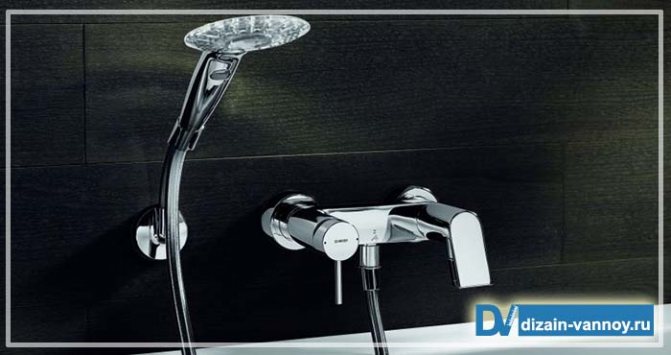
Pictured is a classic wall-mounted mixer with a flexible hose shower.
Important! There are no significant differences in the installation of the mixer on the sink and the side of the bathtub, therefore, it makes sense to consider only the installation on the wall and the sink as examples of various works.
It should also be remembered that mixers within each type are divided into many subspecies, moreover, each manufacturer uses some of its own design developments and solutions. Nevertheless, these structures do not have fundamental differences, and their installation, accordingly, also.
Mounting on the side of a bathtub is similar to mounting on a washbasin.
Important! We will consider common models, the assembly and installation of which reflects the general rules of such work.
Methods for installing a faucet in a bathroom
There are several options for installing the crane:
- hidden installation on the wall - the crane is placed on the wall, the pipes are covered with tiles or plasterboard;
- wall mounting with a special rack;
- installation of a tap on a bath.
Concealed installation is more difficult to make, since it is more difficult for a plumber to get to communications. If you have enough free space in the bathroom, then you can make a separate stand, connect the mixer and close the communications with ceramic tiles.
Installation tricks
How to install a mixer in the bathroom if the pipes on the wall are crooked video
- It is not difficult to use tow correctly, to do this, wrap it tightly around the thread in the direction of twisting. Be careful not to twist the tow into bundles.
- When installing plumbing along with water pipes, you will need to mark the height. It is 15 to 20 cm above the top of the bathtub.
We suggest that you familiarize yourself with How to choose the right toothpaste by strips
How to correctly install the mixer in the bathroom on the wall, which does not require a call to the master and financial costs. In addition to invaluable experience, this process will help you grow in your own eyes. Remember: if you want to do something with high quality, do it yourself!
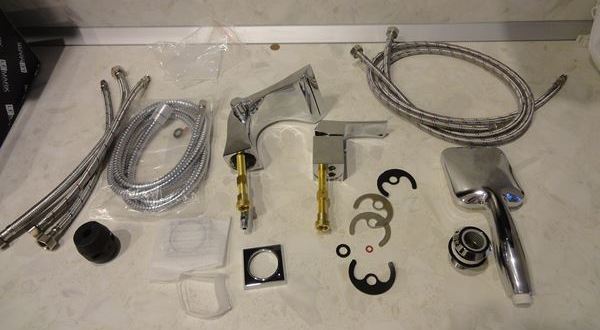
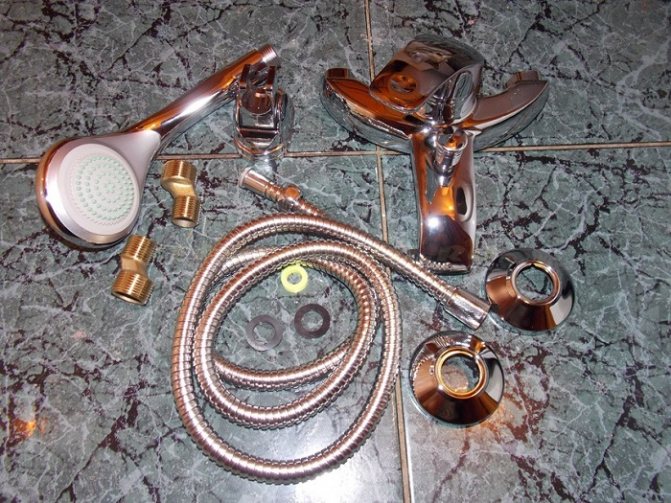
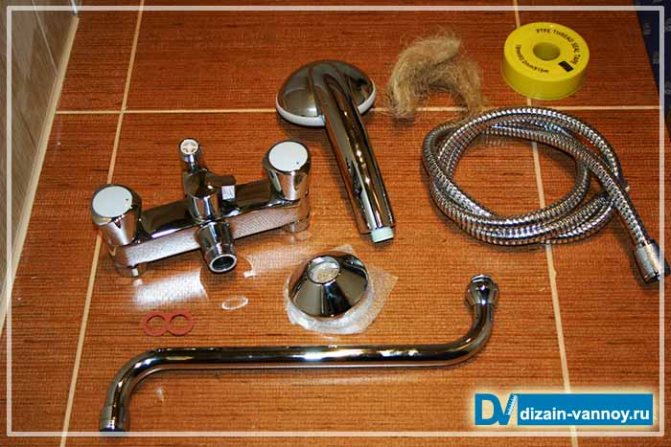
Mixer complete set and consumables
To understand how to properly install a purchased mixer in the bathroom, you should first figure out what kind of product it is.
In stores, you can now find a wide selection of cranes, both open and concealed installation. However, what is included in the basic set when purchasing a mixer and are additional expenses necessary for any accessories? In order not to visit the retail outlet again, it is better to decide in advance what the purchase is.
The standard set of a bathroom faucet includes:
- the mixer itself;
- eccentrics;
- a set of gaskets;
- decorative cups;
- shower head.
Depending on the type of mixer (with built-in tap or long swivel), it can also be equipped with a separate jib of various lengths.
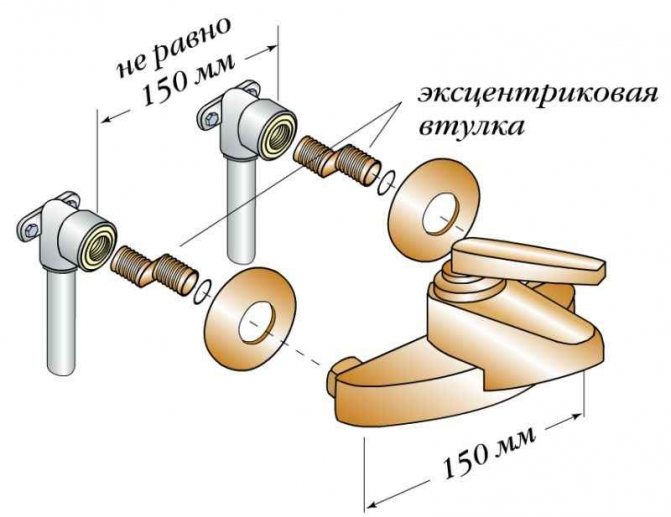
The eccentrics are designed to attach the mixer to the wall. They are also needed to level it up. With their installation, the process of installing bathroom faucets begins, so it is extremely important that they are made of quality materials. The durability of the crane depends on this.
It often happens that the standard gaskets included in the set of bath mixers do not have sufficient thickness and subsequently, after installation, cause leaks. To prevent this from happening, you should additionally purchase a spare kit during the purchase in the store. For installation, spacers 3-4 mm thick and ¾ in diameter are ideal - they will provide a reliable seal.
Tow should also be purchased as consumables - it is wound when the mixer is installed in the place where the pipes connect to the eccentrics and provides additional insulation.
Installing a wall-mounted bathroom faucet
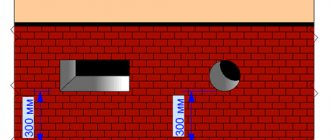
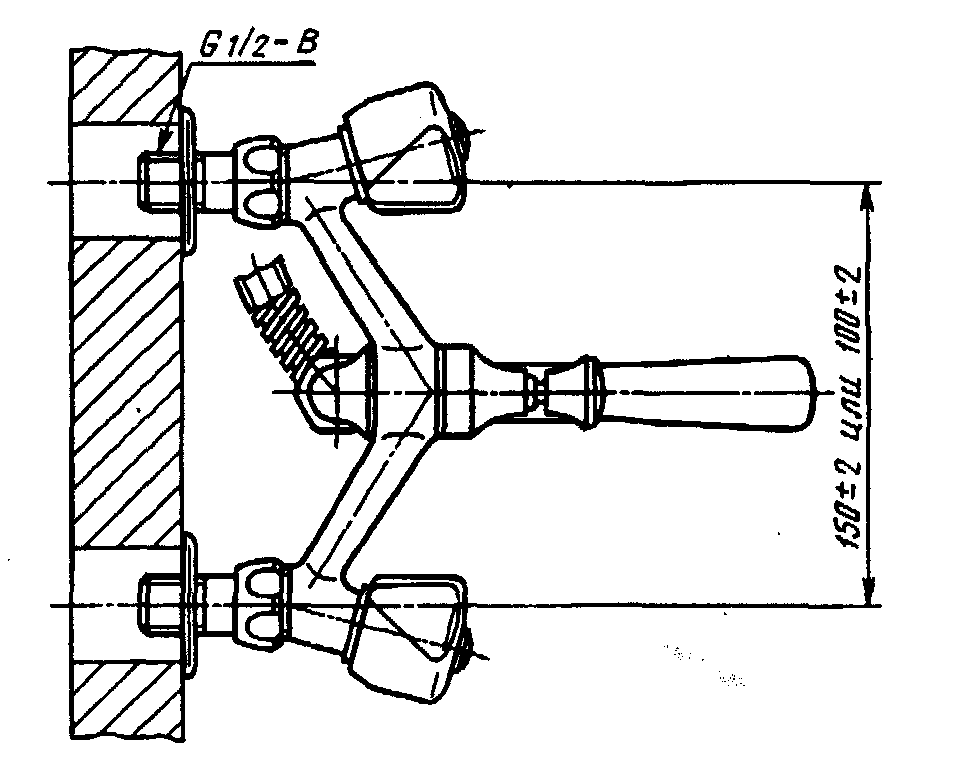
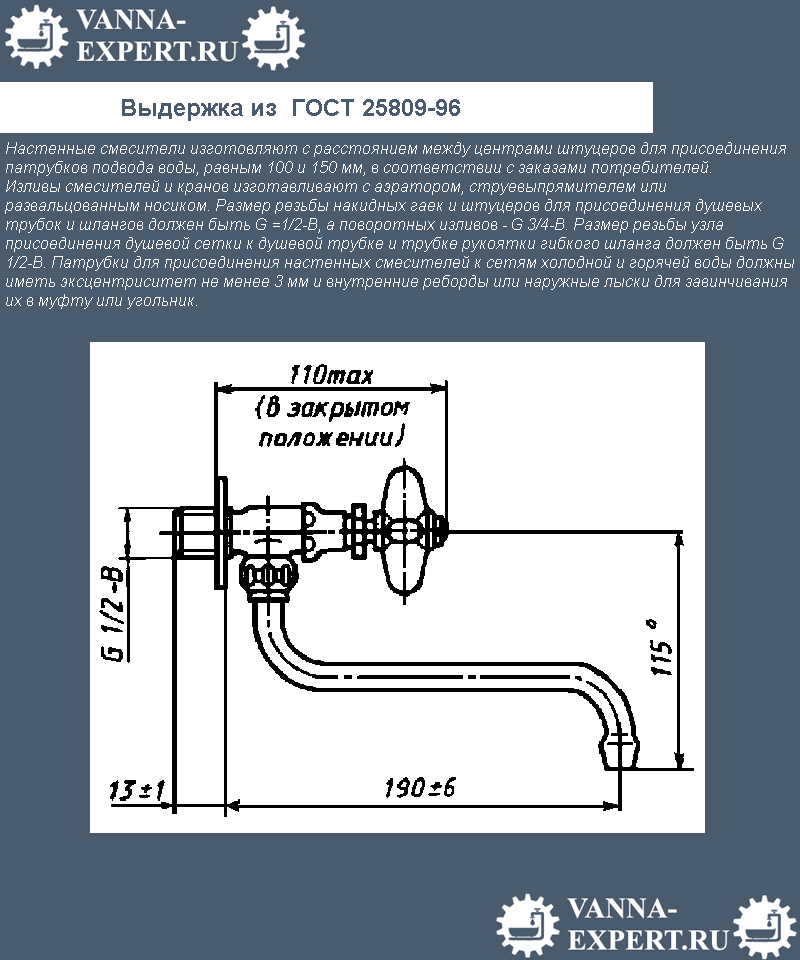
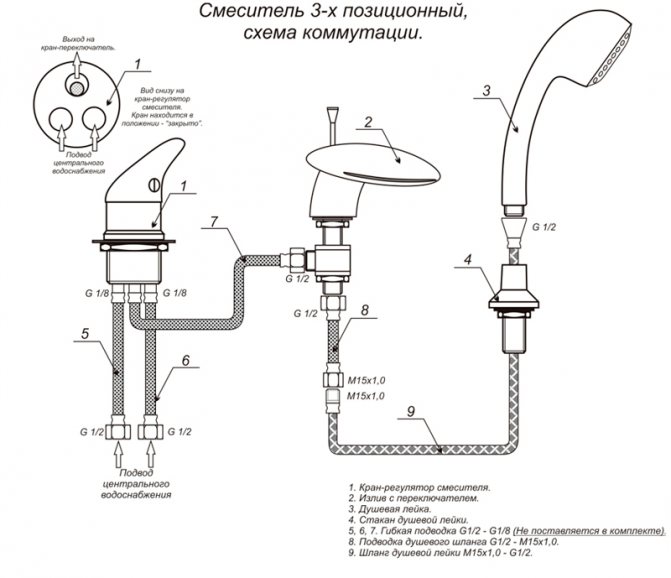
The height above the level of the bath should be within 30 cm, chosen taking into account the size of the mixer and the preferences of the owner. The standard distance between the centers of the two fittings is 150 mm, the eccentrics make it possible to correct errors in the horizontal and vertical direction up to 5 mm.
Extract from GOST 25809-96
Single-handle bath mixer with separate connections, wall-mounted with a shower net on a flexible hose, spout with aerator
Mixer for bathtub and washbasin, two-handled with inlets in separate holes, wall-mounted with a shower net on a flexible hose
Working with fum tape
As an example, consider installing a faucet on a new wall. The pipelines have already been installed, plastered and tiled.
Step 1. Study the instructions of the mixer manufacturer, check its completeness and the presence of all rubber gaskets. The pipe outlets must have an internal thread.
Single-lever wall mixer
If this is not the case, then several problems arise.
- First. We'll have to buy and screw in couplings. These are additional jobs and new places where a leak may appear.
- Second. The mixer will move away from the wall, will not fit snugly to it, the fittings will be visible. This is a major cosmetic defect.
- Third. Due to the increase in the length of the threaded connecting fittings, the risk of cracking in them increases. The shoulder increases, due to which the mechanical stress increases.
Step 2. Clean the pipes from residual materials. To do this, it is better to open the taps on the pipes with hot and cold water for a few seconds. A strong pressure will wash away all the dirt. Such an operation is much easier to do right away than to dismantle the mixer later in case of clogging.
Pipes prepared for mixer installation
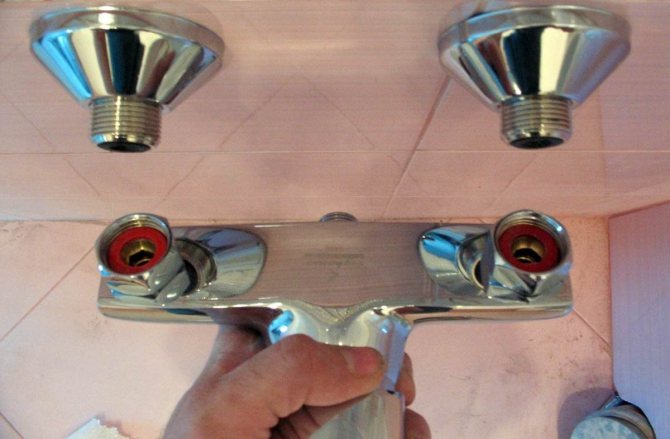
Step 3. Take out two eccentrics. On the one hand, they have a ø1 / 2 ″ thread, and on the other - ø3 / 4 ″. Different manufacturers have different attitudes towards the accuracy of the manufacture of eccentrics. We advise you to check its dimensions. To do this, screw the eccentrics into the threaded outlets without a seal, pay attention to the ease of screwing.
Valve installation using eccentric adapter sleeves
Installation of eccentrics

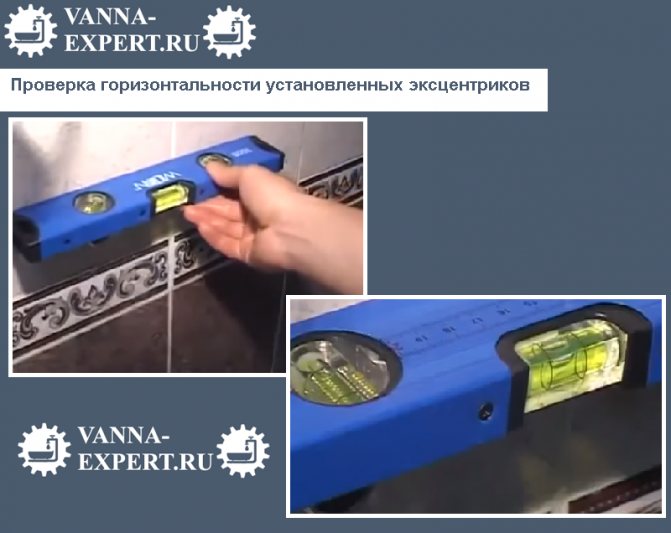
At the same time, notice the correct position of the eccentrics. After you screw them in without a seal, attach the mixer. Pay attention to whether the clamping nuts coincide with the thread and the horizontal position of their position, if necessary, tighten / unscrew a little, depending on whether it is necessary to increase or decrease the distance between them.
Checking the horizontal position of the installed eccentrics
Keep in mind that eccentrics with already wound seals should only be screwed in, twisting will cause leaks.Once again, we remind you that during the fitting you need to roughly remember the position of the eccentrics.
After winding, press the tape along the entire diameter of the eccentric with your fingers until the thread protrusions appear.
Step 4. Screw one cam into the pipe fitting. The eccentric position is the same as in the trial assembly. Don't try too hard. If the eccentric is screwed in very easily, then you need to unscrew it, remove the old seal and apply a new one, but in an increased amount.
Step 5. Screw in the second eccentric. Don't screw it up to the end. When there is about one turn left, try on the mixer several times, pay attention to whether the clamping nuts fit exactly. Repeat the operations until the axes of the mixer nuts coincide with the axes of the eccentrics. The nuts should be easy to profit by hand.
Screwed eccentrics
Step 6. Replace the decorative cups. They are threaded and screwed onto the protruding thread of the eccentrics. Screw them all the way to the wall.
After installing the eccentrics, we wind the cups
Step 7. Insert rubber seals into the tightening nuts; they are supplied with the mixer. Screw the nuts on the eccentrics with your hands until they stop. Tighten with a wrench to completely seal.
Mixer installation
Step 8. Check the tightness of all connections, open the cold and hot water supply taps. Leaks can be so slight that they can't be noticed right away. Place a piece of paper under the joints and wait a few minutes. If wet spots appear on it - a problem.
Step 9. Assemble the spout, flexible hose and shower head on the mixer. They also have rubber gaskets, do not use too much force when tightening the nuts.
How to attach the shower hose and hand shower
During the final assembly of the mixer work carefully, do not damage the decorative outer coating of the mixer.
Watering can connected to the hose
Check if the mixer and shower are working
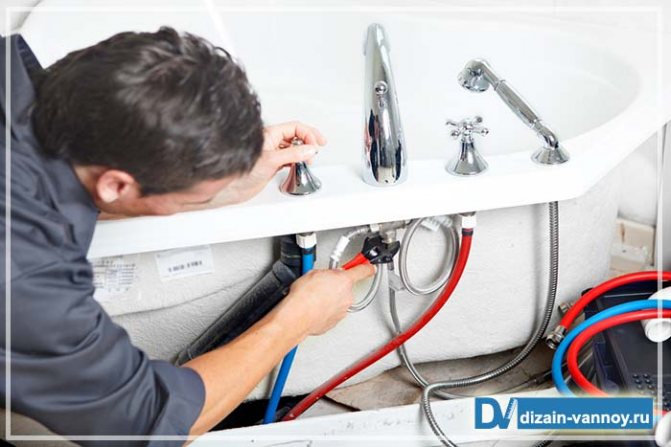
Installing a tap on a bath is only possible if it has holes for pipes and a mixer. If there are holes, then you need to choose an eyeliner - flexible hoses that connect the pipes and the outlet of the mixer.
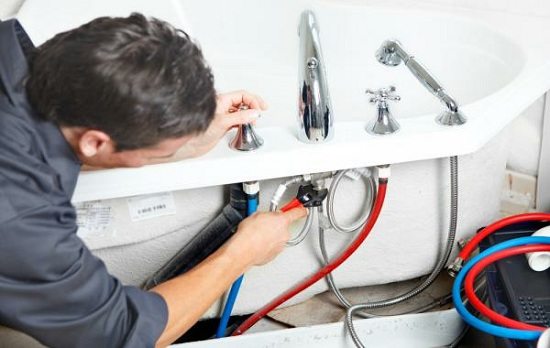
Submarine hoses differ in material, hole diameters, length. If you haven't bought them yet, our plumber will bring everything you need with him and connect the mixer without any extra hassle for you.


Installation of the crane
Then it remains to assemble the bath mixer with a tap using the nuts included in the kit. Check if there is a winding.
After that, you can turn on the water and start testing the tap. Do not immediately apply a strong pressure of water so that it does not break off. Check for leaks. At the end, you can attach decorative strips to the junction of the mixer with pipes. After that, you can begin to seal the wall damage with mortar.
Actually, the process of assembling and installing faucets is not a particularly complicated procedure. However, if you are buying an expensive designer model or a model with an innovative system, it is better to use the services of a professional so as not to damage any fragile elements.
You are on the website of the manufacturer Profsan. Check out our bathroom faucet models here.
Installation and connection diagram
So, you have selected the model you need, now you can get to work. Any of the models, regardless of price and quality, must be accompanied by instructions with an installation diagram. After carefully studying it, you can independently connect the mixer. It should already be assembled, so you just have to check the seal in the spout, the fit of the oil seals, the operation of the valve head, inspect the gaskets and seals, the valve turns.
We invite you to familiarize yourself with How to cut ceramic tiles with a manual glass cutter?
Next, unpack all the boxes and packages that come with the kit.There is a standard set: gaskets, nuts, eccentrics, wall reflectors, bushings, a faucet spout and a shower head. All this you will need to connect to the tap.
Strict adherence to the instructions will not create any problems. But do not forget about the standards: the installation height must be at least 1 meter from the floor.
Install the water sockets in the appropriate places, when removing the fittings, calculate the distance between the pipes with water - it should be 15 cm. It is very important that the fittings are mounted strictly horizontally to each other and are not too long. Having finished with the conclusions of the fittings, proceed to the main part of the work.
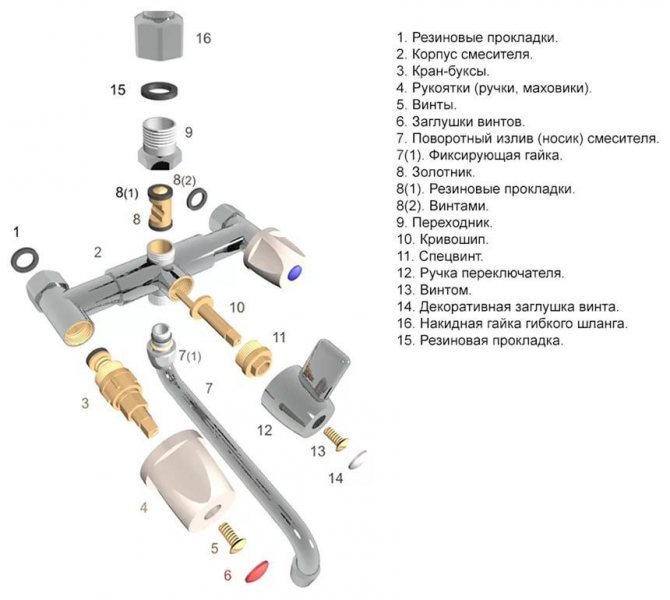
How to assemble the mixer correctly
Today, a huge number of mixers are offered on the plumbing market. (The offer of our company manufacturer Profsan - wholesale mixers - follow the link.) Different manufacturers may differ in the design features of the models, so the assembly should be done as carefully as possible. according to instructions... Usually mixers go on sale already assembled, however, you can check the presence of a valve head with a flywheel and a stem in the kit, and also see the spindle and valve in the mixer body.
Sometimes the mixer can be disassembled in the box. In this case, the parts of the device will be in separate bags. There is usually no particular difficulty in assembling a bathroom faucet with a shower, read the steps below.
- To assemble the structure you need to attach a gander and a hose with a watering can to the main unit... When assembling, do not use extra force, do not use wrenches, do not tighten the nuts.
- Then follows put eccentricswhich come with a sealing winding. If there is no winding, you need to wind it with a thin layer to insure against leakage. Traditional materials - fluoroplastic thread... If the installation of adapters is required, it is also better to wrap their threads with thread. Eccentrics should be wrapped calmly and freely. The eccentrics can be screwed on with an adjustable wrench. Usually 5 turns are required. The turns should follow the sealing thread. The winding should fit as tightly as possible to the thread.
Basically, this completes the assembly of the bathroom faucet.
Installation nuances
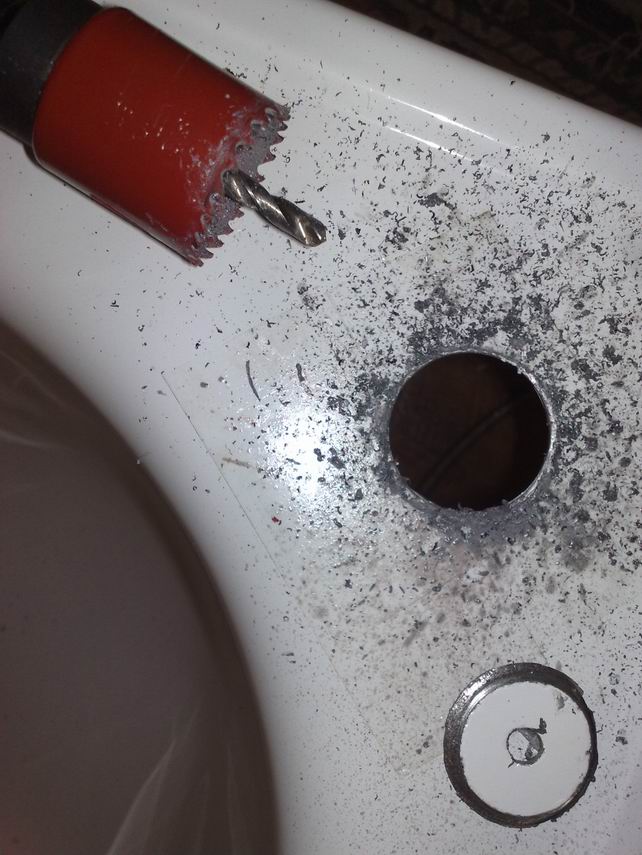
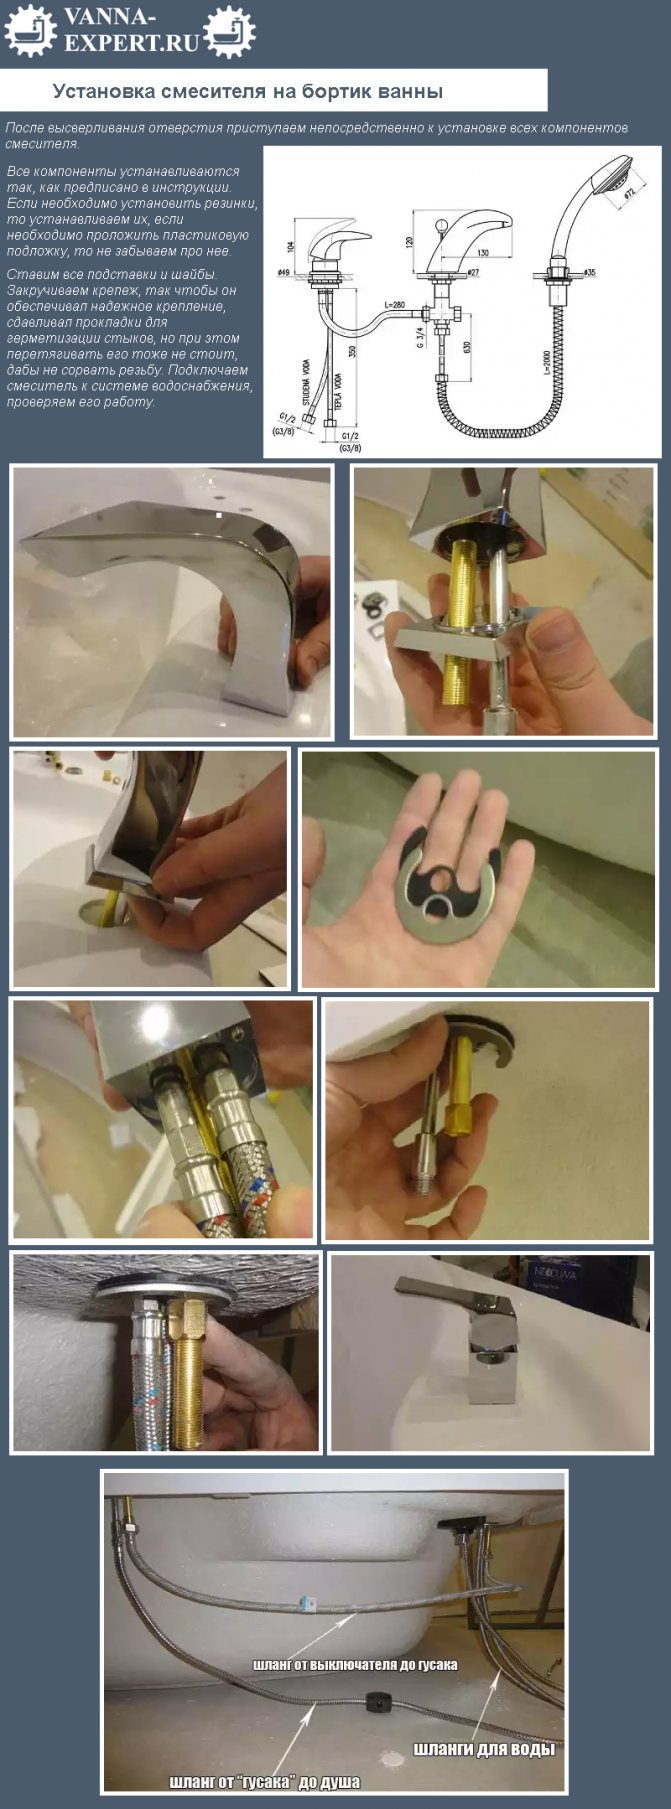
Special attention should be paid to the installation of the mixer on the side of the acrylic bathtub - in this case, you can drill holes for installation in a convenient place and mount any mixer. It also has its own peculiarities:
- holes must be drilled with a special tungsten drill;
- you need to install the mixer before installing the bath itself;
- the side of the bathtub must be reinforced with a special gasket so that it does not bend during operation;
- the tap must be located next to the open side in order to easily and without unnecessary problems get to the pipes and valves.
Required tools
You need to immediately prepare all the necessary tools: the mixer itself and all its components, pliers, building level, tape measure, adjustable wrench, open-end wrenches. Also prepare linseed tow, silicone, sealing tape. You will definitely need a piece of soft cloth, a bucket, wet wipes, and even toilet paper.
A great option is tools without teeth, but if they are not, don't be discouraged, just cover the parts with a rag or towel. This will protect them from damage to the coating. Paper is needed in order to wipe everything and check for leaks. And if a leak takes place, you will have to disassemble and reassemble the structure, and this is unlikely to give you pleasure.
Mixer assembly process
The next step is the mixer assembly process. The mixer is a special two-function device that is capable of supplying cold and hot water to the tap at the same time.Due to the fact that today on the plumbing market you can encounter different types of faucets, sometimes you should work hard to assemble it. Consider the assembly diagram of a standard bathroom mixer.
To carry out the assembly correctly, you need to check the presence of such mandatory parts in the mixer kit: the valve head itself with a flywheel and stem, a spindle and a valve directly in the mixer body itself.
Assembly and connection diagram for a bath mixer.
First you will need to install the eccentrics. Usually they already come with a special sealing winding. But if such a winding is not available, then it is advisable to wind it in a thin layer as insurance against water leakage. Use fluoroplastic thread or plain flax for this. If the walls are quite thick and adapters are required for installation, then their threads must also be wrapped with thread or ordinary tow.
Check that the eccentrics are loosely wrapped. In the case of unsuitable eccentrics, the best option would be to purchase others, especially since they are inexpensive. At the same time, try to remember as much as possible the center of displacement and the number of twists of the eccentrics. Take them off.
Now check their ends. To do this, a flat and hard object is leaning close to the ends. If no gaps are found, they are suitable. Now you can start the process of screwing them. Tighten them with an adjustable wrench about five turns. You need to screw it so that the turns go in the same way as the sealing thread, and not towards. This plays a huge role in the quality of the installation. Try to twist so that the winding is not damaged and continues to fit as tightly as possible to the thread.
Installation subtleties
It is necessary to screw the gander to the main unit, then turn the hose with a watering can. You do not need to use the keys and tighten the nuts too. Having assembled the model, you can start the installation, which consists of the following steps: wrap the eccentrics with sealing tape, then insert the fittings located in the wall, which remained from the previous tap.
This must be done very carefully. If there is no tape at hand, tow can be a substitute. Next, we screw in the eccentrics, strictly measuring the distance between the inputs on the mixer and using a level. This is done for a reason - the distance should be strictly 15 centimeters. After that, we wind the main block on the eccentrics. This should be done slowly, as it must be secured carefully.
Try not to rush, and if something does not work out, it is better to take a short break and calm down. If the block on both sides is screwed up calmly, then everything can be put correctly. Then the block must be removed and decorative shades must be screwed onto the eccentrics, which must necessarily fit snugly against the wall and close the insertion points of the mixer to the wire. If everything is exactly like that, then your work is done perfectly well. Next, we screw the block back using the reel. In order for the shrinkage to be tight, gaskets from pressure nuts must be used. The nuts need to be tightened with a wrench, but not very tightly.
We open the hot water tap and check how the mixer works. Start the test with a low pressure, gradually increasing the power of the water supply. Be sure to check how the shower works. If everything is in order, then you did it the first time. But if there is a leak, you need to find its source, turn off the water again and repeat all over again. There is a good chance that you have overtightened the nut or some fastener.
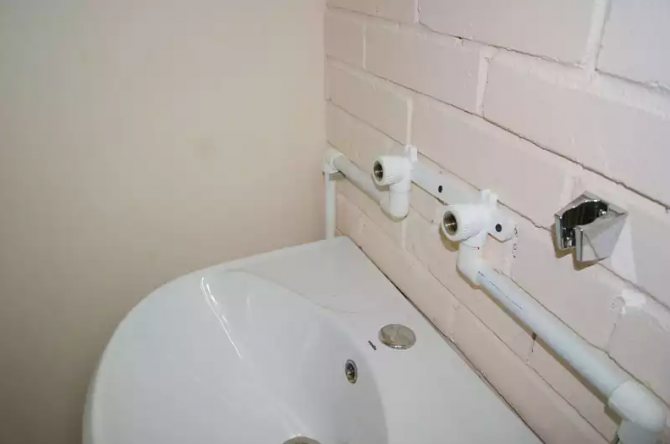
You already understood how to install a new mixer instead of a worn-out one, now let's deal with a more difficult task - installing a mixer on a new wall. First, pipes are replaced, the walls are tiled.Further, plumbing pipes are laid out, beacons for plaster are installed.
You must calculate the notches in the wall so that they exactly coincide with the distance from the lighthouse to the tiled plane.This is about 17 centimeters. If you are not sure that you can carry out all these work, then it is better to invite a specialist after all, so that later there will be no problems when installing the mixer.
After all the work done, you can start installing the fittings. In order to install them, you need to postpone the distance between the centers of the fittings - 15 centimeters. The centers should be on the same parallel, the end point should protrude beyond the wall, and the fittings should be flush with a suitable height. Once the fittings have been installed, the mixer can be attached. This is done in the same way as in the previous version.
Now let's consider another option for installing the mixer - on a horizontal surface. Such a need arises when installing a mixer on the side of the bath. Before embarking on such an installation, it is imperative to clarify whether the bearing side of the side can withstand the increased load. To mount this type of mixer, you will need a drill with a set of cutters, wrenches and screwdrivers.
At the beginning of the installation, you need to make a markup in order to then strengthen the plates along it. After marking, holes are drilled in the side of the bath. Carefully study the instructions on how to connect the mixer to the pipeline using the connecting hoses and other components included in the kit. Next, we glue the horizontal surface with masking tape to protect the surface from chips and damage, apply the markings and start drilling the holes that are necessary to install the mixer. After the holes are ready, remove it and process the edges with a special tool.
We suggest that you familiarize yourself with Installing a screen under a bath: how to install a screen with your own hands under an acrylic model, installation instructions
The next step is to collect all the parts and fix them without using keys. If the connecting hoses took their places without hindrance, then everything was done as needed and you can proceed to the final fixing of all parts of the mixer. The next step is to check the mixer for leaks.
The last method of installing the mixer, recognized as the most difficult and expensive, is to install the mixer in the floor. Before any renovation is done in your bathroom, you need to start laying two pipes for cold and hot water. In the floor, recesses are made in the size of the diameter of the pipes, pipes are laid along these recesses to the place where the bathtub will be located. After this, the grooves are closed up, the floor screed is made and the tiles are laid. Then we act according to the technology described above - we mount the mixer, check for leaks, etc.
Installing a tap in the bathroom
Standard mixer package
For each specific option of equipment, there is a general instruction on how to install a mixer in a bathroom, without taking into account the characteristics of a particular room or existing piping.
Consider the most difficult options for installing a faucet in a bathroom, when you need to replace an old mixing system or carry out equipment transfer on board a modern acrylic bath.
Dismantling the old mixing system
Before the installation of the mixer in the bathroom is carried out, it is necessary to carry out simple work to dismantle the old equipment:
- Turn off the hot and cold water taps on the inlet pipeline;
- Unscrew the union fastening nuts and dismantle the old mixer;
- Unscrew the control cams (if any) and inspect the condition of the pipeline
(very often steel pipelines are so overgrown with rust and dirt that they cannot provide the required throughput, and the ingress of foreign particles into modern mixers with ceramic shut-off elements can damage them. In case of very poor condition of the pipes, it is better to replace them with new ones);
- "Drive away" the threaded connections and remove the remnants of the sealing material with a wire brush;
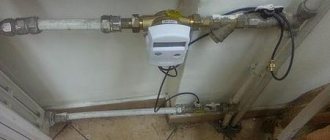
- Measure the center-to-center distance between the pipe taps for the correct selection of the mixer model.
After completing these works, you can start installing the mixer in the bathroom.
Currently, a huge number of mixers of domestic and foreign production are presented in the trade network, designed for installation on vertical or horizontal surfaces, up to embedding in wide sides of acrylic baths of various configurations. Vertical installation ensures the connection of the mixer in the bathroom without altering the existing attachment points and is used most often when carrying out cosmetic repairs or forced replacement of equipment. Using horizontal installation, before putting the mixer in the bathroom, it is necessary to perform a number of works to create a horizontal surface or at least transfer existing pipelines, which is possible only when carrying out a major renovation of the room or a complete replacement of equipment.
Purchase of a new mixer
Buying a new mixer in a store
Currently, there are two types of mixers that have a similar appearance, the same installation options and have almost equal consumer qualities, except for one - durability. High-quality mixers are made of special brass with a high copper content and a very small amount of impurities, or high-quality stainless steel with a chromium content of at least 15%. They have significant weight and a fairly large wall thickness. The only drawback of such equipment is the rather high price.
Faucets in the lower price range are made from an aluminum-silicon alloy called silumin or stainless steel with a chromium content of 10-13%. The main disadvantage of such equipment is insufficient strength and short service life. When using equipment in this price category, the problem arises of how to fix the mixer without breaking the fasteners that crack with little effort.
Types of bathroom faucets. Overview of modern designs of the plumbing market
Assembling a conventional bathroom faucet
Assembly and installation of the mixer
After the mixer connection scheme has been selected and the equipment corresponding to it has been purchased, you can proceed to further work.
- The box received from the seller will contain a set that includes a mixing chamber, locking and regulating elements, fittings, decorative shades, a shower head with a hose and a set of gaskets.
- Well-known manufacturers must put instructions in the box, which indicate the scope of delivery and the assembly diagram of the mixer. Before assembling a bathroom faucet, it is necessary to study the assembly procedure, because in complex models, the sequence of connecting the components depends on each other.
- Carefully installing the gaskets in place, the mixing chamber and shut-off and control valves are connected. Considering that the cartridges, in which the ceramic elements are installed, are made of special plastic, you should not use excessive force during assembly. With correctly assembled parts of the mixer, the required tightness is achieved by screwing it in, as they say, by hand.
- Then, fastening plugs with union nuts are installed in the mixing chamber housing, which fix the mixer to the pipeline.
The assembly of the bathroom faucet at this stage can be considered complete. The shower hose with a hand shower is connected after the mixer is in place.
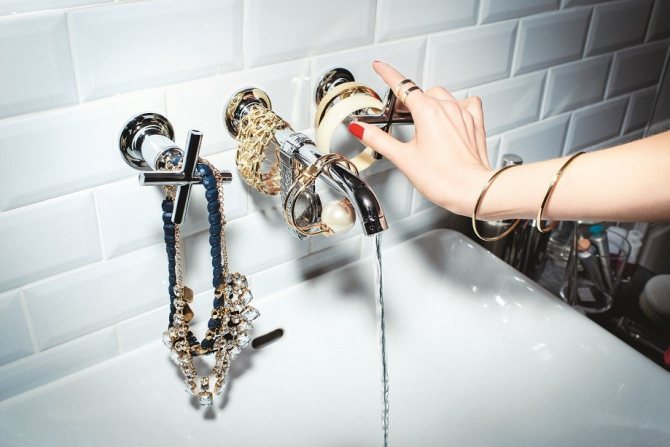
Mounting the mixer on a vertical wall
Wall-mounted faucets
After making sure that the condition of the pipelines allows them to continue to operate, you can install the wall mixer:
- Measure the center-to-center distance between the fixing nuts of the mixer;
- Wrap the supplied eccentrics with tow or FUM tape and screw them into the couplings installed on the pipeline. The location of the eccentrics is chosen so that the center-to-center distance corresponds to the dimensions of the mixer, and the upper parts of the eccentrics are strictly horizontal. The distance from the ends of the eccentrics to the wall must be the same;
Tip: Cams should be chosen with the thickest walls. Sometimes cheap models of mixers are equipped with thin-walled eccentrics, which cannot ensure the correct fit of the sealing rubber and the tightness of the connection.
- Before screwing the mixer to the eccentrics, decorative caps are installed to hide the place where the pipes exit from the wall. The caps are screwed onto the threaded part of the eccentrics until they fit snugly against the wall;
- The mixer is connected to the pipeline using union nuts with sealing gaps made of rubber or paronite. The nuts are tightened gradually in order to avoid distortions, leading to a violation of the tightness of the connection;
- In order for the connection to be tight enough, it is necessary to gradually "tighten" the union nuts with a tool with soft sponges, taking care not to damage the decorative coating.
Moving the crane to a horizontal surface
Mixers on a horizontal surface
The need to transfer the mixer to a horizontal surface also arises in the case of using non-standard designs in a room intended for installing a bathroom or when installing a mixer on board a modern acrylic bathtub. Before placing the mixer on the side of the bath, it is necessary to clarify the possibility of such an installation with the seller or on the manufacturer's website, so that the bearing capacity of the side can withstand the increased load.
To perform work on the installation of the mixer on a horizontal surface, you will definitely need a drill with a set of appropriate cutters, standard wrenches and screwdrivers.
The order of work is slightly different from installation on a vertical wall:
- Before starting to drill holes in the side of the bath, it is necessary to perform preliminary marking and after looking at how the mixer is attached in the instructions, establish the need for an additional reinforcing plate to unload the weakened part of the side;
- Clarify how to connect the mixer to the pipeline using the supplied connecting hoses and accessories, taking into account the necessary freedom of movement of the bath after installation to provide access to the equipment;
- In the case of installing equipment with an automatic thermostat, provide for how to adjust the mixer to the desired temperature, as well as the possibility of changing the parameters of the thermostat after completion of work;
- Cover the horizontal surface with masking tape in order to avoid chipping, apply markings and drill the necessary holes for installing the equipment. After completing the drilling, remove the tape and process the edges of the holes with any suitable tool;
- Using the section of the instructions on how to fix the mixer in the bathroom, you need to assemble the accessories in a certain order and fix the mounting elements without using keys. If all the elements are assembled correctly, the connecting hoses easily fall into place, you can make the final fixing of the mixer components on the base;
- After installation, it is necessary to carry out a hydraulic check of the connections for leaks, and then install the bath in place. In some cases, the question may arise of how to connect a mixer in the bathroom, the dimensions of the connecting elements of which do not allow for the necessary movements. In this case, instead of selecting non-standard hoses, it is better to lengthen the supply lines. Installation safety will only benefit from this.
Installation of a mortise mixer in the bathroom