
It is better to entrust the installation of the heating system to professional plumbers, especially when it comes to installing cast iron radiators. Errors during installation can lead to malfunctions in the operation of the system, and repairs and alterations during the heating season are highly undesirable. If you nevertheless decide to install cast-iron heating radiators with your own hands, then remember that cast iron is a heavy material, products from it weigh a lot, so you need to find an assistant for self-installation. Enlist his support, prepare radiators, materials and tools and get down to business. You will find recommendations and helpful hints in this article.
Installation of cast iron heating radiators
The market for heating devices is striking in its diversity. But the familiar cast iron radiators are still popular due to their many advantages. They are durable, corrosion resistant, easy to use and very durable. But even the most reliable device may one day require replacement. The question of how to hang a heating radiator on the brackets can be solved independently. The main thing is to have experience, the necessary materials and take into account some of the nuances of installation.
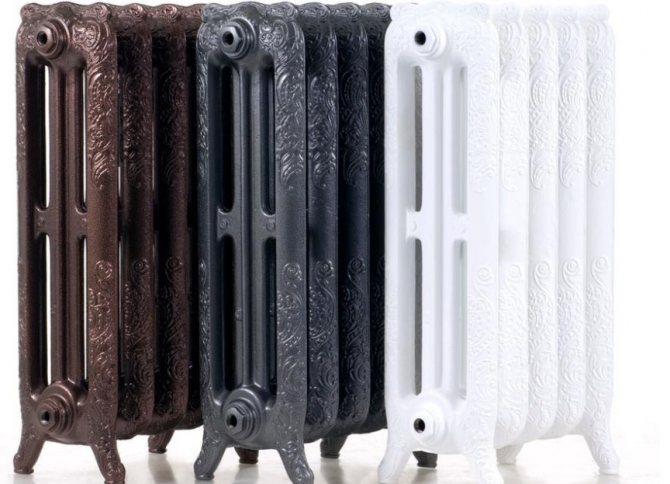
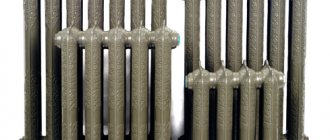
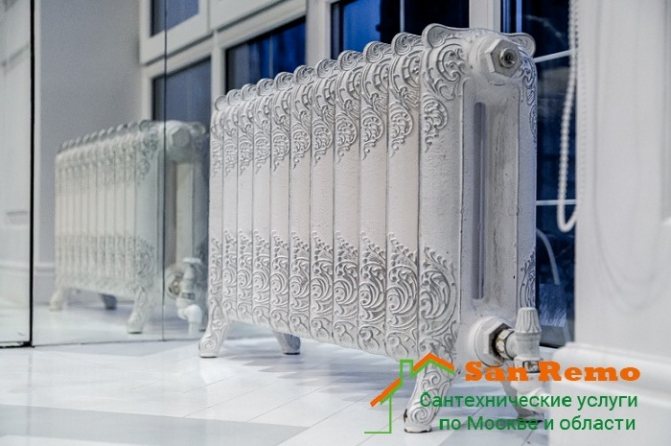
Modern cast iron radiators - an example of style
- Features of selection and installation
- Preliminary preparation
- The main stages of independent work
- Decorative design of radiators
Pros and cons of cast iron batteries
Installation and connection of cast-iron heating radiators in a private house or apartment gives the owners the following advantages:
- Reasonable price and availability of the heater make it popular.
- The high inertness of cast iron ensures long-term heating of the battery and the same long cooling after turning off the heating.
- If the surface of the battery is periodically painted, then it is reliably protected from corrosion, which allows housewives to dry laundry on it.
- The durability of cast iron radiators is their main advantage. Heating devices installed in Soviet times are still working properly. The units will last over 50 years.
- Cast iron batteries withstand high hydraulic pressure in a centralized heating system and water hammer, therefore they can be installed in apartment buildings.
- A battery made of this material is insensitive to the quality of the coolant, which is very important for centralized networks.
- Installation can be done with your own hands.
The disadvantages of cast iron heating devices include:
- the battery is quite heavy, therefore, difficulties arise during its transportation and installation;
- due to the high thermal inertia, the device heats up for a long time, therefore, after starting the heating system, the room will warm up only after a few hours;
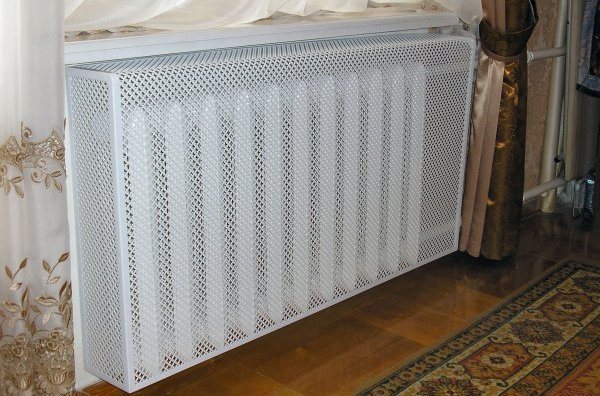
- outwardly, cast-iron units are not very attractive, therefore they spoil the interior of the room (they tend to be closed with various screens, which worsens heat transfer);
- periodically, the unit must be painted to protect it from corrosion;
- due to the inertness of cast iron, thermostats are not installed on the batteries, because it is still impossible to adjust the temperature in the room;
- during long-term operation, plaque forms on the inner walls, which reduces the throughput of the device;
- a significant amount of coolant circulates inside the battery, which contributes to the high energy consumption for heating it.
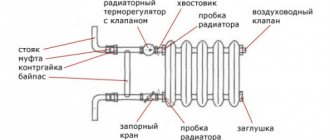
Connection sequence
The most crucial moment in the installation of batteries is their connection to the heating circuit and subsequent check.In order for all the work to be carried out efficiently, it is necessary to follow the sequence of installation of a cast-iron radiator.
- The heating circuit is pre-switched off, the supply of the coolant to the apartment is stopped, followed by its draining from the pipes using a circulation pump.
- The battery is hung on brackets with checking its horizontal and vertical position with a building level.
- The plugs are unscrewed from the device.
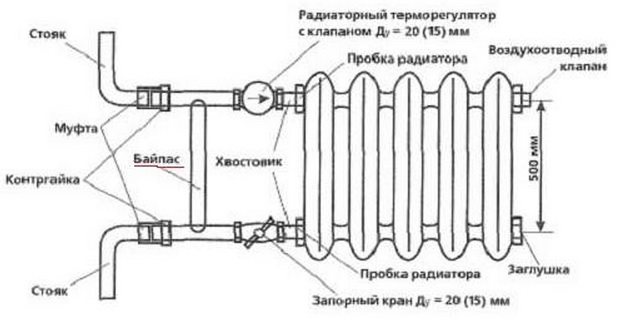
- In the event that the lateral connection diagram of cast-iron heating radiators is "introduced" into a one-pipe circuit, then a bypass with a valve must first be installed and connected. If the system is two-pipe, then squeegees with cranes are used.
At the last stage, he installs the Mayevsky crane on cast-iron radiators.
After connecting all heating elements, a trial check of the quality of work is carried out. It will show how securely the system is mounted. To do this, water is launched into it under pressure. If there is no leakage, no incomprehensible noises and knocks, then all circuit elements are connected correctly.
Replacing and installing batteries
Advice: having decided on the type of design, it is better to start with the purchase of the batteries themselves. The fact is that such things as a cap for a cast-iron radiator, a Mayevsky crane, suspension brackets and other accessories, quite often come with the product.
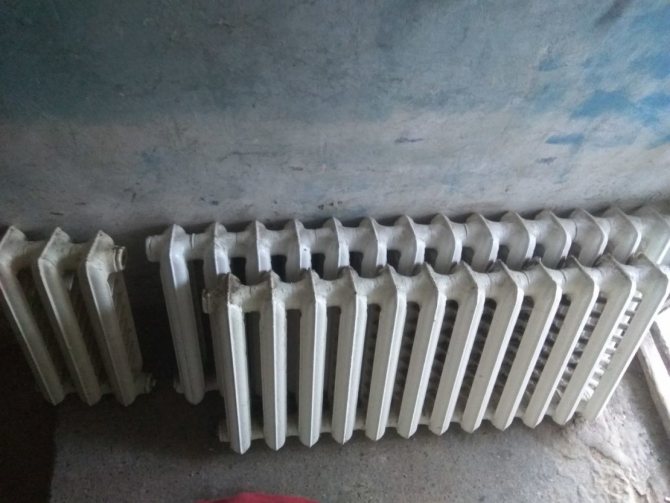
Dismantling a dilapidated radiator
If your cast-iron battery does not heat up well enough, and for some reason you don’t want to change it to a new one, it is possible to do prophylaxis for it, clean it, rinse it, repaint it and it will last as long.
Dismantling cast-iron heating radiators is an easy task, but it requires accuracy.
- Initially, go to make sure that the water is drained from the system, in this case you should not keep hope for personal knowledge, it is better to contact the locksmiths. Since, in addition, in the summer, without special need, the water may not be drained;
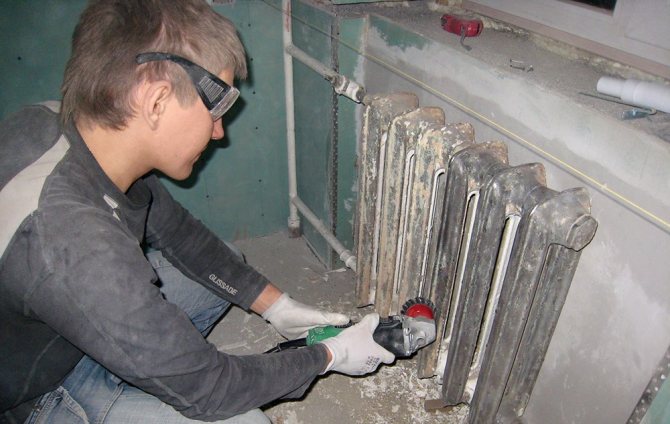
- Then the instruction prescribes to disconnect the unit from the system. If there is a threaded connection, then everything is simple, took the gas wrench and unscrewed it. In the absence of such, you will need to use a grinder, at the end of which, remove the structure from the awnings;
- To make a major prophylaxis, you need to disassemble the "button accordion" into sections. Specifically, the disassembly of cast iron heating radiators begins with unscrewing all the side plugs. There is one nuance here, so that the fragile metal does not burst, the plugs must be preheated with a blowtorch;
- Be careful when unscrewing. The thread of the cast iron radiator is possible right or left;
- The problem of how to find out the direction of the thread in cast iron radiators among specialists is easy to solve. On the right side of the section, a right thread is cut, respectively, on the left side there will be a left one;
Advice: since it can be difficult for an amateur to find out the thread on a cast-iron radiator, especially when unscrewing the plugs, pay attention to the plugs themselves. Under a layer of paint on them without fail there is a letter "P" or "L". This indicates a right-hand or left-hand thread.
- At the end of unscrewing the plugs, you have access to the inside. By and large, the sections are connected by nipples, they resemble pieces of pipe with different types of threads at both ends. The nipple has grooves for the radiator key from the inside. The photo shows such a key and a screwing scheme;
- But, in most cases, in dilapidated batteries, the grooves for the radiator key have already rusted and after heating is over, it is unrealistic to unscrew the nipple. Here a simple grinder comes into operation, the dilapidated nipples are simply cut. At the end of which, their remains are sprayed with a rust remover and carefully knocked out of the thread with a chisel;
- While your cast-iron "accordion" is disassembled into sections, its interior is washed with water under a tremendous pressure.The paint can be peeled off from above using a drill attachment or a grinder with an iron brush attachment;
Assembling and installing a new battery
Advice: if there are dilapidated metal pipes in the apartment, then it is better to change them outright for plastic, and bump into the neighbors, from above and below. A couple of meters of pipes with fittings will cost a penny, and it is quite easy to solder them.
As already mentioned, the assembly of sections in such radiators is performed using nipples. Before connecting, wind the sealing fum tape on the thread. Dilapidated craftsmen prefer to seal with hemp and oil paint, but this requires skill.
The instruction is approximately as follows:
- The radiator key is inserted into the section, a nipple with a fum tape is put on it, after which both sections are connected and the nipple is screwed in;
- Do not forget to first put a rubber gasket on it, it will be a seal between the sections;
- It is necessary to tighten with reasonable effort so that the metal does not burst.
Connecting cast-iron heating radiators to the system is possible lateral, lower or diagonal, but whichever option you choose, it is better to immediately install shut-off ball valves at the inlet and outlet and mount a bypass. So, you will always have the opportunity to replace the radiator without shutting down the system and draining the water.
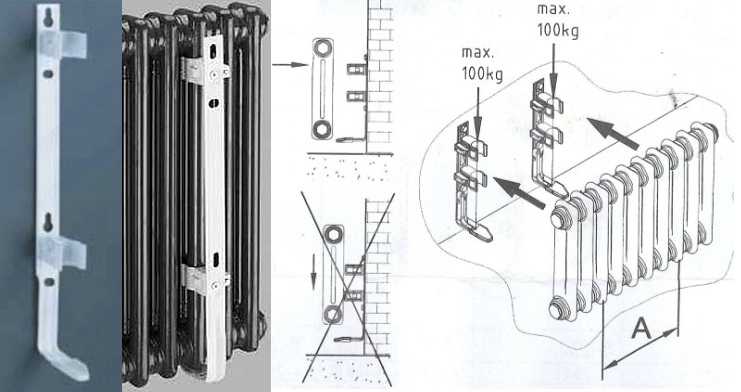
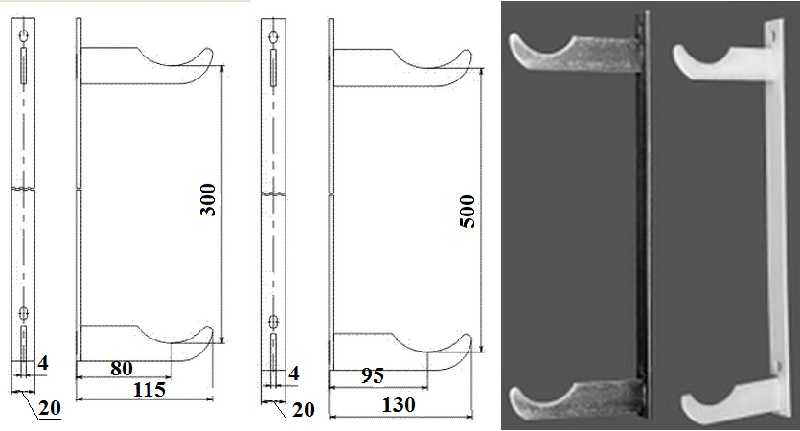
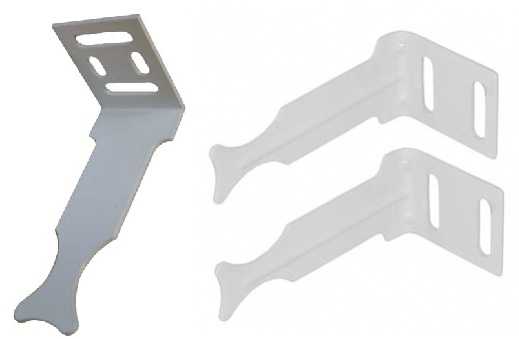
Fasteners for cast-iron heating radiators must be taken special. If those brackets that come in the set do not suit you, then when choosing from the catalog, pay attention only to the brackets or floor stands marked "reinforced", they are calculated by the weight of cast-iron structures.
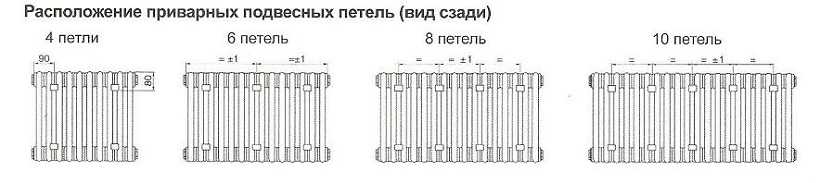
It is fundamentally important: for 6 - 8 sections, 1 bracket is installed from the bottom in the center and 2 brackets from the top. With an increase of 5 cells, an additional canopy is added at the top and bottom.
The video in this article demonstrates the technology for installing radiators.
Installation procedure
Mounting brackets for a cast iron battery
First you need to determine the required number of brackets. It depends on the area of the heater. For 1 sq.m. heating surface requires 1 bracket. Calculate the surface area of the radiator depending on the number of sections of the device and mark the wall for installing the brackets. After marking, check the calculations again, drill the holes, insert the dowels into them and screw in the fasteners.
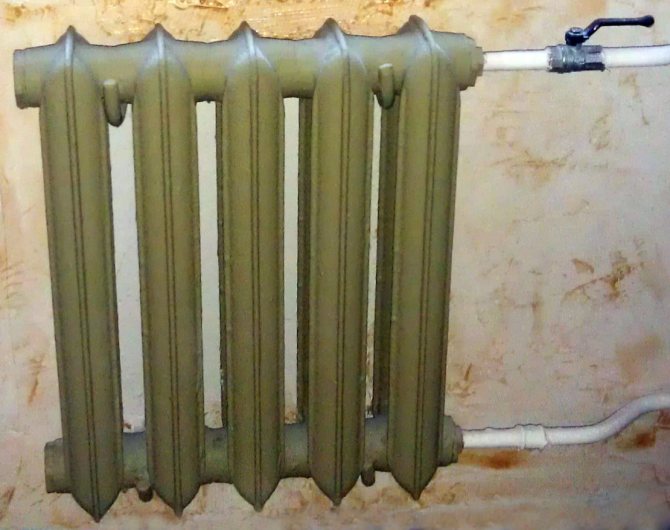
Heating radiator installation
The heating circuit must be shut off and the water removed completely. The residual heating medium can be pumped out with a pump. The battery is hung on supports, for a one-pipe system, a bypass is connected. Next, the radiator is connected to the system using threaded squeegees. All joints must be sealed. For this, any sealing materials are suitable, usually tow is used. If you know how to handle a welding machine, take the opportunity and weld the joints of the sleeves and the pipeline.
After installing the device, crimping is required. This procedure is performed by professionals with the appropriate equipment. If you have a device, do everything yourself, if not, then it is not advisable to buy an expensive device for the one-time installation of one or several radiators. After finishing the installation, check the system operation.
Theoretically, there is nothing complicated in the installation of cast-iron heating radiators, but in practice, not everything is as easy as we would like. If you do not have the necessary experience or an assistant who has already done similar work, it is still better to hire a team of plumbers. Of course, paying for their work will significantly increase the cost of the heating system as a whole, but you will save time, effort and nerves. The final decision is only yours.
Why is it dangerous to contact non-specialists?
By entrusting the installation of heating radiators to non-specialists, you run the risk of:
- Waste of time.Installation of heating batteries by unskilled workers can take several days or even weeks. This is due to the fact that non-professionals who do not have the necessary skills and knowledge work slowly.
- Loss of funds. Incorrectly installed radiators can leak (at attachment points or at the joints of sections). The work will have to be redone. You will not be able to use heating! In addition, you will have to pay for re-installation.
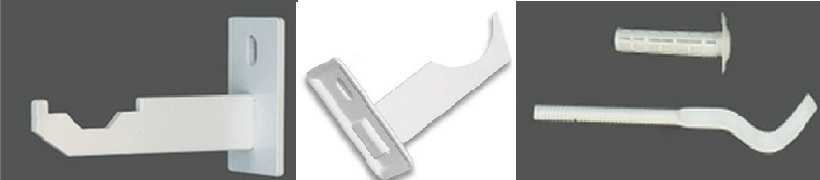
How to choose the right bracket
The main rule when buying a retainer: it must withstand the weight assigned to it. The maximum load is usually indicated in the attached instructions. The easiest way is to choose a bracket for an aluminum radiator, since it is lightweight and any type is suitable for it.
Use floor stands for very powerful batteries. But if the covering in the house is wooden, then you need to make sure that the clamps are equipped with additional fasteners to the wall. This is to reduce the load on the boards. For light heating elements that will be located in a deep niche under the window, it is better to buy a long bracket.
It is recommended for cast iron radiators to take holders with the ability to slightly change the height, otherwise difficulties with installation may arise. The price of an adjustable bracket is not so high as to give up the convenience of mounting.
It is important that the alloy contains no toxic substances released during heating. It is not worth buying parts hand-held, especially without the appropriate accompanying documents
Please note that the lightest - the corner bracket - is only for aluminum and copper radiators
Fasteners for steel radiators
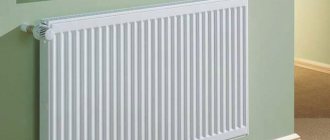
There are two different types in this group: tubular and panel radiators. They have a different design, respectively, a different mount.
In panel radiators, brackets are welded on the rear wall, with which they are hung on the brackets. The shape of this type of fastener is different: it is designed specifically for staples.
In panel radiators, brackets are welded on the back wall
When installing panel radiators, it is necessary to strictly observe the vertical position of the brackets. High precision is required: four or six staples must fit exactly on the hooks
It is also important here that the wall is perfectly flat and smooth. In general, using ordinary brackets, panel radiators are quite difficult to hang
Easier to work with other types of holders.
Standard bracket for panel radiator
Since the mass of the heater is small, it is enough to fix it on the upper brackets, install stops at the bottom that will give it a direction in the horizontal plane. They are not attached to the wall, but cling to the bracket with hooks and simply abut against the wall. For reliability, the part that faces the wall is widened.
This is how a set of brackets for tubular steel batteries looks like: the upper collector is hung on the hooks, and plastic stops are placed below
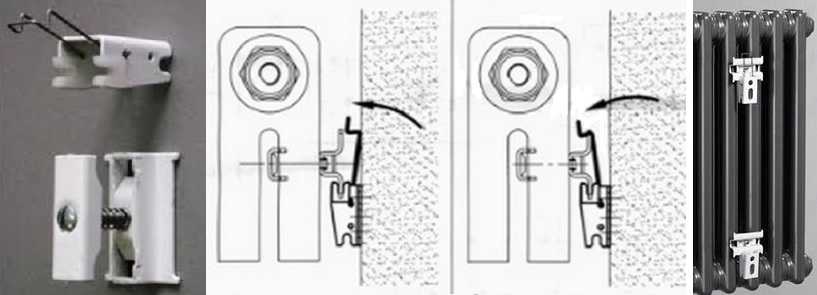
There are also special mounting plates for easy installation. They are a strip of metal with plastic clips at the top and bottom. The brackets on the rear panel are not required when using this fastener. The strips are fixed on the wall, a radiator is inserted into them, which is held by plastic hooks.
Bar for quick mounting of panel batteries
Fasteners for tubular radiators are similar to sectional ones: the same hooks, only of a different size, often equipped with plastic pads.
There are also special fasteners with grips for SMB tubes. This is a strip of steel with plastic clips and a shelf on the bottom that serves as a support for the radiator. This mounting plate can be used if the weight of the device filled with water does not exceed 100 kg.Installation is simple: place the battery on the shelf, bring the upper edge closer to the clips. They clasp the nearest tube, a click is heard. The radiator is installed, supply pipes can be connected.
Rail for quick installation of tubular radiator with shelf and clamps
There is a second option for quick installation: SVD fasteners. It has two parts. One is attached to the radiator, the second to the wall. Then they are connected to each other and fixed with a steel loop.
Another type of holders for tubular models: two parts, one is mounted on the wall, the other is fixed to the pipe. They are pulled together with a wire retainer.
Floor mount for tubular radiators can be of several types: tubular stops, which are welded at the factory, or posts with hooks. Radiators are hung on such racks, and the racks themselves are attached to the floor.
Brackets for radiators are of different types and types: for wall and floor installation. The standard ones that come with the kit are reliable, but they are more difficult to work with. Planks and quick-fit devices save time, but cost a lot.
Fasteners for cast iron, sectional, panel radiators
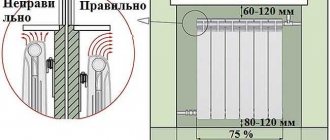
The order of installation of radiators does not depend on their type: the rules remain the same, only the fasteners change. If it is supposed to be installed under a window, the following distances must be observed: from the floor must be at least 80-120 mm, to the window sill at least 60-100 mm, to the wall - 30-50 mm. It is also necessary to determine the number and location of the fasteners.
The number of brackets (hooks) per battery depends on its length. If there are few sections - up to 8-10 pieces, then two holders are required at the top, and at least one more at the bottom. If there are more than 10 sections, three supports are installed on top, and two on the bottom. For each next five to seven sections of cast-iron radiators and ten tubular and aluminum, the number of fasteners increases: one holder is added at the top and one at the bottom.
Ways to use different kinds of fasteners for sectional radiators
Preparation of cast iron radiators for installation
The preparatory stage includes such actions as: choosing and purchasing a radiator, purchasing the necessary additional components, such as a Mayevsky crane, mounting brackets, squeegees, buying paint, sealant and tow. Also, do not forget to prepare all the necessary tools that will help us carry out the installation of cast-iron heating radiators.
The cast iron radiator is capable of withstanding operating pressure up to 9 atmospheres. At the factory where the radiator is manufactured, the device undergoes a hydraulic test before it is sold.
Within one minute, it must withstand a pressure of 15 atmospheres. At the same time, you need to be very careful when transporting such devices, since cast iron products are quite fragile. You may have to think about how to disassemble a cast iron radiator.
Adding cast iron battery sections
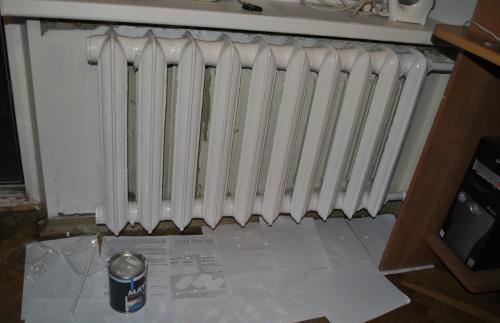
After the cast-iron radiator passes all the tests, it is painted and then dried. Paints and varnishes must meet the following requirements:
- They must have good corrosion resistance.
- The paint must be able to withstand high temperatures. Based on thermal standards, the radiator should not be heated to temperatures exceeding +80 degrees.
- In the course of its operation, the device should not change in color.
What paints are suitable for cast iron radiators? It is best to use enamel paints. They do not contain harmful components that will evaporate during the painting and drying of the device. You can also use acrylic paints. Such paints are good because they will not crack, change color and withstand quite high temperatures.
Painting a cast iron heating radiator
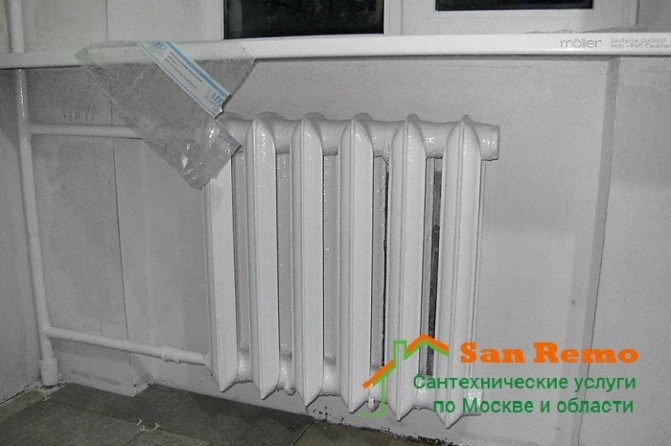
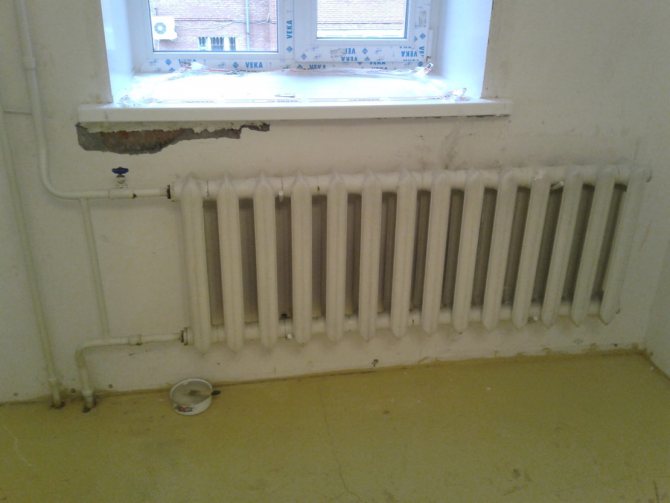
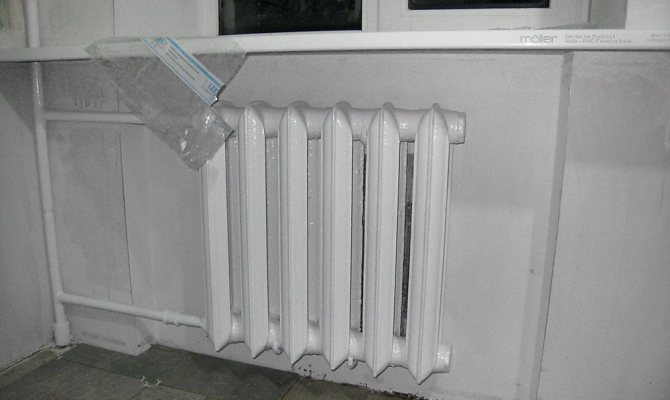
The cast iron radiator must be installed under the window. This is necessary in order not to let in the cold that comes from the window.
Thus, a thermal curtain is created. The cast iron battery should not occupy more than 70% of the window opening. In order for the circulation of warm air to be optimal, the following conditions must be met:
- The distance from the top of the radiator to the window sill should not exceed 5-10 cm.
- The distance from the floor to the bottom of the battery should also be 5 to 10 cm.
- Leave a distance of 2-5 cm between the radiator and the wall.
After installation, the cast-iron heating radiators are connected.
Requirements for installing a cast iron heating radiator
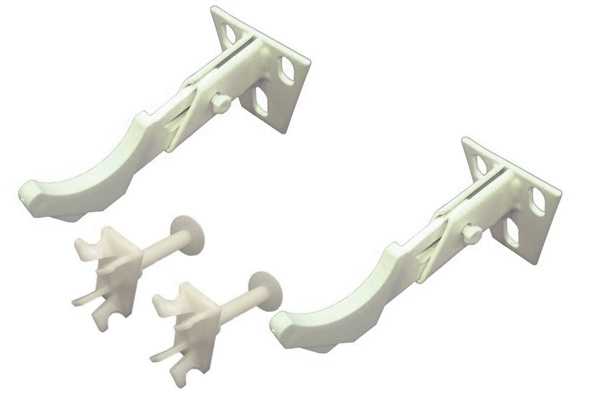
Fasteners for cast iron batteries
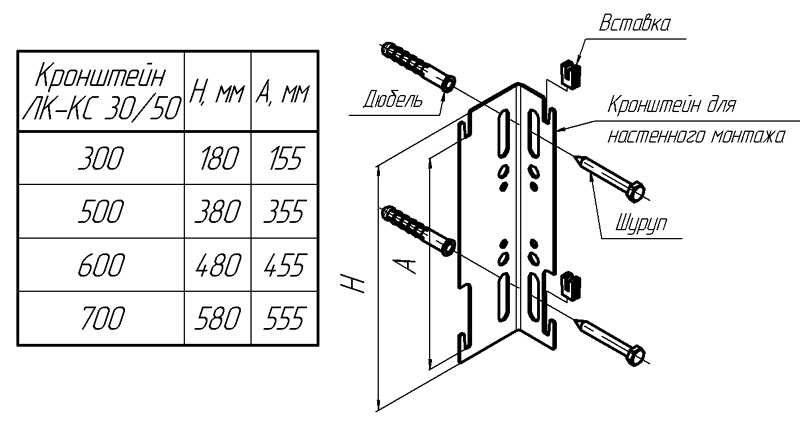
Since these are the heaviest heating devices, the holders for them are the most massive: they must hold considerable weight for years. These can be single or curved pins fixed to the bar. In any case, thicker metal is used in the manufacture of fasteners for cast iron batteries. In the price lists, it usually comes with the addition of "reinforced". Can be painted (standard color is white) or not. Some manufacturers paint on request in the desired color (when ordering a radiator, specify the type of fastener and its color).
Mount for a cast-iron battery and make it reinforced: from a thicker metal
When buying, you will need to take into account the dimensions: fastening for sections of different depths is done on purpose, since it is necessary to ensure a distance to the wall of at least 3-5 cm.
In addition to brackets for cast-iron radiators, hooks are also produced. They are sold together with wall plugs. They are installed as standard: a hole is drilled, a dowel is inserted into it, and a hook is screwed into the dowel (there is a thread on one side of it).
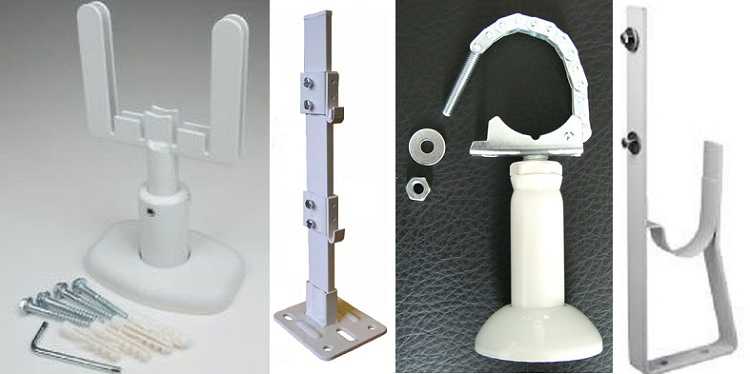
There are mounting plates for cast iron radiators that make installation easier.
In addition to the wall mount, there are feet for floor installation. They are height-adjustable or not. The upper arcs are also different, fixing the section on the stop: there is an arc made of steel wire, and there is a chain of movably connected links. In both cases, the batteries are fixed to the support using these arcs and bolts.
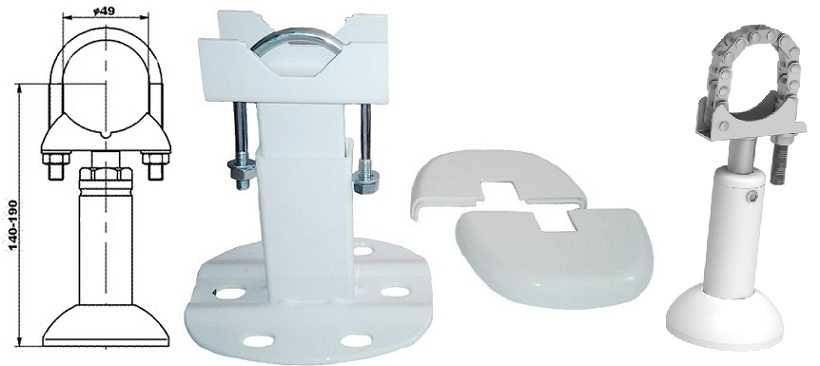
Stands for floor installation of sectional radiators - any wall-mounted battery can be installed on the floor
Cleaning cast iron batteries when clogged
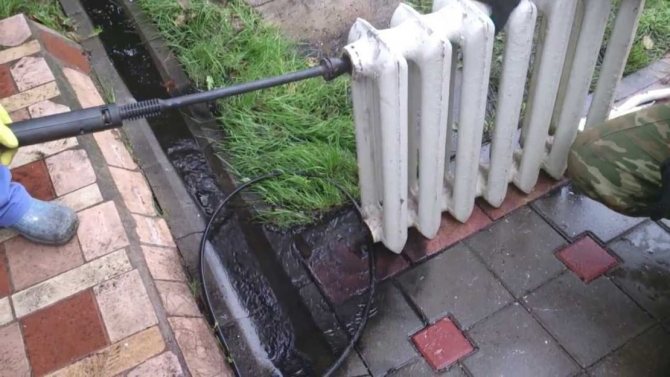
To improve the heat transfer of the heater, its internal space must be periodically cleaned of scale and deposits.
This is done at the end of the heating season as follows:
- Cover the floor under the battery with plastic wrap. Close the shut-off valves and disconnect the heating unit from the mains.
- Gently tilt the appliance over the basin to drain the water. Then transfer the battery to the bathroom. Cover the bottom of the bathroom with a rag or place a wooden pallet there to protect the plumbing from scratches.
- Unscrew all plugs from the heater. Pressurized water into the battery until clear liquid flows.
- Sometimes, to remove deposits, you need to pour vinegar or citric acid solution into the unit overnight. Instead, special flushing solutions can be used. After a while after filling with a special liquid, rinse the battery with clean water.
- Reinstall all the plugs, and connect the device to the heating main.
Connection diagrams
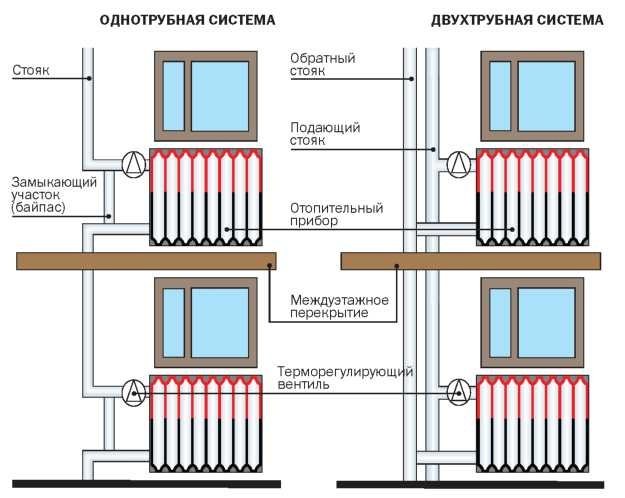
The most fail-safe circuit for connecting heating radiators in a private house with a bottling and a boiler is a single-pipe Leningrad. Heating devices are connected in parallel with the filling, which is laid along the perimeter of the room.
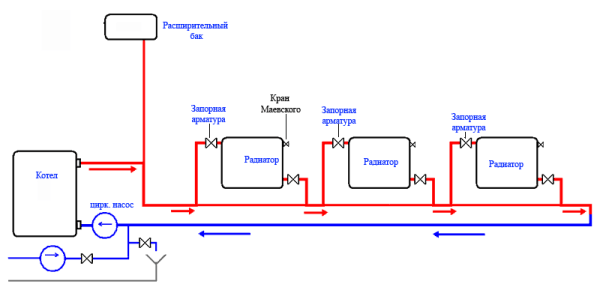
Somewhat cheaper in installation, but much more problematic in operation is a circuit using a series connection of batteries. Suffice it to say that their independent adjustment is impossible in this case.
Single-pipe version with series connection.
Finally, a two-pipe system involves connecting each radiator as a jumper between the supply and return lines. It is inconvenient in that it requires the already mentioned balancing - limiting the passage of heating devices closest to the boiler.
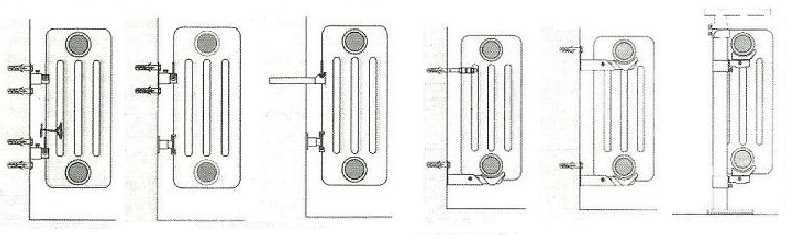
What can be the diagrams for connecting heating radiators to the supply line?
- One-sided. connections are connected to the upper and lower radiator plugs on the right or left. It is compact, but makes the heating of the device uneven: the last sections will always be colder than the first.
- From bottom to bottom. In this case, the battery must be equipped with an air vent. The advantages of the solution are that the radiator, with such a connection, does not require flushing and always heats up along its entire length.
- Diagonal. Heating of the sections is even more uniform; however, the bottom corner of an instrument with a blind plug will gradually silt up.
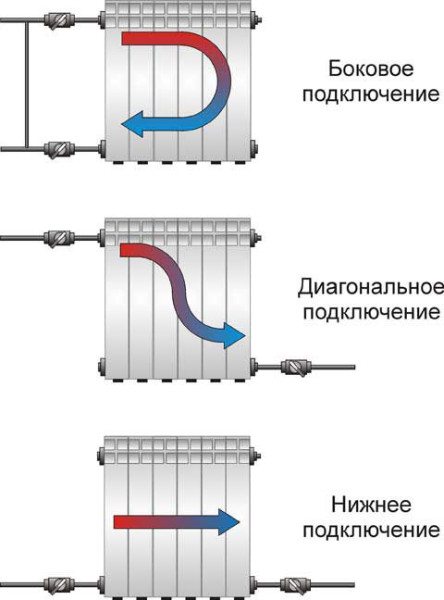
Connection options for connections.
Required tools and materials
Technology for unscrewing and assembling cast iron batteries: a - nipples capture the thread of the sections (2-3 threads); b - tighten the nipples, dock the sections; c - mount the third section; d - group two radiators.
Replacing or installing various cast iron radiators can take place in several stages and in completely different ways. To complete this installation, you will need:
- gloves;
- protective glasses;
- gas welding;
- assembly keys;
- rubber gaskets;
- screwdrivers;
- radiator keys (short and long).
If you decide to install or replace yourself, then be very careful and follow the rules of safety and security. Welding work can be harmful.
Mounting methods for aluminum and bimetallic radiators
The products are very similar in shape. Only they are made of thinner metal. In general, brackets for sectional radiators of any type are very similar. There are universal angle brackets for aluminum and bimetallic radiators. They have a recess at the top and bottom for the collector, so they can be attached both to the right and to the left.
Special angle brackets for light sectional radiators
There are no floor-standing aluminum and bimetallic radiators. But there are racks that allow any of them to be installed on the floor. In this case, the rack is first fixed on the floor, and then the heating device is installed and fixed on it.
Floor mounting of aluminum radiators helps out if the walls cannot withstand even such a small weight (if they are made of plasterboard or aerated concrete, other similar materials).
Any sectional radiator can be fixed on such racks.
You will not be able to hang anything on the now fashionable glass wall
But then you need to pay attention to how the whole structure looks from the back side. In this case, it is more advisable to use convectors built into the floor for heating.
floor models of tubular radiators (at the same time can serve as a fence), cast-iron retro radiators.
Compliance with installation standards
Even knowing how to install a cast iron battery, you should remember why you need to adhere to the norms approved by SNiP. Maybe someone will consider this optional, and they will be wrong, since any deviations from the parameters are not just a violation of security rules, but also a decrease in the efficiency of the system itself.
The general rules for installing radiators include:
- The position of the device relative to the vertical axis of the window. The middle of the battery should line up with it. The permissible deviation should not exceed 2 cm.
- The battery must have such a number of sections that, when assembled, it occupies 75% of the width of the window opening.
- The SNiP indicates how to fix the cast-iron battery to the wall. So the distance between it and the floor according to the standards is 60 mm, 50 mm under the windowsill, and 25 mm from the wall.
When the place is chosen and all the calculations are made, you can begin the installation of cast-iron heating radiators with your own hands. This will require the tools and necessary fasteners.
What is the secret of popularity
- Let's start with the fact that such units are considered almost the most durable... Most of the reputable manufacturers boldly give a 50-year guarantee. And this is fully justified, for example, in Tsarskoye Selo there is now a radiator installed 110 years ago;
It is fundamentally important: there is a conclusion that at the moment the cast-iron radiator is worse than the Soviet era. This is only partially correct. It all depends on the quality of the product and the manufacturer's company. If the battery is molded in accordance with domestic or European GOST, then there is nothing to fear. But receiving units from Chinese or Turkish "masters", a person, in fact, takes a pig in a poke.
- Cast iron in its features, despite the fact that it is a brittle metal, but still strong enough... The working pressure for such a battery is 8 - 12 atmospheres, plus with short-term surges or water hammer, it can withstand a load of up to 20 atmospheres. If we take into account the fact that the pressure in the municipal network rarely exceeds 6 - 8 atmospheres, and the average water hammer force is 15 - 20 atmospheres, then the safety margin is obvious;
- Such batteries are present both in the budget market and in luxury goods.... The fact is that the price for the classic MS-140 is almost the lowest. At the same time, the price of artistic thick-walled casting can sometimes be many times higher than the price of a good bimetal;
- Adherents of modern materials forget about the quality of the heat carrier in our urban networks... This solid "cocktail" is capable of knocking out many newfangled models. While cast iron is completely resistant to any chemical attack and neutral to corrosion, it simply does not rust;
- Due to the huge diameter of the battery channels, any debris slips through it without actually lingering, which is very important for municipal high-rise buildings, with dilapidated piping;
- As we know, cast iron has a high heat capacity... The battery gains temperature for a long time, at the same time it holds it for a long time. In case of interruptions in heating, this unit will give off heat for another couple of hours at the end of the shutdown;
- Technically, installing a cast-iron heating radiator with your own hands does not imagine enormous difficulty.... If you have a tool and a couple of assistants for support, it is possible to finish the work during the day;
- Another important advantage is the fact that components for cast iron radiators can be found in any hardware store. and the price for them is fully acceptable;
We sort of figured out the circumstances of nationwide popularity.
Now let's chat about the pitfalls of these heating devices:
- The first circumstance by which many abandon cast iron is the important weight of the structure. Judge for yourself, a standard section has a mass of about 7 kg, on average 7 - 10 sections are installed per room. As a result, we have from 50 to 70 kg of an empty structure, when filling, another 1 - 1.5 kg is added for each section. In addition to troubles with the installation, not every wall can withstand such a unit;
- The minimum amount of coolant in one cell is about 1 liter. For modern rivals, this indicator is 3 - 5 times less. And as we know, the more liquid, the more energy is required to warm it up and maintain the temperature. Plus, it is very difficult to quickly regulate the temperature in such systems, due to the high inertness;
- The area of such structures, when compared with modern counterparts, is slightly smaller, respectively, and the heat transfer is lower;
- Reproaches about the unattractive design are not consistent, to some extent it is possible to address them to the widespread MC-140. As for the figured casting, in their beauty they leave their modern counterparts behind at a great distance;
Placement of heating devices
It is of great importance not only how to connect heating radiators to each other, but also their correct location in relation to building structures. Traditionally, heaters are installed along the walls of rooms and locally under windows to reduce the penetration of cold air currents in the most vulnerable place.
There are clear instructions for this in the SNiP for the installation of thermal equipment:
- The gap between the floor and the bottom of the battery must not be less than 120 mm. With a decrease in the distance from the device to the floor, the distribution of the heat flow will be uneven;
- The distance from the back surface to the wall on which the radiator is mounted must be from 30 to 50 mm, otherwise its heat transfer will be disturbed;
- The gap from the upper edge of the heater to the window sill is maintained within 100-120 mm (not less). Otherwise, the movement of thermal masses may be difficult, which will weaken the heating of the room.
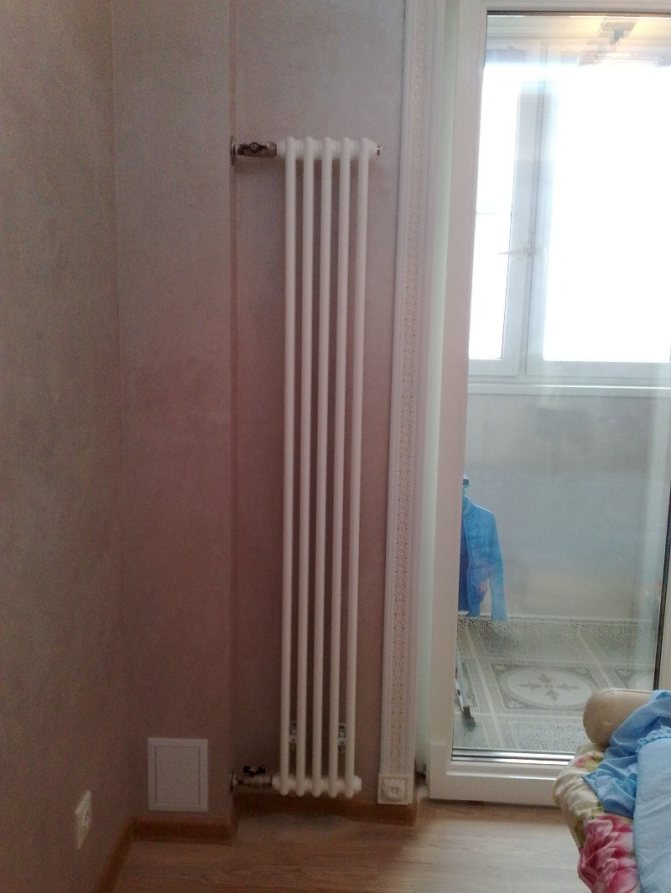
Bimetallic heating devices
To understand how to connect bimetallic radiators to each other, you need to know that almost all of them are suitable for any type of connection:
- They have four points of possible connection - two upper and two lower;
- Equipped with plugs and a Mayevsky tap, through which you can bleed the air collected in the heating system;
Diagonal connection is considered the most effective for bimetallic batteries, especially when it comes to a large number of sections in the device. Although very wide batteries, equipped with ten or more sections, are undesirable to use.
Advice! It is better to ponder the question of how to properly connect two heating radiators 7-8 sectional instead of one device of 14 or 16 sections. It will be much easier to install and easier to maintain.
Another question - how to connect sections of a bimetallic radiator may arise when rearranging sections of a heater in various situations:

The place where you plan to install the heater is also important.
- In the process of creating new heating networks;
- If it is necessary to replace a failed radiator with a new one - bimetallic;
- In case of underheating, you can build up the battery by connecting additional sections.
Aluminum batteries
Interesting! By and large, it should be noted that diagonal connection is an excellent option for any type of battery. Not sure how to connect aluminum radiators to each other. connect diagonally, you won't go wrong!
For closed-type heating networks in private houses, it is advisable to install aluminum batteries, since it is easier here to ensure proper water treatment before filling the system. And their cost is much lower than that of bimetallic devices.
Of course, over time, moving along the radiators, the coolant cools
Of course, you will have to try before you connect the sections of the aluminum radiator for regrouping.
Advice! Do not rush to remove the factory packaging (film) from the installed heating devices before finishing the finishing work in the room. This will protect the radiator coating from damage and contamination.
The work process itself does not take much time, you do not need any special skill or expensive equipment, you can purchase all the necessary tools at any hardware store. And do not forget, the connection will serve you for a long time and without hassle only if you used high-quality materials in your work and followed all the rules for installing the heating system.
We are talking about exactly what is indicated in this figure.
In the video presented in this article, you will find additional information on this topic.
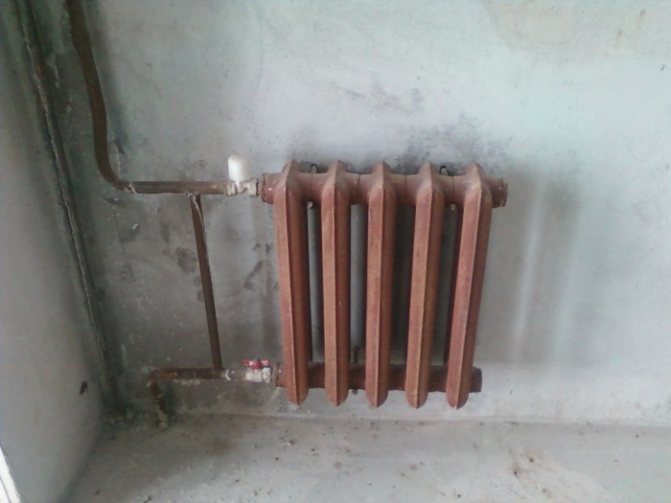
Installing cast iron heating radiators with your own hands
- Required tools and materials
- Stages of installation work
Cast iron radiators are a fairly popular battery, with the help of which heating is carried out in multi-storey buildings. This is due to the fact that cast iron batteries have undeniable advantages over other types of heating. In addition, most of the installed batteries in homes have already expired and now need to be replaced. That is why information on the installation of cast iron radiators is very relevant. Installing heating systems is not an easy task, but it is quite feasible for business executives.
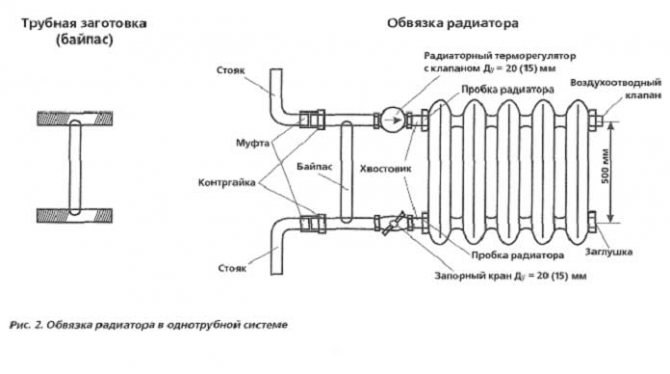
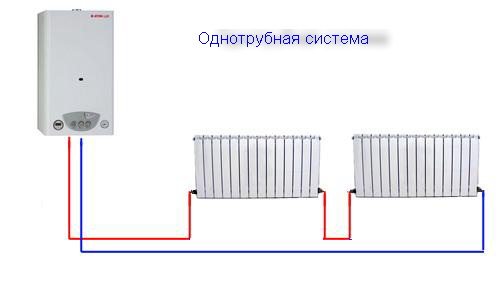
Radiator piping in a one-pipe system.
An important role is played by the site on which the installation of cast-iron radiators will be carried out.
The surface composition of the installation site will be reflected in the heating installation stages. Installation of devices can take place on a wooden wall. In this case, you will need one strip and one stand for each radiator for installation. Batteries can also be installed on a brick plastered wall. You will need a bracket, a window sill and a niche here.
Also, a lightweight wall can become a place for installation. Here you will need a solid support on which the heater will be installed. It should be noted that it is advisable to choose a place for installing a cast-iron battery with the condition of convenience, not beauty. To add beauty elements to heating appliances, you can resort to simpler methods of decorating and decorating batteries, for example, using rattan grates.
Preparatory work
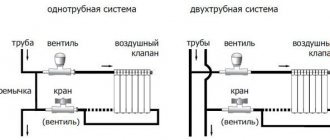
In order to choose the right parts and calculate their number, you should know the type of wiring of the heating system - one- or two-pipe. In a single-pipe, the heated coolant rises along the riser, and the heating devices are connected to the descending line. In a two-pipe system, the heat carrier moves from the heater to the heating devices and vice versa. One line is designed to supply hot water, the second is to return the cooled coolant to the boiler. There are two ways to connect system elements - horizontal and vertical.
All the nuances of the connection should be clarified before starting work. Before installation, you need to drain the water from the system, dismantle the old heating devices, remove the fasteners on which they were held. The supply of hot coolant to the system must be stopped before the end of the work.
Assembling cast iron heating radiators
The first step is to group the sections. To do this, you need radiator keys. The device is fixed on a workbench; radiator keys must be inserted into the lower and upper holes so that they rest against the internal projections. Both nipples must be deployed at the same time to avoid skewing the sections, so the manipulation is performed with an assistant. The nipples should be greased with linseed oil, and gaskets should be put on them. The keys are rotated in the opposite direction to the thread. If it is left, then turn to the right, and if it is right, to the left. You need to screw in 1-2 threads.
Hydraulic tests of the finished structure are carried out on a special stand, where a pressure of 4-8 kgf / cm2 is created using a press. The performance of the device is checked by a pressure gauge. If its indicators begin to decline, it means that either defective sections are connected, or the work was performed poorly. In the first case, the elements are replaced, in the second, the nipples are tightened. If minor damage appears, it can be repaired with epoxy adhesive. If the connections are incorrect and the joints are leaking, the gaskets should be changed.
Painting the radiator after assembly
After the tests, the heater is painted and dried. Two thin coats of paint must be applied to obtain a durable and even finish.As a result, radiators must meet the following requirements:
- Heat-resistant coating of the device body. It must withstand temperatures of 80 degrees, without softening and not emitting harmful substances into the atmosphere.
- The painting should be of sufficient quality to protect the radiator from corrosion as much as possible.
- The selected composition should not change in color.
Experts recommend using alkyd enamels as a coating, because after drying, they are harmless and do not poison the air during operation. Option - acrylic compounds. They do not crack, do not change color and are resistant to heat. Both types of formulations have their own advantages: alkyd enamels are cheaper, acrylic-based paints are more durable. You can also use water-dispersion paints, which bear the manufacturer's mark that they can be used for painting heating devices.
How to correctly determine the location of the radiator
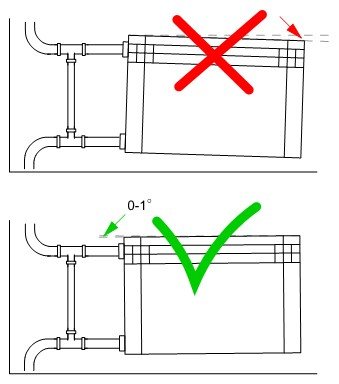
Heating devices are usually located under windows at a height of at least 6 cm from the floor and 5-10 cm from the bottom of the window sill. The distance to the wall should be at least 3-5 cm. The pipes of the system are placed under a slight slope, which is made in the direction of movement of the coolant. If there is no slope or distortions appear when installing a cast-iron radiator, air will accumulate in the batteries, which will have to be removed manually. An “airy” radiator will not be able to warm up normally and give off heat. The center of the device should coincide with the center of the window opening plus or minus 2 cm.
Climate
48 votes
+
Voice for!
—
Against!
Radiators are an important part of any heating system. Nowadays, there are several main types of heating batteries: steel, aluminum, bimetallic, cast iron. But for more than half a century at the peak of fame, it was cast-iron batteries. Do not rush to write them off, because they can live a "second life" in your house. Today we will talk about how to disassemble a cast iron battery, wash, paint and reinstall.
The need to install cast iron batteries
Cast iron radiators are rightfully called "legendary". They were quite popular in the last century, or even the only ones, and were used in structures and buildings of various types and purposes. No apartment of the Soviet era can be imagined without such bulky and hot units.
Cast iron radiators were not just heating devices, they were used not only for heating. Housewives adapted them for drying wet shoes and washed linen, heating cold things and even defrosting meat. Modern radiators can hardly boast of the same number of functions!
The big advantage of cast iron over other materials is its ability to resist corrosion. With proper use, such a radiator can last over 50 years. It has low hydraulic resistance and high heat dissipation. Exceptional reliability and ease of use are a significant advantage of these radiators.
But the main and main advantage of cast-iron radiators is not their low price and excellent heat transfer, but their ability to function well regardless of the quality of the coolant and how much water is in the cast-iron battery. When installing new generation batteries, our consumers rarely think that the incoming water to the batteries must meet European standards in order to be harmless for European radiators.
Our coolant is inferior in many respects to the coolant used in developed countries. In domestic coolants there are so many different "chemistry", therefore it is of low quality, and because of this, metal batteries of a new sample sometimes do not withstand this and succumb to the destructive force of harmful substances.
The result will be the following: batteries "break" with all the ensuing consequences.And all this happens when you least expect it, as a rule, in terrible frosts! It is difficult to deal with such a problem, which means that it is necessary to prevent this by installing cast-iron radiators in the house.
Advantages and disadvantages of cast iron radiators
The most surprising thing is that, despite the shortcomings of this material, the installation of cast iron batteries is not a very rare occurrence. Such radiators are still very popular among our compatriots. Let's find out why:
- Availability. Cast iron radiators are one of the most inexpensive types of radiators on the market. This is the main reason for such devotion to cast iron.
- Long-term preservation of warmth. Cast iron heats up for a long time, but the accumulated heat is also saved for a long time, therefore, even if the heating system is turned off in the room, the optimal temperature is maintained for a person.
- Functionality. Nowadays, housewives continue to dry clothes on batteries. And yet, no matter how funny it looks, this method makes it possible to do it as quickly as possible.
The disadvantages of cast iron batteries are as follows:
- The radiators are pretty heavy. Radiators of this type are difficult to install, because they are heavy, therefore, installers in most cases work in teams, and not one at a time, as is often the case when working with bimetal and aluminum. Therefore, the connection of cast iron batteries requires corresponding costs.
- Significant thermal inertia. Cast-iron batteries heat up for a long time, because of this, it will be cool in the house for some time after connecting the system.
- Unattractive appearance. Compared to other types of batteries that are known to modern man, cast iron does not look aesthetically pleasing, they are not smooth and more bulky.
- The need for special care. Installing a cast iron radiator is not the last step to be done with batteries. After installation, it is the turn of painting the batteries so that there is no corrosion.
Preparation for the installation of cast iron radiators
It is not yet known how long the installation of cast-iron radiators will still be in demand, but nevertheless these batteries hold the record for the time of their use, and so far their popularity is not expected to decrease. According to experts, replacing cast iron batteries is impractical for any other batteries, because cast iron is a more suitable material for heating radiators.
The preparatory stage for the installation of radiators includes the selection of batteries and their purchase, the purchase of all the necessary elements (plugs, brackets, Mayevsky crane, adapters). Before proceeding with the purchase of the last parts, we choose a battery, because often a crane and other parts are included in the kit. During this stage, the brackets are installed, as well as preparations for installing the batteries.
The procedure for replacing radiators requires some preparatory work, which is overlapping and draining water from heating risers, as well as dismantling old equipment and their fasteners. You also need to keep in mind that when replacing heating (old cast-iron radiators), you should decide on the time of such work and agree with the necessary services so that they turn off the hot water supply in the premises.
DIY installation of cast iron radiators
Domestic-made cast-iron batteries, unlike imported heating devices, require mandatory broaching of intersectional joints, as well as additional painting prior to installation. With these works, it is customary to begin the installation of a cast-iron radiator. And at the end, you can install a screen for a cast-iron battery for greater decorativeness.
Grouping radiator sections
In accordance with the project, the first stage in the installation of cast iron batteries is their breakdown into sections.To do this, fix the radiator on a workbench and insert two radiator keys into the nipple open holes. The radiator key on one side has an eyelet for the handle, and on the other side it has a flat screwdriver, the width of which allows it to freely pass through the nipple hole and abut against their internal protrusions.
Both radiator keys are inserted to the appropriate depth in the lower and upper nipple holes. In order to prevent skewing of the sections, it is necessary to unfold the nipples at the same time, therefore, two people must perform this operation. The nipples on different sides of the radiator have different threads, which, of course, affects the direction of rotation of such a radiator key.
If the sections are disconnected from the side where the nipple has a left-hand thread, the key should be turned to the right; if the radiator is disassembled on the right side of the thread, then, accordingly, the radiator wrench rotates to the left. The grouping of the sections actually begins with the fact that the sections that will be connected are laid on a workbench and the nipple is lubricated with linseed oil. Next, put on gaskets and screw in the nipples for 1-2 threads.
The final tightening of the nipples is carried out using both radiator keys at the same time. The direction of rotation of the keys itself also depends on which side the sections will be grouped on: the key from the side of the section with the left thread rotates to the right, and from the side of the section with the right thread - to the left.
Radiator hydraulic test
After grouping the sections and connecting the cast-iron battery, it is worth doing a hydraulic test of the assembled cast-iron radiator on a special stand. The radiator is connected to a hydraulic press and filled with water, before that, do not forget to release all the air from the device. In the radiator, under the action of the press, the required pressure is created in the range of 4 - 8 kgf / cm. sq.
If during the test the pressure gauge needle begins to fall, this means that the sections are badly rolled up, or they have cracks. In this case, it is necessary to replace the defective sections or tighten the nipples with radiator keys. You can seal small cracks with epoxy glue. Small leaks in the places where the sections join can be eliminated by replacing the gaskets.
Radiator priming and painting
Then you can proceed to painting the cast iron battery. The first thing to do before painting with a radiator is to remove traces of peeling paint and corrosion from it. Next, you need to prepare the surface. Remove the old paint with a remover, then sand it carefully. For this purpose, use a special attachment for a drill, grinder, brush with metal bristles.
If there are already several layers of paint on the radiator, it may be necessary to get rid of them, since these layers can interfere with normal heat transfer. For this purpose, you need to remove the paint thermally or apply various chemicals. If the old paint stays flat and there is no tendency to delaminate, you can apply new paint over the previous one.
Also, before starting to paint cast iron batteries, it is necessary to remove all dust from them and neutralize them. For this purpose, you need to take a common solvent. Next, you need to treat the entire surface of the radiator with a primer, which is selected so that its characteristics correspond to the maximum of the characteristics of the paint. Most often, cast iron batteries are painted with a special curved brush designed for radiators, since it is very difficult to paint over the inner surfaces of the sections with a regular brush.
If the painting will be carried out in an upright position, work must be done from top to bottom so that sagging does not occur. After the primer layer has dried, you can start painting the battery with decorative enamel. For radiators, you need to choose a special enamel.Otherwise, you run the risk that the paint will begin to peel off, turn yellow in the midst of the heating season.
The following requirements are imposed on paints and varnishes for cast iron batteries:
- Resistant to fairly high temperatures (the so-called thermal standard). It is necessary that the paint can withstand the temperature of the radiator, which heats up to 80 degrees.
- The ability to perfectly resist metal corrosion.
- Lack of tendency to discoloration.
There are many different enamels on the market nowadays for radiators, but acrylic enamels are in greatest demand due to the fact that there is no toxic smell when painting batteries, unlike alkyd enamels. If necessary, such paints can be diluted with water, and if they get on hands, clothes and other places, they are perfectly washed off. In addition, acrylic compounds perfectly withstand use at high temperatures, do not crack, do not flake, do not turn yellow.
When painting cast iron radiators, remember that it is not recommended to apply paint and varnish coatings to a hot battery, as the risk of uneven coatings increases, as well as a strong smell of paint increases. Start painting from the top of the batteries, because according to the law of gravity, dripping paint can damage the bottom layer.
First, the inner covers of the radiators are painted, and then the outer ones in order to avoid the appearance of various stains on clothes and hands. There is one more rule to remember when painting cast iron batteries: two thin layers of paint are much better than one thick layer.
Installing a cast iron radiator
Usually cast iron radiators are installed under windows. In this case, it is recommended to adhere to certain requirements:
- It is necessary that the radiator fins are strictly vertical.
- The deviation of the center of the radiator should not be more than 2 centimeters from the center of the window opening.
- The distance from the upper plane of the heater to the window sill should not exceed 5 centimeters. This is necessary for the convenience of repair, dismantling and maintenance of the device.
- The distance from the floor to the battery should be at least 6 centimeters so that it is convenient to clean the floor under the radiator.
- The distance between the radiator and the wall is determined depending on the material and thickness of the walls, as well as on the installation method of the heating device.

Also, remember that all heating radiators in the same room must be installed at the same level! Before hanging the heating devices, we recommend to mark the holes for the brackets. For this purpose, it is necessary to make a special template of thin plywood, the dimensions of which should slightly exceed the size of the cast-iron battery.
On the template itself, in the places where the brackets are attached, holes are drilled on the same line in the lower and upper rows of the conditional sections. For one heater, the number of brackets is determined based on the following calculation: for every square meter of heating surface, there must be one bracket. Next, the template is installed along a plumb line in the place under the window where it will be necessary to install a cast-iron radiator.
In place of the holes in the wall, the nests are punched with a bolt, which are subsequently drilled, after removing the template. The dimensions of the sockets should allow the brackets to be inserted at a depth of at least 12 centimeters and brick them up with cement mortar. To ensure that the brackets are firmly in place in the grout, a second template must be made.
This template is made from a piece of plank and steel reinforcement, then inserted in the place where the brackets come out of the cement mortar. Then, as the cement slurry has frozen, the template can be removed. The use of such a template makes it possible to prevent the bending of the bracket inserts themselves after the grout has set.
The connection to the heating system of cast-iron batteries is carried out with the plugs turned out by means of a squeegee. All threaded connections must be sealed with tow for better tightness. Next, open the valve so that the battery is filled with water.
Replacing and cleaning cast iron batteries
Sometimes water begins to drip from the radiator, and then the question arises of how to eliminate the leakage of the cast-iron battery. To do this, you must first dismantle the battery by preparing a pipe wrench of the correct size to unscrew the locknut flanges, or a pipe cutter with which you can cut the pipe near the locknut if it is impossible to unscrew it.
Then the radiator should be disconnected from the heating system and removed from the bracket. This work must be done in the summer before the heating is turned on. In winter, in this case, you need to leave the whole house without heating and, of course, drain all the water from the system. The procedure for disassembling and assembling cast iron radiators is a rather laborious process and requires the necessary skills from the performer.
It often happens that you need to change any one section, or after prolonged operation, the cast-iron radiator becomes clogged with rust, although it remains fully functional. In this case, it is necessary to disassemble and rinse it. Before disassembling the cast-iron battery, you need to make sure that you have such materials and tools: pipe and battery wrench, grinder, chisel with a hammer, brush for removing rust, blowtorch, gaskets, tow, nipples.
Then the cast-iron battery is disassembled: first, the plugs on the batteries are heated with a blowtorch, after which they are unscrewed. Next, the nipple is carefully cut with a grinder between the radiator sections, then the sections must be disconnected. After that, it is necessary to knock out the nipple with a chisel, while not damaging the thread, which then needs to be well cleaned.
In the last step, the cast iron batteries are grouped and collected. It must be remembered that the nipples on different sides of the radiator have threaded connections of different directions. Gaskets are installed between the sections and smeared with silicone for better tightness. After that, it is necessary to flush the cast-iron batteries inside with a hose.
Thus, in almost all new homes, radiators are installed, which are created using the latest technologies. Cast iron in modern realities seems rather heavy and too cumbersome, so the whole world is switching to more modern alternatives. Of course, these are quite important arguments, but still, our country is different from Europe and the whole world. And with us it is more expedient to install cast-iron batteries.
Installation of cast iron heating radiators
When mentioning heating, the first image that appears in the imagination is the large cast-iron radiators, which used to be in almost all apartments. They were all the same, rough in shape, gray in color, which was simply impossible to lift. Pipes went to them across the room. They tried to refine their appearance by painting them with white paint. But it should be noted that it was these radiators that could happen almost forever, and, perhaps, it was they who were and remain one of the most heat-conducting radiators among the existing heating devices.
Modern manufacturers did not stop producing cast iron heating radiators. It's just that their design has changed radically. Now on the market you can see both antique and modern design radiators.
In most urban heating systems, pressure is usually very high, and the heat carriers, on the contrary, are not of very good quality. And cast iron heating radiators fit perfectly into this heating network. Thick cast-iron walls of radiators can easily withstand high pressure for several decades, their use is possible even if steam with a temperature of about 150 degrees is used for heating.And corrosion to cast-iron radiators is not terrible.
Installation diagram of a cast iron radiator
When water is drained in late spring for preventive maintenance, they tolerate airing the system well. In the event of a power outage, cast iron batteries continue to generate heat, as they cool much slower than other radiators made of other materials. Video
Of course, cast iron radiators have some drawbacks, but there are no perfect things. The first drawback of cast iron radiators is their weight. They weigh a lot, which means that their installation will require a lot of physical effort. You cannot install such batteries on your own. Since this type of radiator is usually hung on a wall, you should make sure that the wall is capable of supporting the weight of the radiator, which, after installation, will also be filled with water. It may be worth purchasing a radiator model with additional legs.
The larger the size of the cast iron batteries, the higher their heat capacity, the slower they cool down. If you buy narrow cast-iron batteries, then their weight, of course, may be less, but also heat transfer and inertia will decrease.
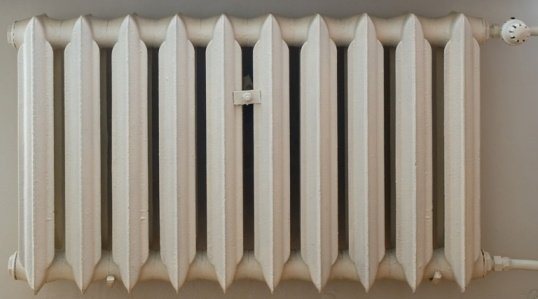
Despite the disadvantages, the advantages are still too good to refuse to install these wonderful heating appliances. In addition, modern manufacturers produce radiators of different shapes and colors. The design of modern radiators is not only accordions familiar to our understanding, models with a smooth surface are produced, with widened gaps between the sections. The widening of the gaps allows the heat dissipation to be increased to some extent. There are also models made in the form of columns.
Cast iron batteries will be relevant for a very long time. And thanks to the design work on their appearance, they can easily complement any interior. But most importantly, the house will be very, very warm.
How useful was the information for you?
Main features of installed batteries
Cast iron radiators are not in vain popular.
| Description of the service | Unit | The cost |
| Manual arc welding of ferrous metals for | 1cm. seam | from 50 rubles. |
| Pipe welding | 1 joint | from 200 rubles. |
| Plumbing work | ||
| Replacing the heating radiator - batteries (2 pcs. Or more) | 1 PC | 4000 RUB |
| Installing a heated towel rail | 1 PC | from 1500 rub. |
| Connection to the water / heating riser | PC. up to d50 | from 500 rubles |
| Installation of a jumper (bypass) for a heated towel rail | 1 PC | RUB 6,000 |
| Filter and counter installation | PC. | RUB 700 |
| Replacing sewer pipes around the apartment | 1 point | from 500 rubles |
| Installation of supply pipes to the heated towel rail | 1 PC. | from 1500 rub. |
| Layout of pipes in the apartment polypropylene | 1 PC. (point hvs / gvs) | from 2000 rub. |
| Replacement of a hot / cold water riser with access to water in an apartment (floor) | floor | RUB 4500 |
| Transfer of cold / hot water / heating riser (floor piece) | pcs floor | 4000 RUB |
| Replacing the heating riser | floor | 3500 RUB |
| Replacement of taps | PC | RUB 500 |
| Manufacturing of metal structures (cost of the finished product) | ||
| Welded fences (grilles, gates) | r.m. | from 500 rubles |
| Fence (welded, mesh netting) | r.m. | from 1000 rubles. |
| Commercial and warehouse equipment (racks, racks, furniture) | r.m. | from 1500 rub. |
| Metal structures and metal products according to customer drawings | ton | from 15,000 rubles. |
| Piece products | negotiable | |
| Additional services | ||
| Painting works, surface priming | r.m. | from 50 rubles. |
| Delivery of metal in Moscow and the region | from 1500 rub. | |
| Cutting metal in one go | from 10 rubles. | |
| Welding and assembly works | negotiable | |
These batteries are different:
- A variety of design solutions. Heating radiators can be both standard and designer. You can easily select a battery that meets all your requests and wishes. Radiators can be used both in homes and offices.
- Versatility.Radiators can be used in autonomous and central heating systems.
- Excellent thermal conductivity. Radiators quickly heat up even large rooms. The flow of warm air is evenly distributed by the radiator throughout the room. Heating is as efficient as possible.
- High corrosion resistance. Cast iron heating radiators serve as long as possible.
- Practicality. Cast iron radiators can be used for a long time without special care and maintenance.
- Neutrality to a variety of coolants. Radiators can be installed in steam, gas and water heating systems.
Note also that most of the heat flux is distributed by radiation. Thanks to this, heating allows you to ensure uniform heating of not only the upper, but also the lower part of the room.
You can talk endlessly about each cast iron radiator! Better buy the models and install them with our help! In no time, you will be convinced of all the advantages of batteries.