We make a stove with a water heating boiler
No one will doubt that in a Russian bath the greatest comfort is achieved if a wood-burning stove with crackling wood, a pleasant spirit and tremendous heat from a live fire is installed. The only bad thing is that sometimes it takes too much firewood to melt the bathhouse and enjoy the cleaning process. A water heating boiler, which is built directly into the stove, can significantly speed up the heating of the room and the preparation of the bath. This tandem significantly increases the efficiency of the wood-burning stove and saves time and firewood. The main idea is that a built-in boiler provides colossal heat transfer even with small dimensions. Now let's talk about how to implement such an improvement in a wood-burning stove using improvised means in a short time.
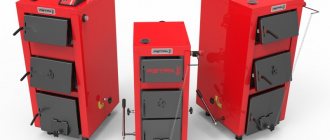
Homemade water boiler made of cast iron radiators
A boiler that is excellent in its qualities and efficiency can be obtained from ordinary cast-iron heating radiators. As a basis, you can take the M-140 radiator. It is easy to find, because in large quantities they are taken out for scrap during the dismantling and demolition of most of the old five-story buildings. The capacity of each section of such radiators is 1.5 liters of water, while the surface area reaches 0.254 square meters. Assembled, when 12 such sections are combined, the volume of liquid is 18 liters and the total surface area is 3 square meters. m. Not every ready-made boiler, assembled from sheet metal, can boast of such parameters with similar dimensions. The performance of such a boiler from a radiator may be quite enough to heat a room with an area of up to 100 sq. m. So it is suitable for an ordinary bath, and the stock will also be large enough.
Before using the radiator, some alteration is required. First you need to get rid of the cardboard spacers between the sections. It is best to replace them with an asbestos cord impregnated with natural drying oil with an admixture of graphite. So you can protect the gaskets from burning out at high temperatures.
While the sections are disassembled, they should be rinsed from the inside with a solution of hydrochloric acid of 6% concentration, and then with a large amount of water. So they can be cleaned of a large layer of rust and dirt accumulated over many years of operation.
The procedure for assembling the radiator repeats the disassembly process, only in the opposite direction. To connect the sections, nipples are used, equipped with right and left threads on each side. Thus, the sections, both from the bottom and from the top, are simultaneously attracted by the twisting of the nipple. As soon as there is a gap of 2 cm between the sections, an impregnated asbestos cord is wound and the nipples are finally tightened.
After completing the assembly of the entire radiator and waiting for the drying oil to dry, you should check the tightness of the joints by supplying liquid under pressure to the radiator. This is the only way to protect yourself from possible leaks during operation at considerable furnace temperatures.
The connection of the supply and return pipes is best done diagonally across the radiator. This way, the water will flow evenly throughout the new boiler. The two remaining holes should be closed with plugs. Pipes are better to take inch. On one side of the radiator there will be a right-hand thread and there will be no connection problems. On the other hand, where the thread is left-handed, it is better to use a nipple and a coupling with a squeegee.
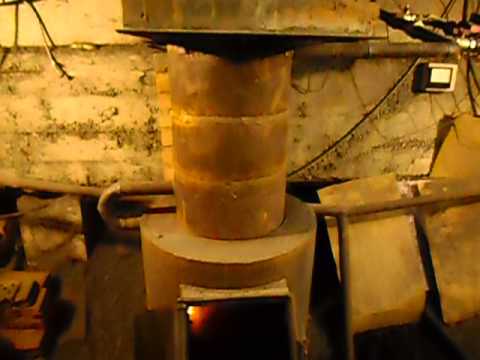
Such a home-made boiler should be placed not in the firebox where the wood is burning, but in the chimney chambers, which are located directly behind the furnace chamber.Since cast-iron radiators are used, they should be heated not with a flame, but with hot gases that are removed from the firebox.
It is better to position the radiator so that the pipes come out of it perpendicular to the floor, and the return supply is also lowered below the floor into the underfloor space. This way you can achieve a better natural circulation of water during heating.
When assembling the sections, you can experiment to improve the design of the resulting boiler. The result should be something similar to the image shown below. So there are shown examples of the location of the boiler and how to connect it. Again, do not forget that in the case of cast iron, the boiler should be placed in the chimney.

Installing a boiler for a brick oven
How to choose the right manufacturing method
Before contacting specialists or looking for manufacturing methods on the Internet, you need to decide on its purpose. Indeed, the type of its design will also depend on its role. First, you need to understand that all boilers with your own hands are based on a single principle: the device heats the coolant, and the heat exchanger receives heat from the burning fuel.
In order to achieve maximum heating efficiency, it is necessary to consider the design and combustion of the fuel. Based on simple physical laws, it can be concluded that a large indicator of heat transferred per unit of time directly depends on the size of the heat carrier capacity and the area of the transmitting tube. Given the completeness of fuel combustion, it is necessary to allow a maximum flow of oxygen to the fuel in order to prevent the outflow of pyrolysis gas, which transfers a lot of heat.
How to place the boiler in the oven correctly?
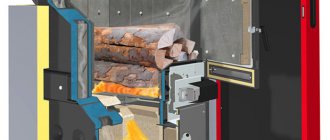
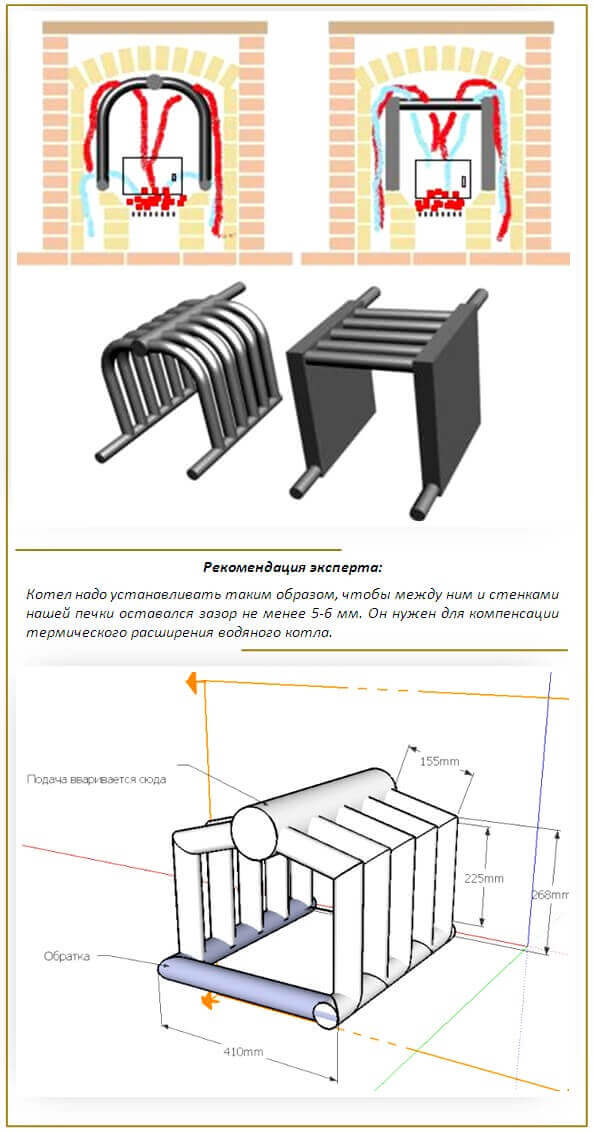
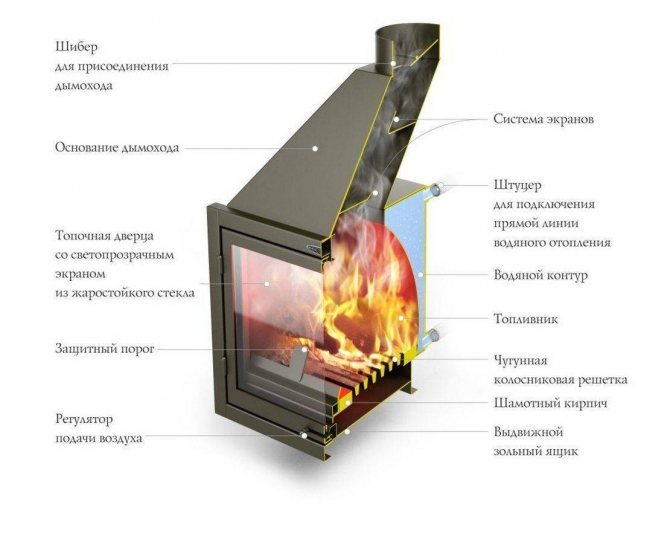
The most effective version of a water boiler is obtained when using pipes or sheet metal with a thickness of 3.5 to 5 mm as a material. In this version, the boiler can be placed directly in the furnace firebox and thus ensure maximum efficiency. The figure above shows a variant of the design of the heating water boiler itself and its schematic location in the firebox. When using pipes, it is better to give preference to seamless ones, but if there are no such at hand, then the existing seam should be additionally welded.
The hot water supply from the boiler to the heating system should be located exclusively at the highest point of the boiler. The location of the return inlet is not regulated, but it is most logical to place it at the bottom to improve water circulation.
When placing any boiler in the furnace, ensure that there is a gap between the outer walls of the boiler and the brickwork of the furnace. This is necessary to compensate for the thermal expansion of the boiler metal.
When welding pipes, it is imperative to cut the chamfer along the pipe shear contour. This allows you to fill the entire thickness of the pipe with a weld seam and securely fasten the parts without fear that they will disperse during operation.
When installing the boiler inside the stove, keep the horizontal level. However, it is possible to deviate somewhat from this rule in order to ensure the maximum height of the feed outlet point from the boiler.

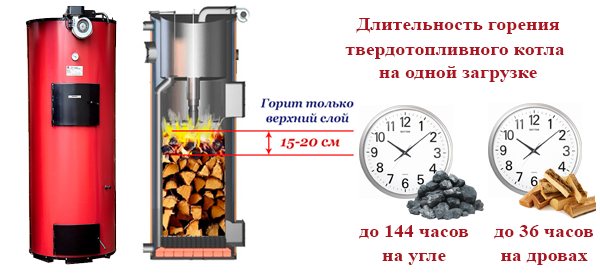
Solid fuel boiler concept
A self-made self-contained solid fuel boiler is, by and large, an ordinary stove installed in a barrel of water. The main task of such a device is to heat boiler water, which will be supplied to home heating radiators, using the heat from the combustion of wood or coal.
But such a device, tempting for independent manufacture due to its primitiveness, will not be efficient in terms of heating and not cost-effective due to high fuel consumption - the simplest boiler designs have an efficiency of only 10-15%.
Primitive solid fuel water boiler with chimney economizer
Important! The operation of a solid fuel heating boiler depends on the quality of the draft and, accordingly, the supply ventilation. Even a well-made boiler will not be able to provide effective heating of the room if the ventilation is not arranged accordingly.
Homemade boilers are assembled not only from metal, but also assembled from bricks. Brick devices are usually built in country houses, where higher requirements are imposed on the aesthetics of the installed equipment than in the premises of economic or technical purposes.
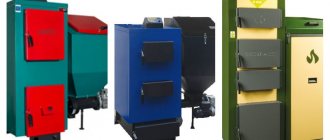
Metal boilers are the simplest devices, the manufacture of which allows the use of scrap materials and, possibly, with the help of available tools. But it does not follow from this that their production and installation can be performed without, at least, sketches of blanks and assemblies, as well as a clearly developed technology - a sequence, ways of performing individual stages of preparatory and basic work.
Choosing a heating boiler design
Heating stoves and solid fuel boilers, with similar combustion processes, differ in functionality. A heating boiler, unlike a stove, must not only heat the room at the installation site by burning wood or coal, but also supply the heating circuit with a heated coolant. But to fulfill the second task, it is not enough to place a heat exchanger (section of the heating circuit) in the furnace - it is also necessary to ensure the continuity of fuel combustion and uniform circulation of the coolant through this coil.
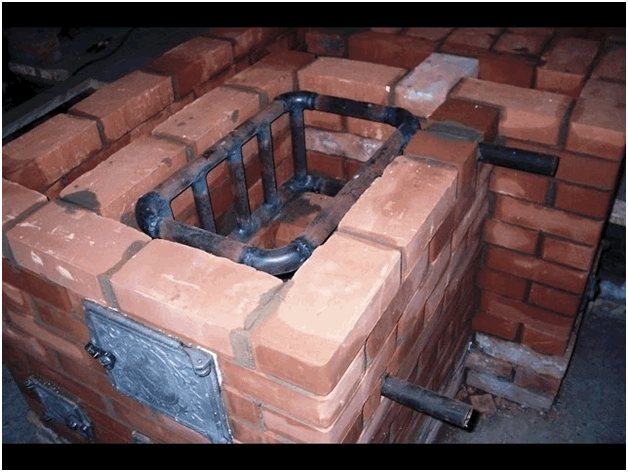
Refractory brick solid fuel boiler tube heat exchanger
What design of the boiler to choose so that it is easier to make it with your own hands, what difficulties will you have to face in the process of work? These questions can be answered at the design stage. Drawings of homemade solid fuel boilers give a sufficient idea of what a particular design looks like, and what you should pay attention to during the manufacturing process.
An example of a schematic representation of a solid fuel boiler from the outside: front, side and rear views.
Each type of solid fuel boiler equipment has its own design features and manufacturing nuances. When planning an independent assembly of a heating unit, it is necessary to decide which design to give preference to - with a lower or upper (shaft) combustion method.
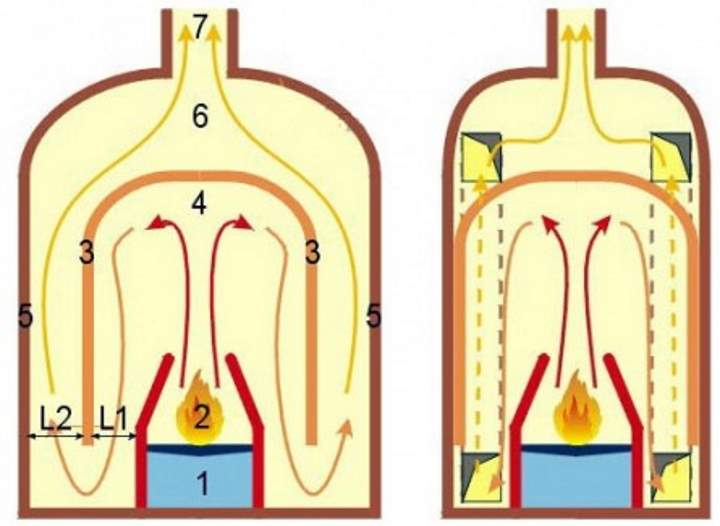
Bottom combustion units are equipment in which the door for loading firewood is located in the upper part of the combustion chamber, but fuel combustion occurs from below, as a result of which the upper layers of the bookmark move downward under their own weight, and the smoke is burned out in the upper part. Depending on the model, the movement of air through the furnace occurs from bottom to top by force (fan) or naturally (draft), which causes independence from the mains, but reduced efficiency and a smaller volume of loaded fuel.
Schematic cross-sectional view of a solid fuel boiler with bottom combustion
In solid fuel boilers of a mine structure, firewood is loaded through a door located in the upper part of the combustion chamber. Such units are equipped with a forced draft, which is directed from top to bottom - it drives smoke to the lower part of the furnace, where it burns in a mixture with air, and on the way heats and additionally dries the fuel of the lower tiers.
Scheme of operation of a solid fuel heating boiler with an upper combustion method
A unit with a lower combustion method is more suitable for self-production, so when assembling it, you can do without a forced draft fan.
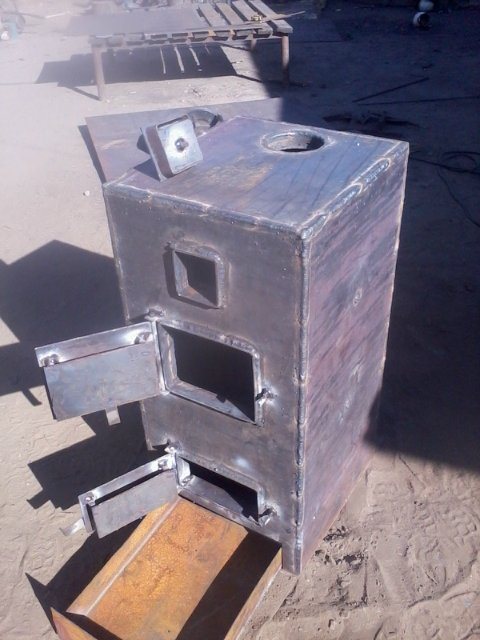
Bottom combustion solid fuel steel boiler without finishing
Important! The more complex the design of the equipment, the higher the technological requirements for the quality of performance of its components, which should not have deviations from the design parameters. The assembly process of such a unit is no less responsible.
By the method of combustion, solid fuel boilers can be designed for a normal mode or work with an exit to pyrolysis - the process of decomposition of solid fuel into two components and their subsequent separate combustion. Giving preference to the second, more complex, option, you will have to take into account the need to install a second combustion chamber, which will increase the dimensions of the heater and, accordingly, require more materials.
The choice of the type of heating equipment is largely determined by the type of solid fuel that will be supplied to the heating device. If you have a large amount of firewood at hand, it will be better if the boiler you have made will be designed for firewood heating. If coal is more readily available, another model will do. The burning time of the bookmark, the quality of heating are determined by the type of solid fuel boiler, its power and design efficiency.
On a note: the combustion temperature of coal is much higher than that of firewood, therefore the grates, heat exchanger and boiler body for coal are made of thicker steel. An alternative could be the creation of the body and the combustion chamber of the boiler from refractory bricks.
If it is not possible to create an external casing of the unit from steel of the required thickness, a brick solid fuel boiler will be a rational solution. Lining with refractory bricks will create a spacious, comfortable and high temperature-resistant combustion chamber.
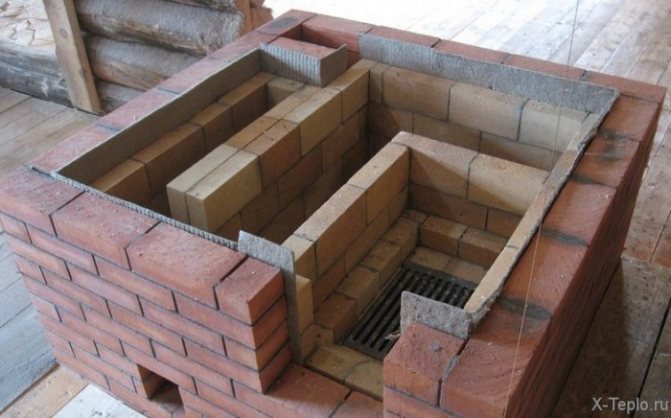
Construction of a combustion chamber made of refractory bricks with placement inside a heat exchanger
The choice of a boiler with a design of acceptable complexity must be done after analyzing the technical performance and an objective assessment of its competence and capabilities. If in doubt, in order to exclude the likelihood of unjustified damage to the material, it is better to give preference to a unit that is simple, understandable from the design drawings - even such a solid fuel boiler is able to provide the house with heat in the cold season.
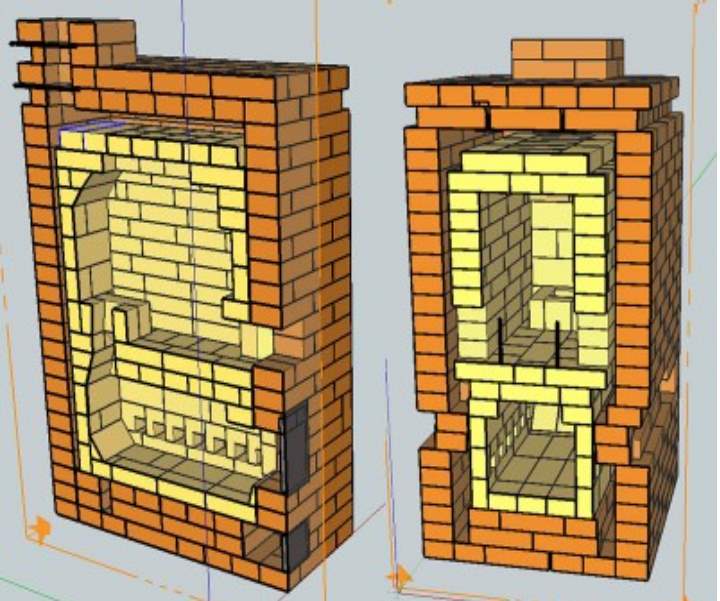
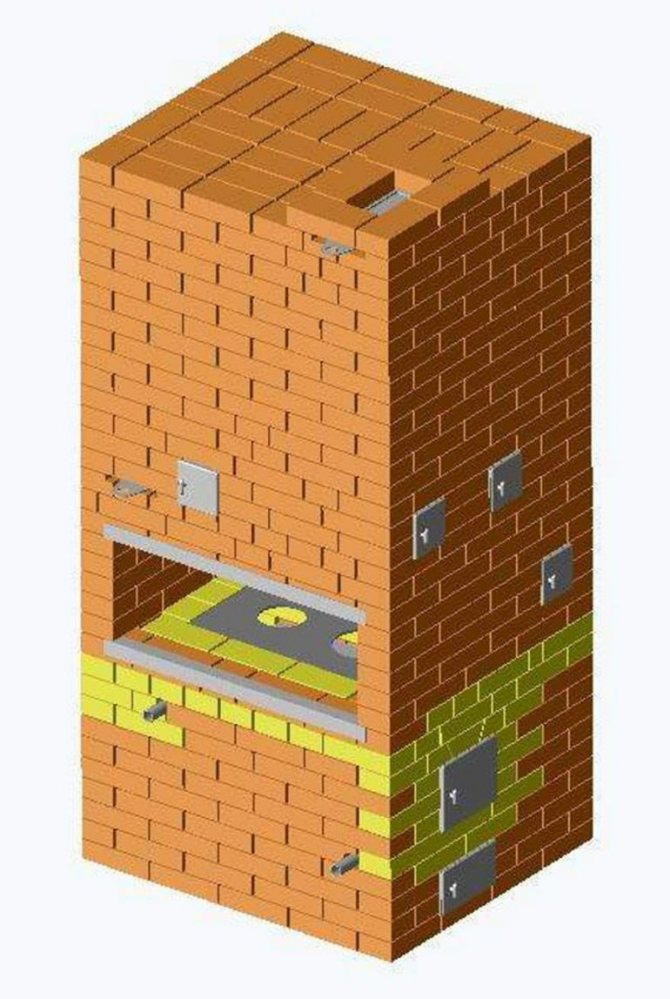
Installing a stove with a built-in boiler
The best option for a bath will be a stove, in which, obviously, even at the construction stage, a specially prepared water boiler is mounted. In this case, the furnace acquires its own specific features in terms of design, which greatly increases the efficiency of the entire system and its compactness.
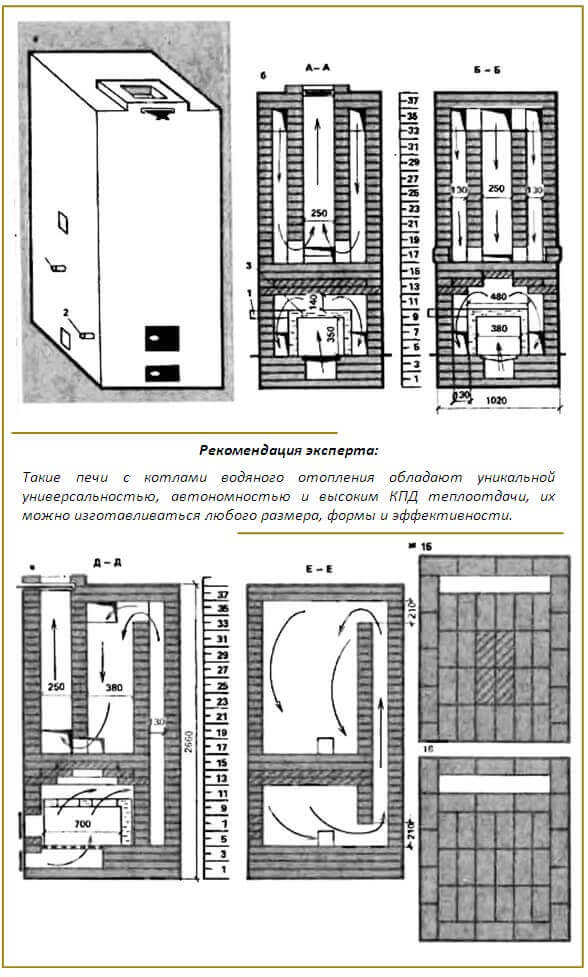
Installation of such a furnace has the highest heat transfer efficiency.
Heat exchanger construction
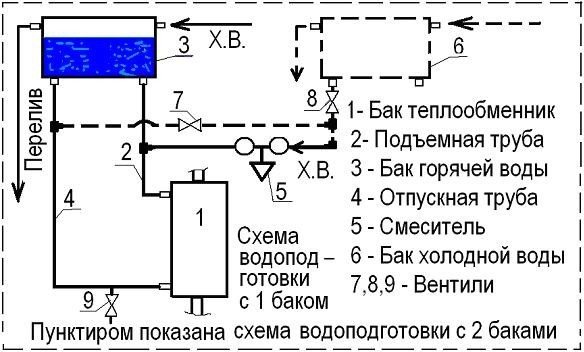
Installation diagram of the heat exchanger and storage tank.
You can easily build an efficient boiler yourself. If it is made in the form of a tank, then high-quality steel is needed, which tolerates heat loads and corrosion due to the coolant well. In addition, the material of manufacture must have a high thermal conductivity in order to increase the efficiency of the system.
The thickness of the walls of the tank should be within 4-5 mm, which ensures its strength with simultaneous rapid heating. There is no standard size for such a heat exchanger, it all depends on the configuration of the existing or planned furnace. The main thing is that the height of the tank is at least 500 mm for better circulation.
If the heat exchanger is a coil or other pipe loop, then there are also some nuances. Pipes for the manufacture of such structures must be thick-walled and have no seams. If it is difficult to find a seamless pipe, then it is necessary to weld the existing seams in order to prevent possible leakage of the coolant.
The inlet pipe is best located at the top of the structure, and the return pipe is located at any convenient place.The pipes are not welded end-to-end, but with chamfers to avoid uncooked areas that will flow in the future. The minimum distance between the knees of the structure is 5-6 cm so that the heating of each knee is maximized. Before placing such a boiler directly into the furnace, it is necessary to fill it with water and check for leaks, which are promptly eliminated.
When placing the boiler directly in the furnace, it is worth adhering to the level, however, slight deviations are allowed.
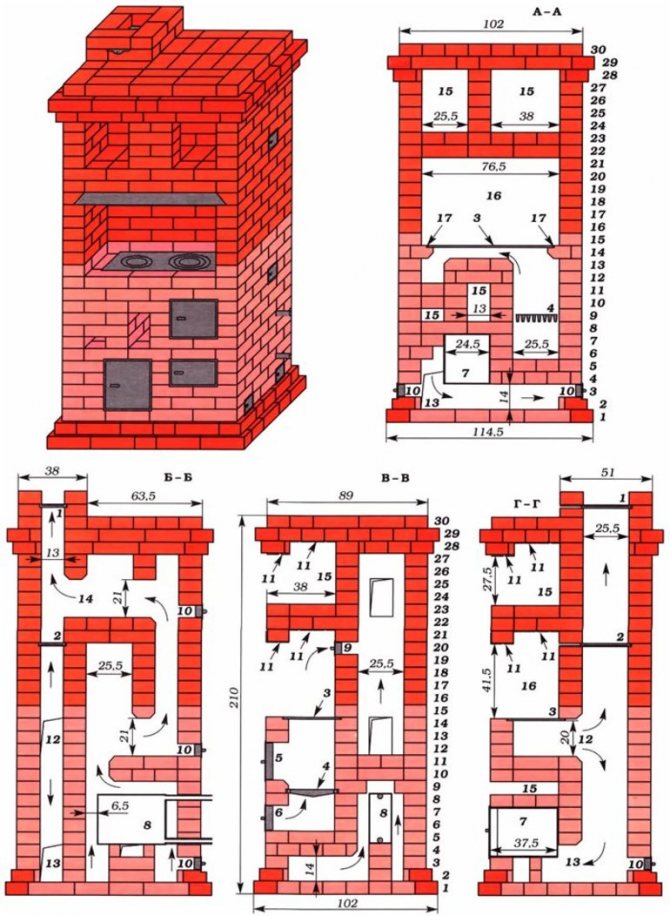
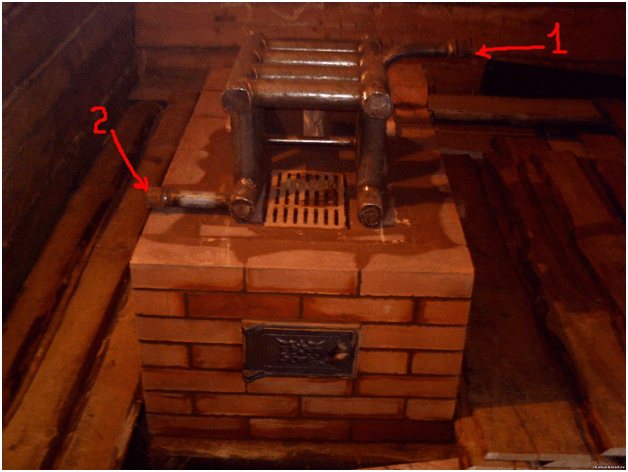
Bricklaying for a furnace with a water boiler
The laying of bricks for a furnace with a water boiler is carried out as follows:
- A concrete foundation with reinforcement is laid.
- For masonry, clay-sand mortar is used. It is best to soak the clay and sand overnight. Lumps of clay and sand are pounded. The next day, both components are mixed in the ratio: 1 portion of clay to two portions of sand.
- A layer of waterproofing in the form of roofing felt is laid on top of the foundation.
- A layer of mortar is distributed evenly and level over the waterproofing, after which you can start laying the first layer of brick.
- The first contour of the blower is formed and the door is installed for it. Further, on top of the laid out several layers of brickwork, a grate is placed that separates the firebox and the blower, in which ash will accumulate.
- When forming the firebox, the size of the water boiler is taken into account with the mandatory gaps between its outer walls and the brickwork along the perimeter of the firebox. A rim is formed along the contour of the first row of bricks in the firebox for installing the corner. It is on the corners that the boiler will be fixed. In the side walls of the firebox, openings must be left for the outlet of return and supply pipes.
- The walls of the chimney are removed with the obligatory formation of channels for dissipating excess heat and dumping ash and burning.
- To top it off, the chimney is laid out. Upon completion of all work, you can connect the heating system to the boiler and check it in action.
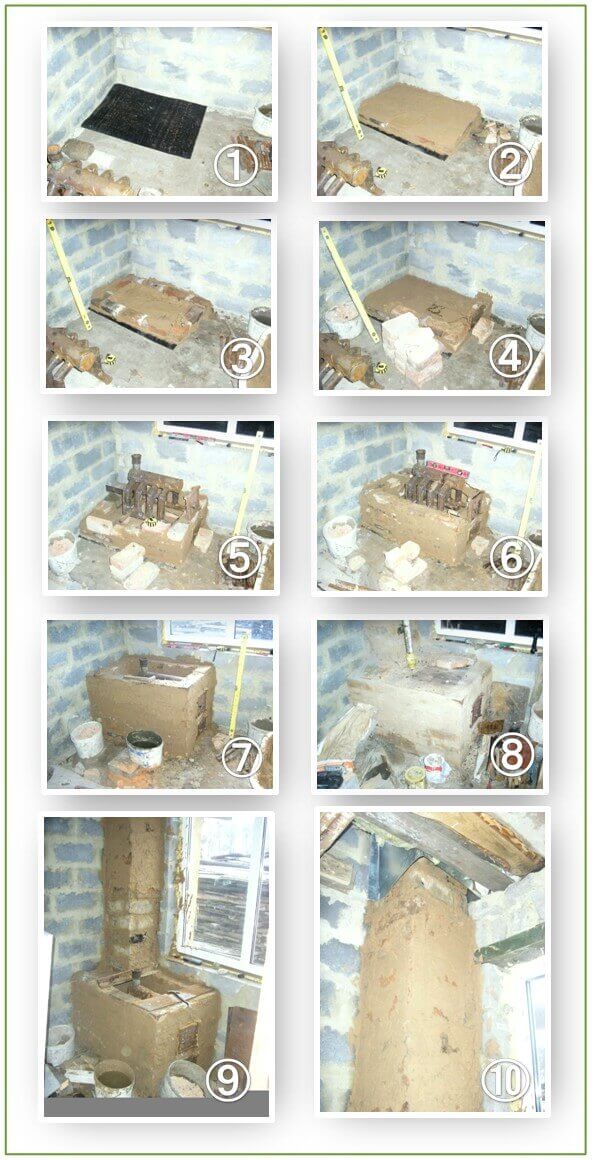
Layout of bricks for a furnace with a water boiler
Simple rules for an efficient heat exchanger
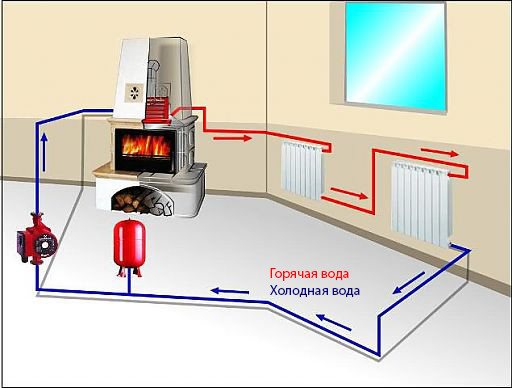
The principle of operation of stove heating.
If the house has a ready-made brick oven, then organizing water heating with your own hands is a rather simple task. To do this, it is enough to place a home-made boiler in the form of a coil or any other shape in the firebox. The main thing to consider when doing this:
- Height difference between the liquid outlet from the heat exchanger and the inlet to it;
- It is necessary to provide the maximum possible surface area;
- The heat exchanger must not interfere with the loading and combustion of fuel.
If a do-it-yourself oven is being built, then a boiler for a brick oven can be made as efficient as possible. To do this, several important conditions must be met:
- The combustion products must come out of the chimney as cold as possible;
- The large heat transfer of the furnace gases inside the furnace increases its efficiency;
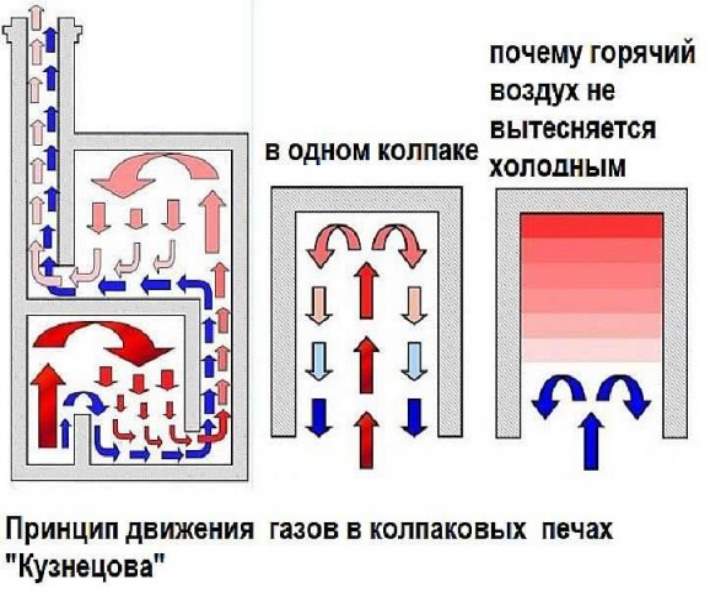
- The heat exchanger is best placed in the chimney and not in the firebox.
Perhaps these rules will seem somewhat strange, because, logically, the heat exchanger should be heated up on an open flame of the furnace. However, it is necessary to take into account other processes taking place in the furnace. From the point of view of physics, flames are burning particles of fuel. And if we take heat from these particles, then they will not burn completely, which will reduce the usefulness of the furnace.
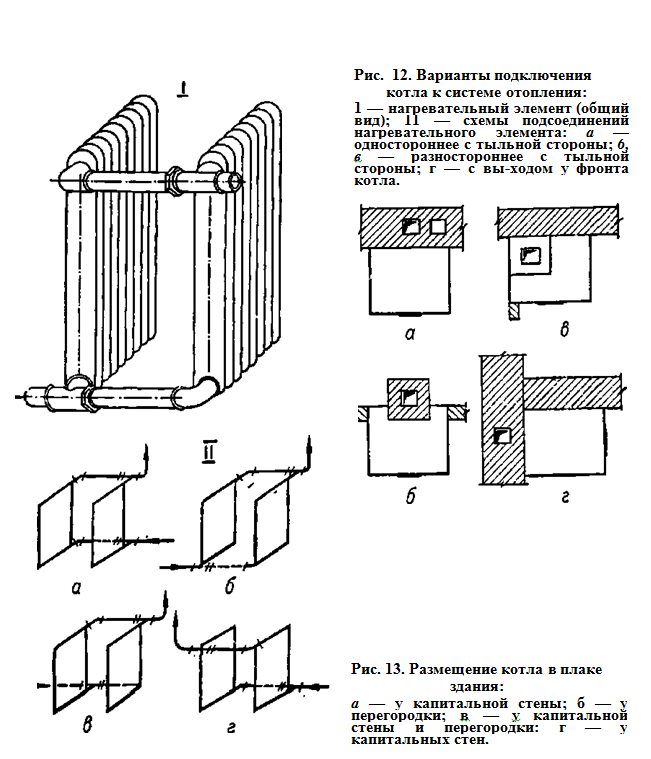
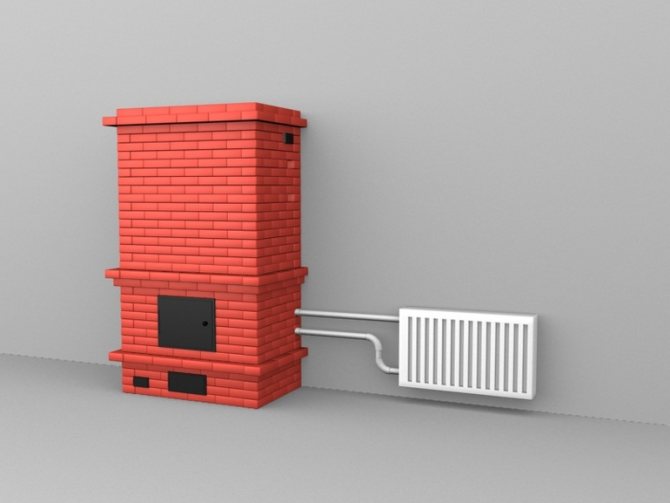
Diagram of connecting the boiler to the heating system.
In addition, for better heating, the coolant must move towards the heat flow. Only in this way is the temperature difference between different parts of the coolant maintained, increasing the heating efficiency and ensuring its better circulation within the system.
Another advantage of this arrangement of the heating tank is that less condensation forms on it, which contributes to the absence of corrosion.