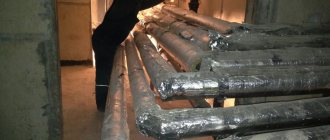
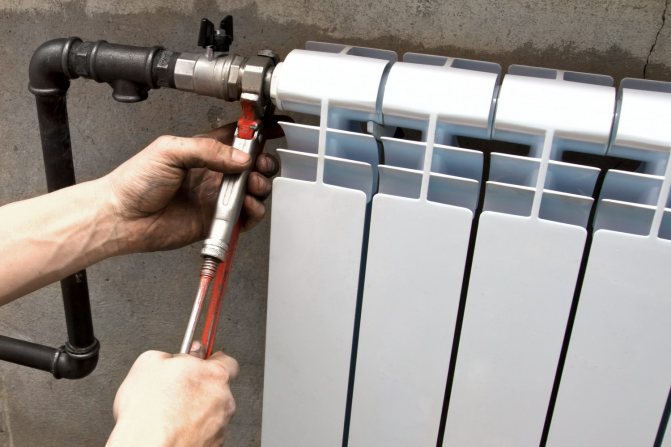
The service life of cast-iron heating radiators is so long that residents take their work for granted, therefore, in the event of a leak or fistula in the wall of the device, they do not know what to do. It is especially unpleasant if the breakdown occurred in the midst of cold weather, but even in the off-season, you cannot leave the heating elements unattended. As a rule, preventive work carried out by heating network workers can reveal the presence of dirt or leaks in the device.
In this case, there are simple ways to eliminate a leak in a cast-iron radiator.
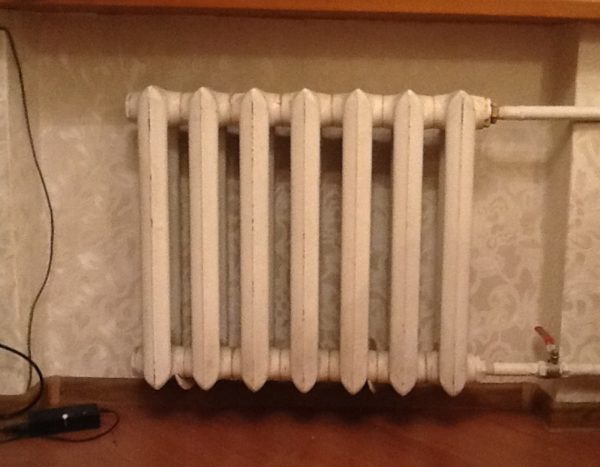
The device of cast iron radiators
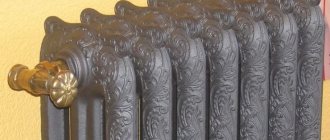
This type of heating device consists of sections. Models of the old type even today are produced in the form of "accordions", while the new generation has a flat outer panel that provides better heating of its entire area.
These devices use two types of heat transfer in operation:
- Radiation, or as professionals call it, radiation makes up 25-30% of the heat. It not only heats the air, but is transmitted to nearby objects, providing a better heating of the room.
- The convection produced by the heating battery ensures the constant movement of air masses around the room, and accounts for about 75% of the heat transfer.
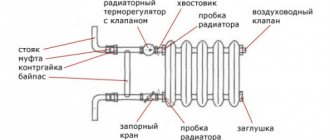
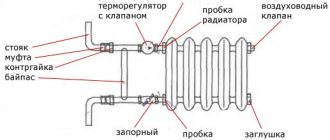
The device of the cast-iron battery, despite all the external changes, remained the same. It consists of sections equipped with:
- plugs;
- locking devices;
- traffic jams;
- shank and thermostat;
- locknuts;
- nipples and gaskets.
As strong as cast iron is, even it has its limits. As a rule, the service life of cast iron radiators is 25-30 years, and with proper care and optimal working conditions, they can work without interruption from 50 to 100 years.
The same cannot be said for the parts that hold the sections together, such as the gaskets. With frequent water hammer, they can "wobble" or crack from time to time. In this case, a leak appears between the sections of the cast-iron battery, which, if not eliminated in time, can cause a serious accident and a threat to human health and life.
To avoid this, you need to check the condition of the cast iron radiators after the end of the heating season. In this case, completely different malfunctions in the heating system can be detected.
Causes of leaks and other radiator malfunctions
Installation of heating batteries and the cost of replacement in the apartment
Before telling how to repair heating radiators with your own hands, you need to consider the causes of their malfunctions:
- If the model of the battery is selected incorrectly, this can lead to its rapid failure. Heating equipment must be selected taking into account the temperature of the coolant, the pressure in the system and the diameter of the pipeline.
- The cause of the breakdown may lie in the incorrect connection of the device to the line.
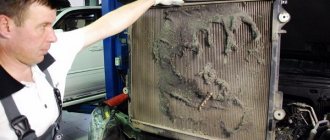
- A fistula on a heating pipe or a metal radiator may appear due to corrosion, which is observed when using a coolant with a large amount of impurities or with frequent pressure drops in the system.
- Plaque can form at the joints of the sections, and the pipelines themselves can become clogged. This is due to the use of a heating medium of an unsuitable quality. In this case, the system must be cleaned.
- Sometimes the reason for the breakdown of heating devices is associated with the destruction of the threaded nipples. So that such a breakdown does not lead to serious consequences, the gaskets must be changed regularly.
- Noise and clicks in heating equipment are not always associated with breakdowns, but it is better to insure yourself and call specialists to assess the health of the system.
- Air locks can lead to incorrect operation of the heating system. They often appear after repairs, replacement of devices, due to leaks or low pressure in the circuit.
- The reason for the pressure drop in the heating system of a private house can be scale in the heating boiler or leakage at the pipe joints.
The most common problems and their symptoms
Although cast iron perfectly tolerates the imperfection of the central heating coolant, and the batteries from it have channels wide enough so that debris does not accumulate in them, even they may have problems. And this despite the fact that this metal has no wear. The following factors may be responsible for the fact that the cast-iron battery burst or a fistula appeared in its walls:
- Everyone knows the large weight of radiators made of this metal. If, during the installation of the structure, not strong enough brackets were used, or there were few of them, over time it can sag under its own weight and bend over. Even a slight deviation of just a couple of millimeters will reduce the efficiency of the device, and if the imbalance is not corrected, then after a few years, corrosion will appear in the place where the coolant is absent. At first, it will look like a small brown speck that will grow with each heating season until a fistula forms in its place.
- The reputation of "long-livers" is characteristic of both old and new models of cast-iron radiators, but provided that they are mounted in the circuit of an apartment building no higher than six floors. If the heating system is reliable and does not “sin” with strong water hammer, then they can be installed in nine-storey buildings. Otherwise, under a strong pressure of water, a cast-iron battery can leak at the joints of the sections. In the event that a cast-iron battery leaks during the heating season, you need to know how to repair it in advance. Today there are a lot of sealants that will help the device "hold out" until warm days.
- The internal structure of domestic batteries is such that the cast iron from which they are smelted has roughness that is completely absent in imported counterparts. That is why, over time, a lot of debris is deposited on the walls, with which the water in the heating network is filled. Suspensions, particles of rust and metals, all this settles and makes the wide channel narrow so much that it is no longer able to pass the coolant unhindered under high pressure. In this case, the structure can burst anywhere, and then you will have to urgently decide how to eliminate the leak in the cast-iron battery.
- Gaskets and nipple threads are the weak "link" of heating devices... If cast iron does not have a limitation period, then this cannot be said about the parts that make up the battery. In order not to bring the situation to the point that the repair of the cast-iron battery is required, the joints must be checked after each heating season and the gaskets must be periodically changed on them.
As practice shows, most often it becomes known that something is wrong with the heating system when the repair of cast-iron radiators is already required. To know about a problem in advance, you need to listen for "help signals" that indicate the presence of defects.
Types of radiators
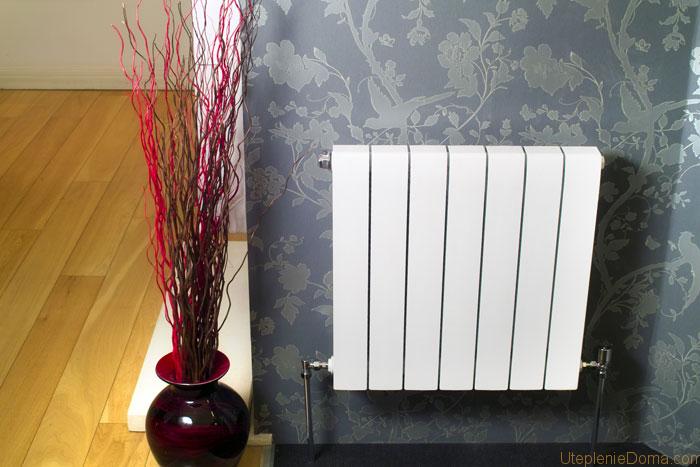
The material from which the radiator is made affects the methods of repair and maintenance
Here are the main types of radiators and describe their features.
Cast iron sectional batteries are a long-lasting and ubiquitous type. They are durable, reliable and heat-intensive. Not subject to corrosion. The quality of the water circulating through them does not matter. Due to their heavy weight, such heating devices are difficult to install and maintain. In such batteries, the intersection gaskets often wear out, resulting in a leak.
Aluminum batteries - characterized by aesthetic appearance, light weight and high heat dissipation. However, they have inherent disadvantages: the quality of the water matters and damage is possible due to pressure surges. If chemical admixtures of the heating liquid have accumulated, the repair of aluminum heating radiators is impossible. When the quality of water is constantly monitored in the room, then it is possible to install aluminum models.
Steel batteries - lightweight and high heat dissipation. It is not recommended to install such models in houses with a centralized heat supply, as they are susceptible to corrosion and have a short service life.
Bimetallic radiators are characterized by a pleasant appearance and corrosion resistance. They provide a high level of heat transfer and are designed for high pressure (up to 40 atmospheres). Do-it-yourself repair of bimetallic heating radiators allows you to eliminate leaks, replace gaskets, adjust or replace regulators and rinse / clean pipes.
The first signs of a problem
There are a number of factors that indicate that something is wrong with the heating circuit or batteries. These include:
- Feeling cool in the room. In this case, it is worth asking the neighbors how warm they are in the apartment. If everything is in order, then you can start looking for problems in yourself. The reason may be elementary contamination of the channels, the skew of the device or the presence of fistulas. In the first case, it is enough to rinse the batteries, in the second - to fix or change the brackets and check the correctness of installation with a building level, and in the third - to provide assistance to the "sick" radiator.
- If an incomprehensible plaque appears on the battery, visible to the naked eye, then the reason for this is worn out gaskets. We'll have to turn off the system, dismantle the batteries and install new ones, for example, made of paronite.
- The leak is immediately noticeable. If it is small, then you can do with a clamp or cold welding, otherwise you will have to completely change the device.
It should be remembered that even small defects can develop into a big problem if they are not eliminated in time. Do not rely on temporary clamps and patches. Only heating specialists can determine the reliability and tightness of the heating circuit and its elements.
Fistula elimination
For any breakdown, there are a number of reasons accompanying it. Fistulas on the pipes of the heating system or on the radiator are no exception. If a small brown speck appears on the elements of the heating network, you should not think that this is the paint coming off. In fact, this is the beginning of an often irreversible process, but knowing how to close a fistula in a cast-iron battery, you can stop the destruction and extend its service life. Reasons for the appearance of corrosion:
- Taking into account the frequent increases in the cost of utilities, some craftsmen are cunning and, for the sake of saving electricity, connect a zero cable to the heating circuit. The currents that begin their "journey" through the pipes by means of the coolant exactly cause the formation of corrosion. It is possible to identify a dishonest neighbor if there are several fistulas, and they appear with a certain regularity. A call to the appropriate service will help to save the situation in order to identify the offender, and do-it-yourself repair of cast-iron batteries.
- Too high acidity of water can harm even corrosion-tolerant cast iron.
- The batteries have expired or deposits on the sides have damaged the metal. In this case, even a small fistula or crack under the influence of water pressure can cause the battery to burst and a stream of hot water will flow out of it.
Any of the options requires urgent intervention. If the cast-iron battery only leaks slightly, then you can do without disconnecting the circuit and dismantling it. The clamp can save the situation.If the water only drips, then a one-sided pad will do, but if it runs in a thin line, then it is better not to risk it and use a double-sided clip.
In the event that the coolant tore apart the place where the fistula was located, the question immediately arises whether it is possible to brew a cast-iron battery... As a rule, cold welding becomes an emergency aid, but even if it has restored its tightness, it is necessary to call the masters from the heating network to check the condition of the heating system.
Is it possible to remove one section from a heating radiator
The need to disassemble heating batteries can arise in every home. If one of the sections leaks, then it must be replaced or removed. It is necessary to add additional ribs when the existing one does not warm up the room to the desired temperature. And if it gets hot in the apartment during the heating season, you need to remove the extra sections. Such tasks are solved with the help of professionals, but if the financial condition leaves much to be desired, you will have to learn how to disassemble a heating radiator with your own hands. This will save money and gain a rewarding experience.
How to disassemble a heating radiator with your own hands
If a heating element breaks down, especially in the cold season, it must be repaired or replaced immediately. Whether the radiator can be disassembled depends on the type of its design. Quite often, non-separable types of radiators are installed in apartments, which cannot be restored. In this case, it is best to purchase a new battery right away. But there are also collapsible models that can be dismantled to replace the damaged element and installed back.
Products are divided into two main types:
- Sectional batteries assembled from several identical sections, securely connected to each other. Each of them has a channel through which water circulates, and fins that radiate heat heat the room. Sectional batteries are the most popular because the cost of such radiators is lower. In the event of a breakdown, it is enough to replace only the damaged section, and if necessary, you can always add or remove ribs.
Sectional heating batteries
- Monolithic products represent one integral structure that does not have separate sections. Outwardly, these radiators may resemble sectional counterparts, but the differences between them are obvious. In monolithic devices, there are no connecting joints, due to which they are able to withstand more pressure. From this, the terms of failure-free operation of these structures are almost twice as long as those of sectional ones. But in the event of a leak, the monolithic device will have to be changed completely. In sectional products, it will be enough to replace the damaged element.
Bimetallic monolithic radiator
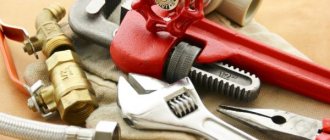
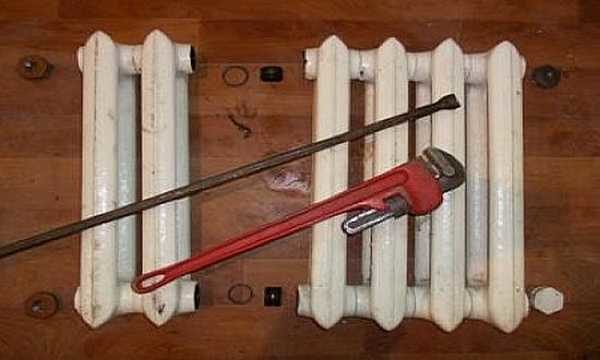
At this stage, you need to prepare all the necessary tools and dismantle the battery from the attachment point. For work, depending on the type and condition of the radiator, you may need the following tools:
- radiator (nipple) key;
- an adjustable wrench or a set of wrenches with different head sizes;
- autogen or grinder;
- construction hair dryer;
- hammer, sledgehammer;
- chisel.
Disassembly tools for radiators
The nipple wrench is an iron rod with a spatula-shaped head at one end and a hole or curved "ear" at the other. The tool purchased from the store has serifs, the distance between which is equal to the width of the heating radiator sections. They will help you find the location of the desired nipple nut.
After preparing the tools, it is necessary to equip a place for disassembling the radiator. A floor or a sturdy table will do. It should be borne in mind that dirty water will flow out of the battery, and do not forget to put a waterproof cloth under it.
To disconnect the radiator from the system and remove it from the mounting location, proceed as follows:
- Stop water circulation and relieve pressure.
- If the radiator is hot, you need to wait until it cools down and then disconnect from the system. To do this, unscrew the inlet and outlet couplings.
- Move the coupling away from the radiator along the pipe and remove the device from the brackets.
- Drain off remaining water and place the product face up in the disassembly area.
- Pull out and rinse the filter immediately so that dirt does not dry on it.
Dismantling of bimetallic and aluminum sectional products
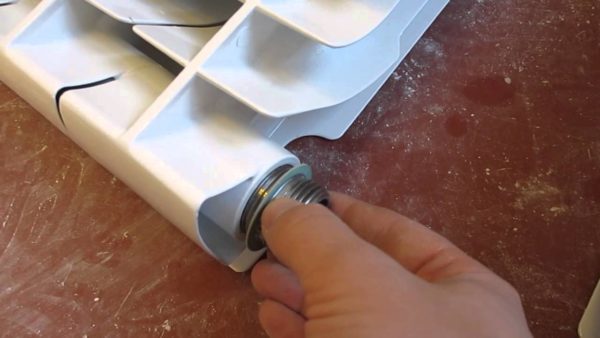
In the next step, the radiator is disassembled into separate sections. To avoid damage during operation, you need to figure out which direction you need to turn the nipple-nut. This element is a ring nut with an external thread and grooves inside on both sides. In this case, one nut has both a right-hand and a left-hand thread. If you unscrew it, then the adjacent sections of the battery will move apart evenly, and when twisted, they will contract.
Typically, manufacturers make marks on the face of plugs and butts to indicate the thread direction. O stands for right-handed thread, "S" for left-handed thread. To accurately determine the direction of movement, it is recommended to take a loose nipple-nut and try to thread it onto the thread in the radiator. Having decided in which direction it is twisted, it will become clear where to turn the key in order to separate the sections.
Important! If the nipple-nut is turned in the wrong direction, you can easily break off the thread on it and on the radiator.
Having decided on the direction of the thread, insert the nipple wrench into the radiator and slide it to the desired nut. The notches on the tool will help to do this. When it is in the grooves, insert the lever into the hole on the other side of it. Force is required to move the nut. Call an assistant to fix the radiator in one place.
Repair of bimetallic radiators
When the nut has advanced half a turn, go to the other side to unscrew the other, and follow the same procedure. After making sure that both nuts rotate without applying great physical force, gradually unscrew one or the other side, moving 5-7 mm.
Gasket between radiator sections
After disconnecting, remove the metal spacers that were between the sections. If they are in good condition, then they can be installed back during assembly, if in poor condition, then use them as a sample for buying new ones. Silicone gaskets must be replaced.
Cast iron heating battery
Cast iron products, as a rule, stand in apartments for several decades. In this regard, in many cases, it is impossible to disassemble them without damaging them. To remove the battery from the attachment point, unscrew the inlet and outlet squeegees. If this did not work out, it will have to be cut off with a grinder or autogenous machine. After dismantling, the product is washed and placed on a flat surface.
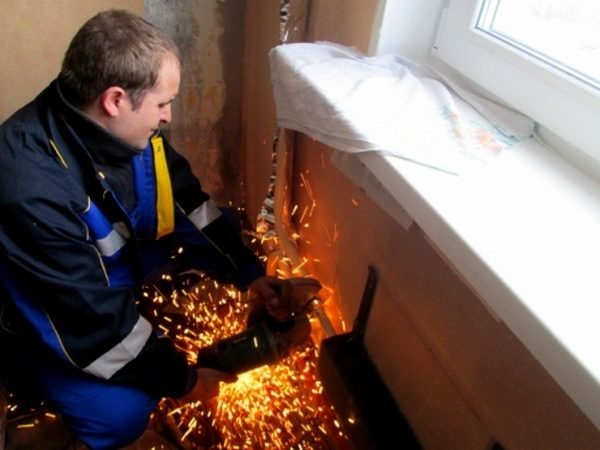
We cut off the old battery with a grinder
Over the years of operation, the joints between the sections, nipple-nuts and other individual elements stick to each other. Due to this, disassembly requires the use of more physical force than when working with new heating radiators. If the nut does not loosen, use a tool to heat up the joints. When the stuck areas are warmed up, it will be easier to separate them.
Advice: for heating, you can use a building hair dryer, autogen or blowtorch.
If the grooves for fixing the key in the connecting nuts are corroded by rust, the product cannot be disassembled. An effective way to remove a damaged section is mechanical breakage using a sledgehammer, but in this case there is a great risk of damaging the entire structure. You can also try to saw the battery at the joints with a grinder or a hacksaw for metal.
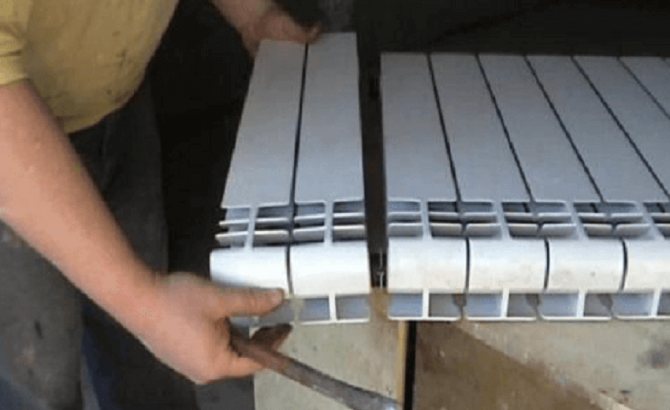
After separating the damaged section from the entire structure, try knocking out the nipple nuts with a hammer and chisel. To make it easier to work, have an assistant. It may not be possible to remove and disassemble the radiator with your own hands, since the cast iron products are very heavy. One section weighs about 7.5 kg. Accordingly, a battery in 10 sections will pull 75 kg.
Disassembly diagram of cast iron heating radiators.
If you understand how to disassemble a heating radiator with your own hands, this can be done quickly and without any negative consequences. The main thing is to stock up on the necessary tools and knowledge. Problems can arise with old batteries. But if you're lucky, you will be able to remove the necessary sections. Otherwise, you will have to buy a new heating element.
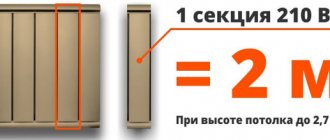
When new bimetal radiators are installed, and the room is still cool, this means that their power calculations were incorrectly made. As a rule, this happens if the calculations were carried out only over the area of the room, without taking into account all the heat losses in it. You need to know exactly how many sections of a bimetallic radiator are required to create truly comfortable living conditions.
In the event that errors were made in the calculations, they can be corrected by increasing the section or several to the already installed structure.
Today, on the market of thermal technologies, you can find several types of bimetal radiators. each of which is of high quality and reliability.
- Sectional models are very popular, as their technical parameters are ideal for multi-storey buildings with a centralized heating system. Knowing how to connect sections of a bimetallic radiator, you can assemble a structure of any length. This allows you to create a different microclimate in each room.
- Cast models are used either as a design solution for the decoration of a room, or in systems with very unstable pressure. These types of radiators are tested at a pressure of 100 atmospheres, which makes them the best candidates where there are jumps up to 30-40 atmospheres. These models have two significant drawbacks:
- Very high cost, which you forget about if the house has a "problem" heating system.
- They cannot be increased or decreased, therefore, their power should be calculated very carefully, taking into account all heat losses, the method of connection and the area of the room.
Read useful information about bimetallic batteries:
To make the correct connection of sections of bimetallic radiators, you need to prepare tools and all structural elements.
Before building the battery, you should not only make calculations, but also purchase the necessary tools. This is especially important if you have to do all the work yourself. For quality work you will need:
- pipe wrench;
- radiator key;
- special nipples (must be included with the battery section);
- plugs with left and right threads;
- gaskets installed between sections;
- emery cloth;
- paronite gaskets.
When the tools are at hand, you can start preparatory work.
- First of all, the radiator is removed, to which the section will be built up. To do this, the coolant supply to the system is closed, and the battery is disconnected from the pipe.
- The removed radiator must be thoroughly washed from dust and checked for contamination inside. Although the indicator of acidity of water is not terrible for stainless steel, the core is not "immune" from debris and scale settling on its walls. They should be removed by flushing the radiator with a special agent.
- Check the joints for thread integrity and quality. It happens that growths form at the joints, so you need to process each threaded hole with sandpaper.
Even if the growths are not found, it is worth walking with an emery cloth along the thread. This will remove any debris that could prevent the gasket from creating a good seal.
- After the old battery has been cleaned, it must be placed on a previously prepared flat surface. This is important, since it is necessary to connect bimetallic radiators to each other without distortions, even the most insignificant. Subtle at first, they can lead to a serious accident in the future.
Only after the preparation, you can start building up new sections.
To obtain a positive result, you should take care of the quality of the radiator gaskets. As a rule, paronite options are used that have sufficient strength and durability. You also need to check the condition of the nipples, especially the quality of the thread and the integrity of the sockets.
There should be no chips on them, and the cutting should be complete and even.
Observing the sequence of actions, with due attention, you can do the assembly yourself. This will require:
- Place the radiator and prepared sections on a flat surface.
- Slide the sections and put nipples with gaskets between them.
- Gently start tightening the nipple. Since it has a left-hand thread on one side and a right-hand thread on the other, when twisting, the sections are simultaneously attracted to each other. Knowing this feature of the nipple, even a beginner will understand how to remove a section from a bimetallic radiator. It is enough to twist it in the opposite direction, and the sections will move away from each other. The work is carried out with a special radiator key.
- After all the nipples are inserted and lightly tacked, they must be screwed on tightly, making the same number of turns. This is important to avoid distortions. If 3 turns were made on one nipple, then the same amount of movement is performed on all the others.
To understand that the assembly of the bimetallic radiator sections was carried out correctly, you can only carry out the appropriate test.
Compressed air pressure testing at home is the best way to check the build quality of a radiator. For this you will need:
- Piece of pipe Du-15.
- Tire nipple.
- Car pump with pressure gauge.
The nipple from the car camera must be soldered to the tube, which is inserted into the radiator. To check, it is enough to create a pressure in a radiator with a capacity of 1 atmosphere using a pump. If you do not hear the whistle of air coming out of the device, then all the actions were carried out correctly, the gaskets are of high quality and the nipples are twisted tightly.
You can check the tightness of the structure using soapy water or tinted water. It is enough to fill the battery and leave it for a couple of hours, observing whether water is leaking somewhere or not.
Only after testing can the battery be returned to its place and connected to the heating system. If several sections have been extended, it is worth checking whether the brackets will support the new weight of the radiator. In this matter, it is better to play it safe and add another holder to the wall, than at an unexpected moment the whole structure will collapse to the floor.
You may also be interested in the following informative articles:
As the sections of the bimetallic radiator are assembled, they are also removed, only in the reverse order. As a rule, there is nothing complicated in this work, therefore, asking the question whether it is possible to add sections to a bimetallic radiator on your own, the answer will be yes. With all the necessary tools at hand, even a beginner can handle this job.
The only thing to remember is that the maximum number of sections in a bimetallic radiator should not exceed 16 pieces. If there are more of them, then it is worth dividing the battery into 2 parts.For example, calculations showed that 27 sections are required per room, which means that the radiator should be divided into two structures, leaving 13 sections in one and 14 sections in the other.
Aluminum heating radiators - general information and characteristics
In the 80s of the twentieth century, a model of an aluminum heating radiator was introduced to the world market. Compared with such a familiar product as cast-iron batteries, this type of heating device had a number of serious advantages, as a result of which it quickly gained popularity among consumers. Indeed, an aluminum heating radiator has a number of characteristics, due to which it is considered one of the most convenient heating devices. Let's consider these characteristics in more detail:
- Aluminum is a material with excellent thermal conductivity, as a result of which products from it can be used in systems with an unstable coolant pressure. Half of the heat is transferred by radiation, half by thermal convection;
- Light weight - this simplifies the installation of this type of device, as well as their transportation and maintenance;
- Durability - aluminum heating radiators withstand a pressure of 16 atmospheres;
- Low cost - devices of this type are much lower than similar bimetal or copper products;
- Possibility of regulation;
- Aesthetic appearance.
Thanks to all these characteristics, aluminum radiators quickly conquered the market and began to be widely used for space heating.
However, along with the advantages, these devices also have a number of significant disadvantages:
- Aluminum is a chemically active metal and lacks corrosion resistance;
- In prefabricated models, it is impossible to use any other coolant other than water with strictly maintained acid-base characteristics;
- Aluminum radiators tend to be airy. Therefore, it is periodically necessary to bleed air from the system;
- The threaded connection in such models is a weak point. A water hammer may compromise the tightness of the product.
Aluminum batteries are available in two types:
- solid;
- prefabricated, consisting of separate sections. If desired, they can be increased - add additional sections, or vice versa, remove them.
Dismantling aluminum radiators
Disassembling an aluminum heating radiator is required, as a rule, in cases where:
- We are going to install a new heating system;
- You need to build up the battery or remove the extra sections;
- Repair the leak or replace the seals.
In order to disassemble the product, we need a set of wrenches, a screwdriver and a radiator wrench.
The first step is to dismantle the battery from the place of its attachment. To do this, we perform the following actions:
- We stop the circulation of water in the system and release the pressure;
- We make sure that the device has cooled down and the hot water inside it does not scald us, pouring out;
- We find a threaded connection in the place where the hose is attached to the battery pipe by means of a coupling. We select a wrench that is suitable in size - with its help it is necessary to untwist this connection;
- We move the coupling along the pipe, remove the device and put it on a plastic wrap specially laid on the floor. A little water may remain inside - you should drain it. We put the radiator face up;
- We take out the special filter and rinse it immediately. Otherwise, the dirt on it may dry out to such an extent that it will be impossible to clean it. In this case, you will have to buy a new filter - it will be impossible to reuse the old one.
The next step will be to disassemble the battery itself into separate sections. You should be aware that the connection of the battery sections to each other is carried out using nipple-nuts - these are empty inside nuts with external threads on both sides and grooves for installation inside.For this purpose, we use a radiator wrench specially designed for working with nipple nuts. If necessary, you can make it yourself. This is a key with a blade with serifs on the rod - the distance between them corresponds to the width of the aluminum radiator sections. That is, by checking how many serifs the key went inside, we can find out which nipple-nut we are turning at the moment.
By placing the vane in the slots of the corresponding nipple-nut in the hole at the top, we make a couple of turns counterclockwise. Then we take out the key, insert it into the hole from below into the grooves of the corresponding nipple-nut and also turn it a couple of turns. Then we return the key to the upper nut and repeat everything until the sections separate.
Unscrewing the nipple nuts in this way is necessary to avoid skewing. In order to be able to apply the necessary force, there is a through slot at the end of the key, into which, if necessary, insert a metal rod as a lever.
After we managed to disassemble the radiator, we clean it inside, change the gaskets and seals. If there is a need to build up the battery, you need to add the required number of sections.
If it is necessary to eliminate the leak, we prepare a special solution - add bronze powder to the epoxy resin and mix thoroughly. We clean the damaged area with a cable, after which we process it with the prepared composition and wait 30 - 60 minutes until it dries completely. When working with this composition, everything should be done so quickly so as not to let it dry out ahead of time.
After completing all the necessary maintenance and troubleshooting operations, the battery must be assembled and installed.
Assembling aluminum radiators
The sequence of actions when assembling the aluminum radiator:
- In order to assemble the battery back, place it on a flat surface. We carefully inspect all threaded connections for cracks and chips;
- We clean each connection from litter and dirt. If we want to add new parts, we need to clean the ends to a shine. Even the manufacturer's paint is removed - at the joints it will be a significant obstacle, causing premature coolant leaks. For cleaning we use sandpaper with a very fine grain so as not to leave scratches on the surface, which can also cause leaks;
- Degrease the ends with gasoline. Wash the gaskets in soapy water. Degreasing is mandatory in systems where antifreeze is used, and not ordinary water. They have a high flow rate and can penetrate the smallest irregularities;
- Now we can start connecting the sections. We put on the paronite seals on the nipple-nut and attach the product section on both sides. Place the key hole on top and turn it a couple of times without using the lever. Then, in the same way, we make a couple of turns of the nipple-nut in the lower hole. We do this until the key stops turning, and we stretch it with the lever. We do not apply much effort - aluminum is a soft metal and it is very easy to damage the thread. According to this scheme, we assemble the whole product;
- We put a plug on the unused hole... and on the other hand, we fasten the Mayevsky crane - it serves to bleed excess air from the system. Then we install the radiator and connect it to the system. We make sure that the coupling tightly connects the product to the water supply hose. Then we can supply water to the system, observing whether there will be coolant leaks somewhere.
So, we were able to make sure that it is not very difficult to disassemble and then assemble an aluminum radiator. All operations should be performed very carefully - aluminum is a very soft metal and it is very easy to damage it.To carry out the work, no special construction skills are needed - only a set of the simplest tools, attentiveness and accuracy. Thus, if you need to service the product or need to add a certain number of sections, you will be able to cope with this task on your own.
The need to disassemble heating radiators arises in cases when they began to leak, one of the ribs cracked or burst. In old buildings, when there was still no question of energy saving, radiators were installed in which more ribs were installed than required, so the extra ribs must be removed.
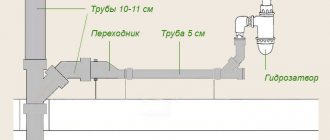
Heating radiator device.
Before disassembling heating radiators, regardless of their type, make sure that no water is supplied to the pipes. It is advisable to carry out the work together.
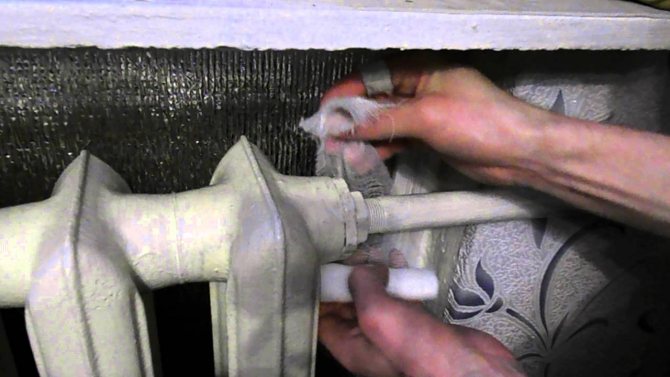
If the heating system is mounted on polypropylene or metal-plastic pipes, the couplings are disassembled.
If the heating system is assembled from steel pipes, you need to try to unwind the bends at the inlet and outlet of the sections. If it does not work out, and it often happens in apartments of an old building, the squeegees need to be cut off with a grinder or autogenous machine.
It remains to remove the battery from the hooks that attach it to the wall and put it on a flat surface.
Dismantling cast iron radiators sometimes becomes a very laborious process, but necessary.
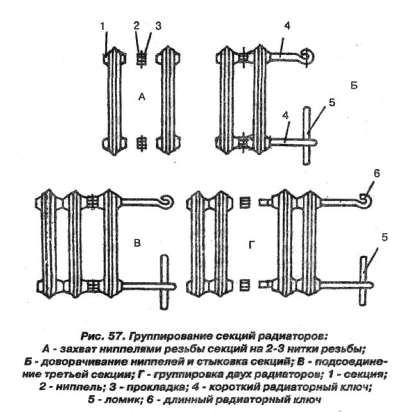
Diagram of disassembly of cast-iron heating radiators: a - nipple gripping of the threads of the sections by 2-3 threads; b - turning the nipples and joining the sections; c - connection of the third section; d - grouping of two radiators; 1 - section; 2 - nipple; 3 - gasket; 4 - short radiator key; 5 - crowbar; 6 - long radiator key.
Place the new or old radiator on a level place. At least on one side, you need to remove the usual footwear or blind plugs. On different sections of radiators, they can be with left or right thread. Typically, cast iron fittings have a right-hand thread, and plugs have a left-hand thread. If there is no disassembly skills, and there is a free section, it is better to find out, before applying force, what kind of this thread and in which direction the key should be turned. If the thread is left-handed, turn the key clockwise when disassembling the cast iron batteries.
As with unscrewing any nuts, you first need to "rip" the footwear from its place, ie. turn them a quarter turn on both sides of the battery. Then the foots are unscrewed so that a gap of several millimeters forms between the sections. If you let go of the footwear more, the whole structure will begin to bend under its own weight and due to the applied forces. This can jam the threads. To prevent this from happening, an assistant must stand on the disassembled battery, who will prevent bending with his weight.
Usually, the dismantling of old heating radiators is complicated by the fact that the footboards and sections are "stuck". In order to disassemble such a battery, you will have to use an autogen or a blowtorch. The junction is warmed up in a circular motion. As soon as it is warmed up enough, the shorts are unscrewed. If it was not possible to unscrew it the first time, the steps are repeated.
If you do not have enough strength to disassemble the battery, you need to increase the length of the key. An ordinary pipe is used, which serves as a stepping stone.
The built-in nipples for venting cast-iron radiators are unscrewed in the same way.
If it was not possible to disassemble the cast-iron battery with the considered methods, it remains to cut it with a grinder or autogenous gun or break it in a supine position with a sledgehammer. You need to split or cut one section carefully. After this operation, the adhesion between the sections may weaken, the battery can be disassembled, the remaining sections will be saved.
The use of a "liquid key" or WD liquid does not give an effect, since in old cast-iron batteries the fittings were sealed with linen and paint, and liquids will not get on the threads.
Diagram of aluminum heating radiators.
Aluminum or bimetallic heating radiators are disassembled in the same way as cast iron, but there are slight differences:
- these are the smaller sizes of keys and nipples;
- as a rule, these are new products, therefore, when disassembling them, you do not need to apply such significant efforts as in the case of cast iron;
- on the front side of the plugs and sleeves there are designations S and D, respectively, for left and right threads.
Metal gaskets are installed between the sealing sections. After disassembly, they should be wiped, cleaned and stored for later assembly.
Under the plugs, gaskets are usually made of silicone, during assembly they cannot be used and must be replaced with new ones.
Many models of aluminum sections are non-separable. You can disassemble them, but you will not be able to assemble them.
For disassembly, you will need tools and materials:
- disassembly keys (5/4 "- for cast iron batteries, 1" - for aluminum or bimetallic);
- gas wrench;
- adjustable (plumbing) wrench No. 2-3;
- grinder with a disc for metal;
- blowtorch;
- gas cutter (autogenous);
- a piece of steel pipe.
Please note that the described work is dirty and noisy. Therefore, it must be coordinated with the neighbors.
Using the given tips and recommendations and if you have a tool, you can disassemble and assemble heating batteries with your own hands.
Methods for repairing cast iron radiators
There are several methods that allow the batteries to hold out not only until the end of the heating season, but also for a couple of years. These include:
- If a leak occurs at the junction of the sections, then it can be quickly eliminated with a bandage and epoxy glue. The material is impregnated with glue and wound around the leak. After it grabs, you can paint over this place in the tone of the battery, but the main thing to remember is that such an "operation" is considered temporary, and it is better to buy and install a new section after the end of the cold weather.
- If a fistula or crack is found, a clamp will be required. You can buy it at a building materials store, or you can make it yourself from rubber or tin.
- Cold welding for cast iron batteries is the best way to quickly fix a defect. This is a special sealant that looks like children's plasticine. It must be thoroughly kneaded and applied to the damaged area. The tool sets quickly, is resistant to temperature extremes and is quite suitable for quick and temporary repair of a cast-iron battery.
Knowing how to weld a cast-iron battery using a welding machine with an inverter circuit, you can save the device from leaks for a long time.
Repair of bimetallic heating devices
If a cast-iron battery bursts, we described above how to repair it. Now let's talk about how to repair bimetallic heating radiators with your own hands. Even such reliable and durable batteries as bimetallic devices fail. And this is not surprising, because the quality of the coolant in the urban network leaves much to be desired.
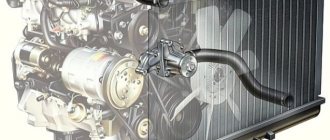
Important! If the bimetallic radiator does not heat well, then more often this is due to clogged pipes.

Who should pay to replace the heating batteries in the apartment?
In order for the battery to warm up again well, you need to clean the system. This can be done at home, if you adhere to the following sequence of actions:
- Switch off the heating system in the house or de-energize the battery circuit if installed on bypasses. Cover the floor with a waterproof material and move the furniture.
- Use a pipe wrench to disconnect the instrument from the line. Tilt the radiator over the container so that all the water drains out. Then take the appliance to the bathroom for easy cleaning.Place a wooden pallet in the bathroom or cover the bottom with a cloth to protect it from scratches.
- Then the plugs are removed and water is fed into the battery under strong pressure. Rinsing is continued until clean water flows out of the device. If the water cannot break through the scale, use special chemical washes (for example, "Mole"). As a rinse, you can use vinegar, which is poured into the device overnight. After that, the unit is washed again with water.
- The plugs are installed in place and the device is mounted back to the line.
Repair of cracks in bimetal devices
Since the bimetallic aggregate contains aluminum, an oxide film forms when it comes into contact with oxygen. The problem with the appearance of a film is solved by using a flux. You can buy aluminum solder from a store or make your own.
After solving the problem of oxide formation, conventional brazing is carried out using an iron-rosin mixture as a solder. In this way, a small hole or crack can be repaired. To temporarily solve the problem while waiting, the craftsmen use epoxy glue or cold welding.
Sequence of work
Depending on how serious the breakdown is, the actions to eliminate it depend. So, if the leak is small, then you can do without disconnecting the battery from the circuit, and repair will require:
- Place a container under the place of breakage in case of a breakthrough or an oilcloth with a rag to collect water.
- The place of the gap or crack must be cleaned to the base with a cable or emery. It is necessary not only to remove the paint layer, but to expose the metal itself.
- Degrease the prepared area with some kind of solvent.
- If special glue or epoxy is used to eliminate the breakage, then strips of thick cloth or bandages will be required. Apply the product to them and wrap them in several layers over the gap.
- In the case of cold welding, no fabric is needed.
- A clamp is put on and screwed onto the place seized by the sealant, but it is important to make sure that its clamps are on the opposite side of the leak. For example, a crack has formed on the inside of the radiator, which means that the clamps will be on the outside, and vice versa.
- If the breakdown is serious and hot water gushes from the battery, then you need to call the emergency team, and not try to stop the leak yourself without the necessary tools.
Even the highest quality repair does not guarantee a long service life of the device. The restored cast iron radiators will still have to be changed, and the sooner this is done, the safer it will be in the apartment.
The battery is leaking, where to go and what to do?
Now let's figure out what to do if the heating battery is leaking. Moreover, we are talking about cases when no temporary means of eliminating the leak will help, because the scale of the accident is significant and the property of residents on the lower floors may suffer.
If a battery leaks in an apartment building, you urgently need to contact the housing office. It is the management company that is responsible for the serviceability of all intra-house networks, including heat supply communications. While waiting for the master, use any of the above measures to temporarily stop the leak or reduce it in order to protect your property and apartment from below from getting wet.
A housing specialist will shut off the heating on a separate riser or throughout the house in order to repair the heating unit. Depending on the cause of the leak and the size of the defect, the master will replace the gasket, weld a fistula or crack, or completely change the heater. Please note that you do not have to pay for the work, because the housing office carries out them at its own expense.