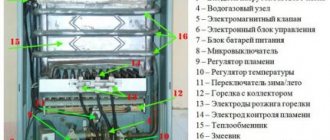
A gas water heater or gas heater is a metal body with two pipes attached to it, supplying cold water for heating and gas.
A gas water heater has several components:
- Radiator;
- Gas supply pipe;
- Burner;
- Igniter.
Cold water flowing through the pipe presses on the membrane that lets the gas in. When it begins to flow into the burner, it ignites from the igniter, due to which it heats up the heat exchanger, through which already warm water flows to the tap.
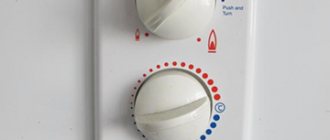
The igniter can be piezoelectric, manual or electronic. The gas is automatically ignited when the water valve is opened.
The main types of malfunctions
You can eliminate the malfunction in the gas column by contacting specialists or with your own hands. But still, when working with such equipment, knowledge of safety measures is necessary, as well as their strict observance.
IMPORTANT! Otherwise, self-repair of the geyser WILL CAUSE HUMAN VICTIMS.
The list of breakdowns found in gas water heaters:
- The igniter does not ignite;
- The igniter goes out;
- A tube is leaking in the radiator;
- Water leaks at the connections.
There are two main reasons why the gas column leaked. The breakdown is determined by the elimination method. The exact location of the fault is indicated by the location of the liquid. The fact that the reducer has failed will be indicated by water flowing from below. If condensate appears in the column, the heat exchanger (gas column radiator) is faulty.
The most common breakdowns:
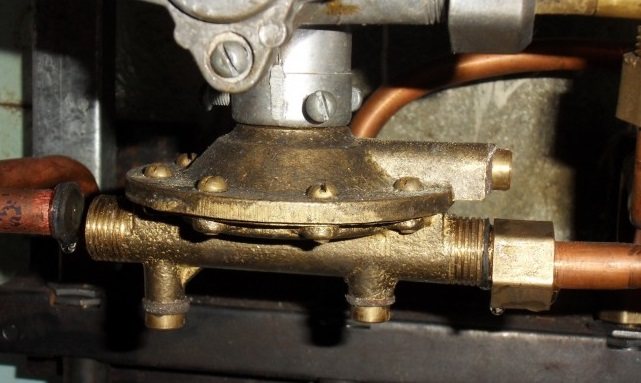
- A reducer or water block is a device that gives a signal to open the gas valve, and then to ignite. From the inside, the gearbox looks like a hollow structure, divided in two by a membrane. When water is supplied to the reducer, pressure arises, from which the membrane wears out over time, which leads to malfunctions. When liquid drips from the column safety valve, this means that the membrane is blocking water from entering, but due to wear, the barrier disappears.
- Another sign of a malfunction in the membrane is the leakage of the water unit. Failure of the stem seal can also cause this failure.
At first, during operation, only a few drops of water are released, over time, the flow in the gas column becomes more and more intense. Microcracks or corrosion in the radiator appear due to constant exposure to fire. Copper or steel pipes of the coil will burn out as a result. In this case, first of all, condensate accumulates on the internal assemblies and the case. The leaks are indicated by a change in the color of the copper - it turns green.
First of all, if water flows from the gas column, you need to check the places to which the pipes are supplied. This will eliminate leakage due to failure of gaskets and a loose threaded connection.
Causes of condensation and remedies
Causes of moisture
If condensate accumulates on a cold water pipe, in order to figure out how to fix the problem, it is necessary to identify the main causes of this phenomenon. There are several reasons for the accumulation of moisture on pipes:
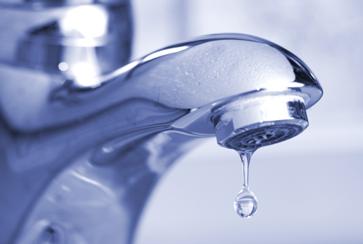
- condensation on pipes in a toilet or bathroom may be the result of a malfunctioning plumbing or water taps. If cold water is constantly leaking in some place, this leads to the renewal of the liquid in the pipe.Consequently, the temperature of the water in the pipe is at its minimum value. A drop occurs and condensation forms on the cold pipe;

Leakage of water from the taps
- if condensate predominantly accumulates on the water supply pipes of the riser in the bathroom or sewage system, then the problem with the formation of a leak may be with the neighbors living on the floor above;
- poor ventilation in the room. The reason for the lack of air movement may be clogging of the ventilation duct or metal-plastic windows, which, when closed, do not allow air to pass from the outside. With poor ventilation, water vapor accumulates in the living room, which subsequently settles on plastic pipes (metal pipes, and so on). You can check the presence of efficient ventilation with a match or a lighter. The flame from any object should be "drawn" into the hood. If this effect does not occur, then the channel is either clogged or unable to cope with its task.
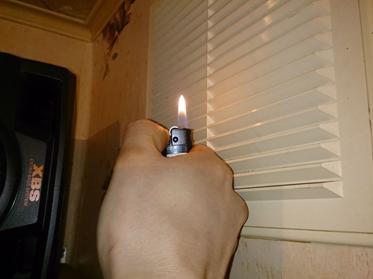
Method of checking the ventilation duct for operability
If moisture is detected on pipes, it is recommended to identify and eliminate the causes of its appearance as soon as possible.
Elimination of leaks
Why condensation forms on the pipes, they found out. Now let's figure out how to fix leaks.
First of all, it is required to determine the place where the water leakage occurs. The leak could be:
- due to faulty taps or mixer. In this situation, water will drip from the tap;
- after a pipe break;
- due to deterioration of fittings on polypropylene pipes (metal-plastic pipes).
It is most difficult to detect pipe breaks or worn fittings if the pipes are hidden in the wall. To detect a leak, you will need to partially disassemble the box that covers the pipes, or resort to the help of specialists who will identify the malfunction with special devices - thermal imagers. Both the one and the other methods will entail significant cash costs.
If a leak is detected in a mixer or tap, then you can:
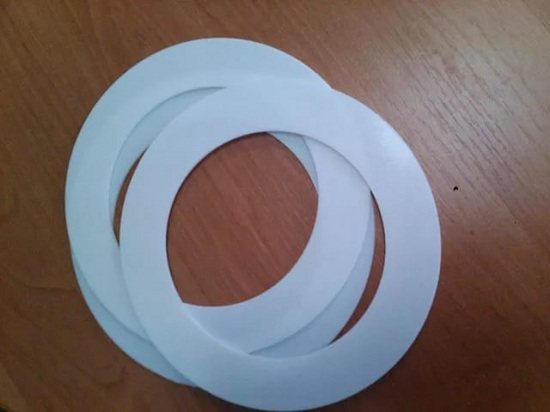
- change all gaskets. You can purchase a faucet repair kit at any specialist store. To select a repair kit, you need to know the brand and manufacturer of the mixer. You can replace the gaskets yourself;
Faucet DIY Repair Kit
- if after the repair the formation of condensation on the pipes has not stopped, then the mixer must be replaced.
If a leak is detected in the pipes, then you can:
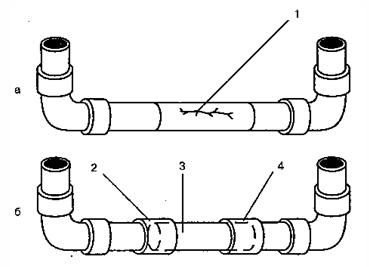
- replace the problem section of the pipe with a new elbow. To do this, you will need to carefully cut the leaking cut and install a new pipe. Everything is quite simple if non-metal pipes are installed in the room. When using metal pipes, special equipment will be required. For help, you can contact plumbers or a management company, who are obliged to eliminate the malfunction as soon as possible;
Installation diagram of a new pipe cut
- solder the pipe, that is, install the plug in the place of the leak. This method is considered the least reliable, therefore it is recommended to use it as a temporary measure.
Pipe restoration without replacement
Replacing the fittings is not a problem. It is enough to remove the leaking part and install a similar new product.
Before carrying out any operation, it is required to first shut off the water supply of the living quarters.
Troubleshooting ventilation problems
How to get rid of condensation on pipes if the reason lies in insufficient ventilation of the room? Required:
- contact the management company with a request to inspect and clean the ventilation shaft of the house. This work should be done free of charge and in a short time, since monitoring the technical condition of the house is the direct responsibility of managers;
- what to do if the problems in the mine of the house are eliminated, but condensate still accumulates. Can be installed in a bath, toilet, etc. additional fan built into the hood. The fan can be turned on forcibly or work, for example, when the light is turned on;
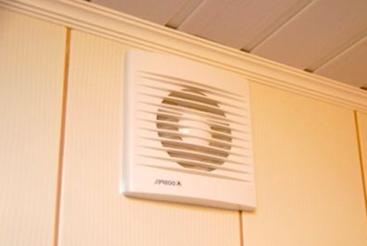
An additional device that increases the performance of the hood
- You can get rid of condensation on a cold pipe by installing an air conditioner or a kitchen hood for a stove or gas water heater.
Elimination of leaks
Leaks can be detected by visual inspection. To do this, it is necessary to remove the casing, which is fixed with bolts or latches. Before carrying out work, you will need to turn off the water and gas supply. But if water drips from the gas water heater, only during operation, then it is necessary to turn on the water heating for a few seconds.
After the reason why the column is leaking has been identified, you can proceed to eliminate the breakdown:
- On average, the membrane lasts from five to eight years. To eliminate the leak, you need to change the gaskets on the stem and replace the worn out membrane with a new one (for which you need to remove the "frog" and disassemble its body).
- Gaskets on threaded and other connections last from two to four years. Replacing all gaskets will eliminate the leak. A leaking hose cannot be repaired; it must be replaced with a new one. The use of sealants or special silicone compounds significantly improves the sealing.
Regular maintenance of the gas water heater, which includes replacing all seals, prevents leaks. With your own hands, you can remove the leak in the threaded connection.
Troubleshooting the membrane requires an understanding of the principle of operation of the water unit and the skills to maintain such equipment.
The sequence of actions when carrying out repairs depends on the equipment model and manufacturer. The geyser neva, ariston, bosch, oasis or semiautomatic device have their own design features and their own segment, which is most susceptible to failure during operation.
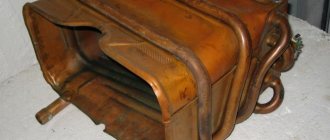
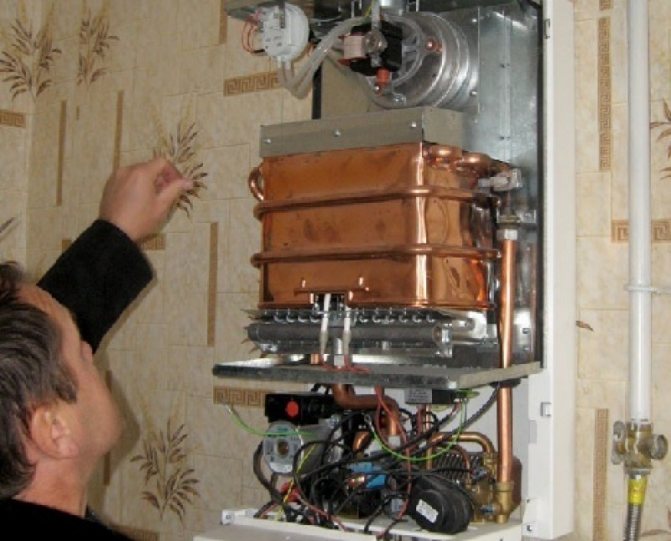
Radiator leak
Hot water comes from the existing heat exchanger. The heat exchanger radiator consists of metal pipes and plates located close to each other. The plates are directly in contact with the fire, due to which soot appears on them during operation.
Signs of soot accumulation indicate:
- The flame is yellow;
- When burning, the fire deviates to the side and heats the body (the flame should tend upward);
- Soot crumbles from the gas water heater;
- Even when operating at full capacity, there is little water heating.
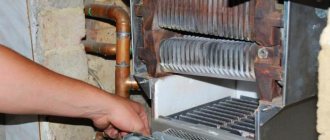
To remove soot, you will need to remove the casing by unscrewing the bolts (latches) that secure it.
Important! To prevent the ingress of soot during disassembly of the column, cover the burner with a rag.
After the assembly is removed, it must be rinsed by putting it in a container of water for several hours to deactivate the soot. This will make it easier to clean the space between the heat exchanger plates. For high-quality cleaning, it is recommended to use running water, a long-bristled brush and detergents. After drying, the radiator is replaced.
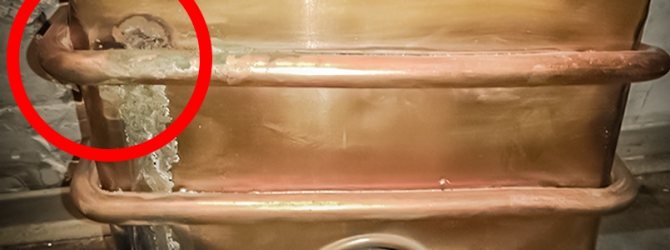
Green spots on the heat exchanger indicate cracks and holes present.
If the gas column is leaking due to the failure of the heat exchanger radiator, then the actions should be as follows:
- The water pipes must be shut off to prevent water from entering the gas water heater. After that, the hoses are disconnected and the remaining water is drained. The remaining liquid in the coil is removed with a pump or vacuum cleaner, you can try to blow out the water with your mouth using a hose.This must be done, since the remaining moisture absorbs heat during the soldering process, and it will not be possible to heat the metal to the desired temperature.
- Damaged areas (they are green) will need to be cleaned with sandpaper and degreased with a solvent, and then wiped dry.
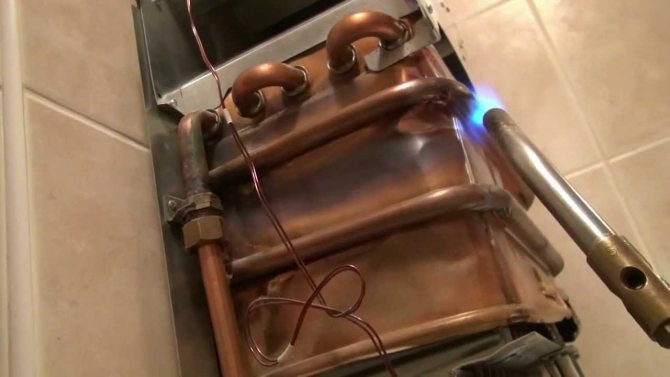
- Sprinkle the work surface with crushed rosin or an aspirin tablet. Rosin and aspirin will serve as solder here.
- With a soldering iron with a power of at least 100 W (since they will have to work at a temperature of 180 degrees), it is necessary to increase the solder to a height of approximately two millimeters. If the soldering is loose, this means that the working surface is not warmed up enough. You can additionally warm up the soldering point with an iron or another soldering iron.
- You will need to solder each through damage in a similar way.
- After the soldering work is completed, it is necessary to wait until the working surface has completely cooled down and assemble the gas column.
- Before full-fledged operation, the equipment is started in a test mode.
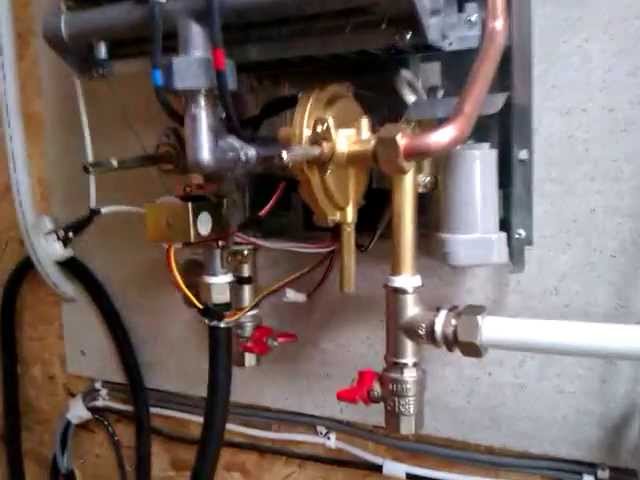
Leakage of threaded connections
Sometimes water drips from the gas column due to leaking threaded connections. In the places where they are located, manufacturers use American nuts (union nuts).
To seal them, rubber gaskets are used, which, under the influence of high temperatures, lose their elasticity, become hard and allow water to pass through.
To troubleshoot you will need:
- Shut off the water (there is a special tap on the tube through which cold water is supplied to the column);
- Unscrew the threaded connection with an adjustable wrench (it will be easier to unscrew if the connection is slightly heated);
- Take out the old rubber gasket, carefully inspect the thread.
If the thread is intact, then you just need to change the gasket with a new one and tighten the connection with a wrench. If there are defects on the American thread, it will be necessary to replace the union nut.
The best option would be modern silicone gaskets. They are more durable than rubber seals and allow for better tightness. It is possible to use two instead of one gasket in one place of the threaded connection.
Why doesn't it light up?
Let's start an overview of breakdowns using the example of such simple gas columns as Oasis, Orion or Neva. These are fairly simple devices, so almost any man who knows how to work with tools and has relatively straight arms can handle their repair.
Here is a short list of possible problems and causes:
- Lack of traction;
- Insufficient water pressure;
- Insufficient gas pressure;
- Ignition system inoperative;
- Clogged pipes and water supply filter;
- Burner clogging;
- Membrane or gas block malfunction;
- Inaccurate mixing of cold water in the mixer;
- Faulty electronics or sensors.
Now we will see how to eliminate breakdowns and the reasons for the lack of ignition.
Elimination of traction disorders
Try using a regular match to test your traction. Bring it to the chimney and determine if there is a draft, then the flame will deflect towards the chimney.
If there is no draft, then the geyser will not ignite, and users will not receive hot water.
Many columns are equipped with traction sensors, and if they show insufficient traction, ignition will be impossible.
Situations are possible when the flame lights up and immediately goes out - this is due to the fact that the combustion products simply have nowhere to go, they remain in the combustion chamber, and the flame goes out due to a lack of oxygen.
Lack of draft will require an inspection of the flue gas collector and the chimney itself. If there are blockages, they can interfere with the normal passage of combustion products.
The column perceives this as a lack of traction and does not allow the gas to ignite (or the gas goes out immediately after switching on).
Unfortunately, it will be possible to independently check only the part of the chimney, which is visible before entering the wall - further work must be carried out by specialists. If the house is private, you can try to deal with the chimney yourself.
Water pressure problem
To clean the water filter, disconnect the cold water supply pipe. At the place of its attachment, you will see a filter mesh, cleaning it will help restore the pressure.
If your gas column does not light up, and everything is fine with the draft, then there may be a problem with the water supply. A small pressure often leads to the fact that the ignition does not work.
You can try to adjust the pressure on the column itself, using the appropriate regulator - sometimes it helps (although the regulator is not present in all models).
We also check the filter installed at the inlet to the column - it could get clogged.
If there is no pressure even in the cold water tap, all that remains is to complain to the authorities responsible for the water supply - the pressure must comply with the standards established in the country.
If no one is going to do anything, we install a pressure boosting pump - it will raise the pressure to the required limits and help ignite the gas in your column. Installing a pump is a perfectly legal operation.
You can also check the pipes passing in the apartment / house, it is quite possible that they are clogged or rusted to such an extent that the clearance has become very small - this has a negative effect on the pressure.
Leaking pipeline
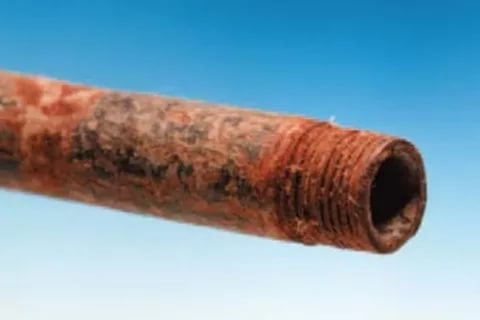
In some cases, the gas column leaks as a result of the formation of holes in the copper pipes. Finding the leak will allow a thorough inspection of the heat exchanger when the water is shut off. Liquid is released from large holes, small damage is detected by rust around and green spots.
What to do to fix the leak:
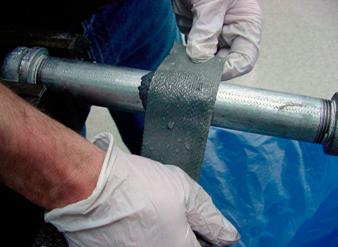
- Cold welding. It is important that the welding compound used withstands high temperatures. Similar information can be found on the packaging of the product. You will need to get a piece of cold welding out of the package, knead it with your hands (with gloves) until it begins to harden. Then apply the compound to the pipe and smooth it until it hardens completely.
- Sealing holes. Eliminate the reason why the gas column is leaking by soldering the damage. Previously, it will need to be cleaned, degreased and coated with flux. Use a powerful soldering iron or torch to cover the damage on the pipe with solder (the solder layer should be approximately 1-2 millimeters thick). Several holes located close to each other are recommended to be sealed with a piece of copper plate. It is impractical to solder Chinese inexpensive heat exchangers, since very often they are painted on top. In this case, paint is used by manufacturers in order to hide the unevenness of the color of low-grade copper (it contains impurities). In this case, the tubes burn out during the soldering process, since they are too thin.
- Installation of a clamp with a rubber gasket. The simplest way to eliminate a leak without damaging the structure. Such a measure is especially effective if the tube does not fit snugly against the casing and if there is sufficient space.
In some cases, it is possible to find out the reason why the column is leaking too late and the pipe has time to rot to such an extent that only its replacement can save the situation. Finding the part you need is not easy even in specialized stores. Use a flexible water line or corrugated stainless steel hose instead of a rotten tube to solve the problem.
A self-worn stem O-ring and rubber gaskets are easy to replace. It is quite possible to eliminate a leak in a gas water heater on your own; special skills and knowledge are not required for this. But, nevertheless, when repairing such equipment, one should not forget about safety.If there is no self-confidence, then it is advisable to seek help from specialists.
A gas water heater or gas heater is a metal body with two pipes attached to it, supplying cold water for heating and gas.
A gas water heater has several components:
- Radiator;
- Gas supply pipe;
- Burner;
- Igniter.
Cold water flowing through the pipe presses on the membrane that lets the gas in. When it begins to flow into the burner, it ignites from the igniter, due to which it heats up the heat exchanger, through which already warm water flows to the tap.
The igniter can be piezoelectric, manual or electronic. The gas is automatically ignited when the water valve is opened.
What to do if a gas water heater is leaking?
- Why is it leaking?
- How to fix the leak?
- Radiator leak
- Leakage in threaded connections
- Leakage in tubes
- Replacing the stem seal of the water assembly
- Waterway connecting elements worn out. That is, in other words, the rubber seals located between the hose and the pipe need to be replaced.
- The heat exchanger has broken through, that is, a kind of "tank" in which the water is heated. The pipes connected to it are constantly exposed to temperature changes, as a result of which they can deform and corrode.
- Regular preventive maintenance was not carried out. A gas water heater is an equipment that needs periodic inspection and maintenance in order to prevent breakdowns. If these responsibilities are neglected, a leak can appear unexpectedly.
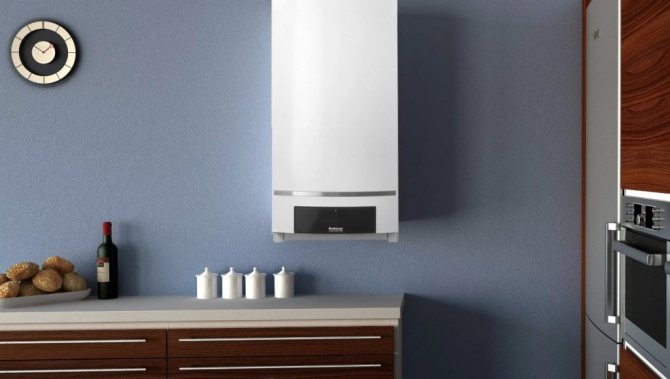
The phrase "gas water heater" is usually called a flow-through gas water heater, which is installed to heat water in houses that are not connected to centralized heating. This heating method has many advantages, not least of which is independence from utilities and maintenance work, which allows you to always have warmth and hot water in the house.
However, residents of houses connected to the gas pipeline also have a lot of problems. One of the most common troubles is the breakdown of gas equipment, which can lead to very serious and even life-threatening consequences. Read about what to do if you find a leak in a gas column in our today's article.
Why is it leaking?
We have compiled a list of the most common reasons a gas water heater starts to leak. So, if you suspect a leak, then perhaps the reason will be one of the following:
How to fix the leak?
Having found the cause of the leak, you can begin to eliminate it. Our further actions will depend on which part of the gas column is the source of the leak.
Radiator leak
The fact that there is a crack or a hole in the radiator is indicated by the presence of green spots on this part. The procedure for eliminating a leak in the radiator will be as follows:
- We shut off the water pipes so that water does not enter the column. Disconnect the water supply hoses from the column. We drain the remaining water from the radiator. To remove liquid from the coil, use a vacuum cleaner or pump.
- Armed with sandpaper, we clean the damaged areas. Then we process these places with a degreasing solution and wipe dry.
- We take a soldering iron with solder, which can be used at temperatures above 180 degrees (the power of the soldering iron must be at least 100 W). Grind a piece of rosin or powder an aspirin pill. Sprinkle the work surface with this composition.
- Heating the soldering iron to the desired temperature, build up the solder to a height of about 0.2 cm.
- We repeat this procedure for each through damage.
Alexander Gerasimov in his video will show and tell you how to properly solder the gas column radiator yourself.
Leakage in threaded connections
Quite often, you can find a leak in threaded connections between parts of the gas column. Pay attention to the pipe in which the leak was formed: water is usually supplied through the left pipe for heating, and along the right - gas. Typically, water will start to leak from the pipe if the gasket is worn out. It is very easy to change this part.
Leakage in tubes
Sometimes a leak is found not in the connection of the pipes, but directly in them. Experts advise, if cracks and small holes in the pipes are found, use the same method as for eliminating a leak in a radiator, that is, to solder. However, in the absence of proper care, it is not always possible to detect damage in time. If you realized too late, and the tube had time to rot so that it cannot be repaired, you will have to replace it.
Those who have faced this problem say that finding a suitable pipe is very difficult, even in stores that specialize in the sale of gas equipment. As a replacement for the tube, you can use a corrugated stainless steel hose or a flexible water line.
How to properly solder the pipe without spoiling it and extending the service life of the gas column can be seen in the video by Vladimir Pekar, which is presented below.
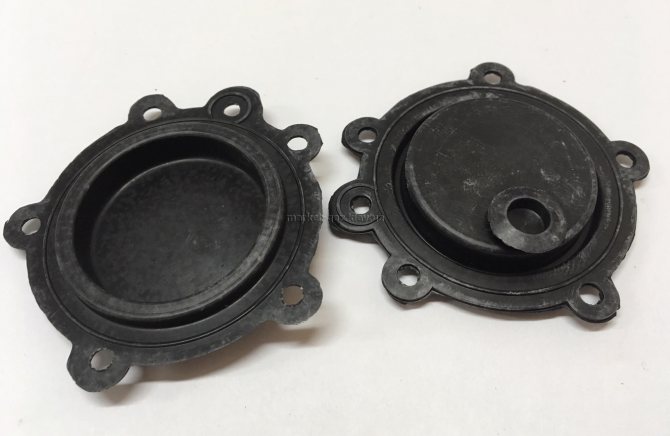
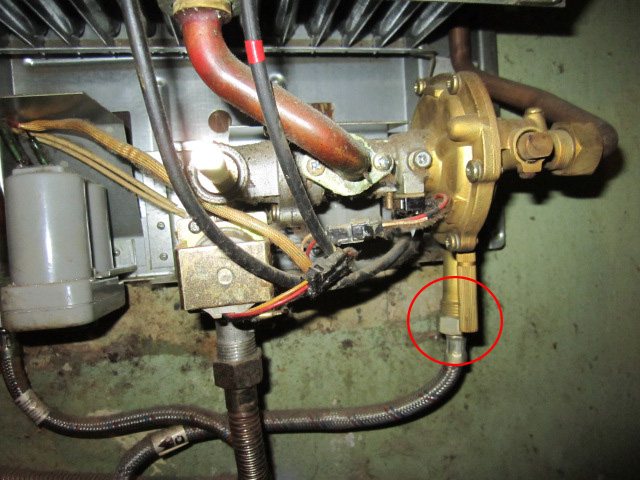
Replacing the stem seal of the water assembly
Another possible location for leaks is the gas-water unit. If water begins to ooze out of it, most likely wear of the stem O-ring has occurred. This part will be easy enough to replace.
The parts of the water unit are held together by six screws - we unscrew these fasteners first. Then we disconnect the two parts of the node body. From the inside, we remove the membrane, the spring and the plate with the stem, which is a round disc with a metal pin. If you unscrew this pin, you can find a rubber ring under it - this is the seal. We remove the worn out ring, put a new one in its place and assemble the assembly in the reverse order.
- The gas column does not light up: the reasons and what to do? Why does not it light up What to do? A gas-fired flow heater solves the problem of getting warm ...
- The gas column does not turn on Possible causes What to do? Among the different types of water heaters, gas water heaters are in greatest demand due to their simplicity ...
- Why does the gas water heater not heat the water and what to do? Reasons for not heating the water Troubleshooting methods What else can you do? A gas water heater is ...
- Gas water heater in the bathroom Show or hide? Site selection and installation principles What is the law governing the installation? Requirements and Conditions ...
The main types of malfunctions
You can eliminate the malfunction in the gas column by contacting specialists or with your own hands. But still, when working with such equipment, knowledge of safety measures is necessary, as well as their strict observance.
IMPORTANT! Otherwise, self-repair of the geyser WILL CAUSE HUMAN VICTIMS.
The list of breakdowns found in gas water heaters:
- The igniter does not ignite;
- The igniter goes out;
- A tube is leaking in the radiator;
- Water leaks at the connections.
There are two main reasons why the gas column leaked. The breakdown is determined by the elimination method. The exact location of the fault is indicated by the location of the liquid.The fact that the reducer has failed will be indicated by water flowing from below. If condensate appears in the column, the heat exchanger (gas column radiator) is faulty.
The most common breakdowns:
- A reducer or water block is a device that gives a signal to open the gas valve, and then to ignite. From the inside, the gearbox looks like a hollow structure, divided in two by a membrane. When water is supplied to the reducer, pressure arises, from which the membrane wears out over time, which leads to malfunctions. When liquid drips from the column safety valve, this means that the membrane is blocking water from entering, but due to wear, the barrier disappears.
- Another sign of a malfunction in the membrane is the leakage of the water unit. Failure of the stem seal can also cause this failure.
At first, during operation, only a few drops of water are released, over time, the flow in the gas column becomes more and more intense. Microcracks or corrosion in the radiator appear due to constant exposure to fire. Copper or steel pipes of the coil will burn out as a result. In this case, first of all, condensate accumulates on the internal assemblies and the case. The leaks are indicated by a change in the color of the copper - it turns green.
Leakage reasons
The main reasons why the gas column has flowed are usually the following:
- Wear of gaskets in joints. The fact is that rubber gaskets are installed between the pipes and nozzles. During operation, they wear out and begin to tear or deform. If the leak is in the area of the fittings, they must be replaced with new ones.
- A hole has appeared in the heat exchanger. Over time, the contour is corroded by rust, it becomes overgrown with scale, which negatively affects the integrity of the metal. Therefore, after 6-10 years of service, the radiator may leak.
Depending on the cause of the leak, measures are taken to eliminate it.
Read here how to properly flush the gas column
The gas column does not work - what to do
Rules for operating a gas column
…
Elimination of leaks
Leaks can be detected by visual inspection. To do this, it is necessary to remove the casing, which is fixed with bolts or latches. Before carrying out work, you will need to turn off the water and gas supply. But if water drips from the gas water heater, only during operation, then it is necessary to turn on the water heating for a few seconds.
After the reason why the column is leaking has been identified, you can proceed to eliminate the breakdown:
- On average, the membrane lasts from five to eight years. To eliminate the leak, you need to change the gaskets on the stem and replace the worn out membrane with a new one (for which you need to remove the "frog" and disassemble its body).
- Gaskets on threaded and other connections last from two to four years. Replacing all gaskets will eliminate the leak. A leaking hose cannot be repaired; it must be replaced with a new one. The use of sealants or special silicone compounds significantly improves the sealing.
Regular maintenance of the gas water heater, which includes replacing all seals, prevents leaks. With your own hands, you can remove the leak in the threaded connection.
Troubleshooting the membrane requires an understanding of the principle of operation of the water unit and the skills to maintain such equipment.
The sequence of actions when carrying out repairs depends on the equipment model and manufacturer. The geyser neva, ariston, bosch, oasis or semiautomatic device have their own design features and their own segment, which is most susceptible to failure during operation.
Radiator leak
Hot water comes from the existing heat exchanger.The heat exchanger radiator consists of metal pipes and plates located close to each other. The plates are directly in contact with the fire, due to which soot appears on them during operation.
Signs of soot accumulation indicate:
- The flame is yellow;
- When burning, the fire deviates to the side and heats the body (the flame should tend upward);
- Soot crumbles from the gas water heater;
- Even when operating at full capacity, there is little water heating.
To remove soot, you will need to remove the casing by unscrewing the bolts (latches) that secure it.
Important! To prevent the ingress of soot during disassembly of the column, cover the burner with a rag.
After the assembly is removed, it must be rinsed by putting it in a container of water for several hours to deactivate the soot. This will make it easier to clean the space between the heat exchanger plates. For high-quality cleaning, it is recommended to use running water, a long-bristled brush and detergents. After drying, the radiator is replaced.
Green spots on the heat exchanger indicate cracks and holes present.
If the gas column is leaking due to the failure of the heat exchanger radiator, then the actions should be as follows:
- The water pipes must be shut off to prevent water from entering the gas water heater. After that, the hoses are disconnected and the remaining water is drained. The remaining liquid in the coil is removed with a pump or vacuum cleaner, you can try to blow out the water with your mouth using a hose. This must be done, since the remaining moisture absorbs heat during the soldering process, and it will not be possible to heat the metal to the desired temperature.
- Damaged areas (they are green) will need to be cleaned with sandpaper and degreased with a solvent, and then wiped dry.
- Sprinkle the work surface with crushed rosin or an aspirin tablet. Rosin and aspirin will serve as solder here.
- With a soldering iron with a power of at least 100 W (since they will have to work at a temperature of 180 degrees), it is necessary to increase the solder to a height of approximately two millimeters. If the soldering is loose, this means that the working surface is not warmed up enough. You can additionally warm up the soldering point with an iron or another soldering iron.
- You will need to solder each through damage in a similar way.
- After the soldering work is completed, it is necessary to wait until the working surface has completely cooled down and assemble the gas column.
- Before full-fledged operation, the equipment is started in a test mode.
If the gas water heater is leaking, but no leaks are visible on the radiator, then it is possible that they are located where it is turned towards the body. In this case, it will be necessary to remove the heat exchanger from the case, for which you will have to disassemble the entire column. Before starting the procedure, it is advisable to familiarize yourself with the diagram in the passport, since this is a rather time-consuming process and knowledge of the device of a particular model will simplify the work.
Important! The liquid that flows down the turns of the heat exchanger can cause discoloration of all coil pipes (they will be completely green due to oxidation). If there are no locally oxidized areas, then it is necessary to connect a hose and turn on the water. Damaged areas can be detected by the emerging drops.
Sealing of damage to pipes can only be used as a temporary measure to eliminate the cause of the gas column flowing, since the repaired surface remains vulnerable. The best option for troubleshooting, due to which water drips from the column, will be replacing worn-out elements with new ones.
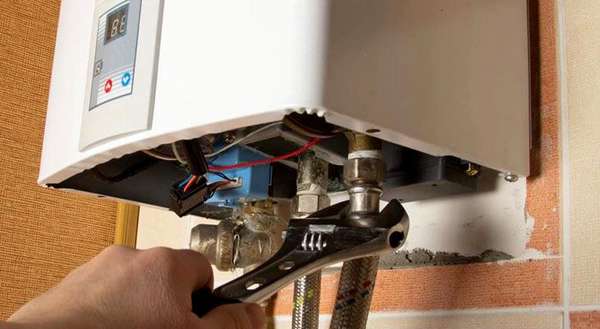
Leakage of threaded connections
Sometimes water drips from the gas column due to leaking threaded connections. In the places where they are located, manufacturers use American nuts (union nuts).
To seal them, rubber gaskets are used, which, under the influence of high temperatures, lose their elasticity, become hard and allow water to pass through.
To troubleshoot you will need:
- Shut off the water (there is a special tap on the tube through which cold water is supplied to the column);
- Unscrew the threaded connection with an adjustable wrench (it will be easier to unscrew if the connection is slightly heated);
- Take out the old rubber gasket, carefully inspect the thread.
If the thread is intact, then you just need to change the gasket with a new one and tighten the connection with a wrench. If there are defects on the American thread, it will be necessary to replace the union nut.
The best option would be modern silicone gaskets. They are more durable than rubber seals and allow for better tightness. It is possible to use two instead of one gasket in one place of the threaded connection.
Leaking pipeline
In some cases, the gas column leaks as a result of the formation of holes in the copper pipes. Finding the leak will allow a thorough inspection of the heat exchanger when the water is shut off. Liquid is released from large holes, small damage is detected by rust around and green spots.
What to do to fix the leak:
- Cold welding. It is important that the welding compound used withstands high temperatures. Similar information can be found on the packaging of the product. You will need to get a piece of cold welding out of the package, knead it with your hands (with gloves) until it begins to harden. Then apply the compound to the pipe and smooth it until it hardens completely.
- Sealing holes. Eliminate the reason why the gas column is leaking by soldering the damage. Previously, it will need to be cleaned, degreased and coated with flux. Use a powerful soldering iron or torch to cover the damage on the pipe with solder (the solder layer should be approximately 1-2 millimeters thick). Several holes located close to each other are recommended to be sealed with a piece of copper plate. It is impractical to solder Chinese inexpensive heat exchangers, since very often they are painted on top. In this case, paint is used by manufacturers in order to hide the unevenness of the color of low-grade copper (it contains impurities). In this case, the tubes burn out during the soldering process, since they are too thin.
- Installation of a clamp with a rubber gasket. The simplest way to eliminate a leak without damaging the structure. Such a measure is especially effective if the tube does not fit snugly against the casing and if there is sufficient space.
Is it possible to use the column if it flows
Only serviceable, serviceable gas-consuming equipment is allowed for operation. It is prohibited to use a gas water heater if dripping from it. There are several consequences of turning on a faulty water heater:
- there is a high probability of flooding the burner with water from the heat exchanger, which leads to an explosion and gas poisoning (if the combustion control function is absent or faulty in the column);
- minor breakdowns (wear of the gasket, loss of tightness of threaded connections) without proper maintenance lead to serious malfunctions of gas instantaneous water heaters and costly repairs.
If the leak was caused by a malfunction of the water unit, the automatic gas water heater simply will not start. The block is connected to an ignition system and a gas valve. A leak indicates a malfunction of the gearbox and often leads to a complete failure of the water heater after a short period of time.
Do-it-yourself tools for repairing a gas water heater
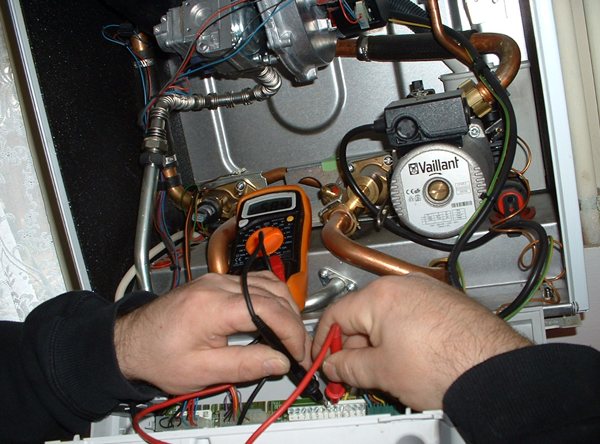
If the gas water heater does not work, and you have to repair faulty equipment yourself, you should prepare the appropriate tools.For work, you will need adjustable and open-end wrenches, which are needed to unscrew and crimp the branch pipes and threaded connections.
You also need to prepare a set of simple and cross-head screwdrivers. Before starting work, you should purchase paronite gaskets to replace worn seals with them. Please note that tow should be used to seal the seams. If you have to troubleshoot electrical equipment, you will need a multimeter to measure a number of parameters. If a leak in the heat exchanger and piping is found, prepare sandpaper, a soldering iron, rosin and solder.
Technical reasons for column leakage
There are two main breakdowns that lead to leaks. The malfunction is determined by the elimination method. The localization of the appearance of the liquid indicates a breakdown. So, if water flows from below, most likely the malfunction is associated with the failure of the gearbox. When condensation occurs, the breakdown is associated with the heat exchanger.
Below is a description of common problems:
- Malfunction of the water unit - a reducer, the simplest regulating device that gives a signal to open the gas valve and to the ignition unit. Inside the "frog" is a hollow structure, divided in half by a membrane. When water is supplied to the reducer, pressure is exerted on the diaphragm, which in turn leads to the movement of the stem connected to the gas valve. The membrane breaks down from prolonged pressure and mechanical stress. Breakout Signs:
- water is dripping from the safety valve of the gas column - the membrane blocks the access of liquid, but the barrier disappears after damage or wear of the gasket;
- a water unit leaks - another clear sign of failure of the membrane, or the stem sealing gasket. Initially, only a few drops of water are released during operation. Over time, the flow in the frog becomes more and more intense.
- Corrosion or hole in the heat exchanger (radiator) - the steel or copper tubes of the coil are exposed to constant thermal stress. As a result of direct exposure to fire, microcracks are formed on the metal surface. Pipes burn out. The first sign of a breakdown is the accumulation of condensate on the body and internal components of the water heater. In places of leakage, copper changes color to a poisonous green.
- Loose threaded connection, failure of gaskets is another common cause of boiler leaks. If a gas water heater is flowing, first of all it is necessary to check all the pipe connections.
To fix the leak, you must determine its root cause. For this purpose, the boiler casing is removed and a visual inspection is carried out. Work begins after determining the localization and intensity of the leak. Turn off the gas and water supply before servicing.
The main reasons for a gas column leak
A gas water heater is a complex piece of equipment that, with proper care, will delight you with long-term trouble-free operation. But, like all similar devices, it has its own lifespan. So, if you do not pay attention to the first malfunctions and problems in operation, you can reduce the operating life of the equipment.
Leaking and dripping from the column is not new. Many consumers face this problem. But only its timely elimination helps to keep the device in good condition. Guided by our article, you can eliminate dripping or leakage from the gas column, if this is not associated with the need for a complete replacement of equipment.
If the leak continues for a long time, and all sorts of methods for its elimination will not help, then, most likely, this will be evidence of a burned-out heat exchanger. Then you have to change parts, or buy a new column
To know which way to fix the problem to apply (and there will be several of them), you need to determine the cause of the malfunction.
Such malfunctions are possible in devices of any brand.Some models have a too vulnerable radiator, others have contact areas, others have a membrane, etc.
And, if you find a leak in your gas column, then perhaps the reason is one of the following:
- Wear of water flow connecting elements... Most likely, it is necessary to change the rubber seals and gaskets that are located between the hose and pipe.
- The heat exchanger is leaking and is now leaking water... The constant impact of fire on the surface of the coil metal causes microcracks. As a result, pipes burn out. And then the first sign of a radiator breakdown is the accumulation of condensate. Water appears on the body and on the column assemblies that are inside the device.
- Worn stem o-ring or diaphragm... Often, it is from the gas-water unit that water begins to ooze. This is often caused by damage to the O-ring or diaphragm. The part (both) can be easily changed to a new one.
- Long-term lack of preventive checks... Typically, unexpected leaks are the result of a lack of preventive maintenance.
When the water heater starts to leak, the first step is to check the pipe connections. To determine the root cause, you need to remove the casing from the column and inspect it visually - the location of the leak indicates the location of the breakdown. Only after determining the specific location and intensity of the leak, you can start trying to eliminate the defect.
The casing can be easily dismantled, since it is fastened only with bolts, and sometimes with latches. If you notice that water flows only when the boiler is on, then you will need to start the heater at the time of the check, then turn it off again. Before carrying out repair work, it is imperative to turn off not only the water supply, but also the gas.

The pipes that are connected to the heat exchanger are always susceptible to temperature fluctuations. This often causes corrosion and deformation.
If liquid appears at the bottom of the boiler, it may be due to the reducer. The presence of condensation, or dripping found in the upper parts of the column, indicates a breakdown of the heat exchanger
Condensate in a gas column - what to do
In this case, the problem is more serious. Most likely there is a leak in the heater. It occurs under the influence of small microcracks. Initially, perspiration appears on the case and internal parts of the speaker. Subsequently, condensate begins to drip from the gas column.
The air heater (radiator, coil or heat exchanger) consists of finned tubes. Under the influence of direct fire, the metal burns out over time. Thinning of the pipe walls leads to leakage and condensation. The malfunction must be corrected immediately. Replacing the radiator or soldering the damaged area will help get rid of condensation.
Soldering is performed in the following way:
Condensation in the gas column can form due to each microcrack and deformation. Each place of damage is processed by soldering.
It happens that condensate forms only on a pipe with cold water, and a problem arises, as a rule, in new turbocharged boilers. While the water heater is under warranty, it should be replaced immediately. There should be no condensation in a working column.
It will also come in handy for repairs:
- How to bring water to the private sector
- Adhesive for foil insulation
- Floor heating in the hall
Gas water heater is clogged: causes and solutions to the problem.
Further, there are two options for the development of events. The scale continues to build up for a long time, gradually reducing the throughput of the tube, or a fragment of scale breaks off and clogs the tube. In this case, the water pressure drops almost instantly.
If the gas water heater is clogged and it happened quickly, i.e.the water pressure at the outlet of the column dropped instantly, in this case we do the following. We shut off the water and gas, remove the column casing, unscrew the heat exchanger connection (the outlet connection, since it is usually it that gets clogged). You need to take something suitable, such as a wire, and clean the hole. Then we connect everything back and the column can be used again.
But if the water pressure drops gradually for a long time, then the wire will not help. You will have to clean the entire inner surface of the heat exchanger tube from scale. To do this, unscrew the heat exchanger and take it out of the column. Next, we take some kind of descaler. Hydrochloric acid works best. Pour acid into the heat exchanger to fill the entire tube. The reaction will start instantly. The acid will fizzle and bubble. This means that it works, i.e. dissolves limescale. The acid level in the tube will gradually drop, so it needs to be replenished all the time. If the acid reaction stops, it means that there is no scale left in the tube. We thoroughly rinse the tube with water so that not a trace of acid remains in it. We put the heat exchanger in place and enjoy the good performance of the column.
An important point!
When hydrochloric acid interacts with scale, poisonous gases are released that can harm human health. Therefore, this procedure can only be carried out outdoors (outdoors or on a balcony). And in no case in a bathroom or other enclosed space. If hydrochloric acid is not available, then you can use other means that can fight scale. There is always a selection of such products in hardware stores. A citric acid solution or highly concentrated vinegar can also help. But still, hydrochloric acid works better and faster.
Prophylaxis
The procedure for descaling the column heat exchanger is rather unpleasant, so it is best to avoid it. And if, when using a gas water heater, a number of rules are observed, then the need for this procedure may not arise or it may not arise very soon. The meaning is simple - the less water boils in the heat exchanger, the less scale forms there. Therefore, a high temperature cannot be set in the column unnecessarily. If the water is too hot, it is better to lower the temperature in the column than to open the tap with cold water. Even if a low temperature is set in the column and the water is not hot, after shutting off the water supply, the heat exchanger remains hot for some time. Because cold water no longer flows into it, then the water in it begins to boil. And it boils until the heat exchanger cools down. Therefore, before turning off the water, it is advisable to first turn off the column, wait a few seconds for the heat exchanger to cool down. And only then shut off the water.
For reference
For some people, the column does not clog at all, and for some people it clogs very often, despite all their precautions (low temperature, avoiding boiling). The thing is that the rate at which scale appears depends on the hardness of the water, i.e. from the concentration in the water of the so-called "hardness salts". The content of these salts in each city is different. In regions with hard water, the column clogs up quickly, in regions with non-hard water, the column almost does not clog.