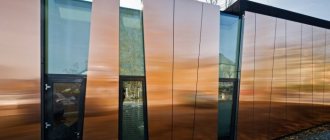
September 5, 2020 Specialization: a professional approach to architecture, design and construction of private houses and cottages, new products on the market of building materials and finishes. Hobby: growing fruit trees and roses. Breeding of meat and decorative rabbits. Considering how to clad a shell house covered with ordinary rough cement plaster, I decided to choose panels with insulation. Facing front panels with insulation are a convenient and interesting option, but finishing with this material has many nuances and subtleties.
I will share my experience on the example of panels made of a cement mixture with additives of a beautiful texture, insulated with a layer of foam. But first, the options that can be found at a large hardware store.
Panel types - advantages and disadvantages
The very principle of the thermal panel device is several layers of decoration. Insulation layer, adhesive base and decorative coating with additional protective functions. Today there are four sandwich options that are quite affordable.
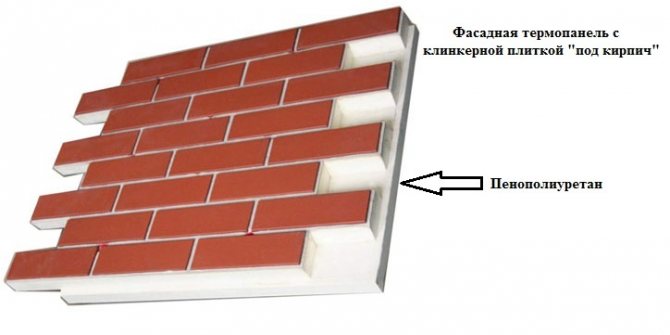
- Clinker tiles as a decorative layer - it looks stylish and allows you to create any facade design. In this finish, the carrier layer is made of OSB, which gives the material additional rigidity. For the base, it is better to choose a material that is additionally reinforced with pressed-in metal or plastic bushings. It is safer. In addition, such a cladding can be easily assembled with your own hands.
- A layer of decorative plaster on expanded polystyrene - there are many options. As a decor, you can choose the addition of marble chips or quartz. The advantage of such panels is the ability to create a perfect seamless finish surface.
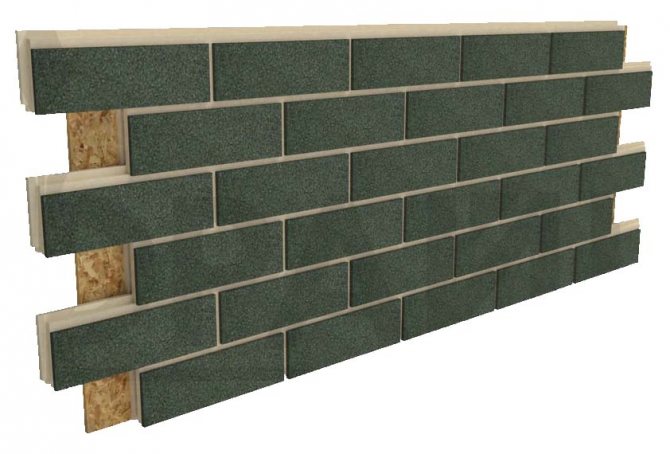
In the photo - the rules for installing metal panels
- The metal coating is reliable and durable. Insulation on both sides is protected by aluminum or profiled sheet. You can choose any - under a tree or under a stone, but it will cost more. Minus metal - heavy finishing, the instruction does not recommend installation on old walls without additional reinforcement and reinforcement.
Concrete coating with additional reinforcing additives and an interesting "torn" texture. Insulation - a layer of foam. The most budgetary option.
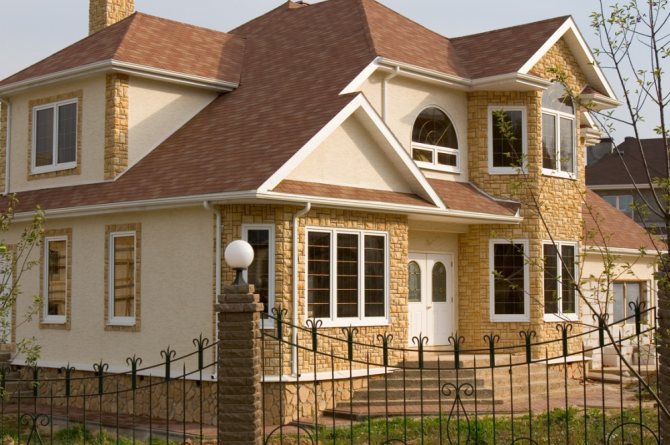
You can buy at mini-factories twice as cheap as in a store. I chose this finish for myself. It can be painted both under the stone-sandstone, and under the marble or wild stone.
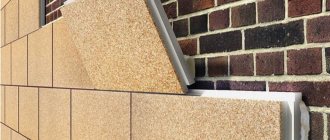
Panels for insulating the facade of a house made of pressed concrete with the addition of strengthening and water-repellent additives can be mounted on any walls with rough plaster. Perfectly smooth out all imperfections and irregularities.
Comparative analysis
You don't have to be a big analyst to tell the difference between these two types of thermal insulation: a very laborious and time-consuming process of creating warm walls with your own hands and light, casual work with thermal insulation panels.
Thermal insulation of a wooden house outside with thermal panels won't give you much trouble and does not require special skills. Will not tire, will not cost a pretty penny.
And although making thermal panels on your own (plastering on top of foam) will cost even less, you will spend much more time on this process.
Insulation of the walls of the house from a bar. Read about it here. And here is an article about the insulation of a wooden house with mineral wool.
This section of our website contains everything that is most important and necessary for insulating your home.
Cladding rules for any sandwich panels
Since I am familiar with many problems firsthand, I will share the main nuances that are important to pay attention to.
Rule # 1
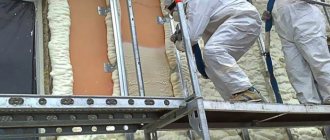
It is important to calculate the loads on the foundation and walls, especially in older buildings with shallow strip foundations. Some insulated facade panels are heavy (concrete or metal). For clinker tiles, the installation of the lathing will be needed.
Architects advised against choosing a tree for the lathing in any case. Even treated with a deep penetration primer, it quickly begins to rot, and besides, woodworm beetles love it very much. Only metal lathing, as for drywall.
It is also important to consider the strength of the walls. If the building is old, then it is necessary to carry out additional reinforcing reinforcement with a metal mesh and apply a layer of starting leveling plaster with reinforcing additives.
If there is no desire to pay for the calculations of the architects for the bearing capacity of the walls, then it is better to opt for a lightweight version for exterior decoration - on a metal frame or light clinker tiles.
Rule # 2
Be sure to look for a professional construction team, because it will be problematic to fix bad work. This is exactly what happened to me. She hired craftsmen, they assured me that they worked with this material, and received not walls - but a chessboard without worn seams. I had to spend money on additional painting with decorative additives.
Let the masters show their work, do not be lazy, go and look at the object, talk to the owners. Now there are a lot of "craftsmen" who can "do everything", but in the end they just spoil good material.
Rule # 3
When choosing thermal panels for insulating the facade of a house, immediately think over the concept of decorating the entire facade. Now for five thousand rubles in the design office you can order sketches with different finishes in texture and color.
Then remodeling and buying additional materials will be not only more troublesome, but also significantly more expensive. Of the most interesting options, I can recommend inexpensive and beautiful combinations:
- Metal base and decorative plaster;
- Plinth made of textured pressed cement and wood-like siding - the plinth can then be decorated with a timber or wild stone. Many decor options.
- Clinker tiles are very "delicate"; it is good to use them as decorative inserts for panels covered with "torn" plaster.
For the basement of an old house, a thermal panel made of metal "like a brick" is ideal, and above it can be insulated with light plastered plates.
Rule # 4
Decide immediately which layer of insulation is needed. The thicker the layer, the more expensive the finish
... But in some cases it is worth paying more. This applies to the basement and those walls of the house where there is most traffic.
Here, the finish must be durable and resistant to soil moisture. Metal panels protected on both sides are the safest for the base / plinth and corners.
If there are strong temperature changes or severe winters in the region, then it is worth choosing not ordinary foam, but bulk. This material retains heat better and is not afraid of moisture.
Rule # 5
When finishing the facade with sandwich panels, one cannot save on protective and disinfecting impregnations, because then the entire cladding will have to be changed.
- It is imperative to treat the walls with an antiseptic and reinforcing deep penetration primer before installing the sheathing. Northern walls even in two doses at intervals of a day.
- If the lathing for finishing is made of wood, then we treat the wood with a protective soil, and in addition, you can also paint it.
- It is important not to forget about the organization of ventilation gaps - this applies to all materials that are attached to the crate, no matter whether it is metal or wood.
- If the site has a close occurrence of groundwater, then additional waterproofing of the basement is required. A resin coating or roofing felt will do.
Thermal panels for insulating the facade of the house save up to 40 percent of heating costs, plus they guarantee dry walls and a comfortable indoor climate.
Summary
In the video presented in this article, it is described in detail about the installation of thermal panels on a metal crate.
I will be glad to discuss this interesting topic in the comments, and in the near future I promise a detailed article with photos of the "masterpiece" of my craftsmen. Maybe someone will advise an interesting painting option.
September 5, 2020
If you want to express gratitude, add clarification or objection, ask the author something - add a comment or say thank you!
Hello.
Thanks again for your advice. Let's discuss the designs with you again.
I want to outline the construction of the Sandwich House in the Brick House.
Sew a 100mm thick sandwich to the brick wall. The wall is not even, in some places the plaster has been rolled away. Sewn on level with anchor screws as tightly as possible to the wall. Without any suspension system and guide profiles. We ensure a tight adhesion to the wall in level in several places (bottom, top, middle) with the help of foam, which we apply to the back side of the panel before installing it. The caps of the anchor screws are sealed with rubber gaskets or ordinary silicone sealant. The bottom to the floor and the top of the panels to the ceiling are foamed, the side joints (groove to groove) are also foamed, you can also silicone it all. So the whole perimeter. Window and door openings - airtight finish, for example, metal sheet. From the window profile to the edge of the sandwich with foaming of the slopes and silicone sealing of the joints. On the floor (screed or tile), the plinth is screwed to the sandwich. After, in the same way, the ceiling is assembled. The joints to the walls are foamed and silicone. The top plinth is also screwed onto the sandwich.
I understand perfectly well that the air will be outside the perimeter of the sandwiches. Maybe it will somehow get there, but not by direct contact to the wall. He will need to travel 100 mm. I think that it will pass through the dew point, and at the contact with the wall it will already be cold. Or will it come from the side of the bricks? Explain, please. Or it will stay there from summer and at the first frost it will condense in the outer layers of bricks and stay there until the end of winter. And next summer it will be saturated with moisture again. But during the winter, he does not get where to come from? With this option, it seems to me that condensation will occur only once a year - in the fall. Maybe I'm wrong. It seems to me that the same thing happens in an ordinary non-insulated thick wall of 5 or 6 bricks in the outer layers to the street. Please comment.
I would like to ask you about external insulation.
- Is it possible to insulate the outside hermetically, for example, also with sandwiches, or with foam (foam joints). Also a House in a House, only bricks in a sandwich. How then is moisture removed from the structure itself (concrete, bricks, floor slabs)?
- What will happen if there is insulation from the inside (5cm foam is sewn up with plasterboard in a part of our room) and we make insulation outside (airtight).
- Is it possible to seal a wall or a ceiling from both sides, for example, outside insulation with foam or sandwich, and inside there is a tile to the ceiling along the perimeter (washing room). Or sandwich outside and sandwich inside (same washroom)
- I often saw that they were insulated with cotton wool (special) and, when sheathed with decorative panels, they left space under the crate. This is a feature of insulation with cotton wool (to remove moisture from the dew point) or for all heaters.
With an internal wall made of an aerated block - good, but a large space is stolen, but in fact, this is the same internal insulation, and it will get wet inside the wall.
Thank you. I am waiting for your answers.
Sandwich panels are produced by manufacturers ready-to-use, so the question of finishing in some cases does not arise at all. For example, in the construction of industrial premises. The product is a three-layer structure consisting of two galvanized steel sheets and a heat-insulating layer between them. Basalt wool or foamed synthetic materials are used as insulation: expanded polystyrene, polyurethane foam and others.
The front surfaces can be smooth or corrugated, coated with polymer resins. Due to this, the slabs are produced in various colors, which allows you to create interesting geometric combinations on the outside of the building. Developers of industrial enterprises use this quality in order not to additionally solve the question of how to finish the sandwich panels. It is quite another matter when it comes to the construction of private houses. If from the outside you can still get by with the appearance of the plates themselves, then inside the premises they should certainly be closed.
Scope of use
Sandwich panels are used in the construction of frame houses, as filling between drains and crossbars of the main frame. They are used for exterior decoration as an independent structure or as part of a hinged ventilated facade. This material serves as both insulation and cladding. There are special three-layer roofing products. Both those and others are equipped with all sorts of additional elements and layouts, so that during installation you can close the joints and arrange edges, corners, transitions. In addition, the products themselves are made with thorn-groove locks, so they are easily and tightly mounted. They can be attached to the lathing, and to a flat surface if it is flat.
Recently, insulated slabs have been often used for interior work. They are used to make internal partitions, stationary and mobile, they are used to insulate external walls from inside the premises, as well as balconies and loggias. It has become especially popular to use sandwich panels for finishing windows, more precisely - slopes. In this case, sandwiches are used with outer layers not of metal, but of plastic and with a thinner layer of insulation.
2.3. Load bearing capacity
Bearing capacity is the maximum load without loss of functional qualities, which can be carried by the structure, its elements, as well as the soils of the bases.
The bearing capacity was calculated in accordance with SP 20.13330.2011 “Loads and Impacts”.
Wall sandwich panels
Calculations of the bearing capacity of wall sandwich panels take into account that tightly glued insulation helps to distribute stresses under loads and perceives shear forces, while metal sheathing is subject to tension and compression.
The calculation does not take into account the possible change in the shape of the panels (cutouts, edge cuts, etc.). For wall panels, the bearing capacity limit states are calculated. The values given in the tables are reference material and must be calculated during design work.
The calculations were carried out taking into account the following simplifications and assumptions:
- the thickness of the sandwich panel is indicated by the thickness of the insulation,
- thickness of metal cladding 0.6 mm,
- the width of the outer supports is not less than 40 mm,
- the width of the internal supports is not less than 70 mm,
- permissible panel deflection 1/100 L of the span,
- when determining the ultimate deflection, the temperature difference between the outer and inner metal cladding t = 55 ° C is taken into account.
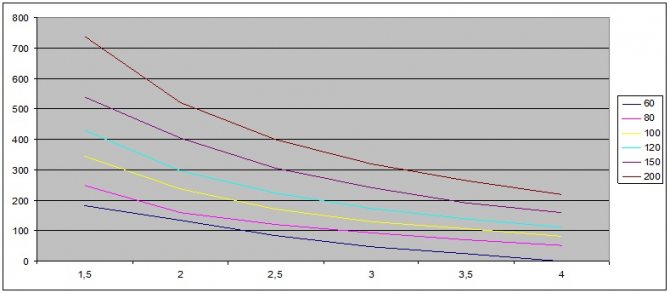
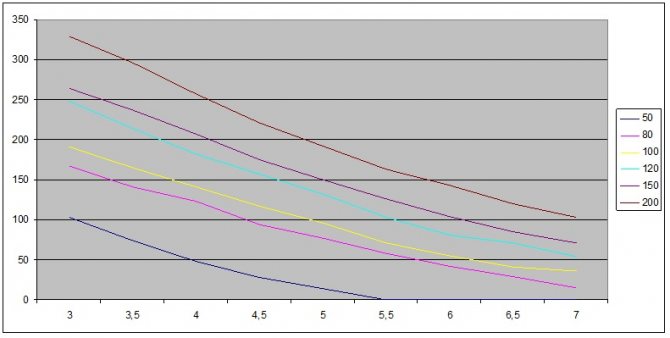
Table 10. Estimated bearing capacity of wall sandwich panels with mineral wool.
| Panel thickness, mm | Bearing capacity of wall sandwich panels at uniformly distributed load, kg / sq.m | ||||||||
| Span length, m | |||||||||
| 3,0 | 3,5 | 4,0 | 4,5 | 5,0 | 5,5 | 6,0 | 6,5 | 7,0 | |
| 50 | 80 | 60 | 37 | 21 | 11 | — | — | — | — |
| 80 | 135 | 115 | 98 | 79 | 67 | 48 | 35 | 25 | 14 |
| 100 | 155 | 136 | 115 | 94 | 76 | 58 | 46 | 34 | 28 |
| 120 | 201 | 174 | 145 | 125 | 104 | 85 | 68 | 57 | 46 |
| 150 | 215 | 190 | 168 | 143 | 121 | 101 | 85 | 71 | 59 |
| 200 | 268 | 236 | 208 | 180 | 156 | 134 | 115 | 98 | 84 |
Fig. 1.Load-bearing capacity graph of wall sandwich panels with mineral wool at a uniformly distributed load. The loading scheme is single-span.
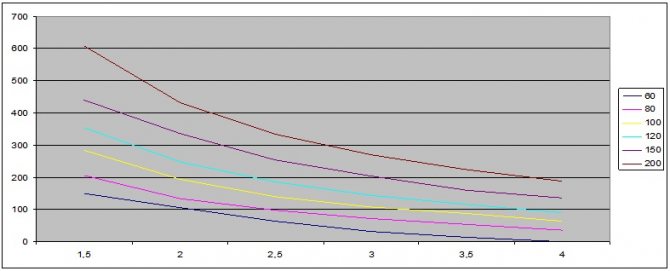
Table 11. Estimated bearing capacity of wall sandwich panels with expanded polystyrene.
| Panel thickness, mm | Bearing capacity of wall sandwich panels at uniformly distributed load, kg / sq.m | ||||||||
| Span length, m | |||||||||
| 3,0 | 3,5 | 4,0 | 4,5 | 5,0 | 5,5 | 6,0 | 6,5 | 7,0 | |
| 50 | 103 | 74 | 48 | 28 | 14 | — | — | — | — |
| 80 | 167 | 141 | 123 | 94 | 77 | 58 | 42 | 29 | 15 |
| 100 | 191 | 165 | 141 | 117 | 96 | 71 | 55 | 41 | 36 |
| 120 | 248 | 214 | 182 | 157 | 132 | 103 | 81 | 71 | 54 |
| 150 | 264 | 237 | 207 | 175 | 150 | 126 | 104 | 85 | 71 |
| 200 | 329 | 296 | 257 | 221 | 192 | 163 | 143 | 120 | 103 |
Fig. 2. Bearing capacity graph of wall sandwich panels with expanded polystyrene at a uniformly distributed load. The loading scheme is single-span.
Slope cladding
With the advent of plastic windows, the problem immediately arose of how and with what the finishing of the slopes should be done. We tried everything - high quality plaster, plastic panels and many other options. But the best solution came with the advent of the three-layer material. Decorating window slopes with sandwich panels at the same time eliminates the “cold bridges” and gives the window opening a complete look. The work is simple and quite affordable in order to do it yourself. The cladding of window slopes should be done before the walls are finished. These works are done in this order:
- all surfaces around the window frame are cleaned from dust, dirt, mortar flows;
- a window sill is installed; most often, a solution based on cement and lime is used for this; to avoid deflections, metal strips are laid under the windowsill, and for insulation, the lower part and sides are wrapped with felt; the insulation is impregnated with an antiseptic before use in order to prevent it from rotting and the appearance of insects;
- sealing of voids and places of abutment of the window and window sill to the opening with mounting foam is carried out; the hardened foam is cut off with a painting knife flush with the main surfaces;
- the sandwich panel is cut according to preliminary measurements of the upper part and sides; the material is very well cut with a jigsaw or a metal file;
- work begins from the upper slope: the starting plastic profile is attached to the frame with self-tapping screws, into which a sandwich of the required size is inserted with a slight slope; the internal gap is filled with polyurethane foam or liquid nails and pressed against the wall;
- in a similar way, the side parts of the slope trim are fastened; it is necessary to ensure that the slopes fit tightly to the sides of the opening, and excess adhesives should be removed immediately and thoroughly;
- finish facing the slopes with sandwich panels by attaching the finishing framing in the form of corners to liquid nails.
There are other ways to install window slopes using brackets, battens and other fixtures. But, these methods are more complicated and time consuming. They are used in special cases when the construction of a window opening or frame requires it.
From the above, it is clear what to do with your own hands and the installation work on the installation of the window sill, and the slopes on the windows, is not such a terrible problem. Moreover, this method of protecting a window opening is successfully used not only for plastic frames, but also for wooden ones. This means that you can create a beautiful frame for a window block without changing the window itself. Moreover, manufacturers have learned to decorate the front surfaces of sandwiches in a variety of colors and shades, including "wood, marble, granite". Glossy, semi-glossy, matte plastic is used. Facing with sandwich slabs of window openings can be matched to any interior style.
1.Plasterboard insulation
A fairly common option for finishing slopes is using drywall.
Drywall is a material whose structure consists of two sheets of building board with a hard gypsum core. It should be noted that this material is quite delicate, since it does not tolerate moisture well, it can swell and lose its original shape.There is a moisture-resistant gypsum board, which contains antifungal substances and silicone granules, but it will be useful to use additional materials for finishing, for example, a moisture-resistant primer.
Insulation technology
Insulation of window slopes consists of several stages. To do the work yourself, you will need a standard set of tools: a tape measure, a painter's knife, wooden blocks, a roll of scotch tape, several packs of polyurethane foam, as well as a sealant, a moisture-resistant primer and, possibly, gypsum plaster.
The insulation process takes place according to the following scheme:
Interior wall decoration from sandwiches
Premises of frame houses, the outer walls of which are made of "sandwich" slabs, are undoubtedly subject to interior decoration. Since the panel itself inside the room will look too dull and official. At the same time, methods and materials can be absolutely any. Only for finishing will need preliminary preparation. Let's say it is impossible to stick wallpaper on sandwiches. Therefore, you first have to sheathe the walls with plasterboard. It may be necessary to take additional measures to better insulate the walls. For this purpose, a layer of insulation is laid between the profiles of the frame, and then it is sewn up with sheets of drywall. This is followed by the standard procedure: sealing the joints with a putty with reinforcing tape, grouting the caps of self-tapping screws and wallpapering, tiling, textured plaster, painting over the finishing putty.
Some interior styles require a lot of wood. In this case, the owner of the house can use his talent and sheathe the walls with beautiful clapboard, imitation of timber, wooden wallpaper. To do this, you need to equip a frame of beams along the surfaces of the walls, placing them in such a way that the cladding lies as intended - in a vertical or horizontal position. If the building is built in a frame version and does not require additional insulation, then it is not necessary to arrange the crate, and the wooden cladding can be attached to the frame posts. All work can be done by hand, showing maximum imagination. The main thing is to choose the materials with taste and assemble them according to all the rules of finishing art.
Front facing thermal panels are presented in the form of special structures that perform two important tasks - they carry out insulation of the facade of the house and are a finishing material.
Thermal panels - facade decorative elements
Metal and rustic facade panels have gained well-deserved popularity due to the relatively low cost and high speed of the installation work carried out.
Installation
The external walls must be leveled before installation. If they are even, then small errors will help level the plywood or similar materials. Further, on the facade, the most convex point is determined and lighthouses are planted along it on the foam. This is a labor-intensive work, which will be simplified by the construction of the crate. The frame system will not only save time, but will also help in creating a ventilation gap that promotes moisture removal.
The installation technology has its own nuances depending on the design of the insulated plates, but in general its scheme looks like this:
- A line is outlined along the perimeter of the house, which will be the starting mark for facing;
- When starting the installation work above the level of the plinth, you must first install the plinth profile on which the panels will rest;
- A wooden crate is attached to the wall, pretreated from fungus and mold. The step of the lathing should correspond to the size of the panels.
Figure 5. An important point
- Installation of thermal panels is carried out from the corner of the building from bottom to top. The ends of the facade elements are either filed and joined to each other at an angle of 45 degrees, or they are formed with a corner. In the second option, you need to start fastening with a corner element.